Detailing a Board-and-Batten Shed
I was hoping someone could help me with a couple of questions regarding board and batten siding details for a shed.
A) Can gaps between boards be plugged?
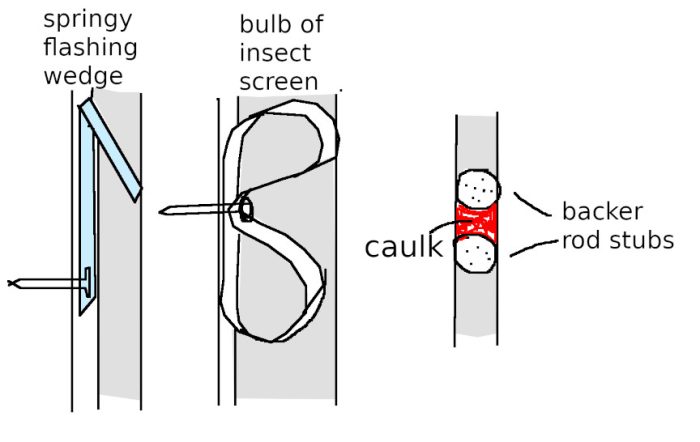
I’m planning on 1/4″ gaps between boards with a standard batten nailed over top. I’d like to keep cluster flies out, they’re a problem here.
My best idea is to put little backer rod plugs in between the boards before the battens get nailed on and use them to form a little caulking plug. Otherwise there will be an entry point for critters at every exposed board end.
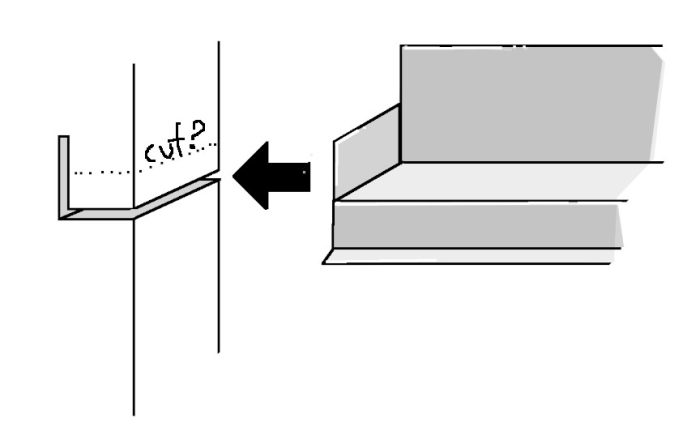
B) How the heck do head flashing end dams fit into a vertical board?
Do I have to make a massive notch into my board to allow the flashing through or is there better way to do it?
Don’t make fun of my sketches…
GBA Detail Library
A collection of one thousand construction details organized by climate and house part


Replies
If you are trying to keep bugs out of your house a better location for air sealing is the existing sheathing. Tape the seams of the sheathing followed by a standard house wrap or use one of the peel and stick WRBs. Without air leak paths to follow, generally a well sealed house is mostly bug and rodent free.
You can do backer rod between the boards but not as you show it. Use the standard backer rod detail which means getting the right diameter so that is compressed a bit and caulking from the outside. You want a nice hourglass shaped cross section of the caulk bead between the boards. This does mean putting your boards a bit tighter together to get the right initial gap. Even with flex caulk, I'm not sure if this will hold up though once the boards dry and shrink.
As for the end dams, they only need to be about 1/4" to work. The siding above should also be gapped a 1/4" above the flashing so no need to notch anything.
No sheathing on this structure, I opted for diagonal bracing (it's a shed). My siding will be the first and only line of defence. It may be impossible to exclude insects, but I will make an attempt.
I agree about the potential for caulking failure. Some of these siding profiles are hundreds? of years old, maybe there's an ingenious way of dealing with such details.
I think 1" end dams are code (for a house?) but I'm too lazy to look it up. If there's a 1/4" horizontal slot through the sliding to accept a 1/4" downward drip on the head flashing (might be hard to bend) -or- if if the drip can be bent down after insertion through the siding... I think it will work.
Thank you for your suggestions
slugboy6000,
I'm not sure you want to block the bottom of the gaps behind the battens with anything that would impeded drainage or drying. My preference would be to run a continuous. drip-edge flashing below the siding.
Our code mandates different heights of end-dams depending on location. The tallest are 5/8". I use 1/2". They work well and are easy to bend. I cut slots in the siding above so that the gap between the head-flashing and siding is 3/16". That's enough to allow drainage, but exclude insects.
Are you sheathing this shed first, then applying board and batten over that? Or just nailing B&B to the framing?
andy_
See post #2.
Doh.
andy,
If I had a dollar for every post on GBA I have misread...
Okay, I'm hoping that the batten nails passing through a 1/4" gap between boards will be a tight fit for bugs and allow for drainage and drying. I do have flashing in place under my sill plate that may help if I modify the angle.
Another detail that I'm considering is the addition of a 6"+ band of flashing separating the cladding from the bottom plate. I expect the back face of the cedar will wick up water if left unpainted. I don't know if that will impede drying, or worse trap water inside if the siding fails. The existing flashing is stainless which may not be contact compatible with the much easier to obtain aluminum.
I might be losing it, too much time spent in the heat bending head flashings without a brake.
slugboy6000,
Tape your WRB, including to the flashing at the bottom, and you should be fine for pests.
Rather than flashing, which risks attracting condensation, why not run a strip of peel & stick membrane on the lower 6" of the wall?
No WRB here, just boards on framing. I didn't consider condensation. I wouldn't use peel & stick out of personal preference.
slugboy6000,
So just wall studs, strapping, then board & batten? As long as you don't intend to insulate or heat the shed it should be fine without a WRB, and another layer of flashing on the studs at the bottom would work.