Breaking Thermal Bridge – Fireplace
JayMart
| Posted in General Questions on
Hi GBA Community,
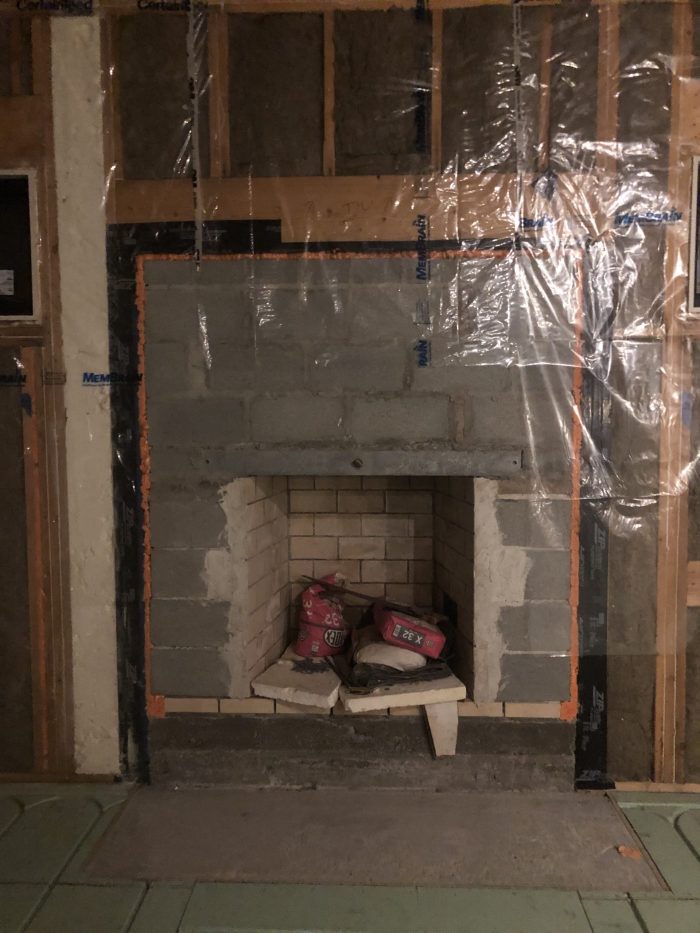
New Build – Zone 5 – I wanted to ask a straight forward question regarding a new masonry fireplace. I wanted to attempt to break the thermal bridging due to the concrete blocks with some rigid foam before the stone veneer was applied.
I had DuPont Thermax in mind due to its fire rating, but does anyone know if this is something that is encouraged?
Idea: Concrete Block / 2″ of DuPont Thermax / 1/2″ Durock Cement board / Stone Veneer
Thanks,
Jason
GBA Detail Library
A collection of one thousand construction details organized by climate and house part
Search and download construction details


Replies
Jason,
I don't know what code you under. here you would be required to leave a 2" air-gap and couldn't use foam against the masonry. That doesn't preclude insulating the fireplace, it just has to occur as a separate layer.
Why are you trying to insulate it? It looks like the fireplace is entirely inside the house's conditioned area, and you want the heat form the masonry to radiate into the room.
Thanks Malcolm - I actually caught this with a thermal camera. Those concrete blocks are the same temperature as outside. The blocks are not within the conditioned area and are exposed to the outside. (a giant hole, sigh -- note: about a 10 degree drop when compared to the insulated wall above the header)
Thank you for mentioning the 2" gap on that subject I'm hoping that fireblocking foam that fills the current gap to combustible framing is acceptable.
Perhaps an alternative approach. Frame a wall flush to the concrete block with steel studs (blue) and use r-15 rockwool in-between to mitigate the cold blocks from the outside.
Jason,
The first place to look is your code.
Unfortunately, if the whole masonry fireplace is outside of the conditioned area, you are going to have a huge thermal bridge at the fireplace opening, whether you insulate the surround or not.
Is that a common detail where you are? I haven't seen a masonry fireplace bridge the house's enclosure on new construction for at least 30 years, mainly because it wouldn't meet our building code.
Thank you for the suggestion. Inspection passed so I'm fine from that perspective. The whole thing I believe was a miscommunication from the beginning.
My plan is going to be a insert right away in an attempt to fix this mess. I think that way I can at least insulate this a bit.
Jason,
I don't want to belabour the point, but if you now add non-conforming framing or insulation to the fireplace you may be violating the code, whether what you have done up until now has been inspected or not. You need to talk to your inspector.
Did we have a previous thread where it was mentioned rockwool is non flammable?
That's a great point. I may now change the plan and frame out (with steel) with hopes of using rockwool in between the studs.
That's what I did in 1948 ranch. 2" Comfortboard 80 applied as continuous layer to the masonry, framing in front with Steel where required, backer board and tile over the whole chimney. More comfortboard inside the old fireplace hole surrounding the new insert to try to decouple and drive the heat out, and L&R of the surround inside the framing (not shown) Old cracked flue was fully packed around the new SS liner with a fluffy wet mix (??) the chimney guys poured in from the top to air seal between liner and flue tile, with metal plate blocker applied 1st at bottom. Double studded the walls left and right of fireplace behind cabinetry 3 insulation layers: CC SPF @ exterior wall to seal the brick veneer / framing interface, Intello taped 360 (1st grouting stepped brick veneer to make smooth sealing surface for tape) CB 80 layer between dbl studs as thermal break, R13 batt in 2nd layer of studs (Yeah, I know, overkill, but we had the materials on hand). Note the R13 showing in framing above fireplace is 2nd layer, 2" Rockwool is behind, held tight by framing. I'm pretty sure we took advantage of new firebrick to downsize, lift, and pull forward old firebox + top step out to put 2 layers of 2" CB 80 on masonry, but don't have a pic of it and memory fades. Plenty plenty of detail measurements and work to get everything to align with no tile cuts except at top. This is a gable end wall. We are applying exterior insulation to the rest of the house, but no gable overhangs @ rake meant we needed to move inside for the insulation upgrade.
@Jaymart, let me know if you want more step by step photos, we learned quite a lot while putting this whole thing together.
That would help me out so much. Thanks!
No IM possible on GBA. Reply if you want to set up an off-line dialogue. Photos largely self explanatory. Fire bricked added in large ole fireplace to narrow in for small stove picked to not overheat room (Morso 5660). Poured floor to lift stove up on the granite face. Used spare and scraps of CB-80 to line the firebox as an afterthought. Was tricky to get the L&R footers and all the heavy brackets exactly in plane to achieve the wall to wall floating granite effect. Just for kicks, granite toe kicks too though far enough back you can't really see them. The center box framing was precisely sized for 7 tiles wide including narrow grout lines and Schluter strips, with precisely 1 tile wide return to wall as needed to provide a reveal on the floating shelves Carpentry + backer board set up so that outside face of granite ant tile perfectly align on the side walls. Custom cabinetry to fit the holes, but we had to cut into the plaster a bit to get them in as we forgot to consider that the old plaster walls were not flat.
My solution was a wood stove insert and exterior insulation around the chimney.