Feedback on Workshop Plans
I’m slowly refining the design on my shed/workshop build, and am finally at a point where I’m ready to submit plans to zoning. Before I do so, can you critique my design?
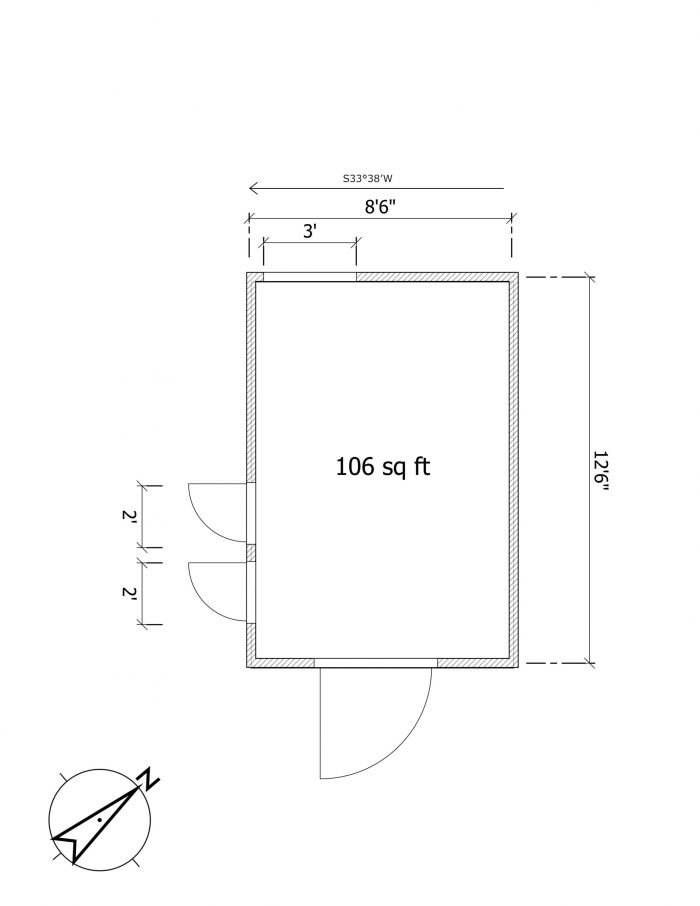
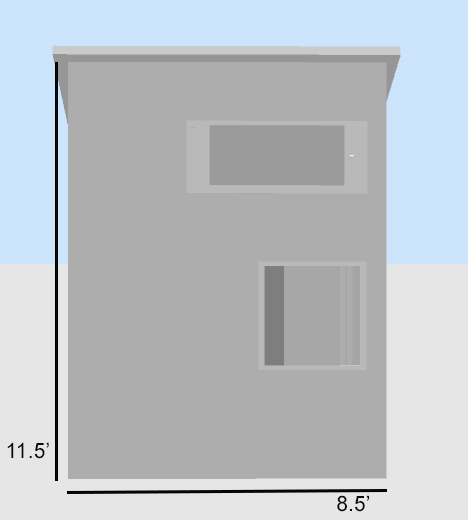
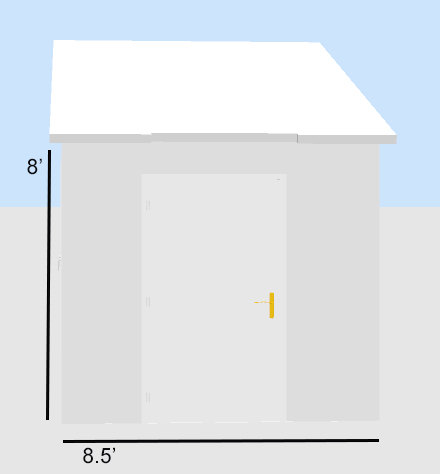
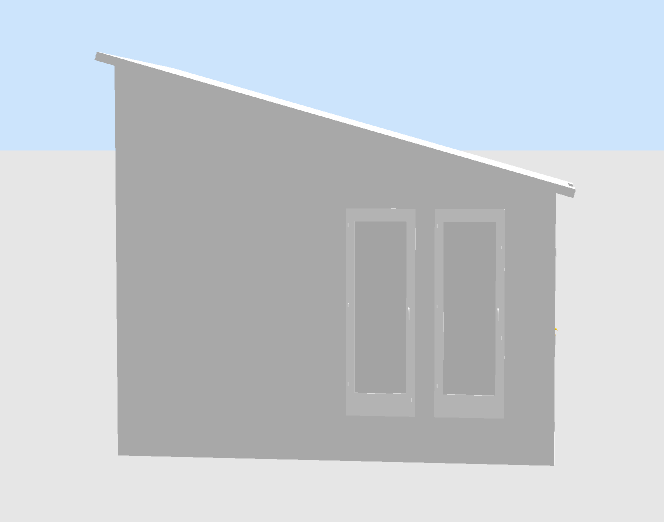
Dimensions: 12.5’x8.5′
Climate Zone: 4A (mixed-humid)
Foundation: Insulated slab-on-grade, 12″ wide by 20″ deep footings, 6″ slab on 4″ gravel (no fines), wire mesh and rebar, 2″ ground contact rated insulation against exterior footing edges
Walls: 2×4 framing @ 16″ OC, 15/32″ rated plywood sheathing, Home Depot HomeWrap House Wrap taped at seams, 2″ exterior reclaimed foam board, 3/4″ vertical strapping, 3/4″ horizontal strapping, vertical shou sugi ban pine cladding with an oil-based finish
Roof: Unvented monoslope roof with 2×8″ beams @ 24″ OC, 23/32″ sheathing taped at seams, 6″ exterior reclaimed foam board, horizontal 1×4 strapping, standing seam metal roof
Heating: 1000 Watt electric wall heater
Cooling: U-shape AC installed in a 5th, tiny window? Is there a better option? Mini-split seems oversized/overpriced for this small of a space
Other details: 2 windows facing SW, 2 windows facing NW. Interior loft. Door on SE wall, gutter on SE wall, flashing, etc.
GBA Detail Library
A collection of one thousand construction details organized by climate and house part


Replies
shedworkshop,
A few things worth thinking about before finalizing the design:
- For small structures like this it is much more efficient to dimension them so that they fall on a module of 16" or 24". This simplifies the framing and avoids a lot of waste.
- That also applies to the roof and will give you larger overhangs, which in turn will make the structure more resilient.
- Those are huge footings for such a small shed.
- There is no mention of a sub-slab vapour barrier, and how it connects with the integral footings.
- If the house-wrap is installed directly on the sheathing (behind the foam), what plane are the windows in, and how are they flashed?
- Similarly, what plane is the door in? If an innie, how is it surrounded? If an outie, how is the threshold supported?
- How is the bottom of the double strapping on the walls protected?
- How are those thin overhangs framed if you have 6" of exterior foam on the roof?
Malcolm, great questions. These give me a lot to think about. I'll try to answer them one by one.
The lot is space-limited, so I'm trying to maximize interior space over maximizing efficiency (even if it costs a little more).
Do you think an 8"x20" footing would suffice? I will definitely include the sub-slab vapour barrier. I see people mentioning shallow frost-protected foundations and alaskan slab foundations, but am getting a bit confused to be honest.
For the window plane, I'm leaning toward following something like this video https://www.youtube.com/watch?v=W5zR3GeUjG4, with 2x2's screwed in to hold the window. It looks like he also makes sure to: slope the sill 5 degrees, tape, caulk, and place the window onto shims to allow water to drain. Then, more tape, head flashing, and more tape. He sure likes his tape.
I haven't looked into the door frame yet. Hopefully there is a youtube video explaining it somewhere.
For the bug screen, maybe a perforated metal J channel?
For the overhangs, this detail looked good: https://s3.amazonaws.com/greenbuildingadvisor.s3.tauntoncloud.com/app/uploads/2021/01/20213006/Screenshot_2021-01-20_21-29-52-700x751.png
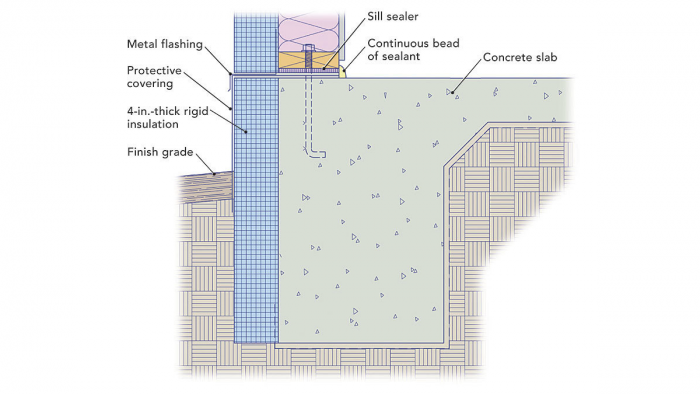
I would spec the rigid insulation to be XPS under that flashing for the "below grade" portion, and polyiso above the flashing. What is the "protective covering" over the insulation? You need something that can provide some physical protection here from things like sticks poking holes and critters chewing -- a sheet of plastic isn't really sufficient.
Those two 2 foot doors should be turned into a single double door. I spec double doors to be either center post less, or with a removeable center post, to allow for the entire opening to be clear to allow big things to move in and out. That's something you may want to consider too, instead of having two seperate, small, doors next to each other. One large opening is more flexible.
I would put a rain gutter on the lower side of the roof to deal with runoff.
While it's not shown on your drawings, I'd bring the electricals up into the shed through the slab for a cleaner look. This is easy to do if you're pouring the slab, not so easy to add later if it's an afterthought. I would bring in AT LEAST two PVC conduits for this -- one for power, another for communications cables. You'd be amazed how often you'll want to run a line out there for a wifi access point or a security camera. If this shed will be on the same lot with a dwelling, you may want to consider a third conduit run for a three way lighting circuit too. My folks have a cottage with several small outbuildings, and I did this for them. They have a light switch in the house, and in each of the two outbuildings (basically small workshops), and those switches run the exterior lights on all the sheds and near the back door of the house. This is nice in the evening, since if you are working on a project past sunset, you can turn on the outdoor lights along the path back to the house from whichever building you're in at the time. I would add at least one receptacle on the exterior for tools too.
Bill
Bill, I appreciate the advice. For the protective covering over the XPS "below grade" flashing, it looks like a metal termite shield with a sill gasket above and below would work (https://foundationhandbook.ornl.gov/handbook/images/Chapter%202/2-08S_no-cap.png). DOE recommends allowing things to dry to the interior though, and I'm now worried that by finishing the concrete floor with epoxy, I would be sealing off the moisture's ability to do that. They also recommend placing the sill plate 8" above grade, which seems excessive to pour the concrete slab that high. Any recommendations?
The two doors are operable windows :) Great point about running two PVC conduits. I haven't worked out the exact electric hook-ups yet, so this is a good reminder for me to start planning out outlets as well.
Ryan
Instead of full foundation, I've built small structures like that either onto PT 6x6 frame at grade, stone blocks over a gravel base or screw piles. The inside can be filled with gravel than 10 mil poly and covered with patio pavers which make for excellent floor. For a workshop, rigid insulation and a layer of plywood over all that will help take some of the edge off the cold floor.
Your idea of resistance and inverter window AC is probably the best option. There are some inverter window heat pump units out there as well but they are harder to source (ie MAW12HV1CWT).
In zone 4 I doubt you are in heavy enough snow country to need 2x8 rafters.
That inverter window heat pump looks great! Thanks for pointing me to it.
The rafter span of a 2x8 is 13' so from what I can find for a 20psf live load at 24" OC. Although I may go with 16" OC just to be on the safe side. https://www.mycarpentry.com/rafter-span-tables.html
Certainly the experts have provided great feedback.
My feedback comes from a "have-you-considered?" perspective:
Have you done an interior layout based on your planned usage? This may alter window / door placement/sizing.
An extra "future-use" conduit is cheap insurance while the trench is open.
If you may move in the future, maybe consider the non-permanent foundation options. If it's not too tall it looks like you could build it to take it with you. Also, costs and codes/setbacks would be less of an issue.
Otherwise, if it remains a permanent foundation, maybe make the walls a bit taller to gain more overhead storage space, assuming the footprint is fixed.
Good luck with your project.
It sounds like running two PVC pipes for conduit is the way to go. I'm planning to set up a drafting table by the 3' picture window for nice views. The 8.5'x4' loft goes above that section (at 6'4" headroom below it) since the ceiling is taller there and the desk doesn't need the additional headroom. Dust collector will go by the door, and there will be work stations on casters along the walls. Planer underneath one of the work stations.
I thought about non-permanent foundation options, but would prefer concrete since it removes the need for building, insulating, critter-protecting a floor. Plus, it gives more vertical space on the interior than I'd get using joists/subfloor.
Thanks,
Ryan
Are you sure you'll have enough room in there for a woodshop? I suggest laying out all the machines on your drawing, being sure to allow enough room to handle materials in and out of those machines at all angles you expect to work with. You don't want a planer right next to a corner where a board will hit the wall as you run it through, for example. Right now, your entire shop floor is about the size of three sheets of plywood....
Bill
Bill,
I bumped into that problem on a lot which could not have outbuildings of not more than 106 sq ft. The solution we came up with was to have two adjacent walls which could be raised up to form canopies, extending the size of the usable workshop area. Those two walls were clad in polycarbonate panels, which were easy to raise, but also let in a lot of light.
Malcolm, you might want to pick up a copy of the Unistrut catalog and peruse some of the handy fittings they have. They make a trolley assembly that rides in the channel of the strut that is very useful for making sliding wall assemblies, as long as you don't need them to seal well. I have uses these trolleys and strut to make all kinds of room/row dividers that can slide out of the way, and it works really well.
Note that if you try anything like this, BE SURE to use split lockwashers on ALL the fasteners connecting the panel to the trolley. Ask me how I know...
Bill
Malcom, was the outbuilding heated/cooled? If so, did you do any insulation on the door/canopies? I really like the idea, but also want a conditioned space to avoid any machinery rusting.
Bill, any ideas for sliding doors that do seal well?
shedworkshop,
No it wasn't heated, which precluded a lot of activities like finishing and gluing up projects.
I used sliding door hardware on a large generator shed. To get it to seal well I didn't restrain the bottom of the door with a guide, but rather left it free, so to close it you pulled the bottom out a foot, slid it along into position, then pushed it flat onto gaskets and latched it tight. It lasted about a year because of who was using it, but a bit of care it would still be fine.
Sliding doors intended for use on a house are about as good as you're likely to find in terms of sealing. If you want to build your own assembly, I've found that brush seals tend to hold up the best over time, but they also seal the worst, so there is a tradeoff.
Note that gasket materials made of "solild" (by "solid" I mean "not foam") materials can often be kept in good condition longer if you apply some silicone oil to them once a year.
Bill
It will have to do :) I plan to make use of indoor/outdoor space where the door is which should help a lot for running extra long boards through the planer.
Ryan-
If you haven't done so I would suggest making old-school scaled paper dolls for your equipment WITH all of the necessary indeed/outfeed spaces. With such a small space it's going to be very important to optimize layout. Even with your tools on casters it will be quite space challenged, assuming you have a planer, jointer, workbench, tablesaw, chopsaw, vac, bandsaw, dust collector....plus wood, clamps, hand tools, and on. I've done the endless tool shuffle before in a small shop, you can get by, but it can be a real PIA.
I'd look at making the door as close to full width as possible so that you could have machinery against the walls and send the outfeeds through the door as needed. And maybe a means to roll a machine outside on a nice day.... some sort of riser near the entry? Maybe an exterior outlet? Or HD extension cord. Maybe look into exterior dust collection- nice for noise, space, and cleanup.
Of course a lot of this depends on what you're making. If you're making small wood boxes then most of this is a non concern. If you're making furniture size pieces, more so.
Depending on drainage conditions, why not dispense with the monolithic footer/slab altogether, and go with a floating slab on a drained gravel base? Thicken the edges (12" deep at most) and the the field need only be 4" thick. Less than half the concrete. Where I am, an outbuilding without a foundation has far fewer code and setback requirements.
Can the floating slab be insulated? I can't find any definitive sources or diagrams on how to do them, plus frost depth is only 18".
Try searching for insulated raft slab. You don't even need a thickened edge. This type of slab likely needs an engineering stamp.
Oh cool! My search led me to the 2021 IRC where I found all kinds of specifications and diagrams for insulated slabs. According to the simplified frost protected shallow foundation method, I only need (at minimum) a 12 inch footing and R4.5 vertical insulation. Both installed over 4" of compacted gravel. With 2" of EPS Type I insulation, I'd be at R7.4 which should be more than enough. Would be great to be able to skip the horizontal insulation since that means less digging.
R value reference: https://plastifab.wordpress.com/2019/08/13/the-great-debate-eps-vs-xps-for-below-grade-applications/
If you called your new shop a detached garage, could the larger building win zoning approval? At least a garage would add some resale value and a shed add zero value.
12x8 seems too small a space given what it seems likely to cost. Consider adding an attached patio you could work on even better if you can get a covered patio approved.
Often enclosed trailers are bigger than this shed. Could you legally park a trailer in your yard?
I admire your efforts to make this building energy efficient but I am not sure it make economic sense since it seems unlikely to be occupied for enough hours to recover the costs.
Walta
+1 on attached patio. Extend the roof as much as zoning allows, a double door opening onto this makes the space much more usable.
If you want something a bit more challenging, lot of zoning defines the area measured at floor level, so you can build something like this to get more interior space:
https://inhabitat.com/strategically-slanted-walls-squeeze-extra-space-out-of-a-small-guesthouse/
Make that +2 to attached patio :) I'm still trying to decide between a double door, a sliding door, or going wild with a massive, oversized pivot door. I'm not big on the slanted walls though. Something about the look of them on the interior feels off to me.
It probably could, but then it would be taking away space from my yard. Pretty space-limited here so I'm working with what I can. With a smart layout that allows an oversized door to open up to an attached patio, I think it will work great for my needs. And if all else fails, I can convert it to an outdoor office which should still add value to the property.
If you're not familiar with electrical codes for your region, you might want to consider hiring an electrician for an hour or two that is. Where I live, a light above the shed door with a three-way switch to control it from both ends is required by code. This would have been an expensive omission had I built without knowing this little detail. Best wishes with your build.
Good idea. They would be able to help me plan out the electric so I can prep everything for a licensed electrician to hook up. Thank you!