ERV Layout Feedback
Hi all,
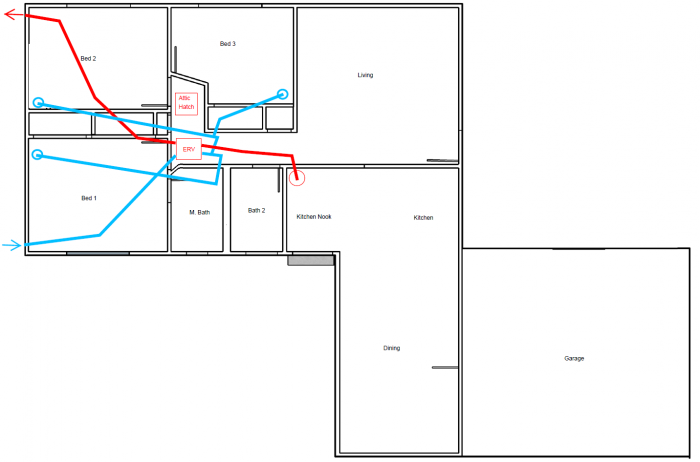
I’m going to be putting an ERV into our 1263 sf single-level house in climate zone 3C (95062). I’ve purchased the Broan AI 130 ERV and am now deciding on the best layout.
I plan to supply and exhaust the ERV through the gabel end of the roof for easy install.
Each bedroom will get a supply which I’m trying to place furthest from the door so as to not have it get sucked immediately out of the room. Also trying to keep it from being directly over a bed.
I placed the exhaust in our kitchen nook. This deals with some kitchen contaminants (we also have a dedicated range hood) and seems to be a good compromise between getting some air exchange in the rest of the house while not having a really long duct run whereas my supplies are quite short. I’m not planning on putting it in the bathroom for several reason:
1. Being coastal our house is relatively to wet to begin with and I don’t want to be recycling humidity back into the house through the ERV.
2. This is maybe better air distribution for our slightly unusual floor plans
3. I just installed new baths last year and don’t want to rip them out…ok I’m being honest….
I’m considering buying a duct silencer (something like fantech6) after I do the install if the bedrooms are too noisy.
The Broan unit has 5″ attachment points but I plan to bump this up to 6″ for better airflow and maybe a little quieter too.
I’ll start with ASHRAE 62.2 targets, although probably fiddle with it as I monitor CO2 in bedrooms.
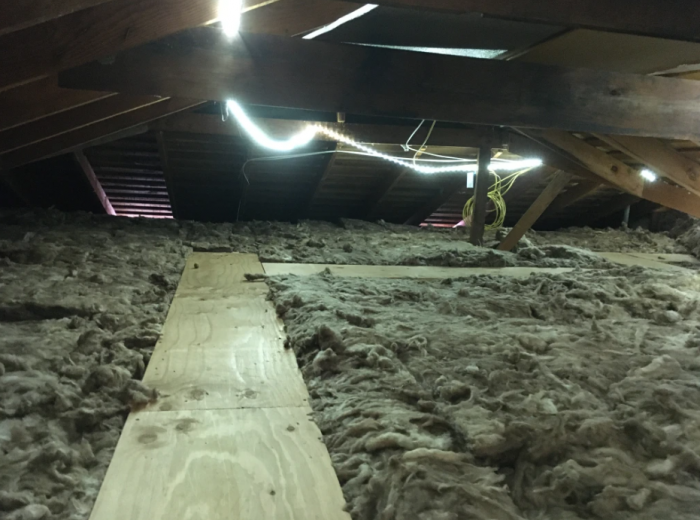
Does anyone have any suggestions based on my attached layout? Fortunately, I have a very easy attic to work in (attached).
Thank you!
GBA Detail Library
A collection of one thousand construction details organized by climate and house part


Replies
Hello Steve, these are my suggestions.
Silencers
I have installed 4 silencers on my unit. One on each port of the HRV. I also used them on my inline hood vent fan. They are amazing. These are some of the ones available. I have always had great service from HVACQuick.
https://www.hvacquick.com/products/residential/Kitchen-Exhaust/Silencers
Duct sizing
Make sure you follow the manufacturer's guidelines for the ductwork sizing. If you don't have duct sizing recommendations from the manufacturer, you can look at Venmar ERV ducting guidelines Page 7-8 of the doc at this link.
https://www.venmar.ca/DATA/DOCUMENT/47_5_en~v~installation-manual.pdf
Use just 1 trunk for supply
You have 2 different trunks for the supply. It is my understanding that the optimum way to distribute the air is to have one trunk and to have take-offs from that trunk that lead to a boot (vent). Also, you never want to have a boot (vent) right at the end of the trunk, which means respecting the 2-foot rule.
Two-foot rule
https://www.venmar.ca/DATA/DOCUMENT/47_5_en~v~installation-manual.pdf
You need a space at the end of the trunk after the last take-off. You can read about the 2-foot rule at this link. If you can't have 2 feet at the end, any amount of length is better than having the vent right at the end of the trunk.
Big round curves
The wider the turns, the better the air flow. You have a 180 degree turn in your plan. I would have a nice wide turn. This means using 2 elbows for every 90 turn. After a 90 turn, but a piece of pipe that is about 6" - 12", then you put your 2nd 90 degree turn with another 2 elbows. Putting a piece of straight pipe between the curves allows you to create a long sweep.
In general, avoid turns as much as possible. When making a turn, use rigid pipe elbows.
Install dampers
You want to install dampers to be able to manually adjust the airflow. It is true that you can use the grill that is over the vent/boot to adjust but having a damper is a more straightforward and direct way to adjust the air flow distribution.
https://www.homedepot.ca/product/imperial-6-inch-round-damper-with-key/1000107389
Use as much rigid pipe as possible
You can use flex pipe on straight runs but it does not provide the same capacity as a rigid duct. The air will hug the walls of the duct and the smooth surface of the rigid ducts will get you much better air flow.
Flex ducts
If you use flex duct, only use it on straight runs and pull it as tight as possible. Make sure that any flex duct is support all the way along the run so that it does not have any point where it is sagging.
https://www.energyvanguard.com/blog/the-science-of-sag-flex-duct-and-air-flow/
https://www.energyvanguard.com/blog/How-to-Install-Flex-Duct-Properly
Noise transmission
There are various products on the market to reduce noise transmission. If you are worried about noise transmission between the two rooms that are side by side, consider installing a duct silencer along the duct line at one point between the two rooms. There are other strategies like using 2 feet of flex duct just before the boot/vent. There are many specific products on the market to reduce noise but using a silencer is my favorite.
Insulating your ductwork
You are going to want to insulate your ductwork if you have this in the attic. You can get insulated sleeves to pull over rigid duct work. You could use other strategies like building up insulation around the ducts using batt insulation.
Sealed ductwork
Make sure to seal your ductwork. Often you will use a quality foil tape. Never use that grey duck tape or duct tape because it will not last.
Washrooms
I can understand that you don't want to mess with your washrooms. Not sure if you are aware but all you would be doing is to drill a 4" or 5" hole (with a hole saw) in the ceiling. Then you intall an elbow above braced to a piece of 2x material. You then insert an air diffuser. There is always a risk that things could go sideways but this is normally very straightforward.
https://www.homedepot.ca/product/hdx-4-inch-5-inch-round-air-diffuser-white/1000427325
You can always add them later if you want, so it is not the end of the world if you decide to wait.
Thank you very much for the detailed response, Hugh! I would totally have missed the 2' rule.
Hugh has given you some excellent advice there. The only thing that I would reinforce is the need for detailed work carefully taping (or using mastic) to air seal and then insulate your attic ducting.
Fantech duct silencers (Hugh linked to them) are excellent but you can also make your own very easily. Longer is better, so for example if you can build one 4" long, it will be very effective. Remember that when you connect ducts to bedrooms, you also acoustically link them :-) You can also spec a larger trunk and just line it with acoustic duct liner (the 1" fibreglass stuff specifically designed and faced for ducts) yourself. Brock White carries it here in Canada in rolls. They also stock "Duck Seal" (sic) mastic for sealing ducts. Duct liner over a sufficient length is magic when it comes to noise amelioration :-)