Flash-and-batt quality control advice
1910duplex
| Posted in Energy Efficiency and Durability on
Hi all!
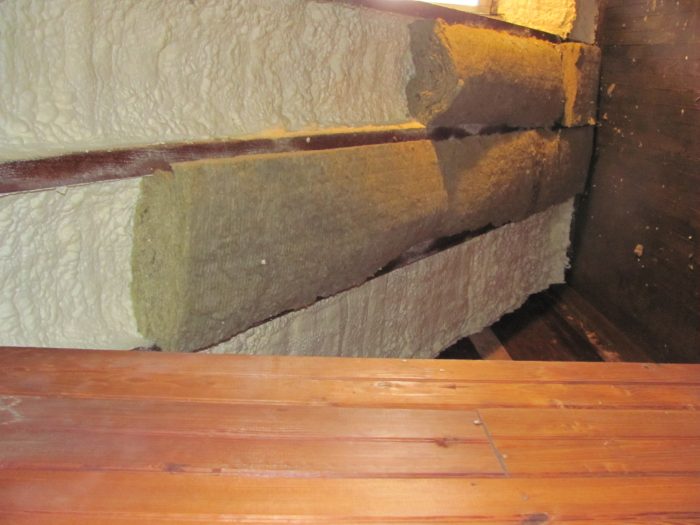
Have started the batt placing process with R-23s over 2 inches of foam in our 2 by 6 bays, as Dana suggested.
These are 15.5 inches wide in a 13.5 wide inch space… some we trimmed a smidge (half inch).
Is this how it should look? Should we add screws every 18 inches along the rafters and string wire in between? The wire they sell for insulation doesn’t seem like it would work because it’s tension based, and obviously we have no rafter space left.
We’re just worrying a little as the batts seem to be fraying some in the effort to get them in.
Mara
GBA Detail Library
A collection of one thousand construction details organized by climate and house part
Search and download construction details


Replies
If you’re not going to putting up something like drywall to compress those batts into place, then you’ll probably want to secure them for long-term reliability. I’d put screws on each rafter with maybe 1/8” sticking out. Simple construction screws will work here, even drywall screws will be ok. Get some 18 or 16 gauge galvanized steel wire from the hardware store, wrap it around each screw head stretching it tight as you go. Do this every few feet vertically so that you get horizontal wires every few feet all the way up to hold the batts in place.
The batt that is humped up in a U shape should probably be trimmed a bit. You don’t want air gaps between insulation layers.
Bill
It looks like they may have been generous on the 2” of ccSPF, which is not a bad thing for you. Is this is actual 2x6 dimensional framing? I would trim a little more off your batts to get the to sit flat. Making a quick jig to guide a 12” breadknife makes things consistent.
With what we see here, I would consider furring the rafters 1” polyiso strips. It will significantly improve the total assembly r value, particularly given that you have a higher than average framing fraction. They are quick to do if you install them with a roofing nail gun. If you use cap screws, you could do 1.5” foam.
I assume there are no plans for drywall? You need a thermal barrier per code if the space can be used for storage. This can be 1/2” drywall, 23/32 sheathing, or 2” rockwool comfortboard. 5.5” rockwool counts in Canada.
I used membrane installed with caps screws and roofing nails to secure the batts. The space became much nicer to work in because I didn’t get showered with rockwool every time I bumped into the batts.
Thanks, y'all!
This is 5.5 inch rockwool.
We are not planning to drywall now, except for on vertical walls in eaves, where there is either no room or just one inch to add insulation. Will be getting half-inch drywall for that area.
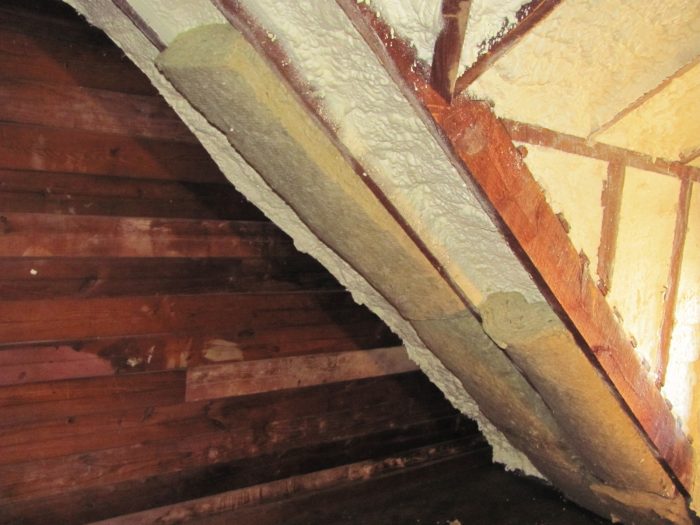
The framing is not standard. That one that you see on the right is 5.5 inches deep rather than six, but in other areas of the roof, it is a full six.
Most of our bays are not this narrow... most are in the 19 to 23 inch wide range (we just got an absurd amount of R-23 23 inch wide batts delivered today!)
Had not really considered doing polyiso furring strips because this already seems like a lot of work and in 4a, our weather is not so severe ... plus I'm hoping to be able to add insulation on the top side of the roof decking when we have the roof redone in the next five years... though I don't know if that will be possible, because we only own one side of a duplex, and that would make the roof two different heights.
And, yes, we do need to trim it a little narrower so it doesn't gap like that. It's tricky when it's so close to the right width. A lot of the other cuts will be a lot more trimmed away, should be easier.
So the polyiso strips are very cost effective, although they are some work. If you have a lot of long straight rafters they go very fast. Dormers and weird areas are more work. It is pseudo continuous insulation, at a very low cost considering you have 5.5" R23 batts going in already.
Here is the total wall R Value calcs for different configurations assuming 20% framing fraction. This is assuming 5.5" framing, so 2" of foam strip would give a perfect 7.5" cavity. I am not factoring compression of the R23 batts you are compressing down to 3.5-4" at the edges (They should be around R15-17 at that level of compression). Factoring in the compression would give more favorable results to furring strips.
Total wall R value (Insulation and framing only):
Bare framing R19.80
1" (R5) over framing R26.20
1.5" (R7.5) over framing R28.40
2" (R10) over framing R30.10
I’ve had excellent luck trimming even small amounts (1/4 to 1/2 inch or so) off of mineral wool batts using this knife: https://www.amazon.com/dp/B000PS1HS6?psc=1&ref=ppx_pop_dt_b_asin_title
The knife is amazingly good quality for only $15 and the “wavy” type bread knife works really well on mineral wool batts. I highly recommend it.
BTW, I like Matt’s idea to use polyiso furring strips.
Bill
I use that same knife in the 12” version. It works very well.
We have been using a bread knife and it does cut through the batt well. I think our main issue is not knowing exactly how much wider the batt should be for the cavity to fit well in it. But hopefully with trial and error we will figure it out soon.
Is this the kind of stapler that would work for membrain installation?
https://www.homedepot.com/tool-truck-rental/Air-Floor-Stapler-18-Gauge/DWEHF1838K/index.html
That stapler is way overkill for just tacking up vapor retarder membranes. I use this one: https://www.amazon.com/Surebonder-9600B-Pneumatic-compressor-needed-not/dp/B000EOJPC6/ref=redir_mobile_desktop?ie=UTF8&psc=1&ref_=ppx_yo_mob_b_track_package_o0_img
It shoots regular staple gun staples, which are cheap and work just fine for things like membrane or kraft paper vapor retarders. I put a swivel air fitting on mine which helps with maneuverability in tight spaces.
Bill
Thanks for the tip on the stapler. Would we have to rent this to make it work?
https://www.homedepot.com/tool-truck-rental/Electric-Air-Compressor/AC1-HE02-05HD/index.html
If so, maybe it would make more sense just to rent the heavier duty stapler??
We are finding now that we've moved over to the wider bays that it's virtually impossible to cut a width that keeps the batt in and also flush against the irregular foam fill (especially as some of the foam is up on the inside of the rafters, so it's an irregular width for where it compresses). So we're planning to start doing the wiring as we go.
(Also, the part of the batt that sticks out beyond the rafter in some of the narrower bays we did Saturday is already starting to separate from the rest).
So is it possible to do both the wire solution and the membrain? The membrain would have to come second, because while we could get one batt to stay in, adding a second one above it made them both fall out.
It seems like 3/4 inch wider that the space is a good size for keeping it in the bay, but that is not getting it flush against foam in the wider bay.
Mara
I'll try to sell you on the poliso furring again. Adding the polyiso strips will actually make this all much easier by giving the correct depth for the batt so it doesn't need to be compressed in thickness. You shouldn't need the wires at that point and a smart vapor barrier will hold everything in place. Rockwool compresses pretty well without buckling, but you are asking a lot doing width and thickness compression. With proper depth bays, you may not need to trim the width.
You will find membrain trickier to put up with the bulging batts. The standard approach is to leave it folded in the height direction, stretch it across the wall and staple the top edge. Then unfold it and work down. With the bulging batts, if you use that approach, you will end up with too much tension in the middle of the sheet as it travels over the bulges. You will need to unfold the sheet and staple down each rafter. It is not terrible to do, but not as quick.
With edges of your batts compressed you are probably getting something like R17-18 effectively out of the batt. Bulgy insulation doesn't work well. That would give you a total wall R value 18.6. If you were to use R15 rockwool instead you would be at R17.8 total wall (notice not a huge difference), with the R15 costing about 30% less per sq/ft.
You probably only need a few sheets of dow thermax polyiso for the strips and nails or screws, so a few hundred dollars. It is about as cheap of an R value bump as you will ever find.
I’ll mention again that I like Matt’s idea of using some polyiso for Furring strips. That really will simplify some things. You could also rip some dimensional lumber to the right size and use that. Either will be easier than dealing with bulging batts, which will tend to try to tear the membrane as you put it up.
You’ll need an air compressor for the stapler I recommended. Pretty much any stapler is going to be pneumatic. There are electric power staplers out there, but the pneumatic ones are better. Don’t try to use a hand stapler — you’ll really wear out your hand doing it that way!
Bill
Definitely understood we shouldn't do a regular stapler -- Gretel got a blood blister just making two screens for the attic windows that way. Just wondered since we'd have to rent an air compressor anyway, if we shouldn't rent the heavier duty pneumatic stapler.
Thanks so much for all your help!!! Without this website, we would have ended up with bays full of open cell foam with no ignition barrier or vapor retarder (that's what companies were pushing).
OK, my wife said: "Let's do it right by doing what the building advisors say."
So we have a power screw driver. Will that work to secure thermax? How much longer should the screw be than strip? Will drywall screws work for that? Or do they have to be cap screws? (I don't know if we have a hex attachment for the power screw driver that would work with cap screws... plus they seem really expensive?)
We're a little scared of the nail gun...
This is what is in stock locally
https://www.homedepot.com/p/Thermasheath-Rmax-Thermasheath-3-1-in-x-4-ft-x-8-ft-R-6-Polyisocyanurate-Rigid-Foam-Insulation-Board-787264/100549260
Which side should face out?
Mara
I would use drywall screws with cap washers like these. Screws should be 3/4-1" longer than the foam thickness:
https://www.idealinc.com/en/specialty-nails-and-fasteners/skphc-white-plastic-cap-washers-500box
Plan 1 screw every 18" or so. You can try doing less and gluing the strips. You just have to be careful when stuff the batts in. You will end up using more screws with cap washers to hold membrain in place, so everything will end up really secure in the end.
I think 1.5" and 2" foam likely make sense for your application. You will have to measure, count and do the math to figure out how much you need.
For the foam, Thermax and Rmax Thermasheath XP are the two I know of that are rated for use without an ignition barrier if that is important to you. I have only used thermax, which is a bit stronger than average as it has fiberglass in it. You likely need to order it from the pro desk at home depot or similar. There are a some commercially oriented distributors like this one you can try calling: https://www.generalinsulation.com/about-general-insulation/
Search craigslist for polyiso and you may find a local reclaimed foam seller. I have someone local to me that sells thermax seconds.
Here is one way to cut the foam: https://www.finehomebuilding.com/2009/01/29/theres-a-better-way-cutting-rigid-insulation
25mm Olfa knives are pretty good to. I used a tracksaw (essentially a circular saw) with a rip guide and dust collection). A tablesaw can work too.
Oh, If you can get thermal barrier rated foam board, you can may be able to use it in some of the spaces with limited room. This will work if the foam sheet doesn't fully seal a stud/rafter bay and transitions to a rockwool filled section to provide a drying pathway.
The good news is with this approach, you won't have to think about exterior foam in your climate.
Looking back at your photo, are the gable ends insulated or is there a plan for those?
Gable walls have spray foam in them; plan for them is to put 1/2 drywall over them. In spots where there's still a gap between foam and drywall, we thought we could just shove some of the rockwool scraps in???
Already checked craigslist, and there is no polyiso for sale, just stuff that is not supposed to be exposed (XPS). Given that we are going with rockwool to make the spray foam safer, it seems like we should stick with something that's allowed to be exposed for the rafters.
We have putty knives, but only a very low quality hand saw (and of course, the bread knives we are using for rockwool).
It’s not that the rental stapler is “heavy duty”, the issue is that the rental stapler shoots the wrong kind of staples (way overkill) for the application. The lighter staples will actually work better and be less likely to tear through the vapor retarder membrane since they are wider than the ones the rental stapler uses.
I’d use the plastic washers made to hold the rigid insulation, but I’d use construction screws and not drywall screws. The reason is that I find drywall screws to be more brittle than construction screws and more likely to snap off when you’re driving them. I also recommend you do yourself a favor and use either square drive or torx screws. Phillips head screws for applications like this just make for more work and more cursing :-)
Bill
Not only the wrong kind of staple, it has a tip on it. Stapling plastic with a stapler that has a nose for tongue and groove flooring isnt going to work. Not to mention it's a narrow crown.
Use duct webbing over wire, slap tacker and you can hold up whatever it is your doing.
Hi Bill,
we already bought 3" drywall screws phillips head, but as long as she drills into the old growth rafters first, it's working fine.
Y'all were SO right. Putting the batts up along the 2" furring strips is SO much better. Don't have a sense how much it will cost yet (each sheet is $33, but we should be able to get 24 strips out of each one) but there really wasn't another option after choosing the R-23 batts.
Will send a picture once we get more up so you can see the progress.
We can't stop talking about how wonderful this site is!