Slab Support
idahobuild
| Posted in General Questions on
Hello All,
I am working to finalize the air barrier and foundation for the our new construction house. Slab on grade foundation, 2065 sqft. in zone 5 U.S.A.
After much GBA, internet reading (including DOE and Bldg Science Corp) and advice from this forum; I’ve modified the design to be as follows (also see atch’d image):
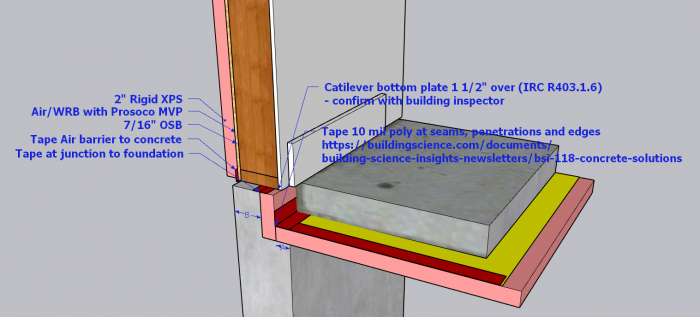
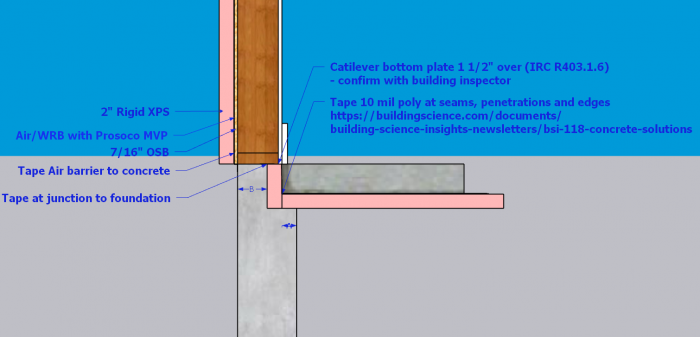
SLAB:
1. 6″ clean gravel (there will be a 4″ radon collection pipe running the perimeter of the foundation about 2′ in)
2. 2″ XPS foam (R10)
3. 10 mil poly vapor/radon barrier on top of the
– – Taped at seams, penetrations and edges. Also taped at junction to foundation.
4. 4″ concreate slab. Radiant heated.
EXTERIOR WALL:
1. Bottom plate cantilevered 1 1/2″ over interior (IRC R403.1.6, etc.). I’m going to confirm that with the local bldg dept.
2. Prosoco MVP Air/WRB applied to OSB
2.1. No interior vapor barrier (R10 XPS keeping condensation point away from interior walls — per table in code)
2.2. Seal with tape across MVP/OSB to top of stem wall
3. Sigo Majrex (or similar) over exterior top plate – connecting wall A/WRB to interior ceiling.
4. Ceiling sheet membrane (Intello or similar as air barrier under truss cord and above Gypsum Board sealed to top plate Majrex.
5. OSB cladded plenum trusses for HVAC, etc.
6. Vented attic with 1″ XPS baffles at top cord to direct air from soffit over the top of the insulation at the 16″ raised hip/heal roof trusses.
QUESTIONS:
1. I’ve seen a couple of different versions (okay, probably closer to hundreds at this point) of stem walls. One version includes a ‘seat’ or notch cut out to support the concrete slab. This makes some sense to me, but I am wondering; why would someone choose to support the slab in this way as apposed to not?
2. I’m going to find an engineer to review the final drawings — hopefully. But if using that stem-wall seat to support the slab, how much of the slab should be supported by it (see dimension A in atch’d image)?
Thanks All!
WD
GBA Detail Library
A collection of one thousand construction details organized by climate and house part
Search and download construction details


Replies
1) The seat cut is a good way to go but not required, so it adds labour to the foundation casting process.
2) As long as the floor slab is only receiving loads associated with floors, and not loads associated with walls and roofs, then the amount bearing onto the foundation should not be critical.
The seat cut, or shelf, is very important in a design like the one you show because it allows for insulation which addresses the thermal bridging you would have if you ran the foundation wall full-width to the top. It also allows you to leave the concrete slab exposed as the finished floor. It's very easy to do; most concrete form contractors are familiar with ripping rigid foam to the correct size and tacking it into place for the pour. If they look at you funny, tell them it's like a brick ledge.
If you were to insulate the exterior of the foundation, the shelf wouldn't be necessary, or not as necessary. But then you would have to deal with exterior insulation, which is tedious at best. Concrete is an ideal exterior finish.
Structurally, your sub-slab prep should be designed and compacted well enough to eliminate settling, so you don't need the shelf to support the slab.
One requirement of the IRC (building code) is that the concrete wall needs to be at least as wide as the wall framing it's supporting, which would limit the width to 5 1/2", but I have often had engineers sign off on a 5" width with a 3" shelf.
idahobuild,
The notched stem-walls are not there to support any part of the slab, only to allow the framed walls above to cover the slab-edge insulation. In fact having the slab supported by that notch can lead to the slab cracking due to differential settlement as the fill under the rest subsides slightly. My own preference is to make the notch deeper than necessary for just the slab and insulation to avoid this.
Malcolm, trying to interpret what you are saying:
Would you tack a 2x (1.5") onto the concrete form for the notch, and then use 1.5" foam for the vertical leg of the notch?
plumb_bob,
I use a similar detail to the one posted by the OP, except make the notch several inches deeper, so that rather than the sub-slab foam sitting directly on the stem-wall, there are several inches of fill in between. That way the whole slab is supported on compacted fill, and any settlement should be pretty similar everywhere.
If I was using exterior foam on the framed walls above, as shown in the OPs detail, I would move the plate in so that the foam sat on the foundation too. That would mean less of a notch as necessary, and it protects the bottom of the exterior foam.
Malcolm, I didn't understand your description at first either but now that I do, I think it's very smart. A lot of builders, clients and sometimes engineers want a direct connection, but I love the idea of building in a bit of "cushion" that will allow the slab to settle a small amount if necessary.
Right, thanks. So this would be with an 8" thick foundation wall and 2x6 framing? I know BC code allows the bottom plate to be 1/3 unsupported, sounds like other codes require complete bearing of the bottom plate.
plumb_bob,
Our nominal 8" concrete ties actually yield a 7 1/2" wall when you use 3/4" boards for cribbing. We also tack a 1"x2" to the outside of the forms as a pour-strip, so there is less to notch than it at first appears.
Recently I changed structural engineers and the new one isn't as happy with the reduction on the stem-wall width, so instead I've been adding a cant strip to the outside of the forms, which gives you more strength but also a bit more wiggle room when the framing and foundation don't line up exactly. it still has the same cantilever of the plate though.
That is where I was going- the reduction in width of the foundation wall at the top and how it would be assessed structurally. In the seismically active South Coast I can see an engineer getting uncomfortable. Thanks for the clarification.
Yeah - BSC has some foundation sections that would worry me a bit. Not much left to support the walls above: https://buildingscience.com/documents/building-science-insights-newsletters/bsi-118-concrete-solutions
Have you looked into a Frost Protected Shallow Foundation with foam on the outside? That's what we did and so far I really like it. The main detail was what to cover the exterior foam with. We used a 16GA stainless flashing that is bent and goes under the 2x6 stud wall to also act as a termite barrier. We did polished concrete floors so I didn't want to take any chance on exposed foam.
Appreciate the great input all. I've spent the last hour or so absorbing the info. and here's what I've gleaned.
FOR QUESTION 1 - why would someone choose to support the slab in this way as apposed to not?
1. Seat not completely necessary, but...
a. Does facilitate the wall's bottom plate cantilevering over the interior insulation -- helping to hide it.
b. Off set of the bottom plate can be used to support/protect the exterior insulation.
c. Can create issues if loads other than floor loads are on the slab (which I would have with a thickened slab supporting a load bearing wall).
d. Uneven settling can be dealt with by deepening the seat and including space for, not just the insulation/conc. but also the compacted gravel.
FOR QUESTION 2 - if using that stem-wall seat to support the slab, how much of the slab should be supported by it (see dimension A in atch’d image)?
Seems as though, especially if implementing the deeper seat method, the amount the slab is over/supported by the seat is not really important -- since the assembly can be built without the seat. So...
Currently, the design plans call for a 6" thick stem wall sitting on a 16" wide footing. If I'm at all correct in my interpretation of this conversation, a 6" stem wall design (see atch'd) with no seat would work. The bottom plate could still be offset to the interior by 1.5" -- both helping to 1) conceal the interior slab's insulation and 2) support/protect the exterior insulation.
Then, if the engineer checks the drawing and says we need a thicker stem wall, I can see if we can thicken the bottom portion. Thickening the bottom, say 10" below sill would then be used in the configuration that Malcolm T. suggests (with the compacted gravel, insulation AND slab over the seat) to allow for a more even settling of the slab -- should settling occur.
2. Am I correct that the depth of the seat would be around 10"; +/- engineering inputs (see red on atch'd image)? Or does it even matter if the compacted gravel base is above?
Adding a 3:
I feel like concrete and related labor is more expensive than lumber, if the engineer calls for a thicker wall would it be acceptable to support the exterior insulation on 2x2 at the bottom plate?
Thanks
Idahobuild,
There are essentially two types of slabs. Suspended ones there the loads are carried by walls or pillars, and those supported by the compacted substrate they sit on. My advice is to avoid a hybrid and allow the fill underneath to do all the work.
If you need a seat, I would suggest making it deep en0ugh to leave 2" of fill between it and the sub-slab foam.
If you can use 6" stem walls, then by all means go with the detail you have posted. It looks simple and will work well.
At the risk of further complicating things: If you do need a thicker wall, another alternative is to inset a 2"x2" as a leveling strip on the outside of your forms. This would allow you to move the exterior insulation another 1 1/2" towards the inside.
Thanks Malcolm,
I'll take your advice and avoid the hybrid.
For the 2x2 leveling strip; something similar (1x2) was also mentioned earlier in the thread. I am struggling a bit to wrap my hear around an "...inset 2x2....on the outside". Some clarification would be greatly appreciated. I am interpreting the location as location 2 (see atch'd image). But I can't see how it facilitates moving the exterior insulation inboard. Are we talking about location #2 and then the insulation sits in the notch created by the 2x (see image 2)
Idahobuild,
The 2"x2" gets tacked to the inside of the of the 8" concrete forms. This provides an accurate pour strip for the walls, and leaves an 1 1/2" notch in the top of the wall as shown in my sketch.
Hoping that the foundation walls and framing above will align exactly is asking a lot. To make sure your drywall and base trim cover the whole of the slab-edge foam, I'd slightly taper the foam at the top.
Thanks. The sketch is a magnificent help.
As a PM, I've always understood that value of visuals, but it wasn't 'til I started working on the house design that I have come to appreciate the clarity they provide in describing complex visual scenarios.
A picture truly is "worth a thousand words".
P.S. I've read previous responses, at least a few that I'm sure you provided, regarding the taper in the XPS. I'll start the taper at the bottom of the slab.