HELP! Air barrier trapped by ceiling and interior walls. How to fix? Impossible to install?
Hello,
I am new to the Pacific Northwest and am an architect by trade, playing GC for my own home. I’m concerned that I created a huge issue due to a sequencing oversight that could greatly diminish the continuous air barrier I detailed and was striving for. Please let me know your thoughts. Framers are leaving site next week (July 10,2023) and I am open to having them re-work issues to save air sealing headaches down the road.
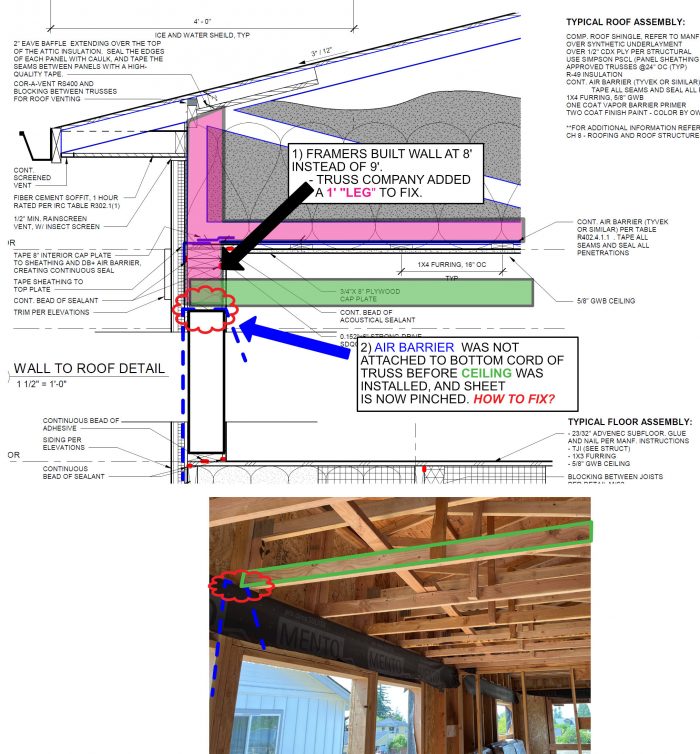
I brought my air barrier from the exterior to the interior above the top of my top wall before trusses were dropped. (side note, trusses have a 1′ “leg” because walls were framed at the wrong height…)
ISSUE: Framing continued before I was able to secure the air barrier to the bottom cord of the truss. Now the barrier is flapped down, pinched between drop ceilings that were framed. (see photo 1)
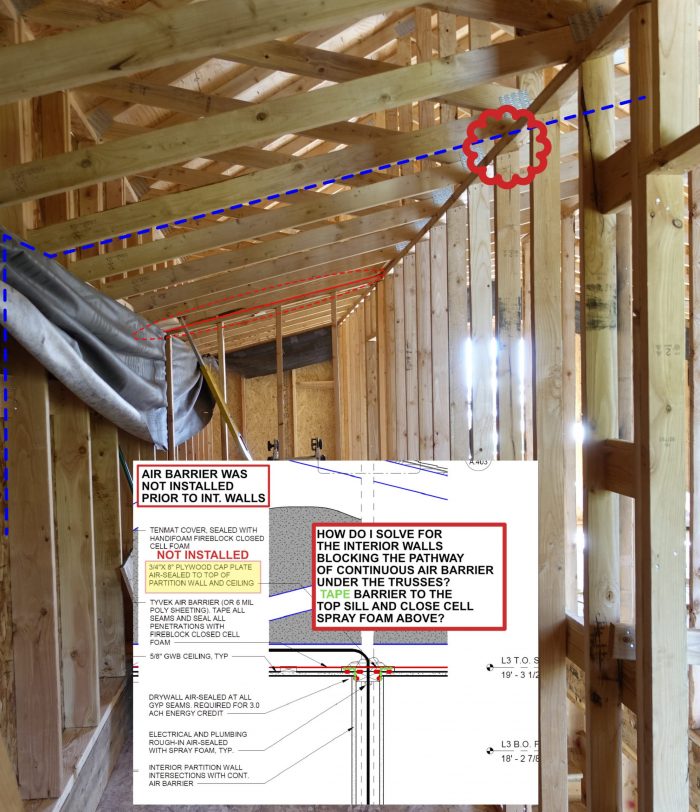
Additionally, interior walls were framed and I am uncertain the best way to install a continuous air barrier when the walls block the install of air barrier along the bottom cord of truss. (see photo 2)
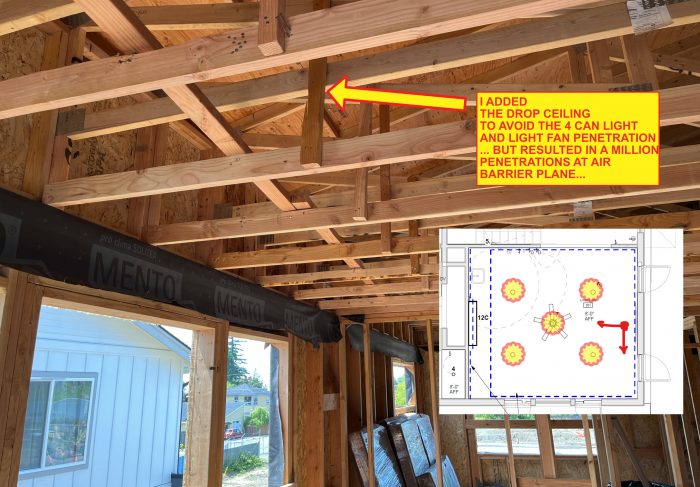
One fix: I am going to have framers remove the drop ceiling, which I was mainly installing to avoid holes in barrier due to lights and ceiling fans. I’ll just use tenmat and seal with foam. The framing of the ceiling cause many more penetrations and install issues!
Additional details:
Using Mento 1000 as exterior air barrier, transitioning to a less robust membrane on interior (proclima DB+.) Both vapor open assemblies. Vented attic, R60 blown in cellulose.
GBA Detail Library
A collection of one thousand construction details organized by climate and house part


Replies
You're doing the right thing by attempting to create an airtight assembly, and honestly these are the same mistakes or oversights that I and every high performance designer or builder I know has learned to deal with the hard way. Don't give up, just plan better using what you now know on the next project!
Framing lumber is airtight on its own, so you can use that as part of your air control system. The weak points are joints and transitions; for those, you can use a tape or a sealant. There are many products to choose from. Since you're already on the Pro Clima path, I would consider Vana tape and/or Contega HF sealant. Working around penetrations is fussy, which is one reason you often see high-performance homes are fairly boxy and simple--that makes it much easier to do a good job of sealing everything, but it's also possible on more complicated projects like yours.
Great, thanks for the reassurance! Spend so much time detailing it and had a head smack moment. Live and learn I suppose.
I would loose the drop ceiling just to get the extra height. Holes for light fixtures in the air barrier can be dealt with pretty easily by using air tight device boxes or sealing from the attic if accessible.
The proper solution would be to nock out the interior walls, install a strip of membrane on top and re-install them. It looks like most of your inter walls are up, this is probably not an option.
The next best thing is to seal the air barrier against the interior wall top plates. Run a bead of mastic (I like Green Glue sealant as it is water based but regular acoustic caulk also works) along the sides of the interior wall top plates, bed the membrane into it and tack it in place with staples. Seal up any wiring holes in the top plate with spray foam. Your wall top plates now become part of the air barrier.
Another option is to do your best with the membrane as is but go up into the attic after all the work is done and spray foam over all the questionable joints. One of the smaller two part spray foam kits works well for this.
Thanks for that advice Akos. You're right, no time/money to take down the interior walls. I will air seal against the top plates like you said.
Curious to hear more about the install method of bedding the membrane into the sealant, as that seams like a difficult task with such large sheets, 9' in the air. Why not just staple to the ceiling with a bit of excess on the top plate, and tape that seam directly to the top plate? Is it because tape costs more than sealant? In that case, why not staple paper to ceiling and caulk the seam/transition after? I'm not an installer, but thought I'd ask for a bit more clarity. Thanks!
Tape works just as well, whichever your trades are more comfortable working with. Our inspectors like to see a nice clean bead of caulk around the perimeter of the interior poly so caulk it is here.
The sealant is not too hard either. You first staple the air barrier up to the rafters and let it hang down by the walls. Go around the wall plate and lay a bead of caulk, push the membrane into it and staple into place. Make sure to allow for some movement in case of truss uplift.
I try to avoid seams in the filed by using larger sheets but if you do have seams, they are best taped.
ArchitectJudge,
One other unrelated point. I would omit the Cor-A-Vent at your trusses. You already have a screened vent on the soffits. it will just impede air-movement
Good point, thanks for catching that! I only have a soffit on one of the four eaves, should be easy to take out now before barrier goes in.
What have you used for insulation baffles? I’ve seen some install before the roof sheathing, but I missed that boat. Smart Baffle was one product I was considering but open to more cost effective options
ArchitectJudge,
The type of baffle and air-sealing isn't anywhere near as important on a trussed roof with the insulation on the bottom chord as it is with cathedral ceilings. I'd use any pre-made baffle your lumberyard stocks.
Agree that you are doing the right thing by focusing on air sealing. I can attest that not only does it save energy, it makes the house SO MUCH MORE comfortable.
A serious consideration is sustainability. Anyone who buys the house after you will wonder why the ceiling was dropped. At the first renovation, it is VERY likely that the dropped ceiling is going to be knocked out to get the 9' height, which future owners (and there will be future owners, even if they take you out of the house in a box) will value over your air sealing concerns. Thus I would be concerned about setting it up for a sustainable air sealing strategy. This may not work for you if the interior walls are only 8' tall as you would have to reframe those at 9'..., but I would STILL follow one of the below strategies. It's going to be a 9' ceiling eventually...
1. First strategy: Consider Scott True's "Modified Monopoly Framing." This is best done when the framers are still there, and has the added benefit of giving you a conditioned attic in which you can install mechanicals. This also eliminates your concern about venting because you don't vent a sealed attic. You do have alot going on up there so maybe too much framing to do that now. https://www.youtube.com/watch?v=2DGxmBpzwOs
(you will probably find it helpful to watch ALL of his videos ASAP if you can find the time...alot of info there on coordinating subs for an airtight home)
2. Second strategy: Abandon the ProClima idea because it is an extra step and alot of work. Instead, continue the Mentos on the outside up past all that mess of framing, to just above the underside of the trusses (just above the point at which you would have a 9' ceiling - ie 2-3" above the bottom of the blown in attic insulation). Have a vented soffit installed by the siding people instead of the framers, so DO NOT YET install the soffit. Seal up the roof so you have a dry interior, and install the windows. After the electrical is roughed in, pay the gyp crew to hang the ceiling ONLY. You can remove the dropped ceiling framing first if you want 9' ceilings, which would be a great idea. Then build baffles out of rigid foam
https://www.finehomebuilding.com/project-guides/insulation/rigid-foam-vent-baffles
I built mine with 2" deep legs and folded the legs only 90 degrees (instead of the 180 shown in the video). Extend the end a few inches past the outside plane of the outside wall. You can temporarily tack them in with a few dabs from a can of spray foam. Then call a spray foam sub to spray the perimeter from the attic - they should spray foam from the underside of your baffles, down to the top of the gyp ceiling around the outside. This will seal your perimeter. Then have them hit the interior walls from the attic - if the gyp is tight to the framing this will air seal that gap. You can also hit any electrical boxes that penetrate the ceiling. This should do it.
For your can lights, suggest the following, in this order:
1. Use Nicor flush Jbox type can lights. The only penetration is the Jbox, and they are awesome lights. Under $20 each, so also less expensive than cans. Have the spray foam sub hit the top of the j-box where the Jbox penetrates the gyp.
https://nicorlighting.com/product/dlf-surefit-surface-mount-led-downlight/
https://www.homedepot.com/p/NICOR-SureFit-9-6-Watt-White-Integrated-LED-Flush-Mount-with-2700K-DLF-10-120-2K-WH/302612508?source=shoppingads&locale=en-US&srsltid=ASuE1wQJx3dmB6FtfEsjQBVOGsi5VjR_mmtEmehH0DVF1cZFo107nicGcDw
2. Use airtight can light housing. Get up into the attic before insulation is blown and hit the perimeter with canned spray foam at the same time you do the same for the perimeter of the bath fans that penetrate the ceiling. (I would not have the spray foam contractor hit these as they are likely to encapsulate them.
https://www.homedepot.com/p/Commercial-Electric-6-in-Aluminum-New-Construction-IC-Rated-Recessed-Can-Airtight-Housing-6-Pack-CAT7ICATA-6PK/202256649
3. If you use the Scott True method, you don't have to worry about the ceiling penetrations.