Concealing Ductwork on Sloped Ceiling
Hi all,
I’ve been getting my money’s worth with GBA prime and my many questions. Thank you all who have helped with my recent garage threads.
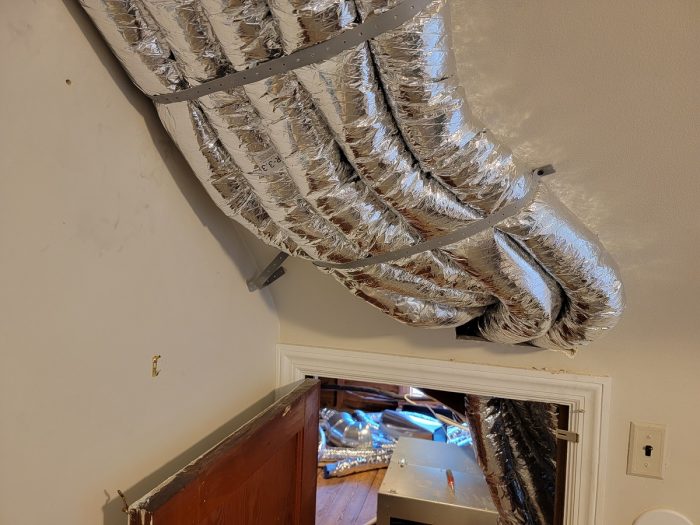
I have another question. I had to run some HVAC duct work exposed in the finished part of my attic for a variety of reasons that I won’t go into here. The ducts are in two parts of the attic–there are five 4″ flexible ducts in one section, and four 4″ flexible ducts in another section. I obviously want to hide them as exposed ductwork doesn’t really fit with our historic colonial décor:)
After striking out on finding someone to do the work, I decided I would DIY. My plan was to use 6″ flexible metal studs on edge to run along the curvature, affixed to the plaster ceiling. The roof rafters run parallel to the ducts, so wherever possible I would affix the metal studs to the rafters. The ducts are 4″ and dip down in spots to about 5″. A 6″ stud should give me a little bit of space without cutting off too much headroom.
I’d then use one or possible two layers of 1/4″ 4×12′ drywall (with the width cut as needed), wetted, and bent, to follow the contours of the arch. 12′ should span the entire arch so I should be able to use a single continuous piece of drywall. I’d use 3/8 drywall on the front vertical face cut to match the contours. I’d use arch corner bead (I think it’s called straitflex?). I’d then do a perfectly mediocre job of mudding and painting.
For both bulkheads the length is about 12′ as I mentioned. The width is about 24″. If it ends up being longer than that in order to line up with a rafter, I may use a third stud in the middle of the ducts to provide additional support for the drywall.
Now my buddy thinks it would be simpler to affix a couple of 1x or 2x nailers to the ceiling and then cut a sheet of plywood–maybe 1/4 or 3/8 to–contoured to match the curvature of the ceiling. And then use a 12′ sheet of 1/4 ply as the flat curved part, prime and paint. I have a jig saw that I’ve used twice, a router that I’ve never used, and a track saw that I’ve never used.
My concerns are weight–as the ceiling curves up towards the peak there is nothing to support I don’t believe so I’d have to use toggle bolts or similar. I should be able to go into wood roofing at the sides of the knee walls. The material of the ceiling is quite hard and dense. No lath. I also thought the texture of the plywood would be off and where the ply meets the existing ceiling could I still use an arch bead to create a seamless look?
I’m looking to do this in a way that winds up looking just north of “passable” and is decently DIYable. I spoke with the flexible metal stud company and they said my stud based plan made sense and *should* work.
I’d appreciate any thoughts you have both on my current plan A, the plywood plan B, and plan C if it is simpler and doesn’t cost a fortune and doesn’t involve me waiting 1.5 years for a carpenter to call me back. (Now if you have the skills and you are near the Baltimore area and I won’t need to sell a kidney to afford it, let me know;)
Thanks!

GBA Detail Library
A collection of one thousand construction details organized by climate and house part


Replies
This is a tricky thing to get right for anyone, especially a novice, but I'm sure you can do it.
Whatever you do, the new structure needs to fastened to solid framing. That will likely mean removing existing drywall or plaster to get to the existing framing. You can add blocking between rafters so you have something to fasten to.
Bending drywall is possible, but I've only done it over a form. With the varying curves you are looking at, it is very unlikely that you would be able to do it in one or even two or three pieces. The traditional approach is to create some sort of substrate, either with lathe or drywall strips, and build up the curves with plaster. You don't have to use traditional lime plaster, you can use a setting-type joint compound such as Durabond for the first layers. It sticks well and cures quickly. Finish coats can be "bucket mud," regular joint compound.
I don't understand what you are proposing to do with the metal studs but I prefer working with wood and would likely do something like your buddy suggests, with the cleats fastened to solid framing, then add drywall in smallish pieces and get good with a plaster hawk and trowel.
Hi Michael,
Thank you for your advice. It dawned on me that there *must* be some kind of framing right above the ceiling to support it, so I went back to the pics provided by our insulation contractor and indeed there are collar ties going across. So there *is* timber I can affix to the whole way. There's also romex and MC conduit up there laying on top of the collar ties so I'll need to be careful obviously.
Pics above ceiling
Another way to make curves is by kerfing plywood, it can then be bent into nice curves while providing some rigid backing.
I agree with Michael that you will need to build it up with some form of mud, using the trowel to achieve the desired finish.
Sounds fun, please post results when done. I love working with any sort of mud!
Man, if I could hire this out to a plaster guy, I would.
If that's not an option, I'd second the suggestions above; gutting out drywall to expose framing is worth the effort, tie into solid framing, possibly make a plywood frame / form / ribs that house the ductwork, fasten strapping to the ribs, fasten drywall to the strapping.
They actually make bendable drywall - I think it's 1/4" - that you can soak and bend up into place and fasten. It works okay, but it only bends in one plane/direction - you can't bend it into complex curves. For complex curves, you'll need to build it up in smaller pieces.
Definitely use setting-type joint compound for the first couple coats, and expect to do a lot of sanding. Finish off with bucket mud, and expect to do even more sanding.
I did something kinda similar to this in an old servant stair in a Boston-area Victorian - curved plaster ceiling on the underside of some stacked stairs was falling apart, and I couldn't hire a plasterer (Hopefully the photos attach - never uploaded a photo here before). It's a lot of work for someone who doesn't do this every day, but it's doable. Spend the time on prep to get things right before you start mudding.
Oh wow, that's pretty cool. Thanks for sharing and for the advice.
I would hire it out if I could have found anyone who had time to do the job. If anyone knows someone with the skills in the Baltimore area who could do it at a decent price, let me know:)
Impressive
Haha whoever changed the title of my post to "Gambrel Ceiling" thank you! I never knew that's what it was called. The amount I am learning on this Q&A is astounding.
I have to ask do you really have the code required 7 feet of ceiling height under that ductwork?
When I look at the photo with the door it looks very very tight at best.
Seems to me no matter what you do it will always look like a cover up. Consider painting it as is.
If you must cover it a suspended ceiling panels would leave you with the most head room.
Walta
We had similar issue with Gambrel roof and new duct work. We went up into the attic and over to get to the opposite knee wall, then framed around that and adjacent corner chimney creating a book case. But note that our attic is conditioned space (closed cell spray foam).
I'm on the same page as PaulMagnusCalabro.
If the duct soffit is not especially wide, you could attach a straight framed "ladder" to each of the 3 ceiling facets (skip over the radius portion) and use curved plywood gussets to create the connecting radius. Put nailers on the end wall, and bridge some 1x4 (maybe every foot or so) across the bottom between the ladder partitions and nailers to support the 1/4" drywall.
Or figure out a way to attach 1x6 pieces on edge to make the end partition, and then connect together with curved plywood gussets, and bridge to the end wall with 1x4 etc. If that's all you need for depth, that may be the easy route instead of ladder framing.
That gives something that's framed like a duct soffit, with the add-on curved gussets like a doorway arch, and finished in drywall. Really it's just a deep doorway arch in the simplest terms.
If you need some visual reference for the framing, Google something like "duct soffit framing" and "plywood doorway arch".
The transition from duct soffit to the sidewalls may take a little thought, as you'll likely have to blend the wall/ceiling transition radius and the wall/soffit transition radius, because the soffit depth and size of radius will affect where they meet on the wall.
Hi all,
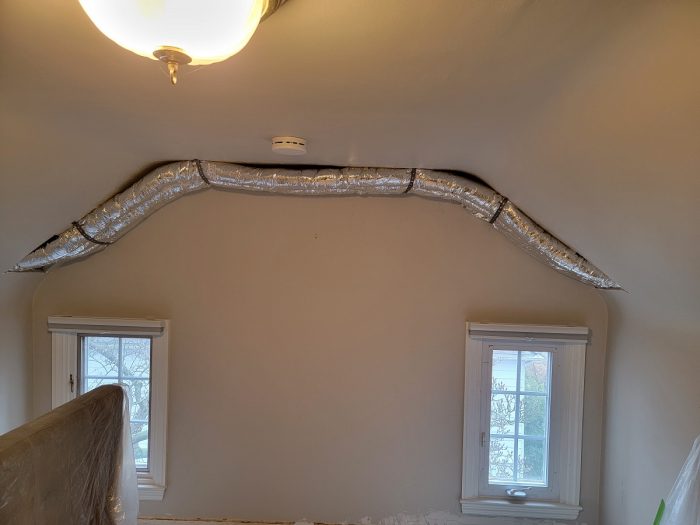
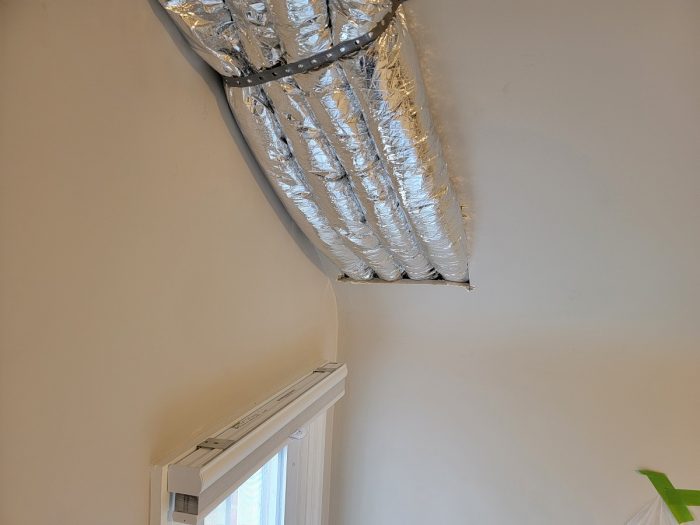
I wanted to close the loop on this project. I tackled the problem using the method I described. The first one (see pictures) took two weeks on and off. Cutting drywall in the garage, walking up three flights of stairs, and....oops, I cut it wrong...back down the stairs...rinse and repeat.
I learned a ton. For example, flexible drywall isn't *that* flexible. I ended up scoring the back of 2 layers of 1/4" drywall. The high flex did help in that the paper was stronger and so it kept it's integrity better. I learned its better to cut the drywall a bit wider and then score/trim/plane it back rather than trying to cut it precisely. I learned the better you mud, the less sanding you'll have to do. I also learned I suck at mudding:)
The first one (windows) was easier in the rafters and collar ties were exactly where you'd expect. It was also narrower. The second one (doorway) was harder in that there's a dormer off to the side so there was a hip rafter(?) going right through the area and finding the wood above the ceiling was a chore. It was also much wider (30") which made everything more difficult.
I am pleased with how it turned out. If you get close you can see plenty of flaws where I didn't sand well enough, or I gouged the mud with a paint roller, or there's a inkling of the plastic corner bead showing through. We'll see how it holds up through seasonal changes here in the mid-Atlantic and whether cracks form.
I ran ethernet through there and back behind the kneewalls (I used plenum rated--not sure if I needed to, but I did).
Your work is absolutely AWESOME!!!
Congrats on doing such a great job, and thanks for taking the time to come back and update this with BOTH the in progress and final pics.
You should be very proud of this.
Thanks for the update--looks great!
That turned out great, nice work. I hear you re: flexible drywall not really being as flexible as one might hope, and I feel you re: trekking up and down multiple flights of stairs for every cut.
Did you use setting-type mud for the first couple coats and finish with drying-type (bucket) mud? I feel like doing base coats with setting-type mud buys you a bit more strength / leeway with seasonal movement.
Great job, and appreciate the follow up - it's cool to see the finished product and how people wind up using the information they get here.
Good stuff!
Thanks for the kind words. I used all purpose for taping and lightweight for skim coats. If I had it to do it over I'd use something like easy sand 45 for taping which my understanding is a setting type. The all purpose is definitely harder than the lightweight.