Help me fix this horrible range hood duct termination/exit (6″ duct into an 8″ termination with no reducer or coupling)
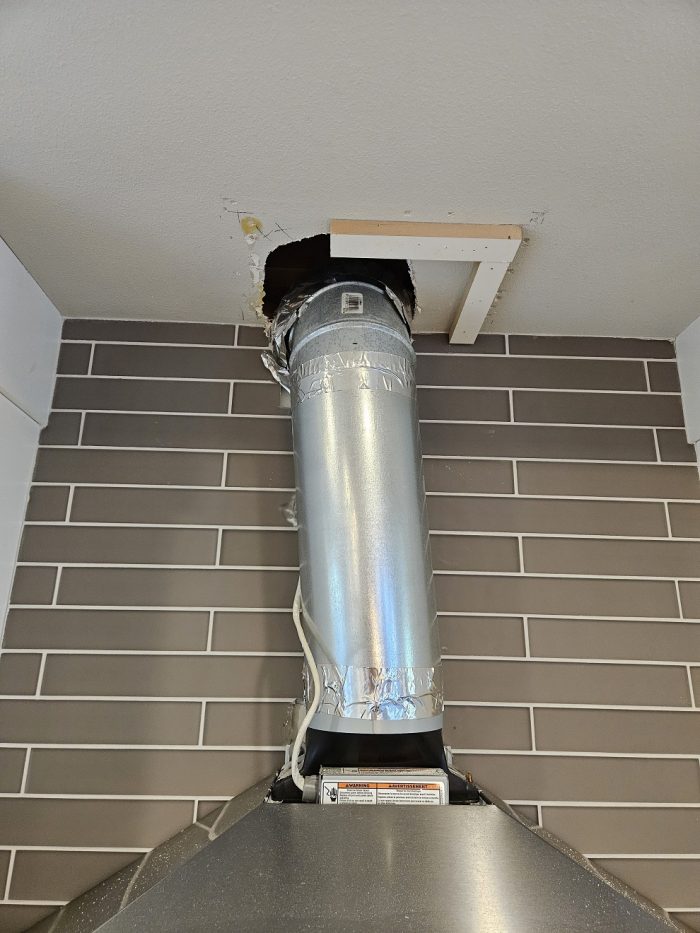
Had a blower door test done recently. Tech noticed unusual amount of air coming in around the chimney of my range hood. I managed to get the chimney off and very quickly discovered why.
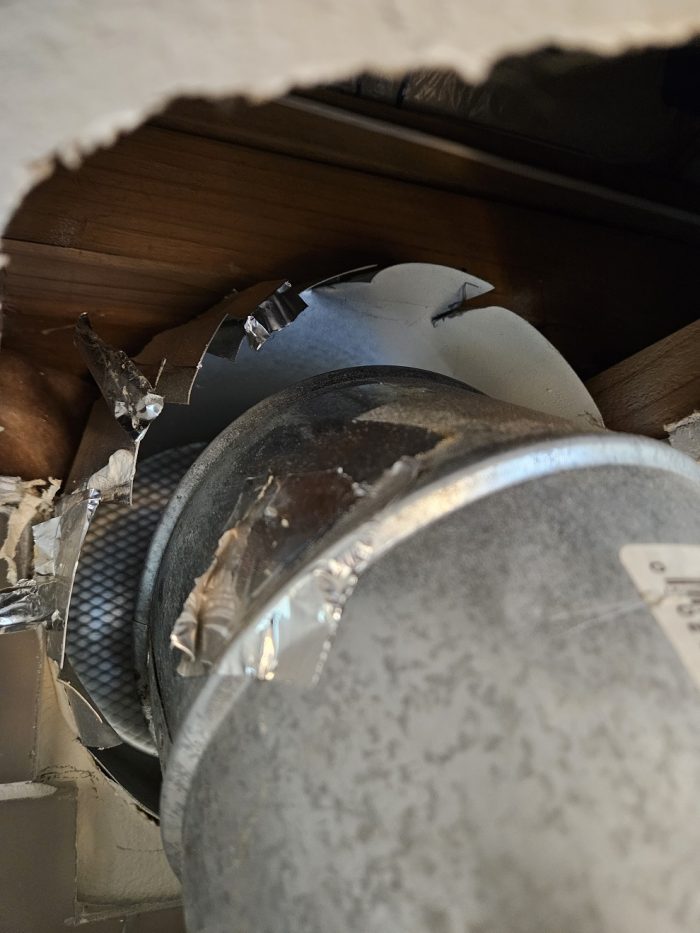
The range hood has what appears to be a 5 or 6″ duct coming off the top. It feeds into what appears to be a small 8″ piece that terminates through the exterior wall. Problem is, there is no coupling or reducer connecting the 6″ duct to the 8″ piece. The 6″ piece was literally just poking in to the 8″ piece and held there by a poorly-done tape job. See attached pictures.
Any thoughts about the best way to fix this without having to do any demolition? The gap between the small piece and the large piece has got to be near 2″. Should I maybe stuff some sort of foam or fiberglass into the gap and then spray over it with some canned spray foam (maybe the Great Stuff can that says it is for “big gaps”)? I need to be conscious of the fact that this is a range hood duct, so it probably gets moderately warm at times and may have some fire-risk considerations.
Many thanks for any feedback.
P.S. House is 5 years old. I’m not the original owner. It was built by a builder who supposedly has a good reputation. I’m no expert but I’ve owned a few homes and this is amongst the worst hack jobs I’ve seen for something that was “professionally” done.
EDIT: An 8 to 6 reducer, or replacing the 6″ elbow with an 8″ elbow + reducer, will not fit the available space + chimney. Filling the gap and sealing is really the only feasible option that would not require me to do exterior siding work. I guess my main question at this point is whether there would be any safety/fire concerns about filling the gap with fiberglass + foam as thoroughly as I can?
GBA Detail Library
A collection of one thousand construction details organized by climate and house part


Replies
These pictures should go into a dedicated "HVAC Fail" showcase!
My guess is the tiler showed up after the range hood was installed (poorly) and the unit was removed...
You need a proper 8 to 6 reducer and the proper tape.
https://www.homedepot.ca/product/imperial-8-6-inch-reducer-no-crimp/1000104927
There's really not enough room to add a reducer. It would stick out too far for the chimney to reattach to the top of the hood. Which is why I'm looking for a way to seal the gap.
The only way to "do it right" would be to get an 8" elbow, then use an 8" to 6" reducer in the straight section of the pipe.
But guess what? The chimney won't fit over an 8" elbow (or any 8" pipe).
So really I'm left with the option of either removing the 8" termination piece and replacing it with a proper 6" piece, which would require doing exterior work and plugging holes in my exterior siding, or just filling the gap between the 6" and 8" piece as best I can and sealing that.
I'm leaning towards just filling the gap and sealing. Removing the 8" piece and the accompanying exterior work that would be required just doesn't seem worth the effort.
And yes, absolutely, these pictures should go into a fail showcase. I'm tempted to email them to the builder (who is still in business...) and asking if this is their idea of an acceptable range hood installation. But I will hold my tongue...
https://www.lowes.com/pd/IMPERIAL-8-in-dia-x-6-in-dia-Duct-Reducer/1000230237
If possible - if the 8" will fit behind whatever shroud normally covers this, I would try to do the 90 degree turn with 8" via this: https://www.lowes.com/pd/IMPERIAL-8-in-x-8-in-Galvanized-Steel-Round-Duct-Elbow/1000237495
The portion shown on the bottom of that photo should fit well into the existing 8" duct. You may need to buy some fittings to connect from the elbow to the reducer to the existing duct. Do yourself a favor and buy a good pair of straight snips to cut that existing 6" duct down so you have space for the reducer.
And buy the GOOD foil tape to seal all the seams, NOT DUCT TAPE. DUCT TAPE IS NOT FOR DUCTS.
See detailed response re an 8 to 6 reducer above. The short version is that neither an 8 to 6 reducer, nor an 8" elbow, will fit in the available space or behind the hood chimney.
I'm leaning towards plugging the gap and sealing it as best I can.
That's a fire hazard. If you had a cooktop fire it would suck the flames right up into your framing.
The hole/gap is a fire hazard as it currently stands? Or filling the gap with fiberglass and/or foam and sealing it up would create a fire hazard? As explained in more detail in a post above, a proper fix using an 8 to 6 reducer will not fit the available space + chimney.
Both.
No room?
I would suggest you remove the exterior hood. I assume it will be attached to a certain length of 8 inch galvanized. Just trim that back so that a proper reducer can be integrated.
And yes, that pic showing a "chimney" to the joist area would not pass firecode.
Thanks so much for the feedback. This was fully permitted and inspected in what is considered to be a pretty strictjurisdiction. No idea how this passed. Guess the builder is buddies with the inspector... hah.
If the reducing coupling were right up against the exterior hood, is there room for a 6" elbow behind it?
Alternately, have you considered just buying a new exterior hood with a 6" connection?
"If the reducing coupling were right up against the exterior hood, is there room for a 6" elbow behind it?"
Possibly. The walls are 2x6 but I think those reducers are usually pretty long. If I should find a really short one it might work.
I would need a hood with an 8" connection but no I hadn't thought of that. Probably won't do it, but thanks for the suggestion, and all of your other feedback in this thread.
At least now I have some ideas and some safety information!
Very short reducer: https://www.plumbersstock.com/swred86-8x6in-single-wall-aluminum-tee-cap-reducerincreaser.html
Alternatively get a sheet metal shop to fabricate a combo reducer / elbow. Not really code compliant but much better than what you have. Or just get a sheet metal tech to redo it - they can probably work it in there and make it fit.
Thanks for the link. Didn't know they made them that short!
I don't know how code compliant it would be, but you could fill the gap with fire barrier canned foam.
That's definitely the easiest solution and would be a pretty good improvement over the existing setup. If I decide that squeezing a reducer in there, or some of the other more legitimate fixes, are too difficult, I still may end up going the foam route.
I've also made adapters out of duct end caps before.
For example, you can get an 8" duct endcap, cut a hole in it and install an adjustable takeoff like this:
https://www.lowes.com/pd/IMPERIAL-6-in-x-7-in-Galvanized-Steel-Adjustable-Duct-Take-Off/1000237101
You can even use a standard 6" elbow and a good pair of tin snips to make the collar.
Remove the screen from the exterior exhaust hood. Extend from the existing 6" elbow with a short length of 6" straight duct. Use fire stop foam to seal up the gap between the 6" new duct and existing 8" to insulate it. Now cut a square piece of metal to fit your exterior hood (same size as current screen) with a 6" hole in it to seal the gap. Replace the screen.
This way you have 6" metal all the way to the exterior and your hood/siding can say in place. If you are able to source a 6" exhaust hood in the exact same style as your 8" you could also cut the 6" straight stub from it leaving just an inch or so, and just use it nested within the existing 8" hood for an interesting look :-)
Good ideas. Thanks.
aunsafe2015,
No useful suggestions, just wanted to express sympathy for having to deal with an annoying and wholly avoidable situation.
Hah hah, thanks for the sympathy. Definitely could be worse :)
I'm sure everybody has their own stories about the crazy things they've seen on a house. I was talking to a friend, and he said he once encountered a wastewater pipe where a smaller pipe was nested into a larger one and held together by tape, just like this. He discovered it because it leaked raw sewage into a stud bay.
Made me feel pretty good that this range hood issue is the worst I've discovered (so far...) on my house. hah!
Just realized two things:
- On image 2, we are seeing the birdscreen mesh on the exterior damper, so this is all on an outside wall, and you have very little space for a reducer.
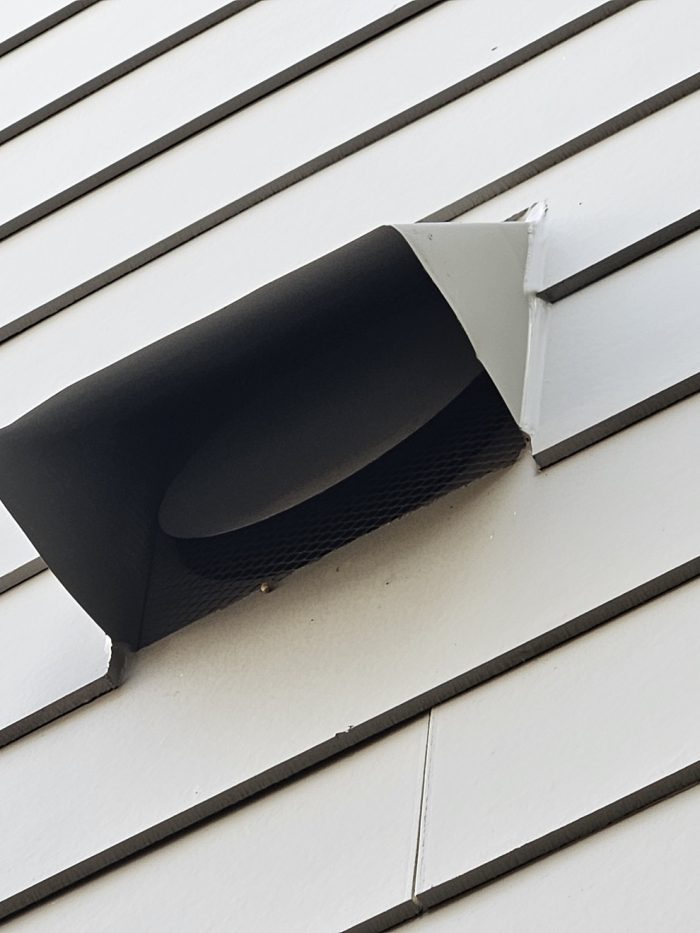
- On image 3, it appears that the birdscreen may have been installed later, and that it may be preventing the exterior damper from fully closing.
Whatever you do, you need a good damper. So if you want to keep the existing exterior wall duct hood, you probably also want to keep it's existing damper. I think you have a chance of fitting a pancake reducer in there from the inside - they are only about 5" - 6" deep, and part of 6" elbow fits into them, so with a 2x6 wall + 1/2" gyp + 1/2" tile I think it will fit
https://www.ductoutlet.com/Short-Duct-Reducer-p/sductreducer.htm
Then put an elbow like this into it:
https://www.lowes.com/pd/IMPERIAL-6-in-x-6-in-Galvanized-Steel-Round-Duct-Elbow/1000227153
Top part of elbow in the picture goes into the reducer.
Then push top of vertical duct with taper into bottom part of reducer. You may need to buy a new piece of 6" with a taper on one end if the existing does not have that.
This keeps damper working.
I would also remove the wire mesh behind the damper if it is preventing the damper from fully closing and use hardware cloth to make a bird screen across the bottom of the hood.
Good eye re the bird screen mesh. I need to check it more closely. You are correct that the damper seems to have trouble staying fully closed.
I am unaware of any canned foam products that would be suitable for this type of application, roxul insulation would be preferable. However, neither of these options would be considered a proper fix, I would suggest you absorb the cost of having the job done correctly, with the correct materials and components, for the sake of the safety of you and your family.