How does my shed/workshop detail look?
shedworkshop
| Posted in General Questions on
I’ve been browsing and asking questions here for a while planning my shed/workshop build. I think I’m finally ready to submit my plans to build it. Any critiques before I do?
GBA Detail Library
A collection of one thousand construction details organized by climate and house part
Search and download construction details


Replies
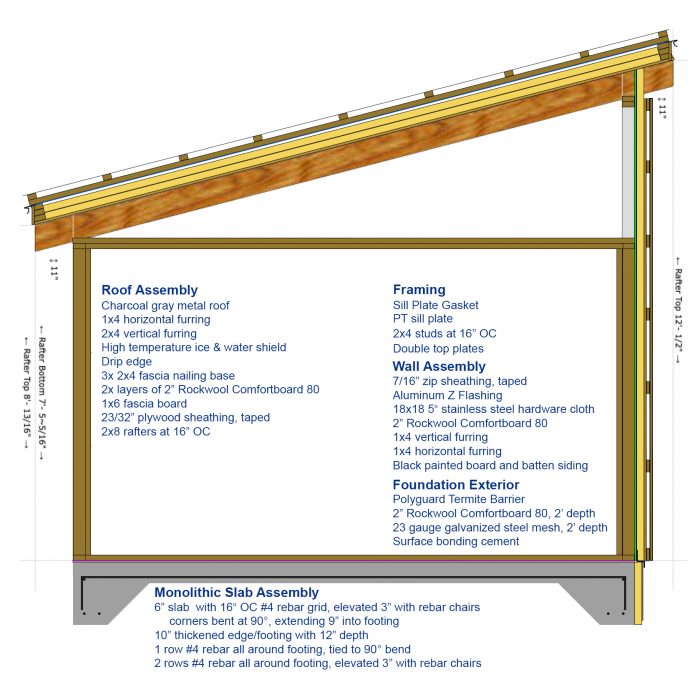
I don't understand your roof assembly. What is the ice and water shield adhered to?
The exterior rockwool. Is that problematic? Should I add some plywood and adhere to that instead?
I'll let professionals share a better opinion but I think that's going to be like trying to get masking tape to stick to a shag carpet. Perhaps a better option is to bring the insulation to the inside.
I have other questions about the roof as well. How do you achieve a continuous air barrier at the intersection from the wall to the roof? You mention a 1*6 facia but it looks like you will actually have closer to 12" with the addition of the 2*8 rafters?
Do you have a horizontal ceiling (appears to be shown in the diagram.) If so, why?
Yeah, I was going for more interior space with open rafters on the inside, but it's not like I can use that additional space anyway. Maybe it is worth investigating using interior rockwool and a simpler roof assembly.
The plan for the continuous air barrier was to run the sheathing up in between the rafters and seal with foam. Plus blocking as needed. No horizontal fascia. Do I need to extend another vertical fascia board over the rafters too?
Ah, the horizontal part was just to make framing easier/cheaper. I can use 2x4x8s cut down to 88.5" studs with a double top plate. There isn't any flooring at that level, although I do plan on a 45 sq ft loft/storage space on the high side of the shed. Hope that explained it well.
I have a few questions and observations based on my Pretty Good House and Pole Barn shop projects.
1) What is the horizontal furring in the wall for? If you're doing board and batten siding, the boards and battens need to be nailed to the horizontal furring.
2) Why is there horizontal and vertical furring in the roof structure? With the insulation above the rafters, I'd use the 2x4's as purlins and screw them thru the insulation to the rafters and screw the roofing directly to the 2x4's.
3) Why 6" concrete? Unless you'll be driving large trucks or have extremely heavy machinery in the shop, 4" over a well compacted base will probably be sufficient. I have a 9,000+lb lathe as well as heavy tool grinders and a Bridgeport in my shop on 5" concrete and have never had any issues. My wood shop equipment - shapers, saws, planers, etc... has been well supported in previous garages on 4" concrete.
4) Unless you're planning on gutters, I'd consider 24" eaves, I have 24" on my house and 12" on the shop and regret the 12" eaves and no gutters. In the winter, I always end up with ice on the shop's concrete stoops, but don't have this problem at the house.
5) At the base of your siding, consider using a piece of drip edge attached to your sheathing that is wide enough to cover both the siding and boards in your board and batten siding. You can get this fabricated at any shop that sells ag metal siding. The drip edge will serve as a good barrier for insects and small rodents that might try to get into your siding thru the bottom. With wooden board and batten siding, you'll still end up with some insects in your rain screen that will crawl in thru gaps between the boards and battens.
I appreciate the feedback! I'll respond to each:
1) From what I understand, vertical board and batten has to be nailed to horizontal furring (https://www.holoweb.net/liam/homeowner/g/board-and-batten-all-334x349.jpg). The vertical furring is to provide a drainable rain screen gap.
2) Like the wall, the vertical furring provides a rain screen gap, and the horizontal battens are for nailing the roof. It seemed like metal roofs require horizontal batten? I could be wrong.
3) I was leaning toward 6" because it would put my walls 6" above grade to try to avoid any moisture issues. I'm not opposed to being talked out of it and using less concrete :)
4) I'm planning on a gutter on the low end of the roof. I wish I could do larger eaves, but there simply is not space for them at the location in my yard.
5) I was leaning toward using the 18x18 hardware cloth so that the assembly could be drainable. Would the drip edge still allow it to drain?
ShedWorkshop,
Id really consider using polyiso here instead of mineral wool. You're highlighting most of its weaknesses by putting it on a roof instead of where it's better suited - walls and below grade. Otherwise it looks fine.
It's heaver than polyiso, more expensive, lower R value, you can't adhere things to it, takes longer to install, and it's itchy.
The main draw for mineral wool for me was termite resistance. It looks like I could do borafoam for a similar cost / R value, so maybe I'll look into that for the roof. I'm also now wondering if I should just scrap the exterior roof insulation idea and go with interior roof insulation.
I'm not sure termite resistance is really a key factor on roofs. It's so far from the ground, drier, and hotter, that they'd surely eat the rest of your house first.
Shedworkshop,
A couple of general p0ints for clarity:
- Your drawings need to match your outline specifications. If the exterior insulation continues down past your footings it should be shown on the drawings.
- Similarly, the complete wall assembly shown on your high wall should be shown on the lower one.
- Divide up your 0utline specifications. They should move from one side of an assembly to the other. Separate out the other elements, (trim, flashing, fascia boards, flashing, etc.) into different notes to avoid confusion.
- Sections should only show the elements that are cut by the section line in bold. The rest should be background. So for instance the top-plates on the end wall should not be drawn in the same way the top-plates on the high and low walls are.
Foundation:
- Vapour barrier?
- What is the minimum depth of footings where you are? At 12", yours will only be 4" to 6" below grade.
Walls:
- I'm confused as to what is going on. What are the horizontal plates shown at 8'-0"? Are you suggesting framing all the walls at that height, then adding shorter knee-walls above to fill in to the underside of the roof? You can do that on the low end and sides, but not the tall wall which needs to be continuous. It can't include a hinge.
- What happens between the rafters? Blocking? What covers the area above where the siding is shown ending?
- How are the walls anchored?
Roof:
- The drip-edge needs to be integrated with the metal roof panels at the eaves, and no drip-edge is used at the peak.
- It's unclear how any moisture drains. Both the eaves and peak need to be completely rethought.
Malcolm, it seems I missed a few considerations.
I forgot to add the subslab vapor barrier, compacted gravel fill, and j bolts to the diagram. Will add them in for my next diagram. I also miscalculated on the exterior insulation. The original plan was to just have it be 18", same as the slab.
Fair point about showing the wall assembly on both sides and dividing up the sections better. I'm confused about your top plate comment. Would overlapping them like I did not work? It's a moot question anyway I guess since I need to change that high wall to be continuous studs.
I modified a rafter calculator diagram to create this one. The front wall is 7'9" including sill plate + double top plate. Back wall is 11'3". Point taken about no knee-walls on the tall wall.
I'll update the drip-edge location as well. The idea is for moisture to drain down the cavities created by the 2x4 vertical furring. After seeing all these comments, it might be easier to just user interior rockwool all around. Probably cheaper too.
shedworkshop,
My comments were mainly geared towards modifying your submissions into a form that your building department will accept. There are conventions for how specifications and drawings are done, and what information needs to be shown, which make it more likely they will be understood and approved.
The convention for describing the footing depth for slabs with thickened footings is to include the slab depth. So if you say you have a 12" footing, that would be the total height from the fill underneath to the bottom of framing ( not 12" plus 6").
If you want to keep the exterior roof insulation I would suggest making two simple changes:
- Replace the rock-wool with foam. This lets you do an un-vented assembly. If you use 3" of foam you can frame the perimeter with two plates. This also clears up all the complications at both the eaves and peak.
- Use another layer of plywood sheathing instead of the strapping. That gives you something to attach the roof underlay and roofing panels to directly.
- Before laying the foam, caulk the interior face of the two perimeter plates, and lay a bead of caulking on the top before putting on the sheathing. That will entirely protect the foam from ant and wasp damage. If termites get up that high, they have already compromised your walls, and the foam is the least of your problems.