How to insulate bumpout very close to ground
jeuteneier
| Posted in General Questions on
I have a garage I’m bumping out a couple feet. I’m not sure how to insulate it given a) I have a bumpout that will function somewhat like a crawl because the soil will come right up to the PT rim and b) the inside of the garage is slab.
Here are three ideas I came up with based on the fact that I have a bunch of 3″ Polyiso (w fiberglass facing both sides) and 3/4″ XPS rigid foam board. Any recommendations?
The bumpout is already framed up.
thanks!


GBA Detail Library
A collection of one thousand construction details organized by climate and house part
Search and download construction details


Replies
Anyone else have a close to ground bumpout with insight?
I can't see any of the detials working well in the long run unless you remove the dirt and slope away. That bump out as sketched is a nice water collection point, it will always be a problem.
I would raise the bump out at least a foot above grade at which point it can be insulated the same as any floor overhang.
I would put the rockwool directly under the subfloor, and the polyiso under that. I'd try to get at least some amount of polyiso under the floor joists to form a layer of continuous insulation too. You'll get interior side drying this way, with most of your R value in insulation that isn't an issue in terms of moisture. I would probably not bother with the XPS, but if I were to use it, I'd use it in the outermost layer of insulation. You need that plywood for critter protection. If you have extreme critter concerns, I'd put a layer of hardware cloth behind the plywood to stop critters from being able to chew their way in to nest in the insulation.
You absolutely need to deal with the grade though. If you have a puddle under there all the time, you're going to have problems. Sloping the ground away from the house in all directions is the best way to deal with this, next best is to put a layer of clean stone under there with a french drain underneath, then drain that to daylight (better), or a sump pump (less desireable).
Bill
If you can't regrade, just pour some more concrete and dowel it into the existing and set your wall on top of that. Otherwise you will ALWAYS have problems. ALWAYS
Thanks all. Hmm. Looks like I under estimated it. I figured with just a couple feet of bump out I could just use PT and moisture resistant materials. I think I'll have to do a slab or stem wall.
It's only 30" x 15' so I don't want to over think it or over do it. I've got about 14" from bottom of existing stem wall to the top of grade. I'd like my flooring to start near the top of the existing stem wall rather than rest joists on top of it and loose the height.
Here's some pics of the actual site. Looks like my options are:
Slab
- remove existing framed floor
- about 11" from top of stem wall to dirt
- add several inches of gravel and rigid insulation so slab is above grade
Higher floor
- move framed floor to on top of existing stem wall rather than flush with it
- provides level grade completely below the framing. bottom of bumpout would be within a few inches of the ground but it's now completely open
If there's a better option I'm all ears. Thanks!
There is no way to make that work as is. You need to either pour new foundation there or raise the bump out well above grade.
Ok I went back to the drawings and they're more complete.
Raised floor
Pro:
- 2-3" off the ground completely
- use materials i already have (lots of reclaimed polyiso, 3/4" rigid XPS, lumber)
- the reclaiimed polyiso thickness varies between 3" and 3 1/4" and the compressed rockwool allows for a 100% cavity fill with no gaps
Con:
- still close to the ground
-lose about 6.5" floor height (but vaulted ceiling so might live with)
- potential for critters
Slab
Pro:
- probably the "right" way
- totally critter proof
Con:
- more work, time, and money
- can't use materials I already have
Are there any issues using the fiberglass faced polyiso in the roof and floor in these applications?
Thanks!
You never regret doing it the right way.
For sure. But that doesn't mean other ways aren't reasonable.
Here is what I ended up with and hoping my floor insulation plan is sound. The question I'm going to ask is if it's safe to insulate the floor from the top down.
I chose to raise the floor but redid the grade coming off the garage to slope away and toward a mini french drain channel. I also added several inches of gravel (see drawing).
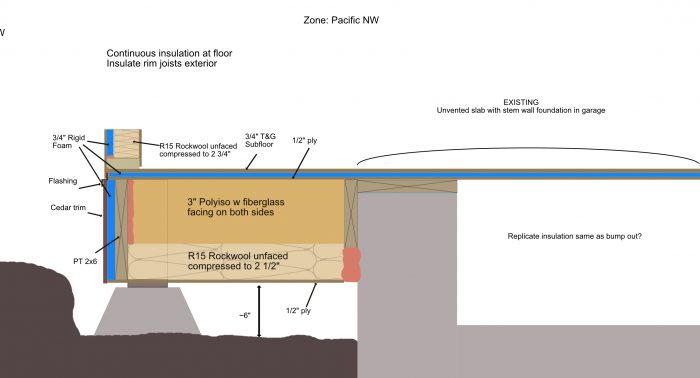
Floor assembly
- 3/4 T&G Ply
- 2x6@16"
- R15 Rockwool
- XPS or Fiberglass faced Polyiso (have reclaimed of both) foamed in with Great Stuff Pro Gaps & Cracks
- 1" R-Tech EPS under joists
- 1/2" PT Ply
Finished floor is 2" above several inches of gravel for the bumpout and 8" over an unvented garage slab which will have a plastic vapor barrier.
Assembly is based on Martin Holladay's article How to Insulate a Wood Floor Assembly (https://www.greenbuildingadvisor.com/article/insulating-a-wood-framed-floor-assembly) where he said the top spray foam is optional.
I know there was some disagreement about this approach related to moisture. I'm not looking to resurrect that discussion per se but I scoured the internet and couldn't find info about bumpouts close to the ground. This is the closest I came: https://www.greenbuildingadvisor.com/question/bump-out-too-close-to-the-ground-insulation-waterproofing-question
Thanks!
Justin
Justin,
Leaving aside whether this is a good idea or not...
- Have you figured out how you will install and seal those bottom layers with no access from the underside?
- Do the new floor joists bear on that single 2"x4" and pier-blocks?
- What's your frost depth?
- Do you have code enforcement where you are building?
1. Yes. It's tricky and I'd never do this on a larger job but since the floor is only 7' x 10' I'm going to frame it up and put the EPS and ply on the bumpout side then set the floor in. For the slab side the EPS will already have been marked out and set on blocks and I'll glue it in.
2. Sort of. The bumpout is only 30" so only that much bears on the 2x4 and blocks. The rest is on the existing stem wall of the garage (see pic).
3. I think roughly 18" and I'm above that which isn't ideal.
4. This is not a permitted project. Just a homeowner DIY 30" bumpout.
jeutbeier,
As you say, it's small and just a garage. Seeing you are that far along, I'd complete it as you are suggesting.
Thanks. So no concerns about making the air seal at the bottom of the joists vs the top?
jeutbeier,
No. Of course a secondary air-barrier is always a good thing, but if there is only one, I don't see any disadvantage to it being on the bottom.
thanks. really appreciate the help.
Here is how the floor ended up. Was a lot of slow careful work but worth it in the end.
Bumpout has 1" EPS and 1/2" treated ply under joists continuously (except where the floor rested on supports) and over slab has 1" EPS and 1/2" treated ply in 4" strips to provide thermal break and support for the first cavity layer of polyiso.
It was fun to think through a solution that allowed insulation under the floor without being able to access once down.
The first joist bay I left a gap to foam in the polyiso but after that realized I was burning through spray foam and I just used a table saw and made precision cuts for a snug fit. My methodical framing payed off as each piece was a tight fit excepts the ends which I left gapped for ease of installation and spray foam.
jeuteneier,
Nice job!