Building Envelope Design for Pretty Good House
Hello! I’m a new member of GBA but have read through the site in depth, listen to BS&Beer podcasts, etc. I could really use input from the GBA community about my building envelope design. Some background on the situation:
I purchased a property at top of Catskills with plan to build a passive house and sauna, working with a passive house architect The sauna is built, but pricing on the 75% construction drawings came in way higher than original estimate.
The house across the street meanwhile went up for sale at affordable price, so I bought it, put passive house on hold, and am now shooting for a Pretty Good House renovation, ideally at half the cost of new passive house.
Please note, I’m NOT an architect, but have computer design skills, so am doing my best imitation of an architect, for “good enough” drawing for building envelope, to help get exact pricing and common reference with build team.
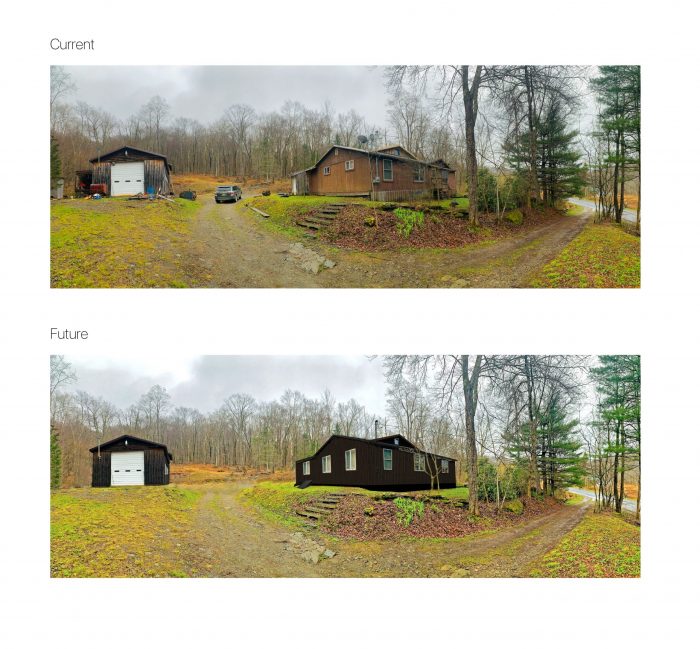
Drawing is attached, along with rough rendering of current / future look of the renovation. It may look nice, but I’m sure there are some issues 🙂
Thanks in advance for any thoughts and feedback! And thanks to Michael Maines for some kind input he emailed already in this regard.
HOUSE DETAILS
* Climate zone 6. Shooting for PGH levels or thereabout. Floor: R30, Walls R-40, Roof R-60, Windows R-5 to R-8 windows (U-0.20 to U-0.13).
* House is 2X6 walls and around 1500 square feet. Pier and beam with dirt crawl space for about 75% of house, then new addition has a mini foundation about 6’ down. There is also an original mini foundation that currently has the furnace and compression tank.
* Will be gut renovation by necessity. The water pipes were placed in attic and burst last winter before the purchase. There is a mold issue. All drywall, flooring and insulation is coming out and mold remediation will occur before renovation.
* Has two trusses! One is over original house footprint, second is perpendicular, over new addition and halfway on top of original truss. A structural engineer reviewed and said it’s sound, with advice to keep as is, rather than incur cost to replace with unified single truss.
* The passive house builder is busy but onboard for focused work on this project. I’m thinking he can help with core air sealing and envelope work. There are a few other good contractors who can handle the rest.
WALL ASSEMBLY
* Materials spec shows Solitex Mento Plus, Siga Majvest, Intel Plus, Siga Jajrex 200, Tescon Vana, etc, because I’m referencing passive house designs by architect. I’m not sure if that’s what’s needed at PGH level, versus Zip or alternatives, curious for input.
* Is interior wall air sealing layer needed along with exterior air seal on sheathing? It is currently included, which makes a wall service cavity necessary to handle electrical placement without penetrations.
* Primary air control layer is at sheathing. Exterior insulation is rockwool comfortboard, because I have that spec from architect. The R8.4 there gets to 30% of total wall R-value, which I think will keep sheathing above the dewpoint? Is it worth pricing alternatives like wood fiber or recycled foam for same R value?
* For transitions between wall and ceiling, it seems like WRB should meet and cross over roof waterproofing layer (Solitex)? And for interior, the air barriers inside service cavities for wall and ceiling meet and cross over each other?
* Is R6 insulation in wall service cavity needed? I saw it in architect drawing of similar wall…not sure how that insulation is even added.
* On original house, is it necessary to remove original plywood exterior cladding, or can foam, rain screen and board and batten go over it?
ATTIC INSULATION
* The two truss situation seems too complicated to insulate across the top of both trusses.
* The most affordable / practical seems to be 16” loose fill cellulose in attic for R60, along with air sealing entire ceiling and having service cavity below it for LED lights, electric, etc.
* I saw several mentions by Martin how the performance of insulation at the perimeter of attic is very important, where heat loss near the eaves leads to ice dams. Also see note to leave air space between top of the insulation sheathing boards to decrease moisture accumulation on boards. Does this mean it’s best to not use loose fill cellulose in this area, and instead use HFO closed cell spray foam? If so, how many inches is advised, before switch to blown cellulose? Until point where 16” of cellulose is not touching bottom of roof sheathing? Any drawing examples are welcome for this!
CRAWL SPACE INSULATION
* Am unsure how to make successful air control transition between wall and floor. WRB membrane goes down wall sheathing, then what should it do to connect with floor air barrier?
* Insulating just the floor seems easier and better than trying to insulate and condition whole crawl space, because of pier and beam setup over irregular dirt floor. To condition whole crawl space, would need to build perimeter wall and handle frost heave just to insulate and seal the sides.
* For floor insulation, thoughts on use of Insulweb needing to hold dense pack cellulose, then the rigid foam to stop thermal bridge, then taped sheathing? Or is the alternative shown better, to use HFO closed cell spray in floor joists? If spray foam, it seems like 5” would get to similar R value.
* There is no foam capillary break between the sill and i-beam on this house. The wood sill rests directly on the i-beam, which rests directly on the concrete pier. Is one needed, or does the i-beam count as capillary break? The rim joist is not currently insulated, but will be with this plan, so I have concern for potential capillary moisture movement and consequent rot.
* Vapor diffusion poly is needed on top of soil in this setup, correct?
* Is the rigid foam needed below floor joists in crawl space to prevent thermal bridging? If so, how thick?
CRAWL SPACE SKIRTING
* This part is mainly for aesthetics, wind, and critters control. I’d like to avoid look of obvious big skirt and have cladding continue almost to ground. Idea so far: Attach 2X4 framing to joists, that doesn’t touch ground. Connect either black metal coil stock or Duraskirt concrete panels buried in ground a bit. Does this work ok, or is there a better solution?
ROOFING
* The roofing is currently exposed fastener metal that seems to be leaking. I’m planning to replace with standing seam 24 gauge with no exposed fasteners. There will be two valleys unfortunately, at merge points between the two trusses.
PLUMBING AND DUCTING
* This design leaves very little room for plumbing and ducting in the conditioned building envelope.
* Seems like water and septic piping needs to go below insulated floor joists and will need to make insulated boxes for them?
HEATING / COOLING
* Because of low ceilings and no conditioned basement or attic, options for ducting and pipes are limited.
* Current plan: ductless minisplits for heating / cooling, two of them, because house is 1500 sq feet and one is supposed to handle 1100 on average. 1 in main bedroom, one in open main space. Floor mounted units because of low ceilings and mainly heat usage.
* House is remote in mountains, where electric power goes out pretty often in winter. Backup heat plan: Stuv 16 wood stove, to replace huge wood stove beast in house now (will move that one into large garage). Plan to feed air direct from outside into Stuv 16. Still working out air / ventilation issues.
VENTILATION
* I cannot see how to duct for ERV in this envelope. The ceiling service cavity is probably too small to hold those ducts? Suggestions? Perhaps go with non-ducted approach like Lunos in the walls? Is it worth it, considering that this is a gut renovation?
WATER HEATER AND PRESSURE TANK
* I am thinking heat pump water heater goes in mini foundation and need to condition it.
MINI FOUNDATION INSULATION
* Have not figured out yet if there is exterior foam insulation underneath the newer concrete mini foundation. May have to assume not, and insulate interior to condition for some mechanicals, wine storage, etc. Suggestions how to?
Thanks again for any input, it’s much appreciated for this PGH newbie 🙂
GBA Detail Library
A collection of one thousand construction details organized by climate and house part


Replies
soulincode,
I've taken a stab at a few of them:
- If your primary air-barrier is the sheathing, I'm not sure an interior service cavity is necessary for the secondary interior one. I would just use air-tight electrical boxes and seal to the membrane. If you include a service cavity I wouldn't bother insulating it.
- Roof venting?
- If you stick with mineral wool as your exterior insulation you don't need to worry about meeting the ratios, as the sheathing can dry to the outside. If you switch to foam, which is cheaper and easier to install, then you need to worry about the 30%.
- The primary transition of the air-barriers is between the wall sheathing and the ceiling membrane. Those are the two you want to connect.
- I'd leave the original plywood and treat it just as you would the new sheathing on the addition.
- You will need to make an insulated core to run services that may freeze. Consider the detail shown in this link: https://www.southmountain.com/wp-content/uploads/2019/02/19-Small-Home-Harmony-Article-PDF.pdf
- The plywood sub-floor is your primary air-barrier. That' what you want to connect to your wall air-barrier.
- The I beam is a capillary break.
- Your details for the skirt look fine.
-
I hope this isn't a dumb question, but for plumbing in exterior walls, would it be easier to just build a nonbearing service cavity, or would you recommend just sealing at the plumbing penetrations?
First choice would be to try and run the plumbing in an interior wall.
Correct. I'm thinking in the common case that someone wants a sink under a window.
Andy,
The only thing that may end up in the exterior wall is the drain and can be handled in a few ways.
- Run it down through the floor of the cabinet instead.
- Run it horizontally to an interior partition either in the back of the cabinets, or in the kick space.
- Put several layers of foam in the stud bay and run it in the exterior wall.
It you decide to include a service cavity, I suggest you only do it in the rooms where the services warrant it, rather than on all exterior walls which often don't have enough services to warrant the expense or space it takes up.
Thanks all of you for this input! The plumbing had me baffled so far, so I appreciate these ideas. Am I correct that the overall advice here is run cold and hot water plumbing in interior service cavity (in PEX or should I re-use current copper)?
I'm guessing in order to allow horizontal movement of the piping, the 2X4s of wall service cavity run horizontal? (I have them doing this in current spec)
I attached a PDF trying to map path from well to heat pump water heater (and pressure tank?), with two options. It seems like best choice may be to condition the mini basement under house addition, sending the water up into service cavity, then around to respective needed sinks and showers. OR, alternatively, it could be placed in the small mechanical room? Then it maps cold and hot water, also gray water.
And then gray water drainage..I'm not understanding some of the terminology. It sounds like advice is that it goes straight down into floor, is sealed around edges, then when it goes below insulated floor joists, will need insulated box until it goes underground deep enough. Or it goes out to exterior wall? Or interior wall and then down? Further explanation or reference drawings appreciated, if available.
Fyi currently, the well sends water over to the original mini basement (smaller) underneath kitchen, and there's just a compression tank in there, also furnace. Meanwhile, the water heater is traditional one and in Bathroom 1. Then the copper piping is all over the place, up in ceiling for water supply (bad) and along inside of walls (exposed) for the baseboard heating (mix of copper and pex because of the recent pipe explosion in winter)
Deleted
Hi Malcolm, trying to figure that out still. There are two gable vents in original truss, with some soffit vents. New truss has soffit vents but no baffles (owner bought cheap foam ones but never installed), and a ridge vent. Because of complexity with two trusses, one thought is following, from a roofer that came by to quote:
* Install solar powered vent with sensor(s) in attic that activates it, and otherwise seal the attic off beyond a few cool air intakes from lower area (ie no soffits, no gable vents, seal off ridge vent). May need two of these, one on top of each truss area. It seems some of these solar powered vents get decent reviews.
* His thought was unless a builder is quite good calculating and installing soffits, baffles and ridge vents, especially with mix of two trusses, it can be risky to handle moisture. Side benefit is this would help keep out critters.
* Also fyi, idea is to air seal ceiling and that includes removing and sealing over attic hatch and existing stairs to attic, using sole window in newer truss gable area as means to get into attic if needed.
The problem with powered exhaust vents is that without adequate air intakes they can depressurize the attic, which then draws air from the house below.
I don't understand your roofer's comments on ventilation. It's not hard to calculate the necessary vents needed. That's what roofers do all the time. How would it cause moisture problems? Leaving the attic sealed up almost certainly will. My advice is to use the same very forgiving system that is used on almost every house built: include vents at both the eaves and ridge, and avoid solutions that rely on exotic mechanical systems.
Thanks for these thoughts Malcolm. A challenge of venting this attic are the two trusses and respective roofs that intersect. I'm not sure how to properly vent in this case.
The original roof and truss has some soffit vents, then two vents on each side of gable (no ridge vent). It has mold from water condensation on underside of sheathing.
The second and newer one on top has a ridge vent, soffits, but no baffles installed to move air up to ridge vent. It has markings of some mold on sheathing too.
The previous owner was venting out of bathroom into attic as well, so there are multiple possible sources of moisture, whether up from dirt crawlspace, through non air sealed ceiling, and also the moisture from bathrooms.
The good news is there is a lot to improve with air sealing, stopping moisture from crawl space up, etc. And the mold will be treated and encapsulated. The bad news is how to be sure of no repeat. The trusses are tricky to figure proper venting.
Here's a photo showing outside of house and the two trusses intersecting. I can get a photo of interior in attic later today. Curious if you feel it's possible to vent properly...
soulincode,
Because it's a trussed roof, having soffit vents everywhere isn't as important as it would be if it were framed with rafters, and the hipped roof doesn't cause the same impediment to air movement either. I would put in a continuous ridge vent, soffit vents where you can, and large gable vents on the three walls to make up for the lack of continuous soffits.
Hi Malcolm and all. I was able to get up in attic and film a quick video, then upload it to Vimeo to show the two trusses situation, and tried to explain and show ventilation challenges.
https://vimeo.com/736313151/67d936ec5c
I'm curious for any suggestions on how to best get proper air flow and ventilation here. On original truss, if replacing sheathing like structural engineer suggested, there are only soffits on one side for air, and then two existing gable vents on each end. And for newer truss, it would be soffits up through baffles and into ridge vents, which seems more straightforward and likely successful.
There are some photos of the trusses inside and out attached as well. Thanks!
soulincode,
Thanks for the video. I think I understand what's going on. I don't see any impediments to doing what I suggested. If you think you need to sheath that existing truss (I'm not convinced some 2"x4" strapping wouldn't suffice), drill a series of 4" holes in it to allow air movement, or space the plywood and leave a 4" gap. Remove as much of that roofing as you can.
So you would end up with :
- The front elevation having some small soffit vents on each side of the entry and a gable vent.
- The rear having continuous soffit vents.
- Both side elevations having large gable vents
- All ridges having continuous vents.
A couple of things I noticed:
- Why are there baffles running up towards the ridge? If you are insulating the attic floor you only need them to run from the exterior walls up to the top of the loose fill insulation.
- That plumbing vent need sto terminate outside.
I love a bargain more than most but when I look at your photos, I see a poorly designed building built from the lowest cost materials that was never maintained now it is a moldy rotting mess.
I say rethink your goals “Floor: R30, Walls R-40, Roof R-60, Windows R-5 to R-8 windows (U-0.20 to U-0.13).” because they fail to make economic sense unless your plan is to fall in love with this shack and live in it for the next 40 years. Seems to me every part of this building was built so far below you hopes and dreams by the time you get half way to your goals the only bits of this building likely to remain is the ruff framing.
Before you spend a dime sharpen your pencil make a written budget to make this a place you want to live for the next 40 years. My guess is you could build a better new building at a lower cost. Yes, it will cost less to do something with this building than to build your passive dream house but a new build PGH would likely cost less.
My opinion passive houses never make economic sense.
Consider doing this house as a flip. Do only the minimal and necessary repairs slap a coat of paint on it and sell at a profit or keep it a rental.
Walta
Noted on your input, Walta. These factors are all part of the consideration, budgeting and planning.
Question for you: In the current market, what is the average cost in the Northeast of the US for a 1500 sq foot PGH slab on grade house? No foam above grade, Floor: R30, Walls R-40, Roof R-60, Windows R-5 to R-8 windows (U-0.20 to U-0.13). Particularly in New York, if you have idea on specifics. I'm curious to absorb and consider this info.
So the whole idea of PGH is that it doesn't add much beyond the cost of standard construction if you build it in from the beginning. Basically to frame the walls and ceiling a little thicker and fill them with fluffy insulation costs almost nothing in the scheme of a house. The most expensive thing on the list would probably be the windows.
Building costs are highly variable, by region, state and even zip code. Probably the best guide is to look at houses being built in your neighborhood and what they cost. In a lot of the US a 1500 square foot house is a lot smaller than what is commonly being built. A lot of the expensive parts of a house -- site prep, utilities, permitting, kitchen, HVAC -- are basically the same regardless of the size, so the profit-maximizing move for the builder is to build four bedrooms or more, those extra bedrooms don't really add much cost.
Thanks DC Contrarian. I've read as much as I can about PGH, also listened to podcasts, so I'm aware of the basic tenets.
However, and this is just in my humble opinion, it's not really helpful to give the kind of critique and input Walta gave without specifics, some numbers, etc, to guide someone that's newer to PGH or passive house calculus.
Here's what I can share. The numbers that came in for 75% passive house CD drawings with double stud slab on grade for about a 1700 sq footprint with cathedral ceiling and small mezzanine was $600K without window cost and some other key items, so probably $700-800K minimum when complete, with various costs not yet built in.
It might wind up $350-500 per square foot, which I know is not terrible in NY and sometimes expected for passive, but it still felt too high for a house in the Catskills, in this location and local comps particularly. I do plan to hold onto these plans and perhaps build passive at a different time, different place...that's TBD.
This house across the street is 9 acres, has a huge well built garage on a good slab, then the house in need of gut renovation. Total purchase cost: $140K. I don't think it would be possible now to rebuild that garage from scratch for less than $75K, more likely $100K these days, so this current house, when gutted equals something like pier and beams, all the framing, a functioning well with water testing fine, electric in place (and underground feed to garage), septic there but iffy, electric there but needing work, at value close to$40-65K.
The house values in the Catskills have shot up incredibly high the past few years, but are falling and will likely fall further based on past cycles. So I'm wary to go above $300-350K range, in this economy and this area and would prefer being below that in total.
If builders, owners, architects, etc on here on GBA can provide specifics with costs they are seeing in total in the Northeast to build a PGH from scratch, on slab let's say, ICFs, perfect 2X6 wall or double stud, whatever the specs, to get a generalized PGH with specs I have read to be around R30, Walls R-40, Roof R-60, Windows R-5 to R-8 windows (U-0.20 to U-0.13), I would MUCH APPRECIATE hearing from you.
This would help to evaluate whether the costs I'm putting together make renovation worth it, versus full demo and rebuild, or otherwise.
Was the cost estimate you got at all itemized? As in so much for framing, siding, drywall, roofing, etc? Because they you could just take it and look at your current house and say, "how much can I keep?"
I think what Walta was getting at is if you end up doing a gut rehab, replacing siding and roofing and mechanicals, basically all you save from the previous house is the foundation and the framing. The last house I built the foundation was 7% and the framing 12% of the total construction cost. The question then becomes is it worth it to save 20% but be stuck with the existing footprint and layout, or should you spend the extra 20% and get exactly what you want?
DC,
When we were first married my wife and I inherited an old couch from her grandmother, which we moved from apartment to apartment for a decade before we finally got around to restoring it.
When we removed the worn upholstery we found the stuffing was straw. Discarding that revealed the springs were rusted out, and the frame cracked. An hour in we realized all we had left were four carved feet. I think they are still in my shed somewhere.
I call my house a pretty good house I tried to guide my decision based mostly on economic.
I cringe when see passive house plans for R30 foam under the basement slab. I see it as a waste of good insulation and money because I doubt that insulation will ever slow enough heat flow to recover its cost or the energy required to make it.
I used a computer program called BEopt to help me make my choices based on my local weather, fuel cost, inflation prediction and cost of capital. The program draws a graph it turns out the code min and the passive house cost almost the same to own over the long run. The code min pays more for fuel each month but much lower construction cost. The opposite is true for the passive house. I recall my BEopt graphs were about 25% cost to own per month than the code min or passive.
The choices are too local for me to help you with the numbers your project but I encourage you to have a written budget.
“Climate zone 6. Shooting for PGH levels or thereabout. Floor: R30, Walls R-40, Roof R-60, Windows R-5 to R-8 windows (U-0.20 to U-0.13). “
This set of goals seems to be right out of the passive house book. But the only way they make economic sense is if you think fuel costs will double every few years and your cost of capital very low and you will live in the house for the next 55 years, all if which seem very unlikely.
https://www.nrel.gov/buildings/beopt.html
Walta
The set of goals is out of the Pretty Good House playbook:
https://www.prettygoodhouse.org/pgh-20
I'm thinking about health and comfort of the humans inside most of all, econ, and climate / earth effects. I've seen BEopt mentioned before, but am on a Mac, so it's not easy to use w/o a virtual machine.
Hi soulincode,
Catskills area builder here.
Pre-pandemic I used to quote folks $300/sq ft as a beginning ballpark cost for a high-performance house with "low" high-end finishes (some custom millwork, nicer tile, etc) and NOT including site costs. That # is now $400/sq ft as subcontractor pricing and materials costs have shot up so dramatically.
IMHO: Building a passive house in the Catskills with an eye on comps or ROI will never pencil out There was a labor shortage pre-pandemic and it's only gotten extremely worse as folks are priced out of living in the area by surging real estate costs and lack of available housing.
Doing the renovation as you describe will have similar issues. Very little of your performance upgrades will result in a higher sales price. Sadly what has higher impact in this market is curb appeal (cute, Brooklyn aesthetic focused upgrades to finishes).
There are a 1-2 builders offering high performance or passive spec houses in the area but they start above $1 mil.
I would also caution that your renovation may uncover many unanticipated conditions that can quickly undermine your budget.
The Catskills is a huge area (it can take 2 hours to drive across it) and I think some areas are poised to retain or grow in value more than others. Some places are a 30 minute drive to a supermarket, others have burgeoning culinary scenes. Without knowing where you are your finished house may have a drastically different resale value.
Lastly many older houses would've sold for $200K (or far less) pre pandemic. We are still in a very inflated resale market and a very expensive construction market that will not come down for a year or more at least. Much as I admire and applaud your efforts to build a high performance building it's hard to make any case for it delivering ROI on energy savings or on resale.
That said if you are willing to stomach the costs and do this is a labor of love go for it! But beware sunk costs and the marginal value of these upgrades. Good luck!
Hi mdb_az,
Thanks for the thoughtful input! I'm at the bottom of Delaware County, pretty much Sullivan, and have been here about 4 years, though back and forth to the city as well. Where are you?
Agreed about the labor shortage, also in general, reliable people and quality craft is tough to find. I'm glad to have local connections, though certainly the timing to build could have been better (ie earlier).
I think the house will wind up getting that curb appeal, and also will plan around possible rental / Airbnb option when I may leave town for periods of time.
The high performance part...I'm looking at comfort, health, and getting enough R value and air sealing in there that two minisplits can handle heating / cooling without crazy bills. I'm also keen to switch to all electric for health and climate reasons...same for ventilation. It may wind up being a labor of love more than profit, but I don't see ethical option to do otherwise.
This said, this reno definitely won't be passive...that's why I'm digging into PGH guidelines, asking here, and trying to find a happy medium. If reno doesn't cost more than $100-200K, it will fall into $160-225 per sq foot cost range, all in, for a decent house upgrade and very large garage + workshop.
I'm also eyeballing the loan cost per month, both for personal ability to handle, also if rented later, to make sure it can be covered, considering your predicted fall in prices, which I agree will happen. I feel like the house prices will fall but not so much the short term rental pricing to escape the city, etc.
We'll see though. I'm gathering pricing asap on as much work as possible and the input here on GBA is helpful!
We work in Ulster and Sullivan. I worry about resale or rental value in Delaware county. It's really at the edge of drivability for the NYC buyer who is the primary driver of housing prices. That said I think Akos' points below are spot on: focus on the low hanging fruit to make the house comfortable and durable. Pick the simplest solutions: the building season isn't long up there. I wouldn't stress about the ethical component provided you are not using materials with gross carbon footprints. That marginal dollar spent on insulation can potentially get more bang for your buck spent on climate advocacy.
Agreed that the NYC buyer is primary driver, especially for any upward or downward movements overall. I'm about 2.25 or 2.5 hours drive from Brooklyn, much less from Manhattan, and off the 17 through Roscoe. So it is on the edge, but also within a radius that can endure for weekend getaways or weekenders (I hope, haha). I nixed the passive house plan and cost because of this...too much risk.
Thanks re: reminder on low hanging fruit and simplest solutions...I'm trying with help of GBA community and contractors on the job. My goal is getting the air sealing and envelope done and roof replaced before winter. Then continue with interior.
PGH only makes sense for new construction. Getting an old house up to that amount of insulation is not worth it. You can however get the place up to good enough levels.
I took a quick look at your drawings and they would work, they are also far out from standard build. This means no trade will be able to price it based on previous jobs, so they will overprice.
I think you have to step back a bit and see what is important to get done to the house and what will make biggest improvement on energy efficiency and comfort. This generally means air seal as much as possible, get the place nice and tight.
Extra insulation is only really worth it in areas where it will impact comfort such as your floors over piers. There an insulated skirt of some kind will also make a big difference for comfort. Spray foam in the floor is only needed if you have other way of air sealing, save the SPF for the rim joists and maybe the crawlspace areas. If you can install a well detailed sheet good underneath the exposed floors, the SPF is not needed.
Your real 6" walls dense packed is good enough in your climate, exterior rigid only makes financial sense if you can DIY most of it, even then the cost of rigid mineral wool is hard to justify. If you are dense packing, you can look at something like a Mooney wall if you really want to add extra R value. A service cavity is not needed.
You only need one solid air barrier. This is best done at the sheathing. Make sure this is well detailed and continuous across any cross section and ties in to your floor and ceiling air barrier. The warm side air barrier should be your secondary one, do your best to get it tight but don't spend too much time on it. A reasonably well detailed 6 mil poly is good enough, no need for any fancy membranes.
As for your roof and attic.
If you are looking to use the walkup only as storage, the simplest is to pull up the existing plywood floor, air seal the ceiling bellow, cross strap the ceiling joists with 2x6/2x8/2x10 (whichever you need to hit your R value target) on edge and loose fill the whole thing with fluffy insulation and reinstall the plywood. Make sure to air seal the access door as this tends to be a huge air leak.
The original trussed section can simply be vented with a combination of gable vents and soffit vents on the one side that is open. As long as the ceiling bellow is air tight and the vent area meets code in your area, they will work without issues. Should be no problem to reinstall the roof sheathing there.
The new section can be vented with a combination of soffit and ridge vents. There should be no insulation in the rafters, all the insulation should be over the ceiling bellow the attic floor.
For the siding you can also look at something like reverse board and batten as it is self venting. A bit more work and less forgiving but might be worth it to save cost.
Hi Akos,
Thanks for your input, it's much appreciated, especially the specifics!
For the drawings and spec, I know a local passive house builder familiar with this kind of assembly and materials. He is busy but onboard to help handle the air sealing and wall assembly. So while the labor and materials will be more expensive than standard build, I think it will be priced fairly for high performance work. The loose cellulose attic insulation and HFO foam for floor can be handled by local insulator (just got a quote today). I'm meanwhile grateful for input here on GBA and already shared a bit with passive house builder, towards finding this happy medium of performance and price.
For your suggestions on floor and crawl space, I have not seen a good solution for insulated skirt that looks good, won't rot if wood, and handles being insulated and sealed close to house structure, also avoids frost heave issues. That's why it seemed to me insulating just the floor joists is better. Maybe you have references for how to handle?
I lean towards HFO spray foam now, because it seems like a lot of work ($) to crawl under there for the dense pack option, which also may not wind up being done properly, with gaps and settling due to the difficulty level. This said, 4" of closed cell arrives at the R value needed down there, and needs nothing further, but also doesn't handle the thermal bridge situation with bottom of joists. And putting rigid foam over floor joists while having big gap between it and 4" of foam seems to invite condensation inside, so that's no go.
I also don't know how air sealing of floor can occur if not using closed cell foam, unless a lot of crawling and taping happens on underside in and out of the joists...or is there a way to fully air seal subfloor surface from above? This part is still a mystery to me if not spray foam. Also, can you describe what you mean by installing a "well detailed sheet good underneath exposed floors"? I'm guessing you mean on underside of floor joists, or do you mean in relation to subfloor?
For wall assembly, Mooney wall is less cost than rigid insulation? It seems like more labor perhaps, but looks good for more R and thermal bridging.
For air barrier at the sheathing, I can’t figure how an air barrier at sheathing can cross over and tie into ceiling and floor barrier through existing framing. An interior air barrier on interior warm side of 2X6s is easier to see how it works. As for a service cavity, it looks like it’s a good place for electric boxes if doing second air barrier, also to run plumbing inside conditioned space?
Thanks re: attic and roof! I’d like to get R60 in there and it’s 16” of loose fill, so I think the cross strapping joists will be tough. I’d like to at least flag / tag everything like lights, etc under the loose fill, to make any servicing easier. For venting, the front elevation has soffits now, and there are gable vents on each of the side elevations. It sounds like Malcolm suggests cutting 4” holes in the sheathing to allow air to also move up into the new section.
Reverse board and batten sounds interesting. Do you mean it can be done instead of the furring for a rain screen? Like it’s a kind of rain screen made by the battens on inside? This would be inverse cladding than how it looks on the existing garage, might look cool, or weird…hmmm.
Thanks again, much appreciate the input while trying to sort, focus and figure things...
Around me basements are universal, so I have no experience with skirts. I have dealt with overhangs though, can tell you that no amount of insulation under a floor where it is exposed to the outdoors will be warm without some form of radiant heat. Won't be cold but nowhere near as warm as a floor over an conditioned crawlspace or basement.
Just spray foam under the floor will definitely not be enough, too much thermal bridging from the joists. If you are adding the rigid underneath to fix this than might as well insulate with cheaper materials.
If you are dense packing the floor, you doon't need to do it from the bottom. Install the foam and tape the seams to air seal . You can than fill the joists by drilling holes into the subfloor above. If your critters are anything like ours up here, you will also need to cover the foam with something underneath to protect it plus keep it from blowing out from dense packing.
Another option is to simply accept that the floors will be cold and install resistance matts to warm the floor. The idea here is to use the resistance matts to only provide a small fraction of your heat, warming the floor up enough to not be cold.
Even if you have somebody managing the details of the wall, the wall you sketched takes a lot of labor. I would have to run the math but I would not expect your wall to save more than about $100/year in heat VS a well sealed dense packed 2x6 wall.
The simplest way to tie the wall sheathing air barrier to the ceiling is to spray foam over the exterior wall top plates. This doesn't need much foam and can be done with one of the smaller two part spray foam kits. The kits are also a good way to seal up any interior partition wall top plates plus any ceiling device boxes.
The floor could be handled the same way with a bit of SPF in the rim joist area or by running some peel and stick from the wall underneath to the rigid/OSB under the floor joists. With pier and beam construction this won't be 100% but you can get it good enough.
Best of luck with your build.
Hi Malcolm and others,
Thank you so much for the input so far! It’s really helpful. I'm not sure how to reply, so this post appears at bottom of page...trying again now.
So I have been absorbing and trying to incorporate the feedback towards a version that can be further priced out and placed in my budget ASAP.
Would you mind looking at the attached PDFs and share any thoughts / feedback?
CHANGES
* Created two versions of Building Envelope design in same PDF attached, based on feedback so far: HIGHER INSULATION / COST and MIDDLE INSULATION / COST. I hope this helps get pricing for both to compare, and would appreciate any feedback on these two options or suggested mix of the two.
* Changed wall insulation to Rockwool bats rather than dense pack, because builder noted he has not worked enough with local dense packer to be sure they will do good job in walls. He can handle Rockwool himself.
* Detailed eaves and soffit vents matching structure of the house. Added baffles and wind washing for ventilation up to point above the 16” of loose cellulose in attic.
* Created attached PDF to visualize advice and input on how to ventilate the two trusses. Please excuse mess in 3D model showing two trusses. Not professional in that area :)
* Created attached PDF to visualize plumbing in wall service cavity, also showing location options for heat pump water heater and the well.
QUESTIONS / NOTES
* High performance builder who will handle wall assembly advises keeping two air seal barriers, also to help with vapor. So I kept them for both versions. Will price out asap and see what comes back.
* Both versions feature service cavity on inside to run plumbing inside, per input here on GBA. Current plumbing is copper and in ceiling, needs to move, especially as we’ll air seal across ceiling. Hopefully it helps make electrical a bit easier and not puncture air barrier. Sound and look ok? Thoughts on best location for heat pump water heater and compression tank?Should it be in conditioned mini foundation basement or mechanical room?
* Per input from Malcolm and others on attic ventilation (thank you!), how does the attached PDF look? Air flow ok? Does proposed strapping with 2X4s look ok to send to structural engineer for review? It seems strapping idea will work better than 4” holes, getting air that doesn’t get out through gable vents, through to ridge vent, and will allow access into that part of truss for servicing.
* I checked and there are 6 soffit vents on front elevation eaves. It’s clear baffles and wind wash dams are needed in these 6 places, also the foam air sealing at edges. But what about the parts of truss meeting eaves with no soffits? Do we continue in exactly the same way in every section? I think we’ll create these custom on site, as it seems the best way to handle, unless people here think it’s much easier to do with SmartBaffle or something similar for the 2” gap?
* Malcolm, per your question of why there are baffles up near ridge vent in that photo, no idea! The previous owner put them there for some reason and didn’t finish his plan. There are a bunch of other cheap foam baffles of same kind sitting unused in attic still. Also, re: the plumbing vent, sounds good, and see below, re: Lunos wall units.
* Removing continuous rigid insulation under floor joists and just spray foaming features less labor, likely less cost (still need to compare). But there is then thermal bridging through floor joists. Is there a way in this setup to stop the thermal bridging? I see Dana Dorsett has ideas for this but I don’t understand them, and it seems at odds with Martin’s input. To me, it seems continuous rigid foam and sheathing below 4” of spray foam in 2X10 will be a moisture trap. If it’s just the 4” closed cell and otherwise nothing further down there, how cold will the floors be in this setup during winter in Zone 6…really cold, where slippers are needed to walk everywhere, or just cool but bearable? Please note, if going with dense pack cellulose, rigid foam and sheathing version, I have affordable labor to help ($20 per hour). The high performance builder doesn’t have time to do this work, but I think he can train, review and make sure sealing is good. I know, this project is a mix of people!
* I’m also open to suggestions on how to insulate crawl space and make it ventless, but every version I have seen seems too expensive and labor intense for a pier and beam situation like this. Solutions insulating floor joists seem difficult but overall easier, and then just insulate the gray water lines that come down through floor joists.
* Removing exterior rigid insulation will cut cost and some here suggest it’s a good move to make. However, that insulation seems to help in two areas beyond more R value 1) Keeps sheathing below dew point, stopping condensation and rot (if going with cheaper Poly Iso or Recycled EPS) 2) Insulates rim joists, which seems the ideal way to do it. Considering the benefits, is it worthwhile to remove and only go with R23 Rockwool Bat in 2X6 wall? Please note we need to remove board and batten from 2/5 of the house (new addition), in order to add the WRB layer all around, then put existing and new board and batten all around. So it is an opportunity to add exterior rigid insulation while this occurs.
RELATED COST QUOTES
* 1 quote so far from insulator features following costs (does this sound decent for average market now for 1500sq ft?): R-30 4 inches of HFO Huntsman closed cell spray foam on Basement Ceiling in mini foundations, also crawl space ceiling/floor of house $11,200. R-60 18inches loose fill cellulose, settles to 16 inches. In attic, on ceiling drywall, above air sealed ceiling. $13,125
* I’m going to ask same insulatort to share whether he could handle the floor dense pack cellulose option, and price if so. If it’s blown down through sub floor and it’s possible to view and confirm how packed from below with just webbing, perhaps it could work. I do doubts if builder has not worked much with him (cellulose people are hard to find here). Fyi, his quote for dense packing walls for 2X6 1500 square foot space was R-20 5 inches at $10,500. Is that a decent price? I’ll be comparing this to the Rockwool bats estimate from high performance builder…
* For ventilation, builder handgun wall assembly suggested Lunos wall units to avoid need to duct for ERV. Received quote from 475 based on floorplan. Requires two pairs of Lunos e2 60 fans. Their minimum wall depth is 8”, so it works ok on both wall assembly versions. Need to decide on MERV 5 filter versus MERV 13 filter, in case anyone has input.? Cost for the two units is about $2800-3000. Two bathrooms can either have two Lunos eGO fans, or if my code requires 50 cfm, may need to do Panasonic or otherwise. Two Lunos eGO fans are $1600. I have seen links to the cheaper Lunos knockoffs on GBA, through Home Depot…not sure it’s worth getting those, in terms of reliability, servicing, etc? While this total cost may approach cost of an ERV, it seems worth it to avoid ducting with this envelope?
* Still need to get minisplit cost. I want enough R value with building envelope so two minisplits can handle heating / cooling, ie one in bedroom, one in open format space. Does it seem like both of these envelope design versions can achieve this? Any advice / links on how to figure? It doesn’t look like there is user friendly basic energy modeler for a Mac user like me. I want to be sure system can handle based on envelope, and not oversize, as this seems to cause issues. Oh, and does GBA community agree that two units should each get their own condensers (no multizone), outside on platform separate from house? That’s what I have absorbed so far. I’d like to avoid minisplit lines along side of house, so if they go down interior wall, through floor assembly, do those lines need to be insulated if crawl space not conditioned? Anybody know a reliable, good contractor who can assess, quote and install these in New York Catskills?
Thanks again GBA community! I'm grateful for the feedback and conversations towards getting this more together!
How did everything turn out with your Stuv fireplace? I'm looking at installing one soon in a tight house and curious how it's been performing.