Venting Between Insulation Layers Inside Log Cabin
HarryC
| Posted in General Questions on
Hi all,
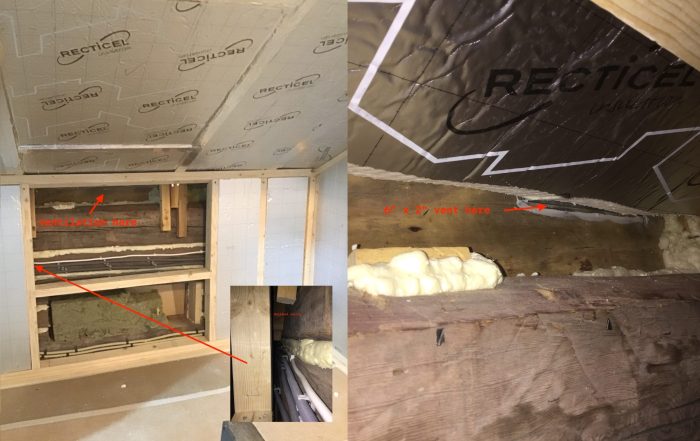
I am insulating our 150 year old log cabin internally, 4” PIR boards between studs (e.g. Kingspan) and planning for 2” over the face.
The log walls are very uneven, so there is a cavity between the inside face of the log wall, and the external face of the insulation. Depth varies (from 1/4” – 2″). I’m pretty concerned about interstitial condensation in that area, and I think the best course is to ventilate that cavity.
I have a 2″ ventilation gap above the rafter insulation (cathedral ceiling), so have the option of leaving that open to ventilate the cavity that runs along the eaves.
I’m not sure what to do about the gable wall – should I ventilate the cavity, and if so how much ventilation is required? There’s already a large square opening from a historic barn hoist which I could open partially as a vent.
1. Should I ventilate the cavity?
2. Will the eaves vents provide enough ventilation for the dwarf walls?
3. How can I ventilate the gable wall cavity?
Bit stuck on this so would really appreciate any help!!
(Climate zone = central Sweden, “Subartic, severe winter, no dry season, cool summer”)
(Please ignore spray foam chinking it was a mistake but I’m leaving it, the logs are cut & laid in a scandi style so it’s not the same type of gap as American style)
GBA Detail Library
A collection of one thousand construction details organized by climate and house part
Search and download construction details


Replies
I’m giving you a bump. I did some digging on your behalf (log homes are endlessly fascinating to readers for the many challenges they present in the name of preserving the aesthetic) but I didn’t see anyone discussing venting from the interior. Still, maybe poke around this discussion while waiting for people to weigh in: Fixing a Leaky Log Home.
Thanks Kiley! It can be difficult to find consistent advice on log construction especially given its a fairly niche construction style. I appreciate the bump :) I'll check out that article.
I'm not positive where your thermal control layer is. You should not allow convective air movement of any kind in the middle of your thermal control layer. It will "bypass" the resistance of the insulation and render it ineffective. Thermal layers need to be continuous.
Hi Matthew,
My thermal control layer (i've never heard that term, but I can guess what it means) is just the interior stud wall (4" PIR between the studs and 2" over the face) you see in the photos. I just haven't finished the insulation between, and haven't started it over.
That itself will provide a high enough R to disregard the impact of the log walls. We are in quite a shaded spot anyway so the benefits you might get from a log wall with a high thermal mass + solar gains are pretty minimal.
My logic re: venting the residual cavity is, in my mind I was treating the build up like a conventional timber frame wall. I'm a brit so you might have to bear with me in terms of conventions. You wouldn't aim to have an unventilated cavity on the external side of the insulation, say in between the battens that the cladding sits on. The heat loss resistance comes solely from the insulation between and over the studwork.
Initially I had hoped to take into account the log walls as part of the thermal control layer but I became concerned about interstitial condensation because the logs are quite thick (150mm) and i'm worred about that cavity becoming an unventilated semi-conditioned space where the temperature is higher than outside and lower than inside. Maybe I'm misunderstanding condensation risk though?
Id suggest even filling the gap with batts or loose insulation to max out the r value, but if not, even air has some R-value if you seal well and avoid convective loops. The logs will add to the whole wall assembly R-value too when there is no airflow between layers. I would consider an interior smart airbarrier over it all at the end to ensure you are airtight as can be.
https://inspectapedia.com/Energy/Convective_Loop_Leaks.php
https://www.ahfc.us/application/files/3613/5724/0564/log_construction_6retrofi.pdf (page 77)
It is best to make sure the outside can dry outward, and work on airsealing inside super well so humid indoor air cannot make it inside the wall where you now may have a condensing surface with the increased delta. Air leakage through the logs will likely help them dry outward no matter how well you chink. The biggest concern with any log home is bulk water (/eyes overhangs), and a vented rainscreen if there is siding. If the exposed logs are drying more days of the year than wetting, they will last another 150 years.
Id play with https://www.ubakus.de/en/u-wert-rechner/index.php? and see how the interior vent option would impact things on paper. Always good to question!
Thanks Gnoll. Complete understand re: the r-value benefit of either stuffing the cavity with batts or just a sealed air but my concern is, I've never fit a Vapour Control Layer before so it will be my first time. I thought I might sacrifice the r-value benefit of the logs / cavity in order to reduce the risk of interstitial condensation in that cavity? Given I have an r-value of 6.5 with the PIR alone.
Another consideration, this is the 1st stage of the renovation. Downstairs is badly insulated with mineral wool battens, I think there is a VCL but its no doubt poorly installed. Ditto to the next door room upstairs. At the moment the entire house is either single glazed or very old style single glazing so extremely leaky. Not sure what bearing that will have on the upstairs bedroom once it is done (we are living here so its one part of the house at a time!)
Bulk water I'll have to investigate! The eaves overhangs are about 2'. There is no siding on the external logs and they will remain that way.
Vertical voids are akin to a chimney, stack effect will suck air and even fire into the assembly.
The interstitial condensation will likely never fail the logs in multiple lifetimes, just lead to surface mold and perhaps mushrooms. Logs are the endgame timber build imo, not like 7/16 osb where you need to tiptoe a moisture failure before the roof is on.
I would never invite outdoor air into my dry wall, as morning dew is nasty without the sun to follow. Vented roofs are an exception since airsealing against the upward stack effect is difficult, some roof mold is the lessor of evils vs trapped water and ice dams.
The North side of any log home is most at risk for a lack of drying with limited sun. I would assume internal log walls bathed in the outdoor air would face similar darkening via mold spores without daylight for a few wet months every year.
Simple is best. If you keep the logs open on the outside, you have more “ventilation” drying than 99% of homes. Water will always go from wet to dry if it makes it past your sealing inside. Having the logs exposed to the daylight/air on the outside is all you need.
The design you propose is unusual for wood, but common in brick/mason walls since they do not mind water. The airflow and wind pressure - drive rain into the bricks since there is void behind them. Less airflow in (more resistance), means less wind pressure water drive.
Do you plan on opening weeping holes outside in the bottom logs or foundation - to induce allow airflow up to the roof? How do you plan on dealing with the highway access for pest? Boring beetles and mice in those lands?
Logs are great at redistributing water if they are not punky from rot; having high permeance and limited local retention. Are you using a log stain on the logs, keeping the topcoat up to date proactively? Any signs of dry rot or bugs? Chinking intact and upward facing checks sealed on the exterior?
Airsealing from the top down - is the way. Cap the chimney of air loss, walls mainly leak on windy days. Focus on sealing the roofs air-barrier to the top log. You will often need something that will accept some thermal movement.
Stuff like https://www.permachink.com/products/log-sealants/energy-seal is great to seal up gaps here in Canada, where it is cold and wet. The stuff is acrylic with sand, water based, so it is easy to tool and stretches over 300% in my experience.
The main reason I would fill it all in - is to make it simple to detail, limit the potential matrix of rogue airflow, fire risk and in the future if someone wants to put exterior insulation on (which could remove all risk of log condensation) in addition.
Thermal mass is great to hold the indoor temperature longer during power failures and if you under-size a heat pump that falls behind during cold snaps, do not under estimate the value of a log home thermal mass, especially with the wood stove. Its like a heat battery.
I would focus efforts on humidity sources - with exhaust fans and dehumidification (kitchen, shower, basement) and airsealing like nuts. Make sure nothing is splashing water onto the logs like a deck, plugged gutters, or roof to wall marriages without kick-outs.
You're a legend, thank you so much! I'll go over this later but I think I'll follow your advice and seal the cavity + focus heavily on air tightness on the details. Like I say its my first time but I'm pretty pedantic with an attention to detail, and I have a background in energy efficiency (theoretical only) as I do SAP assessments for UK new builds and conversions.
I like the sound of endgame timber! I had thought it was the case. when I opened the walls initially I was surprised at just how good a condition they were in for the most part. Only water damage I have found so far is round a leaking chimney.
In terms of rodent control I have used rolls and rolls of tight galvanised steel mesh around all corners, any holes, around the perimeter where the wall met the ceiling boards (ceiling downstairs is 1" hand planed pine boards!) etc etc. Then loads of spray foam between the steel mesh. caulk in the smaller gaps for insect control. Boring beetles don't seem to be a problem in these parts (central Sweden). We had a serious carpet beetle problem living in the old mineral wool which was part of the reason I didn't use it again (plus mice loooove it). But that's not an issue for the actual logs.
Weep holes, no, but the foundation of the house is the truly old school style where the logs are balanced on large boulders! so lots of air gaps (nice for mice too). I'd like to attempt to mice proof that but atm I'm just trying to keep them out of the part I have renovated and accept them in the rest of the house.
Almost all houses in Sweden are painted in faluröd a traditional red paint, oil based. Not sure if that acts as a seal. Old log houses here are rarely chinked , I would guess because the scandi log method means they sit quite snug on each other compared to the North American style. But I could chink it one year over summer.
Would you advise stand alone ventilation in the bedroom? or I could monitor the humidity and then fit one retrospectively . . .
During cold weather, Id suggest playing with a small standalone dehumidifier somewhere central between the largest water sources (showers and cooking) and the construction front. Monitoring data from there is smart. Often a small unit is all you need since water molecules disperses so evenly between air. If it isn’t keeping up, it is cause too much outdoor air is coming in, or past mentioned indoor sources are not being dealt with locally.
You may be able to seal off/isolate the construction zone with a portable dehumidifer and a temp plastic door if the rest of the houses latent load is too great and you are still over 60%RH.
Focus on the ventilation as a “system”, often a single hvac solution like ducted heatpump or erv/hrv to bath/bedrooms is more cost effective than many standalone X units, which often result in pressure imbalances, which you likely do not want with a wood stove. Once you are sleeping in the suspect bedroom, maybe consider CO2 monitor to ensure temporary solutions are safe until you can complete the retrofit / system design. Even small air movers and open doors can do the trick in a half leaky home.
Looking online confirms Swedish 'timmerhus' style of build is not generally chinked due to the type of log construction. But the place definitely needs a fresh coat and maybe some sealing around some of the joints.
Gnoll - can't reply to your last post but that makes sense. I'll monitor humidity in the colder months, as I say its very low downstairs by the log burner partly because that room is so leaky so I suppose that plays in my favour somewhat! Am I right in thinking inside humidity is less of a concern in the warmer months or am I misunderstanding that?
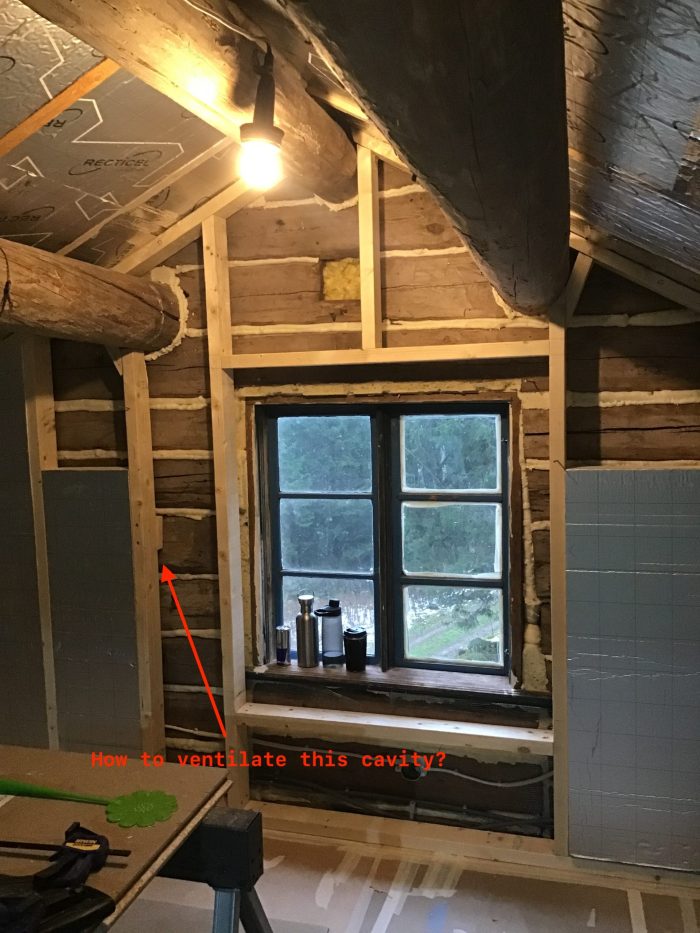
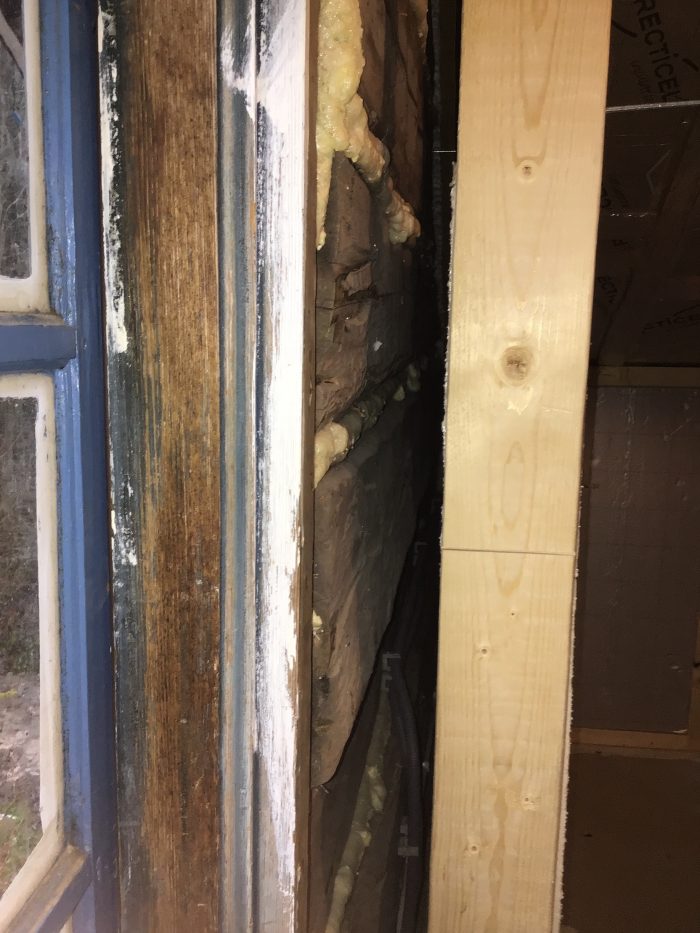
I have attached a photo of the current detail where the roof insulation meets the soffit vents meets the wall cavity. What's the best way to seal this off? I have 50mm PIR boards, expanding foam, mineral wool battens etc. I just rammed some offcuts of mineral wool in there as a temporary thing. As you say, something that can withstand some degree of movement.
Again, really really appreciate your help so far!
Np friend, happy to partake in mulling about preserving great beauty while making it livable and lovable for years to come.
What I like best for the nastiest roof/log connections:
1) use some canned spray foam in the crack to stiffen up the connection,
2) if the connect is tight, I use high performance caulk/chink, or tape graded for wood, or some poly strips smothered+stapled with a lot of acoustic sealant over the whole connection.
3) Then I would cover it all with a 2”+ layer of 2-part spray foam, up and down 4”+ to either material.
4) Finally I would detail a smart membrain/airbarrier over the new framing or do a “Airtight Drywall Approach” as final belt & suspenders.
Top logs crying is a thing /w vented roofs, and spray foam can uncouple over time (40+ years of movement). But most would call it overkill. You have the advantage of the connection being something you can bury behind the new framing, so it doesn’t need to be pretty. looking closer at your photo, I would likely just 2-part spray foam the area and, spend the effort sealing inboard. The more the roof "sucks" from inside the wall, the more likely it will pull moist air in the lower logs where it can.
Yes, couple easy ways to control condensation on any cold surfaces. Throw heat at it (temp delta), or reduce the water in the air to a point it will not condense /reach dew point on said cold object. The humidity has to be really high to condense in warmer seasons, but unfortunately for us in winter, warm air has a much higher capacity to hold water. I like to think of a cold drink on a hot day.
GL