Turned-Down Ridge Detail
slugboy6000
| Posted in General Questions on
I was hoping to get an opinion on the attached drawing.
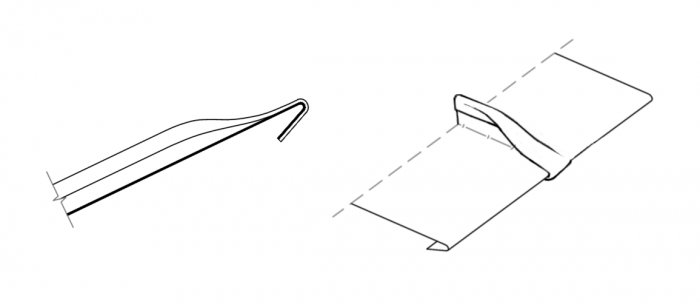
It’s a traditional, double locked, standing seam eave detail (pulled from elZinc) that I’ve redrawn for use as a mono-pitch ridge.
Seams are often laid down to accommodate an upwards plane change or for rolling into a ridge/hip seam. That said, I’ve never seen this particular detail employed or recommended.
I have a good understanding of my ridge options, but I’d like to keep it as simple as possible. It’s hard to get pro advice on this topic.
-Thanks for your help-
GBA Detail Library
A collection of one thousand construction details organized by climate and house part
Search and download construction details


Replies
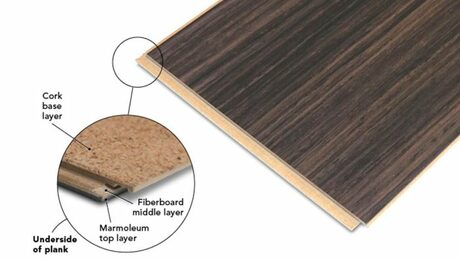
Funny you mention this. I was just talking with a roofer this past weekend about this very same thing and he said there's a metal endcap which made to sit on top of the steam and then drop down. Basically like this
https://www.familyhandyman.com/wp-content/uploads/2021/07/1200_FH21SEP_613_50_07_120-700x700.jpg
John,
It's a bit more work, but you get a cleaner result if you use the same profile as you would at the gable ends, which gets cut around the ribs, and has a hemmed edge that sits down on the panels. You can see it in the corner of this photo from when I did my shed:
Richard,
At the top:
You need a cap trim at the top of a mono-pitched roof. You shouldn't rely on turning down the edge, and I don't see it offers any advantage. I prefer the detail I posted to John above. The alternative is to use a Z flashing above the panels. and attach the ridge trim to it.
At the bottom, either:
- Leave the bottom edge of the panels alone and simply install them over the drip-edge.
- Cut back the ribs 1" and fold over the panel in-between so it can be crimped tight to the drip-edge. Shown at 12:30 in this video: https://www.youtube.com/watch?v=KlOMs8y7Nrw
I've never seen the detail you posted done, and can't imagine how you could get a consistent fold to match all the rest that wouldn't look like hell.
I was hoping to fabricate a ridge detail that would be more in line with what would be seen on a historic standing seam copper roof, maybe without the finesse but with all of the practicality. .. no sealant, no exposed fasteners. It can look like hell if it's water tight.
Maybe this is the wrong place to ask, but I did find some posts here from a guy who worked with copper.
Below is a detail (again from elZinc) which shows a similar detail but with an upstand rather than a downward fold. Also a video from Stortz showing a seam laid down and rolled into a ridge.
https://youtu.be/wlvO3oNCYt8
Thanks for the replies
Richard,
It may be well worth pursuing for purely aesthetic reasons - and that's an important consideration that often gets neglected here on GBA - but practically it may be be a bit suspect when you have the seams laying flat at either the eaves or ridge. Overlaps work best when they are either oriented down the slope, or are elevated (hence the ribs).
On painted or galvalum standing seam roofs the ribs are never laid down. All the detailing is based on that. Copper detailing tends to be a bit different because the material easily conforms to matching pieces when crimped, maintains the shape you have bent them to, and you can always resort to solder joints if in doubt. If you are going to pursue this I'd get a couple of scraps of the roof panels you are considering using and mock up the profiles you need to create. Find out whether it's a fun project, or too complex to be worthwhile.
FWIW, they are laying seams down using a painted steel material in that video I linked to and I know reputable installers are using European style details with galvanized steel as well. I'm in no position to judge. You're advice is always valuable, thanks Malcolm.
Richard,
Frankly I wouldn't feel comfortable with the level of craftsmanship those guys were able to produce with the pre-finished panels. They seemed to be fighting it the whole way, and the result looked... perhaps as you would expect working with a material that wasn't amenable to the techniques you were attempting.
My reservations come entirely from what I see as practical concerns - and admittedly long experience with the modern detailing I'm used to. I hope I haven't discouraged you from trying what may yield results more in keeping with how you would like the roof to look.
If you are looking for a clean ridge and don't want to use a ridge cap, you can do a hem but it needs different panels.
What you want is a seamed roof that has batten caps (ie Vicwest Tradition 100). With these types of panels you can hem the top and miter the batten cap to close off the seam. I've seen this type of detail for wall panels at the top and bottom, it does look very clean. Thinking about how I would do it, it is an unforgiving install, you really must have everything square, straight and level.
Trying to do what you sketch with painted metal will damage the finish too much, I can't see the finish lasting, those areas will rust much sooner. Plus it looks like a PIA with anything except maybe 29 gauge steel.
That's a detail I would like to see.
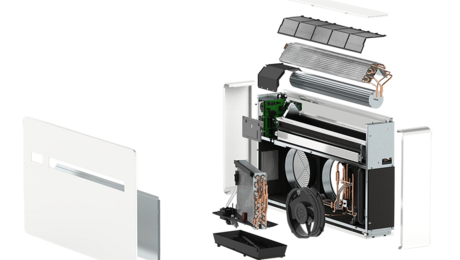
If I understand you correctly, it would be similar to the image below (minus the batten cap) - but there remains a small opportunity for water to enter at the apex of the turned down hem?
I don't remember where I saw it, just made a mental note that it looked nice and never to try it.
You would miter the snap cap and use it to cover the vertical leg of the seam plus the gap between the panels. Similar to the slope transition on P 28:
https://vicwest.com/wp-content/uploads/2016/06/Marquis_System_-_Design_Manual.pdf
I should mention that I did find a viable, perhaps questionable no-cap, mono-ridge detail from Rheinzink. They specify that it should not be used on slopes less than 4/12.
That looks workable. I would add some caulk or mastic tape to seal it up.
That's a nice detail, thanks Akos