Peel-and-Stick WRB with Rigid Foam
chrisincr
| Posted in Green Building Techniques on
Hello All – Zone 5 here (but building to meet Zone 6 or 7).
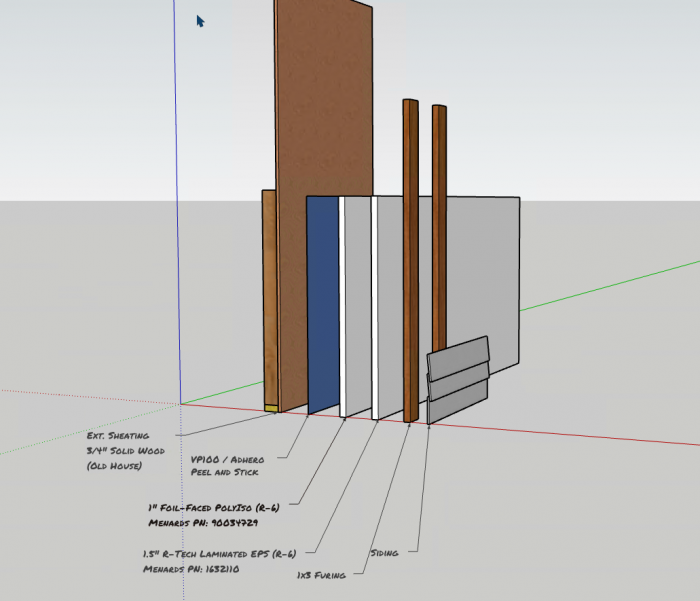
I want to use either Henry VP100 or Pro Clima Adhero as an exterior WRB. On top of that, I ‘d like to put 1″ Foil-Faced PolyIso and 1.5 of Laminated EPS. See attach for exploded wall assembly.
I’m just curious about the laminated eps and foil faced foam. Since the idea is for the wall to dry to the interior, is there any concern with the foil being faced or the EPS being laminated?
The thought is the laminated EPS will keep the Polyiso from being derated in cold weather here in Iowa.
Thanks!
Chris
GBA Detail Library
A collection of one thousand construction details organized by climate and house part
Search and download construction details


Replies
Chris,
Sorry I don't have any useful answer to your main question, but if you do go with faced rigid insulation, I wonder if it makes sense to use a permeable WRB like the ones you are considering, if the layers outside that will not allow any drying anyway?
Ah! I see what you're saying. I hadn't thought of it that way.
Just so I understand: Re: Permeable vs Non-Permeable WRB
At this point it's more the stable air seal/windbreak I'm going after out of it rather than the permeability (the rigid insulation would take care of that, as in block it).
So really, I could use whatever's cheapest of the two and not worry about it?
Thanks!
Chris,
You have all sorts of options depending on what you want your primary air-barrier to be.
- If you tape and seal the sheathing you can use any sheet WRB like regular Tyvek, as it's role is really just to stop any bulk water intrusion that might get through the faced foam.
- With the sheathing taped as an air-barrier you can also just use use the faced foam as your WRB by taping it against water intrusion. Then you don't need any sheet WRB, self-adhered or not.
- If you want to use the WRB as an air-barrier you'll want a self-adhered one, but with faced foam boards, I don't see any point in it being permeable, as it is only there to stop air and water, not vapour.
- If you use un-faced foam you will get some drying to the outside and should then use a permeable WRB. That WRB can be placed under or over the foam. If under, your flashing at openings should go back to the sheathing. If over, the flashing just needs to tuck under the WRB.
My preference would be to tape the sheathing, use un-taped, un-faced foam, and a good sheet WRB like Tyvek Commercial under your rain-screen strapping.
Plus +1 on Malcolm's suggestion.
I have built this type of wall, simple to build and detail, works great. If you have simpler envelope, you can build the whole thing on the ground before standing it up. This includes taping the seams, installing the rigid, WRB and strapping while flat. Tyvek commercial comes with a convenient 8x8 grid printed on which makes finding studs much easier for attaching the strapping. I have done 45' in a single section like this without issues but does require some extra lifting assistance. Tyvek is extremely slippery to walk on especially with some snow, so take extra care.
This is easier than working on a scaffold and much quicker plus you end up with a weather tight wall at the end.
To connect up sections (sides/bottom/top), use a flashing tape with a split seam release (ie 3m8067), remove half the backing and tape it to the wall and leave the other half with the backing on over the side. The next wall section, start the insulation 2" away from the edge of the wall but leave some extra WRB. Once all the walls are up, remove the backing, tape the edge and install a 2" strip of rigid to cover the corner. Tape the WRB and install corner strapping (usually wide section of ripped plywood). Same idea works for foundation connection.
The amount the polyiso would be derated would still be higher (or about equal) to the EPS r value per inch. I would just go with all one or the other.
Are you doing innie or outtie windows and doors?
Thanks for the input Kyle re: the insulation, I'll definitely research that a bit more before doing anything.
I'll be leaving the windows as innies.
-Chris
Chris,
I won't challenge Malcolm's expertise beyond expressing a bit of hesitancy about putting the WRB over the foam. I am not convinced about flashing just to the WRB. Maybe his crews are that good. Your mileage may vary. Levels of driven rain and overhang depth can make or break your WRB choices. Plus the Building Science maven found out about gaps between foam sheets. Especially if the foam shrinks.
If it helps to decide, I used VP100 on my entire house which has 6+ inches of exo-insulation with midi windows. I am in CZ 6A. The insulation and finish detailing creates a double drain gap that helped me decide on this path. I do rely on the drying to the interior wall model and as best as I can tell from a few exterior wall outlet changes, the combo of VP100 under the exo-insulation is working fine. If any interior moisture is making through the Blueskin it is all good. Certainly not seeing anything coming in at me.
My faux-dobe styling and wall cap details means the primary drain gap at the sheathing foam interface is only open at the bottom cap weep holes. The base cap is a starter strip and protects the foam from critters. I believe the air exchange in this gap is extremely minimal and pretty much limited to diffusion capacity if indeed any bulk water makes it that deep into the wall. The gap placement is a bit odd, but as the entire house is fully wrapped in Blueskin I don't worry.
My primary goal in using the Blueskin was the same as yours, best air sealing with the added ability to seal screws and nails driven through the material. The backing sheet and adhesive are not really goopy, but it also does not tear the way ordinary Tyvek does in my experience. There are also not several thousand staples holding it (the common method) or the lumpy cap nails, which in my opinion will not seal well against water going down the sheet.
VP100 also went on very well in adverse conditions, as you can see. The window bucks got wrapped into the openings a little bit. The window flange taping sealed the entire perimeter contrary to some sill taping details. Thanks to my favorite sin of sloth, I can report that no water has made it in for seven years now. I may even nail down the sill trim boards this year.
The air tightness of the house is, I believe, quite high though not blower door tested. My heating is running about 1.2 BTU per sq.ft. per degree day. The window area is ~15% of wall area. We experience frequent strong winds at our elevation. Overall I am glad that I buried a few more dollars in the walls.
Attached our two pics with Blueskin in progress and the foam and finish on.
Onslow,
I think Kyle asks an important question as to where the windows will be - which may inform where best to locate the WRB.
The advantage of locating it outside the foam is that the WRB can protect it against bulk water intrusion, rather than just protecting the sheathing - and having it directly under the rain-screen battens most closely mimics, and can use the same detailing as, a typical wall without foam. So the usual flashing details can all be used, as opposed to having to run deeper flashing, end dams, etc. back to the sheathing.
Thanks so much for all the information. I really appreciate you taking the time. This is very helpful!