Quarter Round on Rammed Earth
RZR
| Posted in Green Building Techniques on
I’m trying to attach 3/4 x 3/4 to rammed earth pony walls I put in this rehab I am doing but the 3″ finish nails are not holding. Any ideas?
I could try dipping in contact cement but I want to keep it all natural. What would they use for concrete?
Reason is although I used a surface sealer I found out the vacuum will tear the wall up.
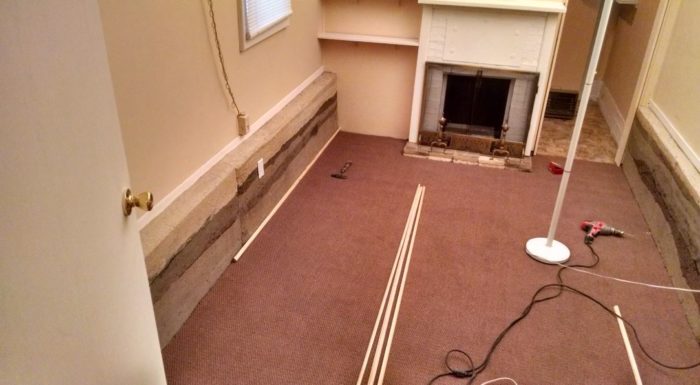
PIC below is before, I’m pretty happy with it for my first project indoors. Realtor is going to give me feed back before I build homes.
GBA Detail Library
A collection of one thousand construction details organized by climate and house part
Search and download construction details


Replies
Caulk used as adhesive, Phenoseal, silicone, etc. Big Stretch is urethane...
Use clear
AJ yeah I thought about that but the surface is not as dense as concrete....there is a thin acrylic seal coat on it to glue to that will peel back. I need fasteners.
Here is another pic....
I have some urethane from the floors.....
If glues do not work I am going to tear the wall off getting it off. I'm trying to get this one on the market tomorrow.
What to do with a mismatch where the forms met?
Terry,
It is unclear to me what this material is like to work with. Can you drill into it, to set some kind of anchor?
Is the 3rd photo in your initial post the proposed finish (faux wood panelling?) If the material is too brittle, or porous to accept an anchor, or adhesive, then maybe you need to coat it with something that will then allow an adhesive to work, some kind of scratch coat.
Sorry, I am not familiar with this method of foundation, need more information.
cheers
Terry, This is an interesting can't see the wood for the trees post. You have been pretty strident in voicing your opinion that those without engineering experience should stay out of technical decision making. Seeing this house I'd fire back: leave architecture to architects. That room is a mess and a bit of quarter round isn't going to help.
Terry,
Q. "What to do with a mismatch where the forms met?"
A. Quarter-round is not baseboard. This situation calls for 5/4 by 4" stock, scribed to the wall on the back face.
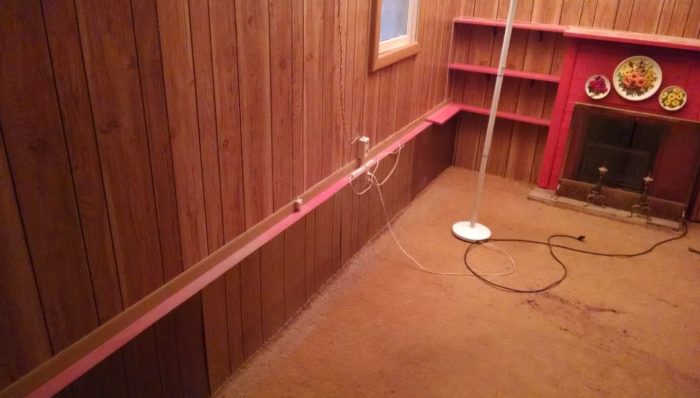
Jason, the third photo is the way it looked before I rehabbed it. Just to show the difference. The first two photo's are the "new room". I have three Realtor's in that like the rammed earth, the room is looking nice, especially for the price point of the home an area competition.
Jason, it's been a learning experience for me too...Most of the Experience is over in Europe including better sealers.....I tried to design to my local resources. Yes, I can drill into it, I'll try an expansive anchor like a dry wall one, but I need a finish nail.
Malcolm, I'll let you know when I need a lecture on Architecture ;)....Most do not rehab homes themselves or get their hands dirty like me. I am the architect and builder, does not mean I am done testing at the last minute, time crunch, or as good as the pro-builders. If you have followed my post as you claim, you'd know I am an advocate of design-build, meaning engineers reach out to builders that know more about building methods, especially uncommon ones. This is exactly what more engineers should do, design it, test it, develop it, build it at a small scale yourself before you build a home and define drawing's.
That is true Martin, with baseboard I could probably get a good bond. IMO, this wall being a pony wall only 2 foot tall I thought maybe the bb would be too over whelming. I want to display much of the RE in this case as possible. If it were a 8-10 foot wall, 4, even, 6 bb would look fine.
Guess I'll go to big box store tonight look for anchors, last resort, fasten and glue 4" base board, paint it white....may look pretty good, a matter of opinion?
Martin almost has it. At the form Change we would add a vertical break of your choice. A small square would do it quick. A full 1x3 or more would do it and could be fitted to cover the form transition. I like the form line so the small block to but ends of trim to works. With a grinder, remove the glaze quick and the adhesive will work. Glue a finish screw in the ends only for abuse protection if bumped hard.
AJ goggle rammed earth it most always has a line or mismatch horizontally where the forms move up. One way out I have not got into the details is "gain forms" vertical ones wall height......I got no idea how that is done yet. I get into form design next when this is all done.
I slapped some fast forms together with out favorite material OSB. It bowed, even with 2xs. Most use marine board. I didn't do the most pro job, tools, now I got to deal with the mismatches....I'll probably just do a taper cut at the end, leave a gap....I could shave it down but I'm out of sealer and $.
What i need is some 16' footers and our trailer I guess....I like the mismatch too it looks more natural. The only way to bond is to the acrylic, not the bare RE, it is too friable.
RE is a different animal.
Terry,
Your form bowed because you built it wrong! Orient the lumber to resist the bowing next time, like a concrete form is built. If only we had an engineer who knew about stuff like this...
The only other idea that comes to mind for future pours is embedding something to attach the trim to when you cast it. A strip of plastic, something that will take a nail or adhesive, but not react with the material itself (pressure treated wood?).
For homemade anchors, put some common nails, or any type, with an oversized head (not finishing nails) into the back of the trim. Then drill matching holes in your wall, slightly bigger than the nail head. Fill with adhesive of your choice. For good measure, weight the trim in place until it sets.
Admittedly, it is pretty mickey mouse, but I'm thinking it will look ok given you have a 2 foot strip of rammed earth as wainscotting.
Also I just noticed that you have carpet in that basement. Is it insulated, with a vapour barrier?!
The authorities have been dispatched.
Jason, the 3/4 OSB was more bowed along the length than vertically. Yes I could of added some verticals too but darn things were getting heavy for this ol man. OSB was not a good choice, I know now, we had some left over from a job.
I'll try some contact cement....I'll glue the 3/4 with some screws in back (good idea). What do I got to loose, the wall is easy to patch as slappin a mud pie on a wall. Matching the color of the striation is a challenge, but who cares it gives it character ;)
Off to ACE hardware :)
Forgot to mention, yes I put a vapor barrier down below the pad and carpet, I just finished the final cuts on the carpet this AM......I purchased the place with this garage conversion. I put a door in and closet over by the garage....no basement. The rammed earth is over a footing that had nothing but ugly panel over it.
Here is the first RE wall I did before going inside using the same forms. I stuccoed it so it can be painted. I think I could paint the sealer, but stucco should hold up better. I need a better sealer for RE, I found one over in Australia they would not respond to my emails. Internet search, not alot, Europe.
Here is what I am going to try...bond these anchors in over night, then bond the 1/4 round to the acrylic sealer, and fasten......Yes, I tested the wall even with light taps of a hammer and thought it did well until I hit it with a vacuum at bottom. If I had it to do over again I would have bonded-casted in a nailer at the bottom for baseboarding.
Terry,
I was unclear in explaining about the form. I know it bent along the horizontal because of how it was built. What I was trying to say is the 2x4s narrow edge should be facing the load it is to resist, just the way a home's wall studs resist a wind load. 2x4 on the flat is no good, as you now know. Running them vertically or horizontally can both work.
At this point I feel obligated to ask, what is the purpose of the RE in the first place? Is it purely aesthetic, a cost saving measure, lower GWP vs concrete?
cheers
Jason, the recycled studs I had were bowed and cracked from screws, had I used that edge it would have broke out when I lifted from it's own weight and bowed worse. It was not really the bow that caused the mismatch. These casting do not see a fraction of the pressure at the bottom as concrete. I had to use center blocks to hold the forms in place since I didn't want to anchor into a concrete driveway or floor. It worked out well except when you cast a 8' section, align a new section butt up and lap a little up to it I did get some drifting (around 1/8-1/4 on the side I shown only that is 5" thick, not the 3" thick with less ramming pressures. Had I drilled the braces into concrete it would not have a mismatched. It is common to see a small mismatch or parting line in RE walls. We can wire brush it which I did to blend it no biggie, it actually looks more natural. The outside wall I was not trying to get concrete smooth and perfect. I just had not planned on base molding inside. I could still wire brush it, no problem.
Rammed Earth has some great benes homeowners have noted a reduction in allergies, mass hvac storage, fire protection, sound, many more. It is too bad it is a lost art form as well. The exciting part is removing the forms to see what art you created. I added iron oxides, others add rock line, seashells, fossil imprints, nooks, etc.....My main goal was to get a feel for it, test it hands on. I found out to taper block out holes at the bottom of walls, and use Styrofoam whenever it can handle the pressures. My drain holes in the outside wall I used landscaping timbers, hard to get out....Some of the guys block out huge arches in tall walls, looks awesome.....the architecture creativity is very rewarding, hard to find a building method like it in that respect.
Well better get to setting those anchors. I'll update the readers interested on my progress...there is very little info out there, it's too bad.
I've also been experimenting with hempcrete and strawcrete which actually would have made more sense here for insulation but I wanted to try RE, it does not seem to be thermally bridging on the side of the exterior footing it is over ( 5 inches thick, 10F outer wall, 70F inside. I think a foam core would be required in sub-zero climates, if the walls are only 12" thick, 24 with foam core. I think I could get a strawcrete or hempcore in instead of foam most use, with RE outer skins in SIP type design....maybe I need to think on that one a little ;)
Well here is my AJ (Assembly Jig) named after yours truly AJ...In aircraft also called a FAJ (Floor Assembly Jig)....Also called a "wet" fastener install, tooling pins(finish nails) and 1/4 round pin locators ;)
I'll let it cure over night, then try the 3/4 area as a bond line. I do not have a lot of faith in those anchors holding, or the 3/4, or screw heads. I noticed the wall breaks apart from drilling small holes, and I installed the anchors Class 1, meaning an interference fit. A/c again, they are the strongest fastener install, class 1 but require more labor, reaming in the metal world. The RE is appearing to not do well in point load from this sealer anyway, and I used 20% portland cement.
I got a feeling the disposition will be "scrap" R&R with 4" baseboards for more surface bond area.
Plan View (looking down)
Look at Royal Wood; I would use vinyl trim and paint it.
I'm with Martin, 1/4 round is funky. Use 2-4" base and scrib the back to fit the wall. If you need to, add some matching re at the deeper offset caused by the forms, or glue a short piece of wood to the back of the base, then scrib to fit. Driil 1/2" holes in the re, consolidate re on the inside of the hole with West Systems epoxy then drive a dowel into hole. Drive nail through base into dowel. Use 1 1/2"to 2" finish nail. Use minimum fasteners, just enough to hold base.
Terry,
Q. "What you guys mean by "scribe" the back of the board?"
A. https://www.youtube.com/watch?v=tdAOGNi49UA
I just got home w/ some 1/4 x 3-1/4 16 footers primed pine, bride the gaps. Debra what you guys mean by "scribe" the back of the board...Darn baseboards are not totally flat I like to mill them flat not scribe....I"ll just try glue and nails. 2 out of 5 of my anchors held real strong, 3 popped right out easy taking sand with it. When i try and drill a hole in some parts of the wall it does not end up round, not close and once the RE starts breaking apart it will continue if I were to drive dowls-glue in it...Best thing to do is patch with a different mix and try again....One I get past the surface sealer who knows. The best solution would have been to bond-cast a nailer in...now I know. ... cabinets too.
The way you get the striations is difference ratio's of sand and soil, so the wall is not consistent like concrete, parts will behave different than others.
I'm running some small glue test first, wet install finish nails....I have two glue types to test, most glues don't like dirt, and dirt don't like glues. Also trying some glue pic hangers to see how they hold up. I'm thinking a brush coat of urathane test and glue.....who knows. Learning process for sure.
Got it thanks! Forgot to mention the BB are 1/4 x 3-1/4 x 16 so if I can not soak it with flex I'll scribe ;)
I do a simular thing on small metal machined part screw ups with clay imprints....I'm more familiar with than wood. My experience is more with flatness and straightness of .005 or better per inch, smiles.
Ok I’ll document some test out here. Three adhesive dots on baseboards spaced 3 ½ inches apart and polyurethane brush coats on the RE along with a double backed tape as manufactured pic hanger test.
1. Poly and F-26, wet install 3” finish nail.
2. Poly and Loctite (concrete approved), wet install 3” finish nail.
3. F-26 top, Loctite bottom, of bb.
4. Contact cement only, nail not wet installed.
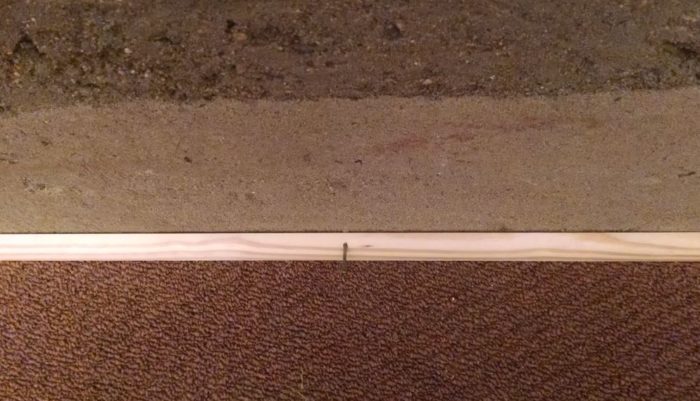
5. Poly brush coat on acrylic as an addition sealer only for durability and perm test. (dark area to left in form transition)
Notes: F-76 has better initial grab strength than loctite but is more messy needing mineral spirit clean up.
I’ll let in cure 24 hours. 9AM, and do pull out test.
Not as natural as I hope but oh well.
You can see what damage some of the anchors did.
3" deck screw and 1 1/2 " reduced 4 pt head holding real good hmmm maybe screws instead of wet install nail. Deck screw for heavy pics. Forget the anchors.
Loctite and reduced head screws did the trick...