Repair or replace sheathing behind brick veneer?
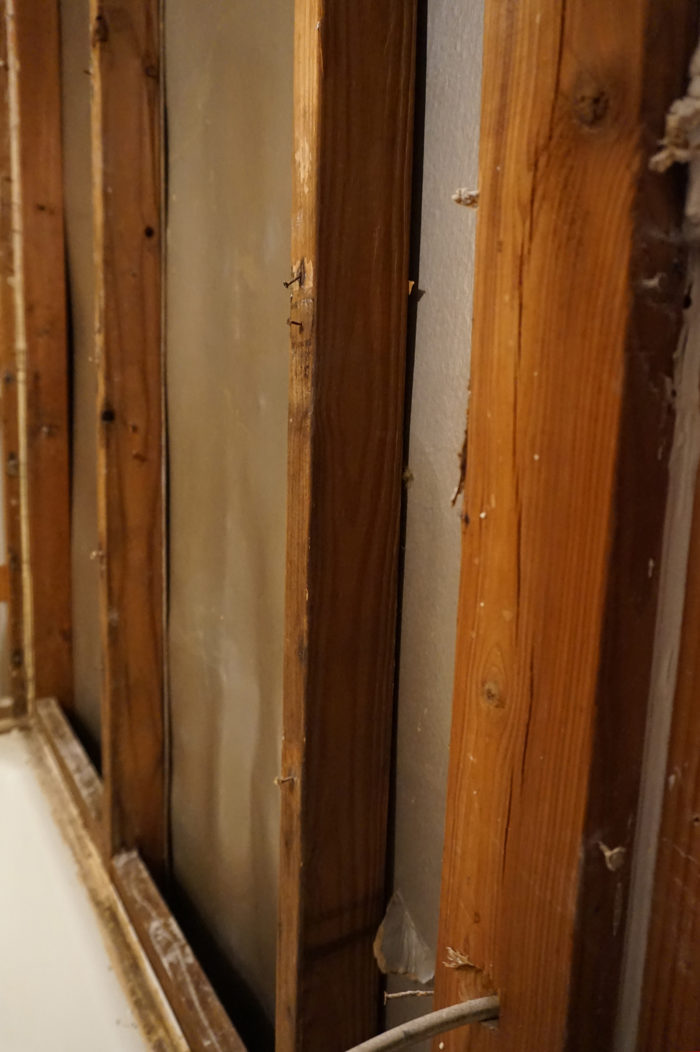
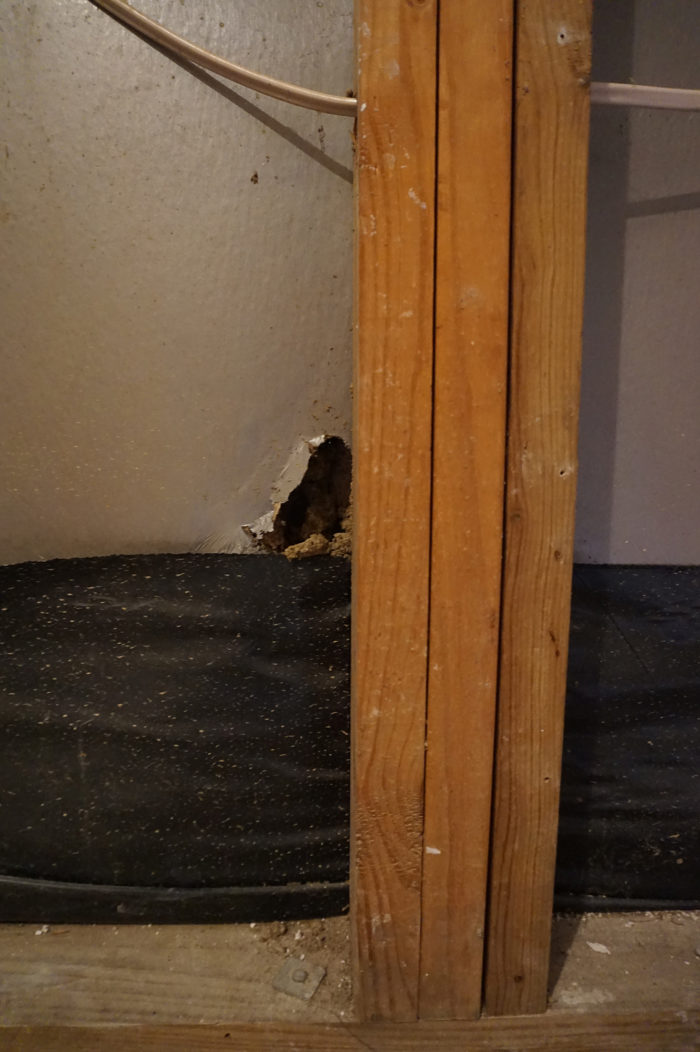
I wanted to get some advice on what to do with existing sheathing material that is currently installed behind brick veneer in a 1980’s home I’m currently renovating. It’s located in Houston, is 2×4 wood frame construction on concrete slab foundation, and the other parts of the house have T1-11 and vinyl siding (which will all be eventually replaced), but my questions concern what to do behind the brick for now. Much of the interior has been gutted down to the studs due to issues with mold and pests. In the parts of the house with brick as the exterior, there is a layer of 1/8″ sheet material attached to the exterior of the studs, a drainage cavity, and then the brick. There’s some kind of black flashing coming up from below, sandwiched between the stud and sheathing. The sheet material looks like a cross between mineral fiberboard and masonite; it has a paper-like backing that is metallic in color, and after removing the drywall and insulation, a few holes have been uncovered, ranging somewhere between the size of a quarter and that of a grapefruit. These look like they were caused by punctures, possibly during construction, or mostly by ant infestations, as the holes usually are found with dirt piles nearby or pouring out of the holes. In a few sections, behind what was once a tiled-shower wall, there is a bit of warping of the material. The warping has caused the sheet to pull away slightly from the studs, and there are a few noticeable gaps where the sheet is no longer in direct contact with the wood. There are also one or two areas where the sheets were too short and do not overlap, so that the wood stud is exposed to the exterior. There seem to be remnants of mold on the surface of the sheet, but not the composite – but I also have yet to cut up larger sections to confirm this.
Most of what I’ve across so far about issues with sheathing + brick are flooding related. My moisture issues have been limited to the wet areas of the house, and do not seem to be coming directly from the exterior, as far as I know. I’m wondering if the sheathing is fine to leave in place, to clean it with detergents, spray with isopropyl alcohol and use a HEPA vac on the remaining spores – the same process I’m using on the studs. If that’s a viable option, my question is then how to fix the holes and the gaps that have opened up. In an article by Allison Bailes (“How I Fixed My Leaky Underinsulated Exterior Wall”), he uses a combination of XPS and spray foam, but I was wondering how that might translate to my specific area and situation. For the exterior walls of the house, I have been planning on using a natural wool insulation, followed by a fiberglass-backed drywall and a lime plaster coating. The shower areas will receive a tadelakt plaster treatment over Kerdi boards/system. The HVAC systems will not be used very frequently, and the priorities are to prevent as much as possible any future mold growth, while still using more people friendly materials.
GBA Detail Library
A collection of one thousand construction details organized by climate and house part


Replies
Sdcnyhou,
First of all, can you tell us your name?
This is going to be hard to diagnose over the internet. You've mentioned mold, pests, ants, warping, and flooding. Those are not good words to hear.
It's quite possible that some of the mold and warping and pests might be related to flashing problems behind the brick veneer. We can't assess the flashing from what you've told us. You are in a better position than we are to assess the flashing situation, but in many cases like yours, the solution is to completely remove the brick veneer and start from scratch.
Hi Martin,
Thank you for your prompt response. My name is Claire. The mold has been limited to areas near the shower or other pipes. There were two boards used underneath the tiled shower walls, and the mold was heaviest between these two boards. One was the regular drywall, and the other might have been a greenboard or something similar - I need to go back and check. I've also only seen the warping of the sheathing in the bathroom areas, but there are a few walls that haven't been opened up yet.
This house luckily has not experienced any flooding, but it is in a 500-year flood plain. By picking materials to avoid mold and pests, occasionally these are also more flood-resistant, something that also factors into the situation, but does not dominate it.
Is there something I can look for to determine if the moisture problems were coming from the interior or from the exterior? Would I be looking for signs of failure in the flashing? I can also open up more walls to check for other signs of mold, that's a fairly simple thing to do. I would like to understand the problem a little bit better before considering the route of removing the veneer.
Looks and sounds like the sheathing product is a Thermo ply type product. I know that during the 80's a product by the brand of Denny Board was used extensively as exterior sheathing in the Houston area. Remembering that the 80"s was pre air leakage concerns, holes punched during construction were commonplace. If this house wasn't flooded during Harvey, consider yourself one of the lucky ones...not that that minimizes your own concerns in any way.
Claire,
Q. "Is there something I can look for to determine if the moisture problems were coming from the interior or from the exterior?"
A. It's quite possible that your brick veneer (and the brick veneer flashing) are fine. It's almost impossible for us to assess what's going on based on your description, however. You need a site visit by an experienced moisture expert.
One way to assess brick veneer flashing is to look for above-grade weep holes at the base of the wall, and so look for through-wall flashing directly under the weep holes. If those details look good, that's a good sign.
If your walls are opened up on the interior, it should be possible to figure out the cause of mold and other problems by noticing where the mold is located.
I did get a chance to examine the weep holes - a bit of clogged dirt, but they mostly looked okay. I wasn't able to see the flashing exactly at a weep hole location, but I did see bits peaking out from in between that same bottom course of bricks and the foundation.
I was also able to open up a few more walls from the interior, and there were no further signs of mold or water damage (aside from a couple of rusted nails from smalls holes in the sheathing). I understand that it would be best to bring in a moisture expert, but given what I've seen thus far and a familiarity with the history of the issues with the house, I'm fairly confident that the moisture issues were coming from interior water sources. There had been a leaky pipe in a shower wall that might not have dried out properly, and none of the drywall had ever been replaced; this bathroom had much greater amounts of mold than the other. And the shower/tub assembly contributed to the growth of mold: unsealed tile grout, paper-backed gypsum behind the tile (although labeled 'water resistant,' from what I understand will still provide an opportunity for mold growth), kraft paper facing on fiberglass batts with 'vapor barrier' facing inwards. The pattern of mold growth was heaviest near the corners of the tub, moving upwards along the grout, and horizontally along the tub edges. As for the walls, mold was mostly limited to the areas directly behind tile.
The sheathing behind the shower, despite a bit of warping, feels much like the sheathing in other parts of the house (does not crumble or give way under pressure). After breaking off some more pieces of the sheathing, it might be more accurate to say the coating is a very thin membrane, almost like latex paint. And it tears as if it were multiple layers of very thin chipboard. And Chris, I haven't been able to find much information on Denny Board to confirm if that's what I have installed, but I'm tempted to agree that it is a thermo-ply product.
I would like to cut out larger pieces from behind the shower to check for mold and other damage, but I'm holding off until I know how I would go about repairing the holes. Would I get a sheet of thermo-ply, square up the holes and cut pieces from the new sheet to fit, and then seal the seams with the recommended tape? For smaller holes, would spray foam or caulk be sufficient? This is assuming that the sheathing does not have to be replaced entirely. This again may not be answerable from a few images and descriptions, but what would warrant replacing the sheathing completely?
*Sorry, that should have been 'water repellent' paper over a 'water resistant' gypsum core for the layer under the tile.
Claire,
I now have a better understanding of your situation. It seems clear that the source of your mold is interior moisture, and it also seems to me now (upon re-reading your original comment) that your reference to "flooding" had nothing to do with your house.
There is a small risk that the grapefruit-sized holes in your sheathing may allow wind-driven rain to enter your walls -- but that risk is quite small, because when rain runs down the cavity behind brick veneer, the water usually clings to the bricks, not the sheathing. Repairing the holes with rigid foam and canned spray foam seems adequate to me.
Then you need to let everything dry out, and address all of the water entry problems from the shower (by installing better details when you rebuild your bathroom). Then you should be good to go.
(I suppose the last concern is the ants. Cross your fingers on the ant problem -- maybe if you can prevent future moisture entry, the ants will stay away.)
Martin,
Thank you for all your help. And yes, I left out a few words in that original posting, so it was bit confusing. Sorry about that. And I see, so it would be unlikely for the rain to come in direct contact with the sheathing, unless maybe there are failures in the brick - perhaps gaps or seams due to foundation damage. That is good to know. And I'm happy that I don't have to replace the sheathing since it is more or less in good shape.
Then moving to the repair; for some reason I'm inclined to use the thermo-ply material for the repairs, using an adhesive to attach the new material. I know the foam would be better for pest resistance and water resistance, but I like the idea that it is more or less the same material throughout.
I was able to speak to a representative for a thermo-ply product, and she made sure to mention that for the gaps and exposed seams, if I were to use a foam, that it should not be an expanding foam. An expanding foam might exert pressure on the sheathing. I'm thinking to use a combination of caulk and a foam backer rod on the exposed seams. As for the gaps along the studs due to the sheathing pulling away from the studs, can I just fill these with my insulation material (a loose natural wool)? The gaps I'm understanding are problematic from an energy efficiency stand point, but since in my case the sheathing is not structural (there is let-in bracing in some areas), then I'm concluding that the gaps are not a structural issue.
As for mold growth on the thermo-ply material, the representative said that even though it is a cellulose fiber based product, it has undergone so much processing that there are virtually no sugars left within the core - nothing for the mold to feed on. The surface however, because of other contents, may provide a medium for mold growth. This is supported by my own experience with the product, in seeing surface mold, but none on the inner layers. The isopropyl alcohol should work to address that; the only thing that might change is to not be very aggressive in the cleaning methods, so that the coating of the sheathing is not affected.
I will be sure that the bathroom areas are detailed better to prevent any future moisture issues, at least from the interior. I also had a thought that since the natural wool insulation has a greater R value per inch, I only need 2" of the wool for an R of 13, leaving about an 1.5" cavity between the drywall and the insulation. Does this help at all in the drying of walls - mostly asking out of curiosity. I've more or less settled upon using a Kerdi system with a Tadelakt plaster finish, both of which are waterproof systems. But I may have to followup with another posting to see if anyone has much experience with a combination of the two before I proceed.
And then the ants. The entire site could use a bit of regrading, or at the very least, the ground around the perimeter of the house needs some work so that more of the foundation slab is exposed. Some of the ground sits at or above the first coursing of brick or covers the wood siding, which I'm guessing only contributed to the ant issues. But this a project for a little bit further down the road. It doesn't seem to be an active problem, but they left quite a few signs of their presence - mounds of dirt within walls, under tubs, dirt tunnels along drywall (eating the paper of the drywall as well). Fun stuff. But now I'll know in the future that if I see ants, to also check for any signs of water problems.
Claire,
You definitely want to fill the entire stud bay with insulation (in your case, mineral wool). There is no advantage to leaving an air gap between thin insulation and the drywall (or interior wall finish material).
If the Thermo-Ply fasteners are loose, allowing the Thermo-Ply to pull away from the studs, I see no problem with stuffing a little rock wool in the gap where the sheathing has pulled away -- as long as this problem isn't occurring at a sheathing seam. If there is a seam, you want to use canned spray foam, to limit air leakage and water entry.
Martin,
It may not make a difference, but I'll be using a natural wool (sheep's wool) insulation, not a mineral wool. The cost would sufficiently increase if I were to fill the entire stud bay, 75% more material, and the increase in R value would be unnecessary. The original fiberglass batts were marked R11, and the wool at 2" will be R13. The natural wool at 3.5" would be R21, which I don't think would pay off in my climate zone. During installation, I can make sure that the wool covers the top and bottom plates completely, along with the studs themselves, but there will be an air gap somewhere unless I opt for more material.
I have not been thinking so much in terms of energy efficiency during this project, (healthy materials, mold/moisture, and pests and even potential flooding have been the main concerns); and past heating and cooling bills have been relatively low. But if the air gaps are problematic, I can reconsider my options. I think it could also be possible to fashion the netting so that the gap occurs between the insulation and the sheathing rather than the drywall - but I don't know that that solves anything.
Claire,
Your assumptions about R-value are skewed.
I agree that your climate zone (Zone 2) is relatively mild, which is one reason why low levels of insulation are common. That said, if your stud bays are opened up during a renovation project, you have an opportunity to improve the walls' R-value. It makes no sense to install insulation that is thinner than the depth of the studs.
If sheep's wool insulation is expensive, consider installing cellulose insulation or mineral wool insulation.
According to the U.S. Department of Energy, the R-value of sheep's wool insulation is about R-3.5 per inch. If your manufacturer is claiming R-6.5 per inch, I'd be skeptical.
Martin,
If the R values I was given are correct - and I trust the manufacturer and representative - then even with a 2" thickness, there would be an increase in value. I have also been provided with a summary of testing data, and a result under a Thermal Conductivity ASTM C518 test would seem to validate the listed values.
I ending up choosing sheep's wool over other materials for quite a few reasons, many of which stem from the inherent properties of the wool. Given that it is a natural insulator, less processing and additives are needed to make it suitable for residential use. In the case of a cellulose insulation, something like borate needs to be added for fire and pest resistant. *Borate might also be added to sheep's wool depending on the manufacturer, but I choose one which uses an alternative, something to resist moths, since the wool itself is naturally fire resistant. And much of the reason I'm replacing the fiberglass batts in the first place is because the kraft paper had provided ample food source for pests and mold alike, and the idea of filling the walls with more paper, even if treated, is not too appealing to me.
I looked at mineral wool insulation, but I was uncomfortable with the level of processing, the use of formaldehyde, and the strong odor from the samples and packages I handled - although I considered it for a bit of time based on its performance in other areas. I understand the formaldehyde is used up during the manufacturing process, and the smell should dissipate over time. These are issues I don't have to worry with the natural wool, and instead, the wool is capable of absorbing and permanently holding VOC's, aiding air quality.
The cost of the sheep's wool was the only drawback, which can be somewhat offset if less material is needed and one is willing to handle the installation. Which brings me back to what happens if there is an air cavity in any layer of the wall assembly? If it affects performance significantly, then I will consider additional material, but I had preferred to put those dollars towards the attic if what was in the walls was sufficient.
I do have another question about the sheathing, which might just be basic construction techniques. Based on some of the damage to the wood, I would like to replace a few of the vertical studs within those exterior walls. I am able to consult with a structural engineer before and during the process, so any issues with load bearing walls and shoring during the repair can be addressed. What is the general practice for removing the studs from sheathing and then securing the replacements? I could potentially cut around the wood in some areas to leave a few of the original fasteners so they can be used in the new studs, but I don't know if that is necessary. Will there be issues with securing new studs to the sheathing with adhesive because I won't be able to apply resistance on either side? I'm also thinking of an option with a few corner braces glued to the sheathing and then screwed along the length of the stud.
Claire,
You seem set on using 2-inch thick insulation in your 3.5-inch stud cavities, and you have your reasons, so I won't try to convince you to do otherwise. If there is air leakage through your wall, a big air space (without insulation) can degrade the thermal performance of your wall significantly. Filling the studs completely with insulation is much more likely to result in good performance. But it's your house.
Removing one or two rotten studs and replacing the studs won't cause significant structural concerns. If you have to replace 6 or 10 studs, that's a different matter.
If the stud only has minor damage, it probably makes sense to leave the damaged stud in place, and to simply sister a stud beside the damaged stud.
If a stud is so damaged that it needs to be removed, you can cut the nails holding the stud to the plates with a Sawzall, and bang the stud sideways with a sledgehammer to remove it. Then you can cut the sheathing nails with nippers. The new stud can be installed with toenails to the plates, and a bead of construction adhesive on the sheathing side.
Martin may not want to try to convince you to do full-depth insulation, but I will.
The thermal bridging of the framing fraction through 2" of R6.5/inch insulation is extremely severe. At a typical 25% framing fraction for 16" on center wall framing more than half the conducted heat will be passing through the 2" deep framing with R2.4 of that framing fraction, and it won't perform nearly as well as full-depth lower R/inch R13 with ~R4.2 for the 3.5" deep framing fraction. It's not a subtle difference- even though it still meets the letter of code, it's a lower performance assembly.
Then there is the convective bypasses in/out & around the insulation when the insulation doesn't have tight air barriers on all 6 sides of the batt. An ASTM C518 test plate provides those air barriers as part of the test apparatus. If installed with a 1.5" air gap on one side it doesn't even come close to matching test conditions, and the odds that it will sag over time leaving partial gaps in the contact with the sheathing, and leaving a gap at the top of the batt is a near-certainty, taking already marginal performance down to truly lousy performance.
Use sheep wool insulation if you like, but double-up on it even if it means compressing it from the 4" nominal to 3.5". Compressing fiber insulation increases the R/inch and air-retardency, even though the total R value drops due to the shallower depth. So instead of the R26 it would have at full loft you'd be looking at R23-R24 at center cavity, and it would outperform an R13 cellulose solution by about R1 R1.5 "whole wall", due to the higher center-cavity R, (robbed of it's potential performance by the R4.2 framing fraction.)
If you're STILL going to stick with just 2" batts, cut'n'cobble some rigid air-tight air-barriers to snug up to side facing the interior to prevent gaps and convection bypass channels from evolving over time, and caulk the edges for better air tightness. Half-inch wallboard cut to 14" width for 16" on-center framing would leave a nominal 1/4' gap at the edges, which is a caulk-able gap, but you might try 14.25". The performance would still be sub-standard, but at least it won't deteriorate over time.