Roof structure, insulation and lighting
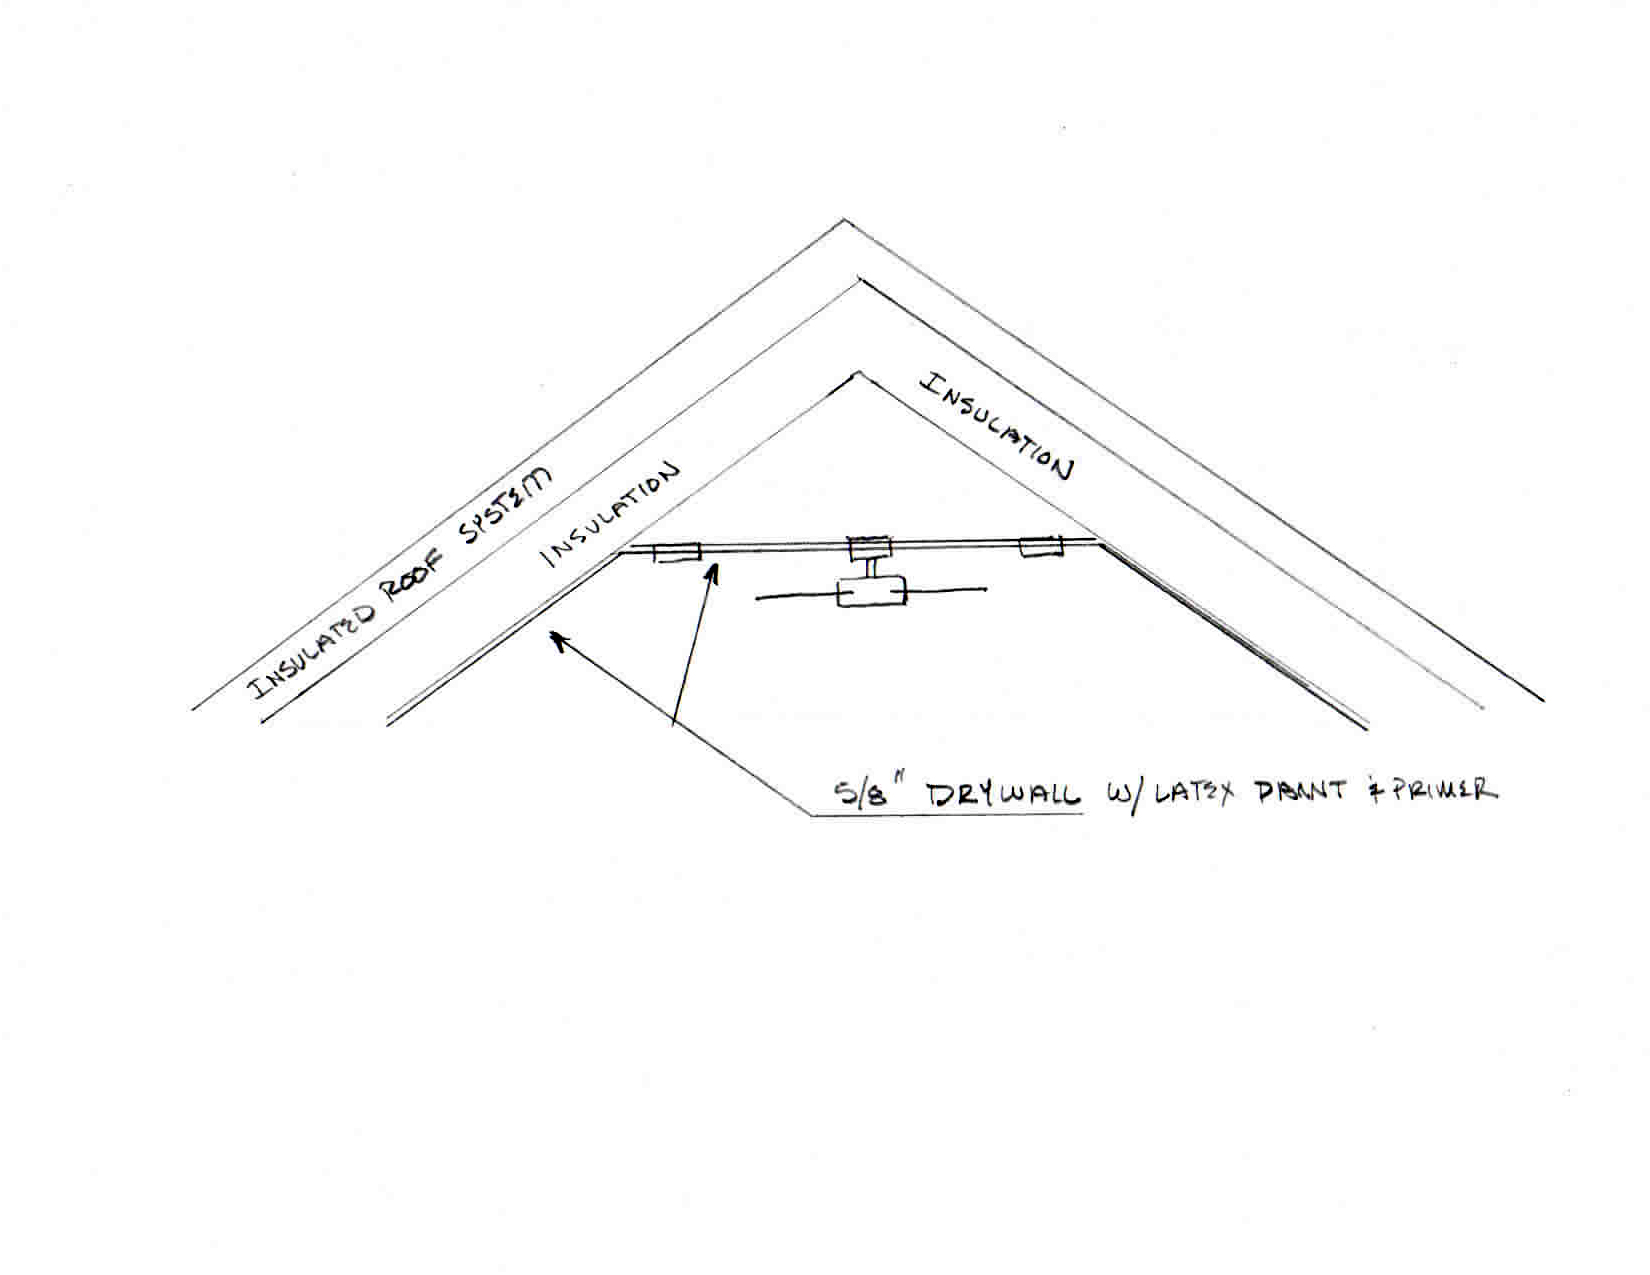
I am planning a new home in northern Idaho climate zone 6 and have some questions regarding the roofing structure/insulation and lighting within this system. this will be a mostly cathedral ceiling with a flat part across the middle in which I intend to put the lighting and ceiling fans. The thought is to keep these items out of the insulated roof. It will be a non vented roof. I have attached two drawings to help illustrate my thoughts. I would like to build the roof as follows from top to bottom:
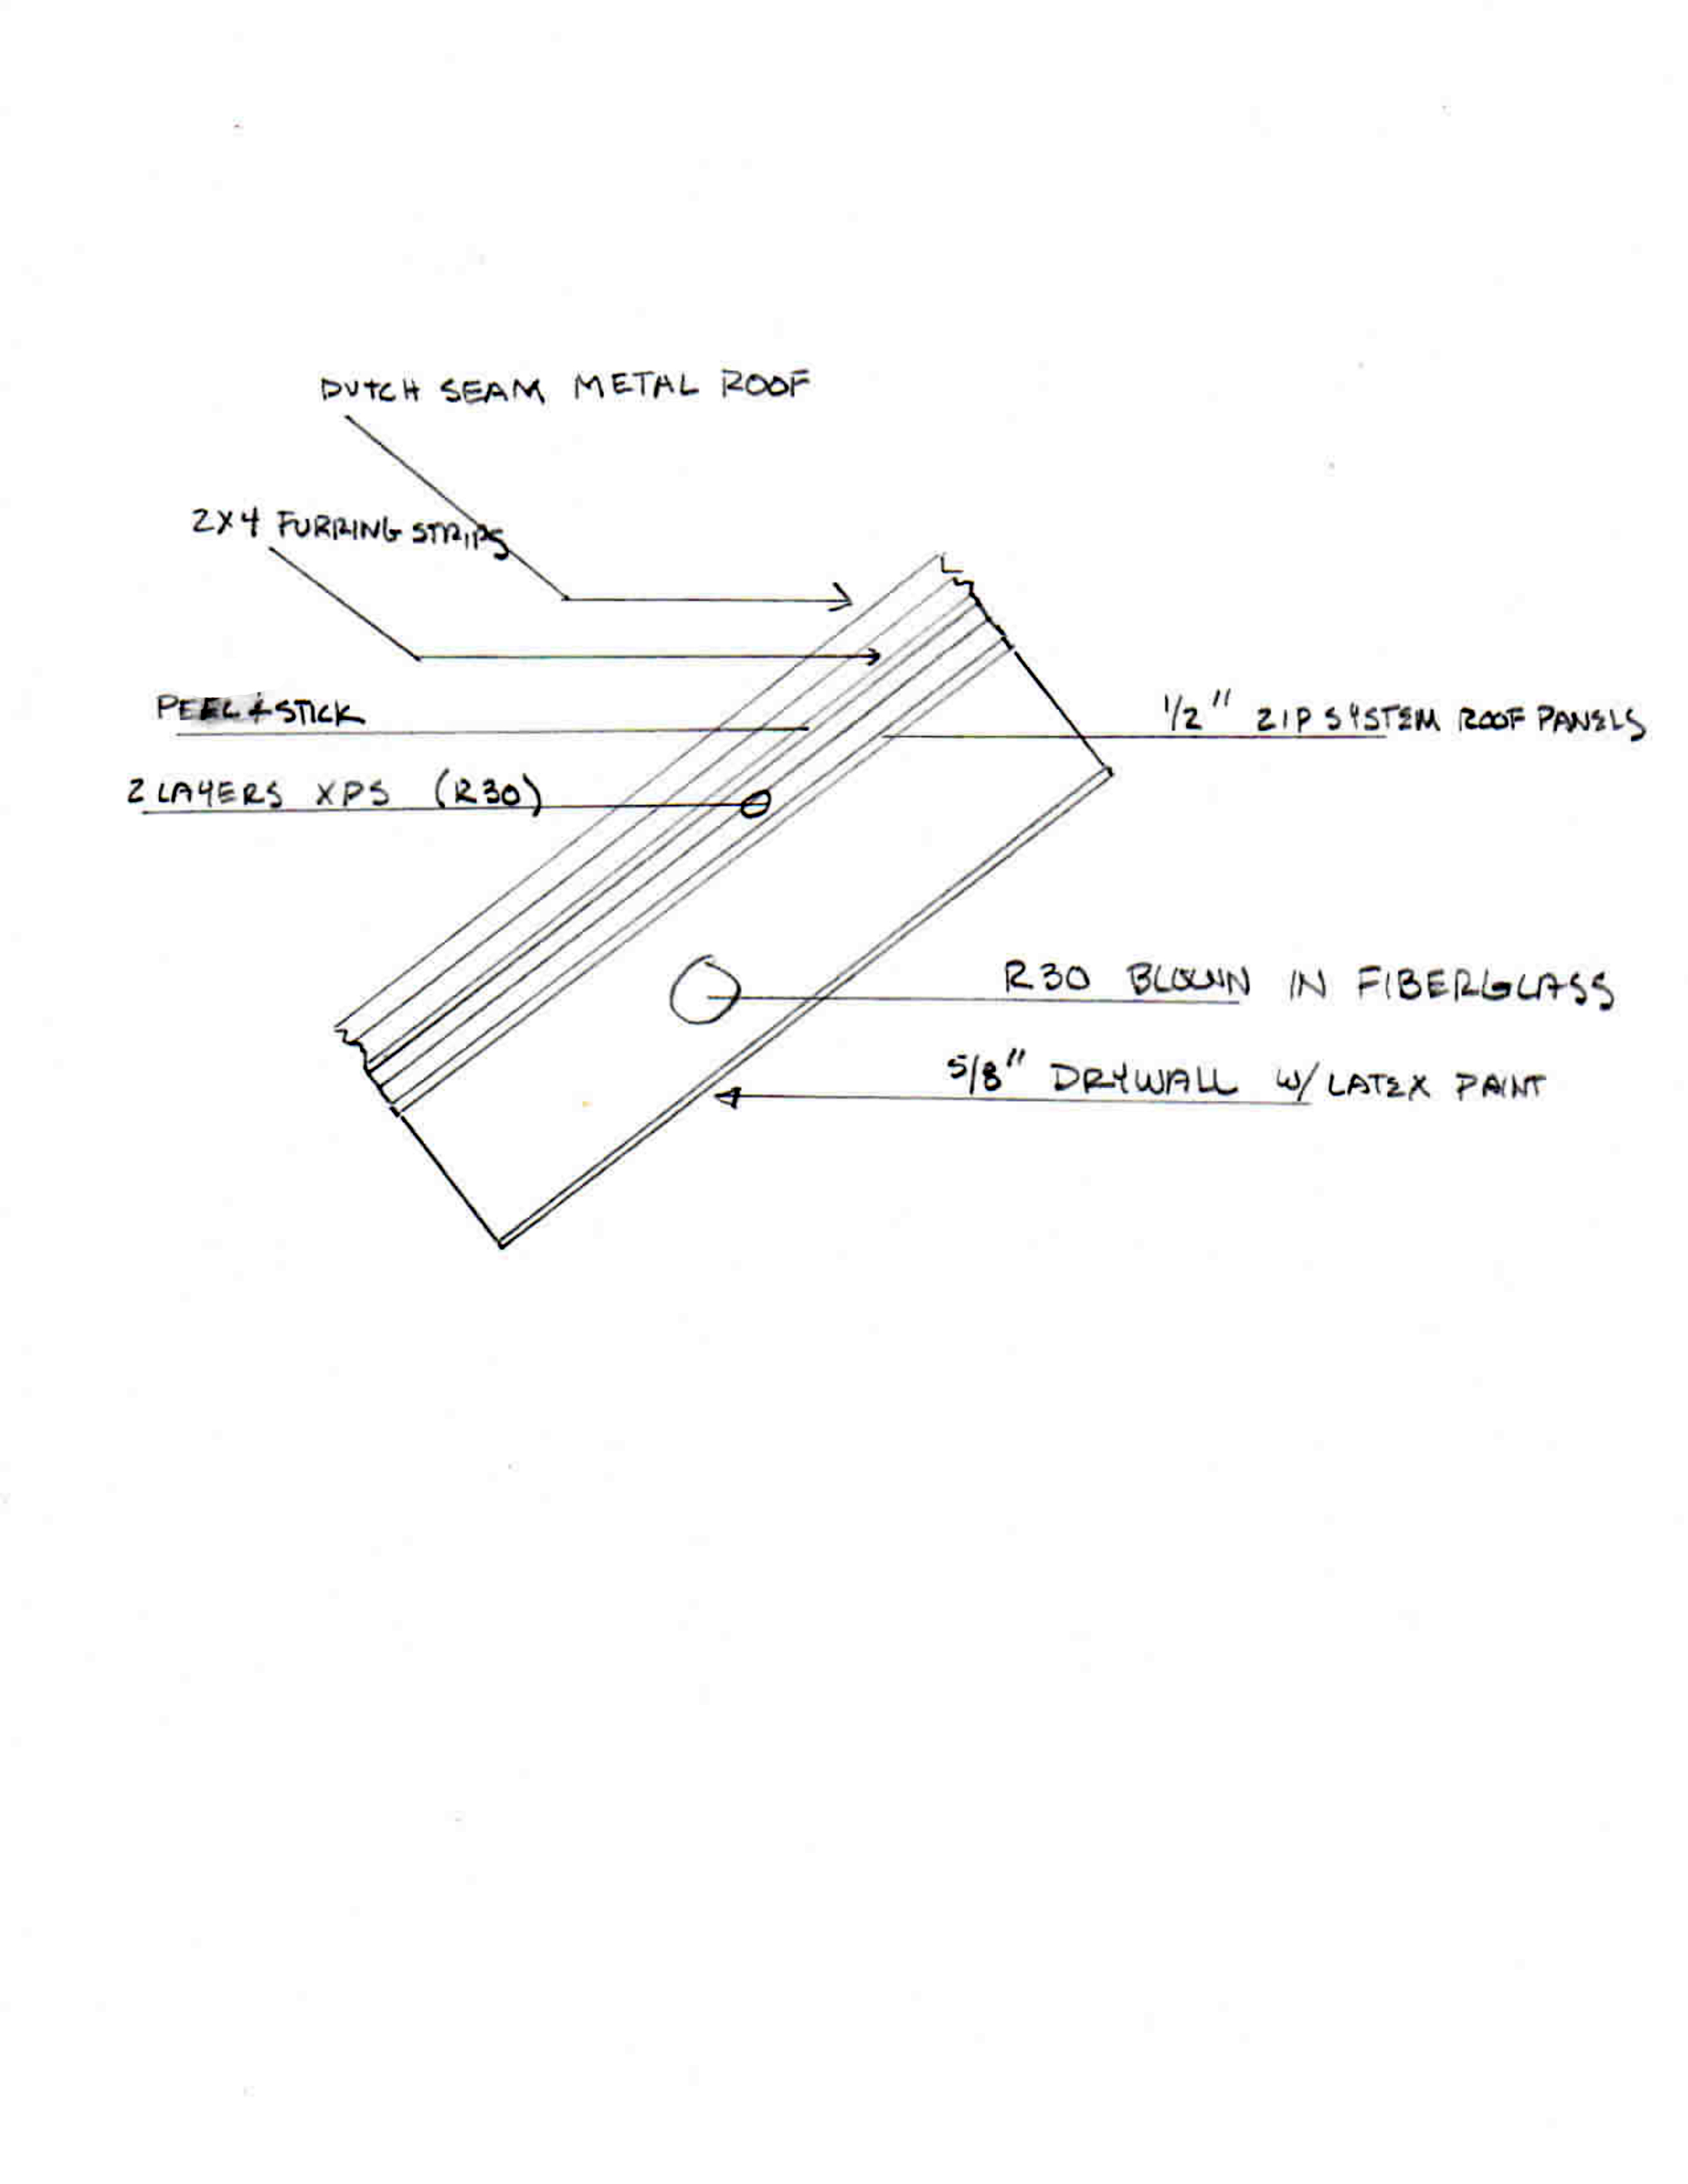
1. Dutch Seam metal roofing
2. 2×4 furring strips
3. Two layers of XPS foam total R30 with the seams of the top layer taped (I can to more layers and also consider a sandwich of XPS and Polyiso). Peal and Stick applied over the foam under the furring strips.
4. 1/2″ Zip roofing panels with all seams taped
5. R30 blown in insulation (I am open to any type of insulation in this area)
6. 5/8″ drywall with latex paint and primer
Question.
1.Will this system work and be a long lasting assembly (with the understanding that air sealing will be a top priority)?
2. Do I need to install another layer of plywood over the furring strips (my air gap)?
3. Is there a less costly approach to this roof assembly?
4. Will placing the electrical in the flat area of the ceiling solve the issue of air leakage and heat causing problems within the roof assembly?
5. With the Zip panels, can the peel and stick go directly on the foam as the primary water barrier?
Any thoughts would be appreciated and questions are welcomed
GBA Detail Library
A collection of one thousand construction details organized by climate and house part


Replies
A couple of things...
The 6" of XPS will be running below R30 in a few decades on a long slow decent to ~R25. That will happen before the lifecycle of the metal roofing is up. Going with 7" of 1.5lb density Type-II EPS instead of 6" of XPS would have constant performance over time, and would not be leaking HFC134a into the atmosphere since it's blown with much more benign and fast-leaking pentane, most of which is recaptured at the factory.
If you're using a self-healing self-sealing peel'n'stick membrane over the whole thing you can use standard grades of OSB rather than ZIP.
Using cellulose for the cavity fill instead of fiberglass offers both better moisture resilience and a measurable amount of thermal mass.
R30 fiberglass at low density fills the 9.25" depth of a 2x10 rafter. At high density it can be done in the 7.25" of a 2x8 rafter, but would be lower performance due the higher thermal bridging of 7.25" of wood instead of 9.25".
At 9.25" most cellulose would run R34, which by the labeled numbers would need another inch of EPS up top to hit the minimum ratio for dew point control your climate. But by the ACTUAL performance at low temp, the 7" of EPS would still be (just barely) enough. Rather than having to model it for the code officials or for your own peace of mind it might be easier to use Type-II graphite loaded EPS, which would hit R34 at the 40F labeled numbers, but beat that performance during the colder weather when it really counts. (The sheathing will average about 40F or slightly cooler, so it would actually beat the 40F performance.)
Intstalling the lights at a ceiling that is fully within the insulation and pressure boundary of the house as drawn is definitely the right way to go.
Thank you Dana,
What would be your thought of using a layer of Polyiso and then the Type II EPS over that to keep the Polyiso warm and get a higher R value per inch overall. Also, so there is no issue using furring strips over the foam and then installing the metal roof to the furring strips and not using plywood as the nailbase?
Kyle,
If you aren't the roofer, you need to talk to your roofer to determine whether the type of metal roofing that you plan to use can be installed over purlins. Some can, and some can't -- you may need plywood or OSB roof sheathing.
If you are the roofer, and you don't know the answer to the question, search online for brand-specific installation instructions, or contact the manufacturer directly.
Kyle,
You can use two types of rigid foam if you like, with the EPS on the exterior side of the rigid foam as you suggested. The EPS will help keep the polyiso warm.
You may also want to look into buying used rigid foam (recycled or reclaimed foam). Many dealers sell it -- search online to find a local distributor. The price of recycled foam is much lower than the price of new foam.
Even though you can technically get a more consistent performance out of a dual-foam approach achieving dew point control at a slightly thinner depth, the consensus among builders that it's not worth the PITA of sourcing and managing two types of foam on a building site. YMMV.
Nationwide Foam ships reclaimed foam pretty much everywhere in the lower 48 for a price, and have multiple regional depots. I'm not sure if there's any within easy trucking distance of your location though. http://nationwidefoam.com/ If you know the type and quantity you're looking for they can often quote price & availability via email or phone. For far-flung locations it has to be a big enough quantity to make it worth their while, so expect the total to vary with distance from their regional site.
With any foam reclaimer always order ~15% more than the minimum needed, to deal with the occasional junk sheets. But the discount from virgin stock is typically 65-75% (cheaper per R-foot than batts!)
Thank you both for the great information. I still have a couple of questions about the roofing assembly. I assume the goal is to allow the roof to dry inwards and eliminate any air movement from the inside of the home through the roof. With that being the case, should I utilize ice and water shield directly on the OSB/Plywood then put the EPS, then the purlins for the vented over roof? Or should the ice and water shield be placed over the foam before installing the purlins? Or should there be multiple layers of an air barrier such as roofing paper over the OSB, then a layer between layers of EPS then the ice and water shield over the EPS. I would value your thoughts on the layers and order of layers in your "perfect" unvented assembly with a venter over roof. Thanks again.
Kyle,
Q. "Should I utilize Ice and Water Shield directly on the OSB/Plywood then put the EPS, then the purlins for the vented over roof?"
A. Your question is addressed in my article, How to Install Rigid Foam On Top of Roof Sheathing. This type of roof assembly needs a robust air barrier, and a peel-and-stick product like Ice & Water Shield is one good way of providing that air barrier. The air barrier belongs directly above the lowest layer of roof sheathing.