Tiny Home Ideas for Steel Tube Framing
Disclaimer: I am by no means an experienced builder and my lack of experience means that I probably won’t have considered all of the potential issues that could arise with my method. Additionally, this design is not meant to be the most energy efficient method, nor traditional in any sense (all within reason).
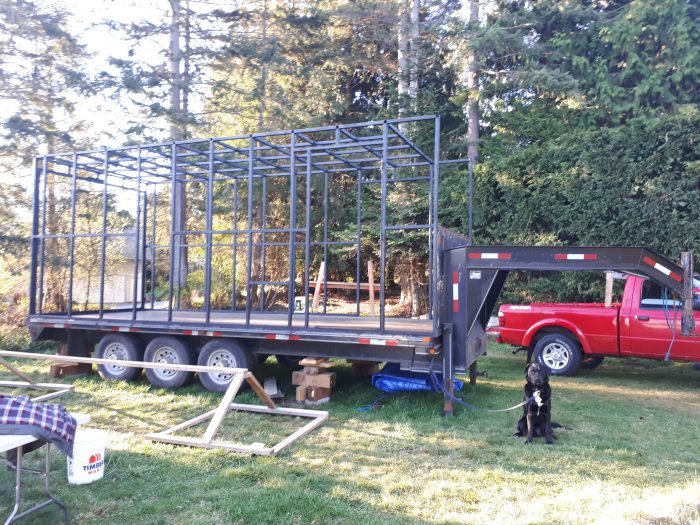
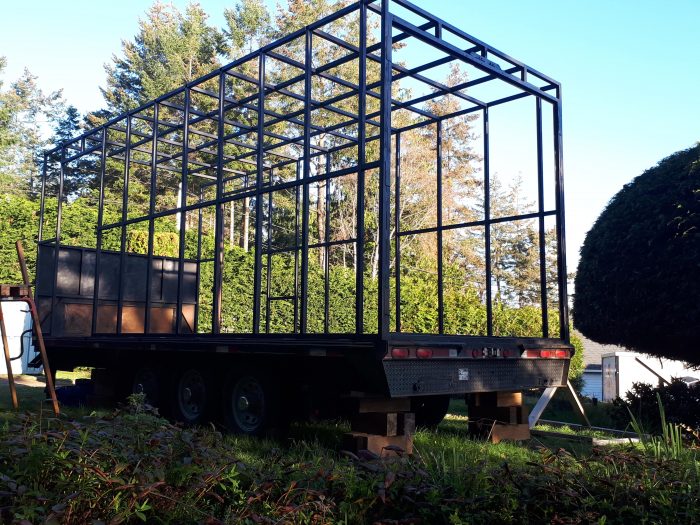
I recently purchased a 20ft gooseneck trailer with a ~7ft gooseneck deck that I plan to turn into a tiny house. The trailer was originally some sort of utility trailer and has an existing 1.5” steel tube structure built onto the main deck (see photos below). The structure seems to be well built, providing me with confidence in its strength and longevity. My plan is to use this steel as the main structure of my home and add to it in order to build a bedroom on top of the gooseneck.
However, the steel definitely provides some difficulties; most notably, thermal bridging and condensation. My main concern is the moisture accumulation since I live on Vancouver Island and many houses here have some degree of mold issues. I would be happy to hear additional concerns as well though!
My current plan for construction is as follows:
-
Frame a 2×4 floor on top of the flat deck with the following floor assembly from top down: flooring (not sure what yet), ¾” subfloor, poly vapor barrier, 2×4 frame with EPS rigid foam in cavities, sheet metal flashing, existing deck boards. The deck boards are not in perfect shape, which is why I plan to use the flashing.
-
Frame a 2×6 floor that is cantilever across the gooseneck; probably doubling up on the rim joists for extra strength. The remainder of the floor assembly will be the same as the flat deck.
-
Flat deck wall assembly from the inside out: refurbished barnwood, (vapor barrier?), 1.5” steel tubing with EPS insulation filling the cavities, exterior insulation (2” of Halo Exterra), ¾” treated rainscreen screwed to studs through the exterior insulation, cedar siding.
-
For the loft walls on top of the gooseneck, I will use the same assembly as above, but replacing the steel studs with 2×4 framing (the walls will pop in 2” when transitioning from the main deck to the loft). This framing will also have T-profile let-in bracing for shear bracing. I was thinking of using rockwool insulation for the cavities here.
-
I plan to build a 2×6 vaulted ceiling (above the existing steel framing) with a metal roof on top. The insulation will go between the rafters. Again, I was thinking of using rockwool here with a ventilation gap under the ½” sheathing.
A couple things to note:
-
There is no sheathing included in the wall assembly. This is done to both to save costs on materials as well as reduce the amount of surface area where moisture can collect within the walls
-
I will frame in the windows and door using the existing steel combined with 2x lumber (I’m thinking 2x4s framed flat for extra strength)
-
There is no indoor shower, which should reduce the indoor moisture content considerably
-
Having 3.5” of insulation in the walls is fairly standard in tiny houses since they heat up very easily (though loose heat inefficiently). I have a small wood stove that is more than sufficient to heat the space and will allow me to open a window intermittently in the winter. This could help vacate the space of excess moisture. Fortunately, it doesn’t get all that cold here compared to the rest of the country, but it definitely rains..
-
The exterior insulation I plan on using is Halo Exterra, which is meant to act as a WRB, be semi-vapor permeable up to 2”, and quite durable. Here is some more info on the product:
https://buildwithhalo.com/halo-exterra/
https://buildwithhalo.com/wp-content/uploads/2020/03/Halo-Installation-Guide-032519-1.pdf
https://buildwithhalo.com/building-science-and-codes/fully-sheathed-or-braced-wall-panels/
My questions for anyone willing to lend some expertise:
-
Does my wall assembly make sense?
-
Should I include a vapor barrier in the walls? What about the ceiling? I haven’t come across a system that uses a vapor barrier in one and not the other, but then again, nothing about this build is conventional.
-
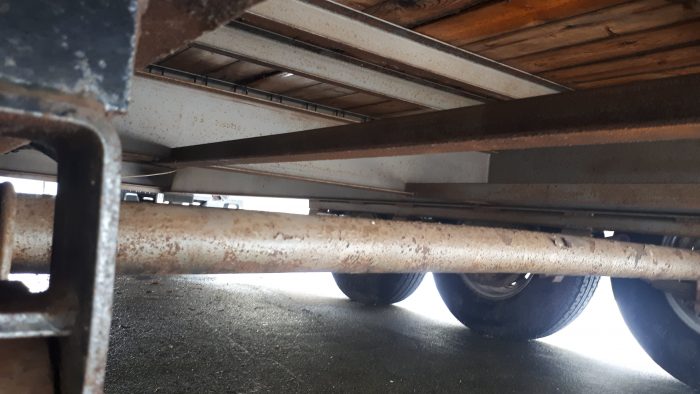
Insulating the underside of the steel along the edges of the trailer seems like a smart thing to do, since the rest of the steel will be covered with exterior insulation. However, it will definitely be difficult to achieve a continuous seal due to the structure. Any suggestions? What are my main concerns with this aspect?
-
Will my cantilevered floor assembly for the gooseneck platform be strong enough if it is bolted to the trailer?
Thank you in advance!
GBA Detail Library
A collection of one thousand construction details organized by climate and house part


Replies
You want to make sure nothing you build will hold mositure against the steel frame. If the steel has water pooled next to it, that's going to be a spot that rusts. I would also go over the steel with a wire brush (or stripper disc), then apply a rust preventative primer and then enamel over the primer. Do a good job coating the steel before you build, that will do wonders to limit rusting down the road. I can see you already have some rust, so that's why you need to strip things first -- you need clean metal for paint to adhere to. I've used the Rustoleum Stops Rust products for this in the past, and while they take a long time to dry (a week or two to really start to get hard), they do a very good job. I've never used them on a trailer, but I'd expect them to perform there the same as they do on structural steel.
If you use any treated lumber, make sure it's not mounted to the steel. Pressure treated lumber is a problem for unprotected steel the same way it is with fasteners. You can use thin stainless steel sheet as a transition material if needed.
I would use urethane caulk for sealing and not canned foam. Canned foam is likely to seperate with flexing as you bounce down the road, I expect the caulk will hold up to that better.
Make sure to provide bracing for racking/shear in those walls.
Bill
Thank you Zephyr7; that’s a lot of useful information. I definitely wouldn’t have thought of the treated lumber issue! I have started with the process of wire brushing and applying rustoleum to the steel cage and will continue with the rest of the structure. For the axles and whatnot underneath, I plan to use POR-15 (cleaner, metal-prep, rust protection, and top coat).
A couple quick questions for you, if you don’t mind:
1. You mentioned a urethane caulk for sealing, where are you envisioning that these seals will be needed?
2. With regards to the bracing for racking/shearing, is a single diagonal let-in T-brace sufficient for each of my walls constructed with lumber? None of these walls will be longer than 8 ft. For the walls constructed with steel tubing, I’m assuming that the existing structure is enough to brace these?
Thanks!
Regarding where the caulk might be needed, that really depends on what you end up building :-) You'll want to seal anything where water might get inside, or where air might leak out.
I would NOT trust a single let-in brace on a tiny house that is going to be mobile. Solid panels (plywood) would be much, much better. You want the plywood to tie the top and bottom plates together along with all the studs. Even 1/4" plywood is going to be pretty good here, just use a lot of fasteners around the perimeter. I don't know how codes might apply to a tiny house build regarding racking resistance though, so if that's an issue for you, be careful and have your plans reviewed by someone familiar with the requirements for your area.
Bill
Thanks Bill, the plan was to also tie these walls into the existing steel tube framing, but perhaps this is still not enough. I will rethink this aspect.
One nice thing you can do when working with steel is to weld things to it. Wood construction doesn't have that option. I would consider welding on some plates to allow you to fasten your wooden structure securely to the steel. Some flat plates on the sides would let you tie the bottom plate into the steel frame very securely at periodic intervals, then you could build with more "regular light construction" type techniques from there.
If you weld, remember that you have to strip and paint AFTER WELDING, not before. You have to protect the welds too, and welds seem to be the places that start to rust first so they need proper protection.
Bill
Hey Bill,
I am curious to hear more of your thoughts on how to build the floor on top of the neck of the trailer. Personally, I would rather not do any welding, and instead, reinforce the floor with lumber framing. This is mostly due to the cost and time it will take for me to get this done. However, if there is no secure way to do this, I will find a welder.
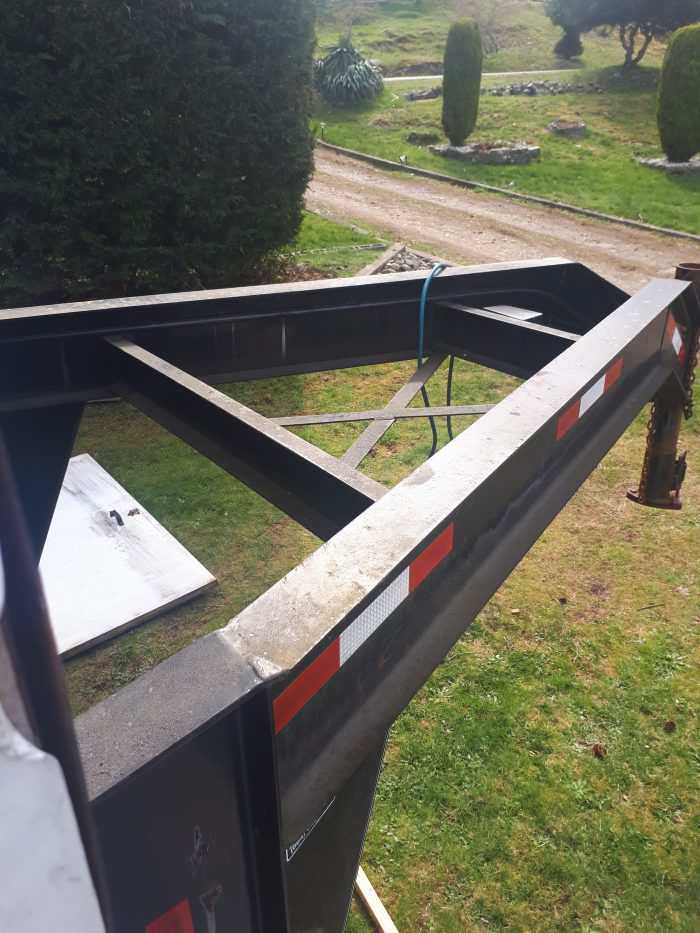
The attached image gives you an idea of what I'm working with. I'm thinking of cantilevering out my floor to 8'2" to match my walls on the lower deck. This will be done with 2x6 joists either 16" or 24" OC, which I can double up on where needed. The sketchy part is near the front of the neck, where the width slims down to about 18". Instead of building right to the end, I could place the front wall further back in order to have a wider platform to cantilever from.
From what I understand cantilevering like this becomes an issue when you have a large load (like my roof) coming down on the edges. Thankfully, the load should be equal on both sides, which helps, but doesn't mitigate the issue. Perhaps I can somehow transfer some of this roof load back to the steel tube structure part of the house?
You mentioned welding flat plates onto the "sides". By this, did you mean welding onto the walls of the steel tube structure at the height of my loft bottom plate? Then fastening my bottom plate to the steel in a horizontal direction? The alternative welding option would be to have a few crossmembers welded onto the neck platform and frame on top of these.
Thank you in advance!
An exterior wall should consist of four layers -- rain barrier, insulation, air barrier and vapor barrier. I would say you don't want the steel penetrating the insulation layer, so I would put the rain barrier outside the steel and hang the insulation, air barrier and vapor barrier on the inside. The steel would act almost like a rainscreen.
Thanks for the suggestions DCContrarian; using the steel as a rainscreen is a neat idea! Unfortunately, the steel frame will penetrate the wall whether I put the insulation on the inside or outside. This is because the ceiling of the frame will be exposed within the tiny house. Therefore, I am trying to keep the metal entirely on the warm side of the wall in order to reduce thermal bridging and condensation. Additionally, I would like to maximize the interior space since the inside of the steel frame is only 7’ 9” wide.
Currently, the Halo Exterra will act as both my insulation and rain barrier, but I do not have an active air barrier in the assembly as I am not using drywall, sheathing, or a housewrap. The question of whether or not to have a vapor barrier in this scenario arises because the exterior insulation may not be permeable enough for the walls to dry to the outside. If that is the case, the walls would need to be able to dry towards the interior side.
As for the air barrier, I am definitely open to ideas. Thanks again.
I don't see how you keep the steel frame on the warm side. Don't the wheels need to touch the ground?
My apologies. By steel framing, I am referring to the steel tube framing which makes up the cage on top of the main trailer structure.
This goes back to my point about trying to insulate the underside of the edge of the trailer. The steel framing is welded to the main trailer structure and, of course, this would be quite a challenge to insulate. However, I might be able to attach a fairly continuous layer of exterior insulation around the underside of the edges.
Without having experience dealing with this issue before, I am not sure how the heat will transfer exactly. The underside of the trailer will be exposed to the cold air, which is welded to the bottom of the steel framing, but the remainder of the steel frame (probably upwards of 95% of the surface area) will be insulated and heated with a wood stove. This obviously is not energy efficient due to the thermal bridging, but my bigger concern is whether or not this will result in significant amounts of condensation inside the walls and in the ceiling portion of the steel frame, which is going to be exposed.
Steel has an extremely low R-Value -- 0.003 per inch. Steel that is in contact with the outdoors and is inside will be at the outdoor temperature. If the indoor dew point is above the outdoor temperature you will get condensation.
There's no way to put the undercarriage of the trailer inside the envelope. The framing needs to be either isolated from the undercarriage or outside the envelope. One thing to consider is having the framing insulated with pipe insulation or spray foam or something similar.
It seems that I have reached my limit of back-and-forth replies, so I will start fresh with what I know now. Let’s say I go with the option of keeping the steel all to the outside and, therefore, acting as my rainscreen. I would then need to either remove the existing steel roof or insulate it and build an insulated attic, correct? For the wall assembly that you proposed, what could I use as my rain barrier on the outside of the steel?
For the rain barrier I was thinking galvanized steel roofing panels. Just put self-tapping screws into the frame. If you don't want to put holes in the frame, use pipe straps to hold furring strips.
Thanks DCContrarian. Looks like I've got some more thinking to do! I appreciate the help.
Humidity control is tricky. The general assumption is that occupant activity will produce more humidity than is desirable for comfort and durability. The smaller the house is relative to the number of occupants the bigger a problem that is. In heating climates interior humidity is managed through ventilation, outside air is always going to have a lower moisture content. In cooling climates you have to have active dehumidification which is usually provided by air conditioning.
In either case you have a vapor barrier to keep humidity out of the wall. In heating climates it goes on the interior, and in cooling climates on the exterior. The wall should be allowed to dry toward the side away from the vapor barrier, which is the drier side. It is also the cooler side. Humidity will flow from wetter to drier and from warmer to cooler, so both forces will drive moisture out of the wall.
Where building science doesn't have a lot to say is when the outside is cool and humid. If the outside is both cooler and more humid than the inside you're going to need active dehumidification, venting is not going to reduce the humidity and will make it worse. Your best bet may be to put the vapor barrier on the exterior and dehumidify the interior year-round. However, there may not be enough vapor drive for the walls to dry effectively to the interior. When it's cool and damp out, the humidity differential is driving humidity toward the interior, but the heat differential is driving it toward the exterior.
Your best bet may be to air seal the interior thoroughly, and make everything outboard of the air sealing out of materials that are unaffected by moisture. Along with dehumidification. Basements have similar issues and that's what I recommend in damp climates for basements.
Thank you for the detailed explanation! It sounds like our outdoor conditions are in the cool and humid class. Dehumidifying is probably a good idea regardless of the assembly I go with.
In order to create a thorough air seal on the interior side, do you have any suggestions that don’t require drywall or sheathing? Perhaps a smart vapor retarder and air barrier that I can put between the barnwood interior and the steel framing?
I am still a bit concerned about the wall's capacity to dry towards the exterior if using exterior insulation, but that's seems like a necessary component if I want to keep the steel on the warm side.
If you don’t mind, I have one more question for you, DCContrarian. As you mentioned, in our winters, the heat differential is driving moisture outwards, while the humidity differential is driving it inwards. You also mentioned that ventilation would make the moisture problem worse. Is this necessarily true though? or does it depend on the balance? If, say, you built a fairly air and vapor leaky structure, but had an oversized wood stove, could the heat differential be large enough to dry out the interior? I know this is not efficient from an energy point of view (and perhaps the logic is completely wrong), but old cabins were built this way, weren’t they? Would it be possible to build a non-airtight structure with relatively limited insulation and just overheat it to drive the moisture out? Thank you for your time!
It doesn't depend on the balance, it depends on the outside humidity level. Heating air doesn't remove humidity. If the incoming air has a higher moisture content than what you want inside, more air circulation doesn't help and in fact is harmful.
Generally you never try to remove interior humidity through the building envelope. In a heating climate you remove it by ventilating and replacing with outdoor air which has a lower moisture content. In a cooling climate you remove it with AC.
If the outside air is cool and near saturation, what's going to happen in a leaky house is that when air enters, it is warmed and can hold more moisture. The occupants of a house are putting off significant amounts of moisture, so the air that leaks out has more moisture than the air that comes in. If the air was near the saturation point when it entered it will be above the outdoor saturation point when it leaves. As it leaks out it will cool, and somewhere within the wall it will condense.
I also recommend this article by Joe Lstiburek about the dynamics of crawl spaces, because the underside of your house will be in effect a vented crawlspace:
https://www.buildingscience.com/documents/insights/bsi-009-new-light-in-crawlspaces
Thank you! That helps a lot.
Although it seems a bit radical, I am tempted to try and develop a method for implementing dlffk’s suggestion below. Namely, separate the existing tube structure from the trailer, frame an insulated floor, then place the tube structure on top of this and tie it down.
Going back in time, it may have made more sense to just remove the steel tubing and frame more typical walls with lumber, but at this point, if choosing between removing it or lifting, lifting may make more sense. Either way it has to be separated and a floor has to be framed. The main difference is the difficulty of lifting the steel vs. framing new walls from scratch (although I have to frame in windows and the door regardless). In terms of time, they may be quite similar, but the latter may require more materials and is a tough pill to swallow after putting in so much work already. I also have grown attached to the aesthetics of having exposed steel on the inside.
The other alternative is - as you proposed - insulating the interior of the steel and removing the ceiling. This will reduce my interior space and also require some reinforcements to replace the collar ties that the steel ceiling provided, but it certainly isn’t off the table.
As always, I’m happy to hear your thoughts. Thanks!
I'd like to offer two avenues to explore:
1. Put the floor and walls outside the building envelope, and cut off the bars that go across the ceiling and replace them with something with insulating value.
2. Put the floor outside the building envelope. Put the walls inside the insulation layer of the building envelope, and encase the ceiling bars in insulation on all sides. There's no rule that the four layers of the building envelope have to all follow the same path. The steel only causes a problem with the insulation layer, so see if you can adapt that layer to the steel. One idea for the ceiling bars would be to cover them on four sides with foam sheet insulation, then box that in with wood to make faux beams.
At this point, I am definitely open to exploring different avenues, thank you! However, I’m not sure that I follow your ideas - or at least not the second one. Avenue 1 is essentially your initial proposal of having the air, vapor, and insulating barriers on the interior of the steel, correct? In your second idea, when you say the “walls”, you aren’t referring to the steel tubing, right? You mean additional framing constructed with lumber? If this is the case, I would think that I’m probably better off removing the steel all together, giving myself a bit more interior room and mitigating the headache of building around the tube framing. I feel like I have misunderstood what you mean though, so please feel free to correct me. Thanks again.
Re-reading what I wrote I can see why you're confused. What I mean in option 2 is put the exterior wall on the outside of the wall bars. Either put the wall insulation completely on the inside of the wall along with the interior wall, or put the insulation on the outside of the wall bars and box them with insulation.
The idea is to have an insulation layer, and whatever steel penetrates that layer is insulated against the interior.
Thanks for clearing that up, DCContrarian. If you have a moment, I would love to hear your thoughts on my new proposed assembly in the below comment starting with "Is the layout in the attached image what you had in mind for the "perfect wall"?" dlfdk also had some great follow-up points to this. Thanks!
I think you're making the wrong compromises by sticking with the existing steel tube structure.
It's no doubt a sturdy and well made bit of construction, it's just not suited for a house - tiny or not. I don't mean to ridicule the idea, it is usually a very good thing to use what one already has, but in this case it seems like starting from a mile behind, rather than getting a headstart. Working around the highly conductive steel is a huge headache and condensation nightmare.
I say this as someone who has designed and built his own tiny house. And done so based on the great resources from this site.
How is the steel tube structure (STS) attached to the trailer? If welded directly, it'll be quite difficult to keep the bottom parts of the STS above the dew point in the winter with the direct path down and through the trailer sitting at ambient (freezing) temperature.
Is there any way to detach the STS from the trailer, build your designed floor sandwich, and then put the metal frame back on, fastened to the subfloor?
All your insulation is then exterior (nothing between the studs) and the STS itself becomes part of your interior, never crossing the thermal control layer. The steel of the trailer doesn't cross it either, sitting completely on the outside. The STS sits at room temperature all year round - no risk of condensation.
Such a build-up would essentially be the"Perfect Wall" as described by Lstiburek. Matt Risinger has a good video of it on Youtube.
Hey dlfdk, thanks for the input. When I first bought the trailer a couple of months ago, I went back and forth between the idea of keeping the STS or removing it and starting from a flat deck. I was very close to removing it for these same reasons, but decided to go the route of trying to insulate the STS instead upon the advice found on another forum:
https://permies.com/t/155711/Suggestions-utilizing-upright-tube-framing
Since then, I have put in quite a bit of work to get the STS to where it is now (there were additional components to the structure as well as surface rust that needed removing and painting). At this point, I am pretty hesitant to turn back and start the build from scratch.
I will take a look this weekend at how doable it would be to detach the STS while keeping it intact. Without a doubt, it would be at least a few more days of grinding away more welds. The next challenge would be to lift the STS and place the framed floor beneath it… any suggestions on how to do this?
Thanks again!
Also, do you have any suggestions for an effective way to fasten the STS back to the subfloor?
Teaghan,
You are probably pretty invested in the steel tube structure having done so much remediation to it, but I agree with dlfdk: I'd cut it off, use it as a great base for a greenhouse or shed, and start with wood from a level base you can isolate from the steel trailer structure below. My feeling is you will be fighting that steel all the way through this project.
Try and make the wall and roof assemblies as close to conventional wood frame construction as you can. The whole industry and all the constituent parts that go into a building are based on easy integration with that form of construction.
Thanks Malcolm, you may very well be right about this. On top of my time-spent bias, I was growing fond of the idea of having some exposed steel within the home. However, it may be time to cut my losses.. I have a few days to think about it before I will even be able to remove it.
I can certainly understand that. It's never fun to see good effort go to waste. Weighing the additional effort required to work around the steel tube structure versus the effort wasted by dropping it is not straight forward. Be careful you don't succumb to the dreaded sunk cost fallacy. It's all too easy even for the best of us.
As for how the STS could be fastened to the floor, I am not a structural engineer so take the following with more than a grain of salt: I'd probably suggest looking at either lag screws or structural wood screws. These would go through clearance holes in the bottom member of the STS and down into the subfloor and rim joists. Note whether the manufacturer recommends pilots holes to prevent the wood from splitting.
And I'm afraid I don't have a good suggestion for how you might go about getting the floor built underneath the STS. Without a crane or some other way to lift it away while you build the floor you're gonna need some ingenuity.
Oh, and I forgot something in my previous reply: Consider skipping the poly in the floor. With it and the metal flashing on the very bottom you create a double vapor barrier, which in turns carries a risk of trapping moisture. Instead I'd suggest you tape the seams of the subfloor - I assume you use plywood - to make it airtight. Your subfloor will then act as a smart vapor retarder, minimizing moisture diffusion in winter, and letting it dry to the interior in summer. This is a neat property of plywood. See this article from Lstiburek:
https://www.buildingscience.com/documents/insights/bsi087-chubby-checker-fat-man-do-permeance
Tape the seams of the metal flashing too. This should eliminate any convective loops that might arise in your floor.
I've done all of this in my own floor frame.
Thanks for taking the time to help, dlfdk! I am doing my best to be objective when trying to decide what makes the most sense moving forward, so I appreciate the reminder. I'll have to consider what I currently have at my disposal and forget about what is already done. Having said that, I am not overly confident in the efficiency of one direction over the other. Lifting the steel is a great idea; I think I could accomplish this by using some shore jacks and putting some temporary blocks underneath to stabilize it, then slide my floor in one piece at a time.
In addition to the structural screws, I could use some strong ties. Something along the same lines as this:
https://www.strongtie.com/holdownsandtensionties_coldformedsteelconstruction/htt_tie/p/htt
Thanks for the insight on sealing the floor. What climate are you in? I just want to be sure your method is transferrable to a cold and wet climate.
Cheers!
Hey dlfdk,
Is the layout in the attached image what you had in mind for the "perfect wall"? I have added in 2x2 furring strips to the outside of the STS in this assembly. These furring strips accomplish two things: (1) the steel tubing is now above insulation and not the rim joists of the floor and (2) with them attached - from the outside point of view - the headache of attaching to steel is mitigated. Of course, the furring strips have to be attached, but at least this is less of a headache; requiring a few screws per stud. The only remaining annoyance of the STS is attaching the interior barnwood, but maybe I can come up with something clever for this as well. Can I maybe use magnets to create a removable interior wall panel..? Could be useful to check on moisture and access plumbing and electrical.
And what do you think about having the 2" of rockwool comfortboard as my only wall insulation? My wood stove can heat up to 3 times my square footage, so maybe having breathable walls makes sense in my case? I know that may make some building scientists cringe (and maybe for good reason; I'm not sure yet).
Anyways, this is kind of my last ditch effort to use the STS effectively. Otherwise, I may sell it and cut my losses. Thanks!
I think your idea of using furring strips outside of the STS is a really good one.
When it comes to insulation in a tiny house my main concern is not the overall heat loss. As you say, it's as tiny as the house and easily covered by whatever means one chooses.
The main concern is the temperature of the last airtight surface as seen from the inside. Humid air will reach this surface. And if the relative humidity gets high enough here, you'll almost certainly get mold.
In the layout, your last airtight surface in the wall is the ½" sheathing. One might be tempted to assume that since all the insulation is outboard of this surface, it will be at room temperature.
Unfortunately that's not how things end up. Next to all surfaces exposed to air is a thin layer of air film. This film has a thermal resistance and thus we get a temperature drop across it. Your layout contains three of these "hidden" layers. At the sheathing surface, at the surface of your finished wall covering facing the sheathing and finally the surface of the wall covering facing the living space. In addition to these is the air space contained between the sheathing and the wall covering, which also has some thermal resistance.
And then there's your interior. Furniture, cabinets, paintings, rugs, cupboards filled with clothes, etc. Layers of thermal resistances and plenty of air films. There's also various effects due to less thermal radiative heat transfer.
There's two given temperatures. Your inside air temperature and the outside air temperature. The temperature drop as we move from inside to outside is proportional to the thermal resistance up until that point, eg. if we only considered the insulation itself, halfway through it we'd be at the halfway point between the inside and outside temperature.
Since there's a significant thermal resistance between your last airtight surface, the ½" sheathing, and the inside air, you'll get a significant temperature drop. If you had a foot of insulation outboard of the sheathing, the proportion of the total thermal resistance of your wall made up of parts inboard of the sheathing would be smaller and the temperature drop thus smaller. Use enough insulation and the whole issue goes away. The issue is a general one when working with minimal insulation and not a critique of your otherwise sensible wall layout.
Actually quantifying the risk of mold growth is difficult. There's just so many variables at play.
There's three solutions: Reduce the relative humidity of the inside air, increase the temperature of the last airtight surface, or do both.
In winter you can likely solve the humidity problem by ventilating. You ought to do this anyway for a whole host of other indoor air quality issues, so it should be a given. Especially in a tiny house. Active dehumidification is also an option as a supplement.
Warming the surface can be done in different ways. First, look at adding additional insulation without crossing any width requirements you may have set up. Second, consider whether you could make the sheathing layer your final wall covering, thereby removing the thermal resistances of a couple of air films and the air pocket. Then you need to consider what you place up against the walls. Keep an air space behind cabinets, don't put clothes close up against the wall, make sure your mattress has some air between it and the surfaces it touches, etc.
There's also the option of simply moving the last airtight surface inwards, thereby increasing its temperature. This could be done with an airtight membrane (taped and detailed) immediately behind your final wall covering. Care should be taken to seal any and all penetrations at build time and in the future. Poly might work in your climate, although I'm not a big fan. A smart vapor retarder of some sort would probably be my choice.
Doing all of it may be overkill and I can't say for a fact that your proposed layout in a house without ventilation would lead to problems. It's just so difficult to predict - especially for a layperson like me with extremely limited experience.
As for the choice of insulation, normally I'd say it doesn't matter whether it's vapor permeable or impermeable when you're only using exterior insulation. But as discussed above, when the thermal resistance of the things inboard of the last airtight layer is significant, there's a risk of moisture accumulating here. For that reason vapor permeable insulation is preferred, so as to permit drying by diffusion outward.
Regarding the floor construction and my climate zone: I live in Denmark. From what I gather, the temperature profiles are fairly close, but you receive significantly more rain than we do. Denmark sits at about 800mm per year. The difference likely translates to a higher relative humidity indoors and thus a greater humidity load. I'd still argue that you can do without poly, but listening to someone with more experience from your specific climate zone is probably a wise choice. Regardless of what you pick, airtightness is always mandatory.
I would wrap the lower sheet metal (which I assume is to protect the underside of the structure from road debris) up the exterior side of the exterior 1/2" sheathing, then bring your housewrap down over the outside of that lip (so that any water runs out, and not into the pan formed by the sheet metal). I would use polyiso in place of EPS and Rockwool, and the reason is that you need maximum R in minimum space, and polyiso is the best for that.
You have some drying towards the interior so you should be OK with foil faced polyiso here. Just make sure you don't have an interior side vapor barrier.
I disagree that the sheathing will be significantly below the indoor air temperature. It will be somewhat lower, but probably not enough to cause problems. Surface air films aren't much in the way of insulation, less than R1. The temperature of a portion of a wall is going to be primarily related to the ratio of the R values of the materials on either side of the portion you're intersted in. Exactly how much lower the temperature of the sheathing is compared to the indoor air temperature depends on how you build the wall out on the inside.
Bill
Thanks Bill. Great tip about the sheet metal; that part was actually bugging me. Perhaps I can tape it along the sheathing as well. Just in case water does get behind the housewrap. Would duct tape work well for this? That is what I was planning on using for the sheet metal seams on the underside of the floor.
In our climate, when using exterior insulation, Rockwool seems to be the go to. I think this is to allow the walls to dry more easily to the outside. However, I definitely understand the need to go for a high R-value. Perhaps I could beef it out to 3” of rockwool by using two panels of 1.5” with the seams staggered. I still have some time before I get to that part.
Bill, do you have a suggestion for the roof assembly? Having the roof sheathing kept at a warmer temperature would be great, but I don't know if I'll have the vertical space for exterior insulation up there. Should I go with the standard method of filling the 2x6 cavities with insulation (with a ventilation gap below the sheathing) and using a vapor barrier on the inside? Thanks again!
Don't use duct tape. I'd probably try a foil tape, or a heavy-mil (thick) flashing tape. You need something extra durable here because it will be exposed to sustained heavy wind, in effect, while you're driving. You don't want things to tear. Regardless of the type of tape you use, wipe the sheet metal where you'll be taping with acetone before applying the tape. Sheet metal usually has an oil film on it from manufacturing, and that oil film will prevent the tape from adhering properly.
For a roof, I'd probably try to use all exterior rigid foam. This gets you a lot of R per inch, even with something like EPS, when compared to anything fluffy, and it won't shift as you bounce along the road. Try to squeeze in 4-6 inches or so, which could be as much as about R39 if you go with polyiso.
Bill
Perhaps it’s easy to underestimate how quickly the numbers add up to a significant fraction when there’s so little insulation.
Given the wall in the drawing above, the R-value of the layers inboard of the sheathing add up to about 20% of the total wall R-value (simple 1D calculation)*. Not because those inboard layers have R-values out of the ordinary - it’s just an airfilm, barnwood and an air gap after all - but because the total wall R-value is so low.
Although significant, those 20% are of course still unlikely to create a moisture issue at the sheathing layer on a bare piece of wall.
It is however a problematic starting point where furniture is added to the interior.
I got curious and decided to collect some data in my own tiny house on what exactly the R-value of a piece of furniture might be. I picked a kitchen drawer filled with dish towels and other kitchen linens and measured the temperature behind it when closed. Using the recorded temperature drop and knowledge of my wall R-value, I could calculate the apparent R-value of the kitchen drawer: It lies somewhere in the interval 10-18 depending on where the ambient temperature is measured.
Suddenly, those 20% inboard of the sheathing grows to 60-70% - along with the proportional temperature drop. And there’s your moisture problem.
Of course, the air movement - and thus moisture transport - towards the sheathing may be so low, as to make the whole thing a non-issue. If we’re essentially only dealing with diffusion, then there’s very likely nothing to worry about. But I think that’s a big if.
In short: Add as much insulation as you possibly can. Not to reduce an already tiny heating bill, but to minimize the risk of moisture issues behind furniture and the like.
*From inside to outside (SI-values, m2*K/W): 0.13+0.11+0.18+0.11+1.44+0.04
dlkdk,
True. Tightly packed clothes closets and have a staggering R-value on exterior walls.
Thanks dlfdk! I will definitely keep that in mind. I appreciate the insight
A drawer full of blue jeans is essentially a batt of denim insulation after all :-)
Most furniture won't be right up against the wall though -- there will be some amount of air gap. The natural convection airflow in that gap is going to cancel out at least a very large chunk of the effective insulating value of whatever is in the furniture though. This would be interesting to measure sometime, all you'd need is a few small sensors (thermocouple or similar), places on the front and back of the furniture, and the surface of the wall. I think you'd find the temperatures on both sides of the furniture to be pretty close.
I absolutely agree to try to get as much insulation into the wall as you can though. I would also try to put as much of that insulation into continous insulation (rigid foam or similar) to avoid thermal bridging issues.
Bill
Teaghan,
What is your maximum trailer width and height allowed for towing on the road under all legal allowances such as special permitting, etc.? What is the maximum width and height of the existing tube frame on the trailer?
Hey Ron,
Recreationally, the limits are 8’6” wide and 13’6” high. With a permit, I believe you can go to 10’6” wide and 14’6” high, though they each require their own permit. My plan was to get a permit for the width and allow myself to build a roof overhang since rain is an issue here. Also, I plan to stay below the 13’6” height restriction. I obviously won’t be approaching any length limits.
As for my current trailer dimensions, the top of the trailer bed sits at 35” above the ground, and on top of this, the tube frame is 95” tall, giving an overall height 10’10”. My plan is to add a couple 2x4 top plates to the structure and build a vaulted roof about 2’ high, giving a pitch around 6/12. The width of the tube frame is 8’ 1/4" currently, which means I can use a couple inches of exterior insulation and still have room for an overhang.
I only plan to move the home every few years and will have to hire someone to do it anyways, so going beyond the recreational width limit seems like a no-brainer to me; a permit for the day is ~$30.
I would be happy to hear your thoughts!
When I've had to do oversize freight, the permits are PER LOAD, not per trailer. You need a seperate permit EVERY time you move the thing. The permits are per state too, so if you cross three states, you need three permits -- one for each state. I had fun some years back shipping a big 700 ton (capacity, not weight) cooling tower to Michigan from one of the carolinas that needed oversize permits in every state and a chase vehicle too. Fun times. There are also weight restrictions based on frost, which has made wintertime generator installations interesting at times.
I strongly suggest you keep your structure within standard dimensions so that you don't have to deal with oversize permits. I'd be especially careful with heights too, I have seen overheight loads catch on utility wires before. Utility cables are supposed to be 17 feet from the top of the crown of the road to the low point in the sag of the cable span, but utility installations aren't what you'd call precision projects, so it's best to be careful. If you catch a line, the utilities will sometimes try to get you for restoration costs which can be very large. Another engineer I know has a story about a garbage truck driver who liked to bounce his truck over a particular bump to go up on two wheels for a bit. This was apparently lots of fun for the driver until the truck caught a subtransmission line (~69kV) and caused a lot of damage. You don't want to be that guy.
Bill
Thanks for the tips, Zephry7. I am aware that the permits have to be acquired each time the trailer is moved. I only plan on having it towed every few years, so this isn't a huge concern. And no state lines to worry about for me!
With regards to hitting utility lines, you're definitely right: I don't want to be that guy. I will be careful with this, thanks for the reminder!
Teaghan,
If I were to build a Tiny House, from scratch, I would use ¾” structural plywood, LVLs, structural screws and glue in a kind of box-work structure. I would not just use 2 x 4s, and nails, and frame it like a house. I would use insulation board or batts. I would want to achieve a very rigid and accurate frame system that allowed as much space as possible for insulation. I would put a lot of thought into the joinery and make drawing layouts to work out all the details.
If I were using a steel frame as you intend to do, I would place all of the fabricated plywood structure with insulation on the outside of the steel frame, as has been suggested. I asked about the width of the frame and the legal limits to see if there was room for insulation outside of the frame. It sounds like there is room.
I would build the insulated structural wall and roof panels to be completely waterproof and vapor impermeable to the inside and outside. There would be no issues with bulk water entry, outward vapor drive, or a need for the insulation cavities to dry. Tiny Houses are small, simple structures, and thus allow the use of a more precise and perfected structural approach.
With this approach, the steel frame would be the working structural frame, and the walls and roof would be carried on the frame as non-structural panels.
Lifting the frame could be done with some lumber planks on each end of the trailer, passing through the steel frame maybe about 3-4 ft. above the bottom of the frame. Then you could use a hand jack on each of the four corner lifting points provided by the two cross timbers. I think that would be manageable, even with one person operating the jacks a little at a time. It would not have to lift very far.
In a way this wall, roof, and floor system would be like SIP panels, except that in this case, the panels would not be structural. The steel frame would provide the structure. But the walls, roof, and floor would all be site built as a custom built, one-piece, multi-faceted insulation panel system. This would avoid issues of sealing traditional SIP joints.
Deleted