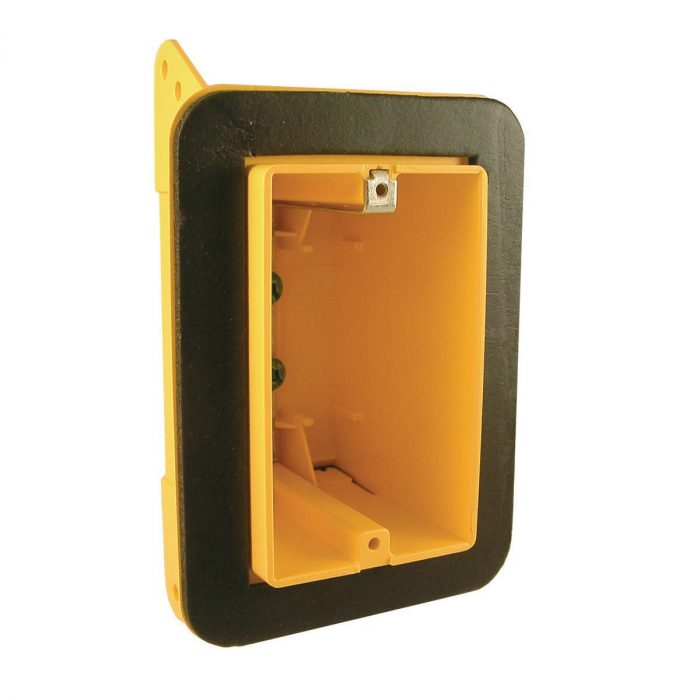
Vapor outlet box
derekr
| Posted in General Questions on
I just got these and I can’t find any info on exactly how you put drywall over this
i see the side of the box shows different depths for drywall, I thought the drywall went on top of the gasket though? Does the drywall go on the sides of this flange? Or does it go on top of the flange and press against the gasket
GBA Detail Library
A collection of one thousand construction details organized by climate and house part
Search and download construction details


Replies
The drywall should be cut so it’s a tight fit around the perimeter of the box, with the gasketed flange behind the drywall. The depth gauge doesn’t really matter here — the important thing is that that gasket is clamped right behind the drywall. If you cut the opening for the box in the usual way with a drywall router, you have to be very careful not to damage the gasket.
I’m not a big fan of these type of boxes. I prefer to limit what gets put into exterior walls as much as possible, and I detail in any electrical boxes to the vapor retarder which I use as an air barrier too (in addition to air tight drywall). I do this detailing using fiberglass boxes (which don’t have any extra holes), flashing tape, red silicone caulk, and sometimes some canned foam. It’s a bit tedious, but it avoids the issues with the flanged boxes and bulging drywall.
Bill
Maybe I can cut slightly into the stud to lessen the bulging
Because of code I have to have an outlet every 12 feet so I really don’t have much choice for the amount things on my exterior walls
Is the bulging that noticeable?
Derek,
I've used those boxes on at least a dozen houses with no issues. They have been ubiquitous in all new construction here in Canada for at least a couple of decades. Just keep the drywall screws at least 6" away to avoid pops when you put the cover plate on.
So you put them flush against the stud and the bulging isn’t too bad?
I can not distinguish between the boxes without flanges on interior walls and those with them on the exterior.
As I said, If it's a problem, it's problem every house in Canada has. Remember - drywalled walls aren't flat. They are built up at butt joints and every corner. You can see that if you put a six foot straightedge on any wall - or install kitchen cabinets.
I've used something similar to those:
https://www.cesco.com/resources/772197/676663-AttachmentURL.pdf
No issues with drywall. The only issues I've had is drywallers tend to be pretty rough and sometime yank pretty hard on the wiring in the box and break the wire retaining spring finger. Make sure to talk to them first not to do this. Once the drywall is in and if any of the wiring is nicked by the rotozip, you can gently pull some extra wire into the box.
I like to caulk over the gasketed flange with acoustic sealant, install the vapor barrier than slit an X at the device box. Push the vapor barrier into the caulk to seal it. Once the drywall is on, it sandwiches the vapor barrier between the drywall and the device box making for nice air tight seal.
If you have any two gang device boxes, they tend to not seal well on the side away from the stud. The best is to support the far edge with a bit of blocking or screw the drywall the flange to pull it tight.
With the 2 gang and 3 gang I would put a 2x4 going across between the studs at the top and bottom of the outlet?
I’m guessing there is some bulge, but it’s not noticeable if you aren’t looking for it?
Our code requires support for anything more than a two gang anyways. I normally frame a 2x on flat across the top and bottom for support. These air tight boxes are usually deep enough to put all the wiring well behind the 2x.
I actually went ahead and got all my outlets in this style even for interior walls, is that ok? just because I liked the way they are built very solid with little movement once drilled on the stud,
I have probably 20 outlets on my exterior walls and 8-10 on interior
Those boxes are an extra complication on interior walls. I don’t see how they’d hurt anything, but they don’t help you the way they do on exterior walls.
The white fiberglass boxes are pretty solid too, and more like the regular boxes. You can also use the rather expensive, but very solid, Madison boxes that screw into the stud from inside the box.
You can also go commercial style and use 4” square steel boxes everywhere with mud rings for the drywall penetrations. Your drywall guy will love you if you do this, since they can run their router around the mud ring to quickly cut the holes. You can mount the box onto the face if a flat 2x4 nailed between two studs. This adds some steps to the installation of the boxes, but will result in VERY solid mountings.
Bill
These yellow Hubbell ones weren’t too bad only 3$ each I’m just going to stay with them since I already ordered, I probably shouldn’t have got them for the interior but if they don’t hurt anything I’ll just stay with them
Derek,
No harm at all. As Akos suggested - leave a courtesy loop on wire so you have some extra for the future.
Some inspectors will fail you on those loops since the code implies a required spacing between box and first cable support. If you want to put loops, you might want to check with your electrical inspector first to see how much of a loop they’ll accept.
Bill
Bill,
I can't see anything in the NEC that prohibits them unless they are exposed, but definitely worth asking the local inspector as their views take precedence.
Our code requires a staple within 300mm (12") of the box or fixture. Including courtesy loops are part of the electrical apprenticeship program here.
I'm not an electrician, so bear with me here:
What is the concept of the busbars with the ground screws on that Hubbell box? Is this just to mimic the ground connections of a metallic box, so that the incoming ground wire is attached to the screw on the busbar, and letting a self-grounding device do the rest?
I'm assuming this is a labor saving step to eliminate having to pigtail together the incoming grounds and device grounds, as would normally be done with a non-metallic box?
If so, and that's an approved method, that's a pretty cool feature.
Chris,
That set up is unique to boxes up here in Canada. The bonding strap grounds the cover-plate through the screw that attaches it. All CSA approved boxes have them.
The incoming ground gets attached to the screw at the back of the box, but you still end up with the pigtails you are familiar with.