Water entry at inset (innie) windows
Windows have been installed for about 6 weeks now. We have had a very dry summer so i have never noticed any problems until this past week. we have had some very heavy driving rain, and i have come to notice water entry between my window frames and my rough opening.
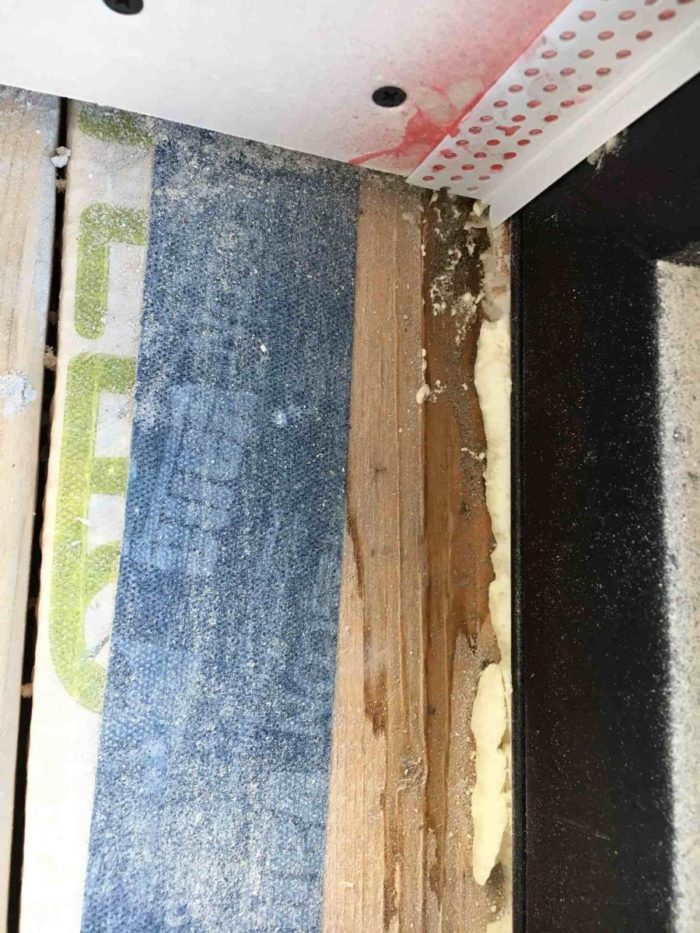
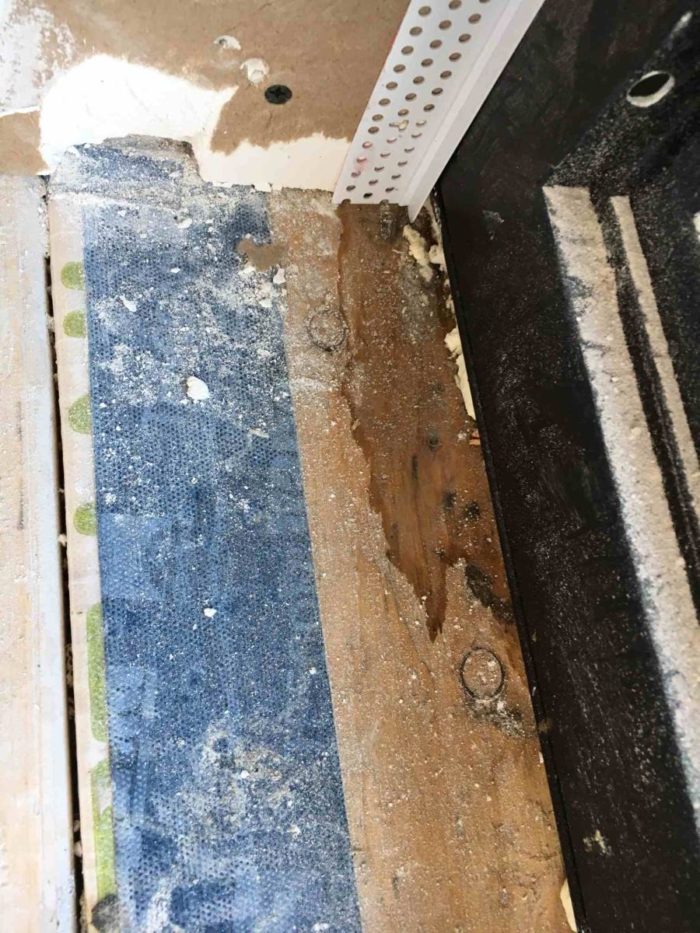
My windows are set into a 2x box which sits 2″ proud of the sheathing (zip) to sit flush with 2″ exterior eps. The joints between the sheathing and the box are very well sealed with zip tape and zip stretch tape. The window sills are sloped for positive drainage. The rough opening is 1inch wider than the window frames (1/2″ on each side of the window). Large metal j trim is used on the outside and spans between the box and the outside window frame. It sits about 1/2″ onto the vynil frame. The siding is not installed (t&g wood) and the seam between the j trim and the frame has not been caulked/sealed.
Once the trim was in place, we used low expansion canned spray foam with gun to fill up the large gap (3.5″ deep, 1/2″ wide).
The inside has drywall returna on the sides and top (these were jusy installed last week with some mudding remaining.
The evidence seems to point to water entry at the corners and only entering between r/o and window, and only on the side where wind driven rain could seamingly force the water in. (Yes the rains were that heavy, and i also have 34″ overhangs)
The window dealer, who ultimately convinced me of this sealing detail, along with the advice of my framer, both suggested this method. In reaching out to them both, they have both casually said “get the joint between window and j-trim sealed up, and the problem goes away”…
Id like to think that finishing it would solve the problem, but for enough water to make its way through the foam to stain and dampen the sill has me comcerned about longevity.
Thoughts on this detail, suggestions for rectification? Go ahead and caulk and live with it and hope it solves the issue permanently, or pull back the j trim and maybe tape between window frame and window box, or maybe just fill the voids in the canned foam and the outter surface with sealant first?
Reallt tryitr to avoid removing the trim as it is custom cut such that my exterior furring strips are ontop of tbe j return…
Appreciate your advice
GBA Detail Library
A collection of one thousand construction details organized by climate and house part


Replies
Ryan,
I'm finding it hard to visualize all of the flashing details that you are describing. Moreover, I'm unsure when looking at your photos which way is up and which way is outdoors.
I'm going to start with basic questions. First of all, before your windows were installed, were the rough openings completely flashed -- meaning that you had a sloped sill pan on the rough sill, as well as jamb flashing at the rough jambs? You can't have a good installation unless the rough opening is flashed before the window is installed.
Ryan, I'm also not sure but it sounds like you have flangeless, European-style windows, installed in a 2x window buck that is well-sealed to the exterior, with the windows sealed in place with spray foam. On the exterior there is only metal J-channel spanning the joint from framing to window? You need to have high quality tape spanning the joint. More of the Pro Clima Tescon Vana that you used on the interior would work, or Zip tape should also be fine.
A cross-sectional drawing of your detail would help a lot.
Martin: The photo is confusing due to rotation, the exposed wood is the sill (bottom)
In my opinion, the rough opening to zip, around the window box, is flashed very well using combination of zip tape and zip stretch tape.
Michael:
you are correct, the only thing missing is the tape from the joint, which I intentionally omitted to allow any water that hit the foam to drain to the exterior, thinking that the tape would seal this joint and that should water get behind it would have no escape. Turns out the water that his the foam is being absorbed/driven through it, perhaps where blocking and shims were installed to level the window, albeit these were fairly well sealed from the interior side.
The third photo shows the J-trim from the exterior, prior to sealing the rough opening with foam, since the return of the trim pieces is beyond the strapping and the masonry, it is next to impossible to at this point.
So, is the canned foam that water absorptive to allow passage of bulk water, or is this an air leak that needs further investigation. It's hard to see from the inside, as the drywall returns are already completed for the sides and tops...
Ryan, it's still hard to understand exactly what your situation is, without higher-resolution photos or a drawing. But it sounds like everyone is giving you the same advice--spray foam does not create a reliable water barrier. The window frame must be sealed to the WRB with tape, at least on the sides and top. 1-part canned foam is usually closed cell foam but with more open cells than 2-part closed cell foam. If your windows were installed with shims, there are tiny gaps that allow for capillary water movement.
What to do at the sill is always a question on these types of installations. I prefer to have a sill pan and to leave the bottom open a bit to allow for drainage to the exterior, but with self-draining European-style windows it's often best to seal the entire frame to the WRB. I can't tell what type of window you have.
In any case, a good rule of thumb is that a building should be watertight before any cladding is applied. You shouldn't rely on interior finishes to block water coming from the exterior; it should be stopped before entering the building assembly.
Ryan,
Before you do anything, I would test where the leaks are coming from. It may be from an inadequate water seal on the exterior OR it could be from the window itself.
I would try this once the sill has dried out:
1.) Cover the weep holes with tape and then carefully pour a cup of water around the sill to see if your spray foam/ pan is leaking. If not- proceed to #2
2.) Keep weep holes covered and then open your window. While the window is opened, pour a cup of water into window (the void between sashes). If the window holds the water without leaking then your window is fine and it is likely a flashing/sealing issue. (Uncover weep holes to drain.)
Check out this video for what I mean: https://youtu.be/Fkvv6T9KdFc
I was recently horrified that my European Til/turns had a manufacturing flaw at the corners (where yours is leaking). The manufacturers often shave away the corners of vinyl windows during production. If they shave too deep then they can make small holes. When rain water hits the window, some of it will drain from the corners in addition to the weep holes.
If this is the case, then you may have to remove them and ask the manufacturer to replace them. I am lucky to work with an exceptional local window dealer who is diligently addressing the issue as I write.
Good luck and let us know how it goes!
I have 8 north american style vynil windows (as seen in the pictures), and 6 European style tilt and turns (not shown in pictures). The euros are are unclad, with no j-trim, so taping will be easy.
I totally agree with the construction scheduling and finishing, however my windows were 4 weeks late arriving to site, and my mason was scheduled to start 4 days after the windows were delivered (not that i'm sure things would have been done differently, as i hadn't planned on taping this seam, but rather using the J-trim as backing for the foam). Rescheduling my mason, would have put a 4 week delay on exterior finishes, as he wouldnt have been able to return until the end of the september (he started aug 1)
Window and door delivery has been the thorn in the side of this project. I am still waiting on my front door and missing a door from my basement to my garage. This means i couldnt do a blower door test before drywall. Also, now that temperatures are dropping down significantly at night, i am going to have to insulate my attic prior to blower door test as well. Two things that i am not super happy about, however i can't simply put a project on hold to do a blower door test. And with the exception of the front door, windows and doors were ordered in February, and the foundation was poured in June. I don't even know how I could have been any more proactive and ensured delivery on-time....
should have some better pictures later today.
I had similar issues with sprayfoam only sealed windows (was before I knew better about spray foam's capabilities). Wind driver rain made it in and stained the sill. Caulking the window frame to the peel and stick on the inside solved the issues.
Ryan, can you update on what happened here?