Window buck flashing
airfix
| Posted in General Questions on
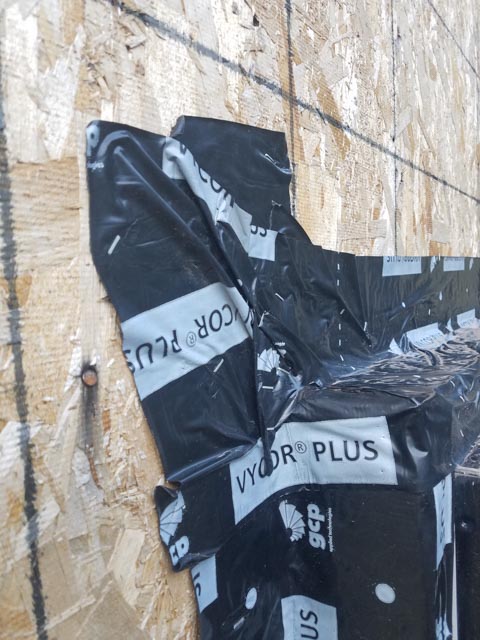
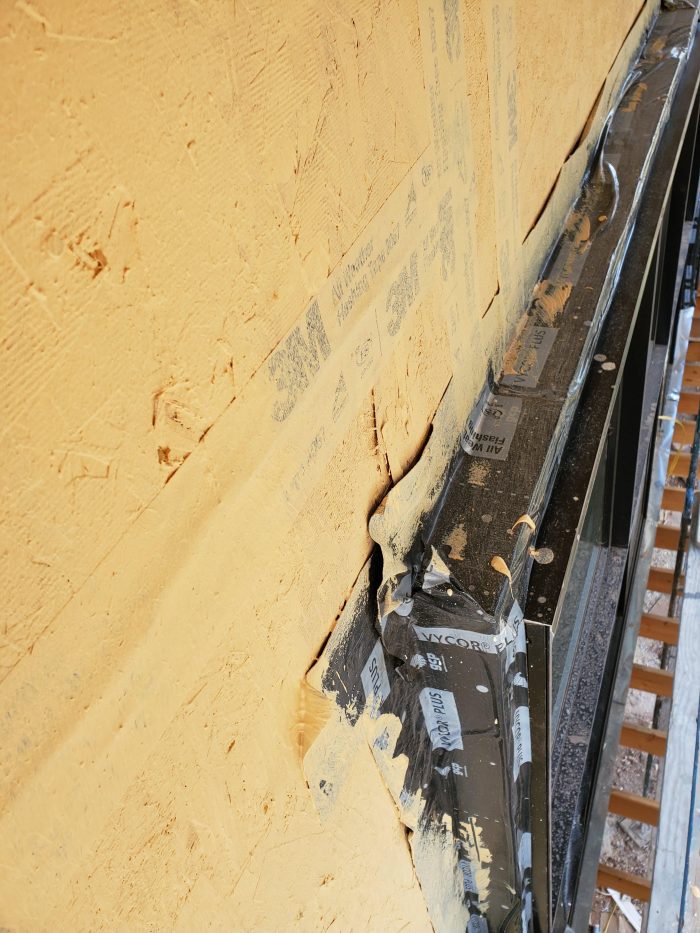
What do you make of the attached pictures and the flashing technique? We’ve got 2x window bucks with flanged windows. They put no flashing underneath the windows. They merely used silicon sealant to seal the windows to the raw window buck and then used that flashing tape over the top. The quality of the taping is poor, with bubbles and such.
The yellow stuff on the sheathing is Waster Wall Rollershield-RS supposedly a water barrier and air barrier roll on product.
None of this looks applied correctly to me. Am I being too paranoid or should I have them re-do the window flashing?
Steve
GBA Detail Library
A collection of one thousand construction details organized by climate and house part
Search and download construction details


Replies
Hi Steve,
I'm still learning about best practices for fluid-applied membranes and the installs that I have seen so far use the fluid-applied WRB with compatible (usually a system from one manufacturers) fluid applied flashing products that would be applied to the window rough opening (or buck) first, lapping onto the sheathing; then behind the window flange, before the window is installed; and then again to lap from the window flange onto the sheathing. I'm not sure what you builder's method was here, but it looks like sloppy work and like there may be some compatibility issues between the WRB and the Vycor flashing tape, which doesn't seem to be staying adhered.
Steve,
I wouldn't be that worried about the window installed directly on the sheathing (it's often done that way when the WRB is being applied afterwards), as long as they put in a sill-pan under the window and had some provision for moisture that ends ups there to drain.
The problem is the integration of the flashing-tape with the liquid WRB. If you aren't using a sheet WRB you can lap, the liquid-flashing needs to form a seal where the two meet, and your's doesn't. Something needs to stop water from getting underneath the tape at the head.
Malcolm,
How would a sill pan work. As far as I can see they used silicon sealant around all 4 sides of the window flange and the windows are already installed. I assume we'd have to remove the window to put in a window pan.
I talked to the installer of the liquid applied WRB and we agreed that we needed to change the window flashing. What the plan is now is to remove the sticky flashing tape. Then he's going to use slap on some of the Rollershield-RS liberally over to top of the window flange to the window buck, then from the window buck to the sheathing, then he will embed the Master Wall RollerShiled-RS mesh at the joints and finally seal it up with another layer of Rollershield-RS.
The plan is to do this around all 4 sides of the window that will be the air seal and the wrb.
Steve
Steve,
In your case the sill-pan would have been a piece of peel & stick membrane running under the window and down the face of the buck before the window was installed. Given that the windows are bedded in silicone sealant, that's probably not worth re-doing now.
I'd concentrate on that problematic intersection between the liquid applied WRB and the tape at the head.
As a general proposition I've got to say I'm not sold on Liquid WRBs or flashing because of precisely the problems your photos show.
I like liquid wrb's theoretically much better than a paper. But like everything else, it all comes down to good knowledge, proper application... And the care to do a job well..
It looks like the Window flashing got put on first, then the wrb got rolled on, that is good. But look at the transition of wrb to tape, looks like the person just rollered near or slightly over the window flashing. That transition needs to be detailed with a brush or small roller, many times, good and thick to ensure water doesn't pool in behind the flashing tape, (as suggested this is why liquid the windows is suggested with liquid wrb, it's just cleaner and less work in details, albeit slightly messier for the installer). And as the installer suggested, mesh tape in the wrb at the transition to ensure thickness and strength in movement.
I'd also suggest cutting some of the sheathing tape back to get rid of those loose bits and bowed out parts. Maybe even lap a new strip on top before applying the wrb transition .
I'm surprised they didn't use the same 3m tape for the window flashing as the sheathing tape. I love 3m for flashing, it's easier to work with, it adhears very well, it stretches well and it really does well with getting nice and flat to it's surface, instead of those bowed out parts in the black tape.
For my own curiosity, how many coats of the wrb did they roll on the sheathing? I can see it's not too thick especially on to of the 3m tape.
Jamie,
All good comments thanks. They are going to remove the flashing tape around the windows and use the liquid applied flashing over the top of the window flange.
I talked to the installer about thickness of the layer as it isn't per the manufacturer's instructions. Per the manufacturer it's supposed to be 10 mils thick (which is pretty thick) and they require 2 coats minimum on osb.
Interestingly the reason we are doing the liquid applied wrb is because we are doing an EIFS layer and it requires the liquid applied wrb. The installer said he would make sure the wrb is to the correct thickness and at least 2 layers under the EIFS but said he was only going to use 1 layer for areas under siding and stone veneer. The reason he said is I have taped polyiso outside of the painted on wrb so 2 coats are not necessary.
I'm not sure how to handle the thickness over the 3m flashing tape? Does it need to be 10 mils thick given the tape is waterproof and air tight?
Steve
from the looks of you photo, my guess they'll need to do 3 or 4 coats to get 10mil. Make sure it's 10 mil in the end. I'm sure there are other ways like some sort of feeler gauge to test the thickness... I usually would drill a 4" hole for a vent at that point and then I have a puck that I peel the the wrb off and measure the thickness with my trusty $20 calipers.
Make sure the window details look robust. You won't be able to measure the thickness there. My guess it after they try to take the flashing off the osb it'll be a right mess.
I'm not sure what's going on with taped polyiso at other parts of the house? So I can't comment on it other than it doesn't sound good. I will say good practice is your wrb should be continuously 10mil thick everywhere with no gaps or transitions all the way to the ground.This includes overtop the 3m tape as well.
Based on your photos, I'm going to guess the 3m tape came after the flashing? My personal ideal would have been to use a polyurethane sealant at the seams first so the wrb would easily roll overtop. But technically the wrb itself should seal the seams, and maybe with a mesh tape over the seams or as per the Manu-Specs.
This is all just my personal opinion. I'm nothing special, I'm just some guy on the internet. All I know is water and moisture management (ie preventing rot) is the biggest factor in house durability over time. There are many ways to skin a cat, but I get saddened when it doesn't get skinned well.
I would strongly consider reaching out to the EIFS manufacturer directly (Master Wall I assume, since Rollershield is Master Wall product) and asking for their advice. https://masterwall.com/support-technical-services/ says that they offer "installation review" at no charge.
You want to make sure that your details and installation are in line with your EIFS manufacturer's requirements/instructions.