Window Sill and Trim Dilemma
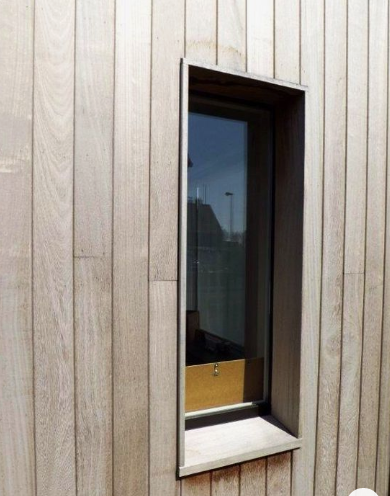
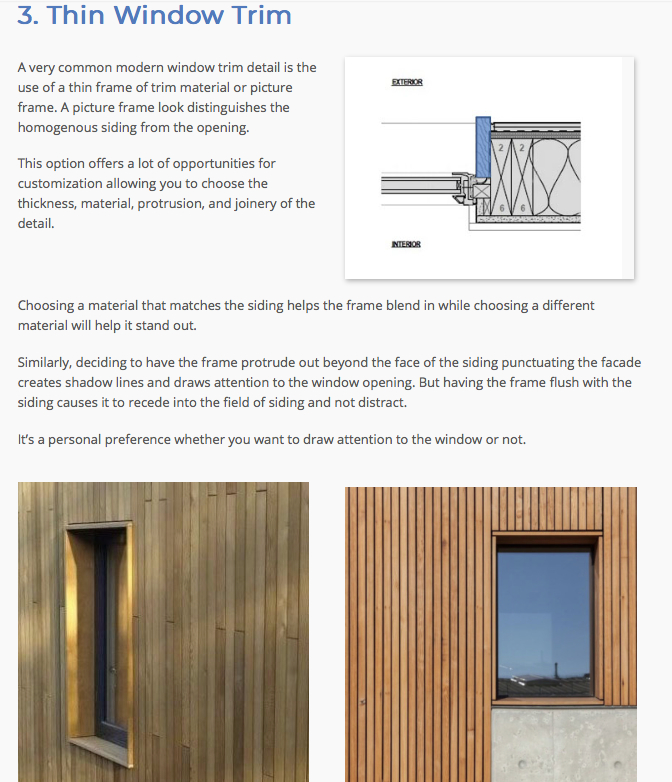
I am trying to figure out the detail for a thin window trim (aka Picture Frame style) using 3/4″ thick larch with the windows inset (refer to photo – ignore fact that there is no flashing).
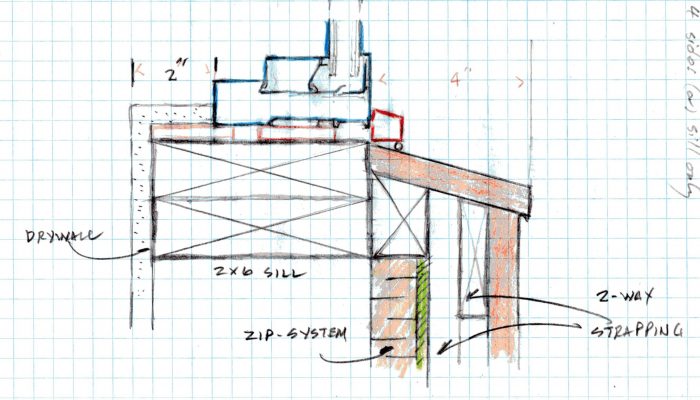
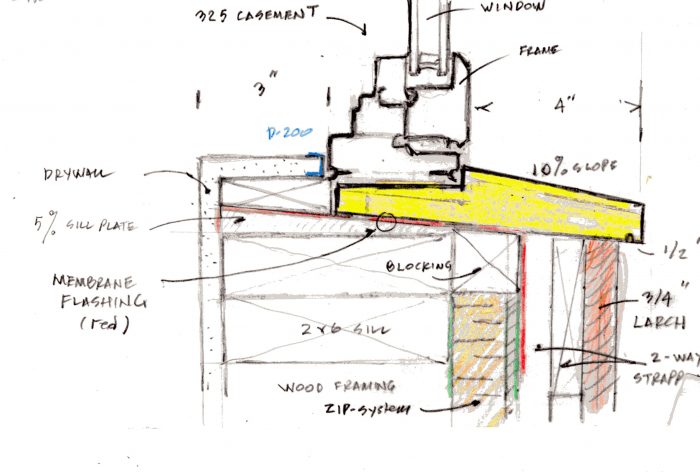
On the outside of the 2X6 framing is 3-3/4″ of total depth (adding up the Zip-system; 2-way strapping; and vertical (larch) T&G siding.
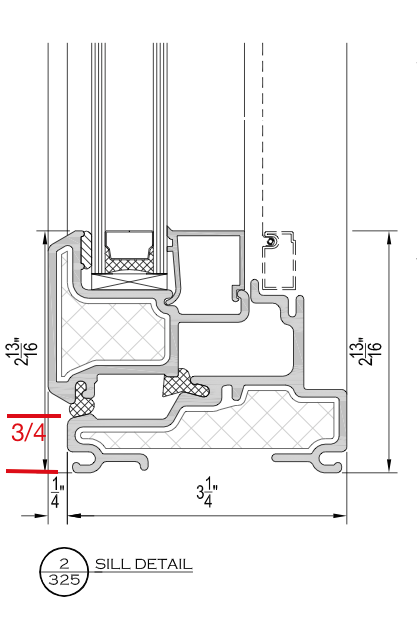
I’ve been told that it is essential to have a slope to the 2X6 framing sill. My first detail (attached, showing a fixed window frame) has a flat sill with the wood sill extension set on the outside. A builder friend didn’t like this detail because there was not enough solid material to nail the sill (and, as per the photo) we don’t want to see any nails/screws
He suggested creating a wood sill that tucked under the window frame and a rabbit joint having the window and sill epoxied together t0 form a single unit (refer to attached detail – showing a casement window frame). Besides being finicky shaping the wood, the casement window has only 3/4″ of frame below the operable window to set the window into the rabbit.
(Note: these particular windows get installed from the inside)
Not sure what to do – any advise would be greatly appreciated!
GBA Detail Library
A collection of one thousand construction details organized by climate and house part


Replies
I would hope you have massive roof overhangs with that window detail, it seems prone to water damage.
The window assembly is within the wall framing as it would be for any window installation, so not sure why it would be vulnerable.
Also, there would be flashing at the top
Your sill extension should not be the only thing keeping water out of your assembly. It should protect the water control layer, usually composed of window flashing membranes. Although sloping the rough sills is a good idea, it's certainly not required. I would rather see a membrane with a backdam, though a backdam and a slope are ideal.
Side note: I think a good name for your casing style is "fin jamb."
Does your window manufacturer provide installation details?
Thanks Michael!
The one detail does show a membrane; overtop of the sloped sill wrapping over the outer edge ( the detail with the sill extension coloured yellow). Seems to me that this is finicky having to create that flat ledge under the window frame
The other detail (with the fixed window and flat sill) could be revised to have a sloped sill plate. My concern with this detail is that you would have to nail the wood sill extension to the blocking above the Zip-system and outer horizontal strapping
The photo shows a very clean look that has no nails/screws
-p
I see now. I would modify that detail as such:
1. Wrap the membrane up and over the backdam.
2. Set the window on "set blocks" or "setting blocks," just chunks of something to put it at the correct height.
3. Butt your sill extension to the face of the window and seal the joint.
This approach will likely direct more water into your rain screen gap than what you show, but it will be much easier to do. If you add a WRB in addition to the Zip-R it will be better able to handle the water. (I like Zip products but they are not quite as robust as using a separate WRB membrane.)
Sealing the sill joint to window allows water to eventually get behind surfaces as you said Michael..
I remember when we detailed homes to shed bulk water over and out to daylight, not under. I was taught caulking always fails and is for mistakes.
James, things change. With rain screen gaps, bulletproof WRBs, European-style flangeless windows and high-quality sealant, if a bit of water gets into the rain screen gap it's not a big deal.
I think that window trim looks great! Super sleek and modern.
The downside is that it presents some serious challenges. Those can be overcome, but you're going to have to be extremely vigilant with whoever does the install that they get them perfect.
One thing to keep in mind with deep inset windows, a wood sill will not last. Paint would have to be re-applied every couple of years. Unpainted larch is reasonably resistant, but it is still a lot you are asking from it.
The best way to deal with this is to have a formed metal sill above the larch. This would only need to have a small drip edge. You would still get the nice thin all wood window trim look but it will keep all the water away from the wood. It would solve most of your issues and also get you a much more durable window install. If you colour match the metal to your windows, it will look like one nice continuous piece.
My house has vertical siding and no trim. The siding runs over the window frame at the top, and sets over the sides of the frame. The bottom of the frame projects out over the siding below, and there is a rabbet in the bottom of the frame for the siding to slide up into. This is a cruder version of the small detail in your last drawing, the saw kerf on the bottom of the angled trim board should not be forgotten, it stops water running in under the frame and into the wall.
I think when the membrane is wrapped over the back curb that last design will be pretty robust, although I am a fan of metal flashing...........belt suspenders etc
Thanks for your valuable advice Michael
I have revised the detail based on what you described
My concern is that the tongue of the rabbet joint is only 3/8" (and the lip is 3/4"); this is due to fact that the casement window has a very shallow frame at the base - only about 3/4" thick
The siberian larch is a very dense/hard wood so maybe this is OK....?
The sill has a 10% slope.
Not sure what you mean by the WRB being added to the sill flashing membrane?
I would eliminate the tongue altogether. 10% or 10°? Not the same. I prefer a 15° slope when possible--get the water away quickly! I would add a separate WRB such as 30# felt paper, Siga Majvest, Pro Clima Mento or even just Typar or Tyvek over the Zip sheathing.
Once again - thank you
The reason I detailed to have the rabbet joint was to epoxy the sill to the window to make a singular unit - thereby reducing/eliminating the issue of how to connect the wood sill to something solid beneath
That photo of the finished example shows a clean sill without any evidence of nails or screws (maybe there could be a hidden screw from beneath through the horizontal strapping into the sill?)
In addition to a caulking bead along the sill/frame should the wood sill be epoxied to the window frame?
-p
I'm a chronic reinventor of the wheel myself, but I have to ask why you are trying to come up with a new way to install windows that have been installed millions of times the way I suggest?
To answer your question, you could epoxy the sill but the normal approach is to use a metal sill that tucks under the window frame. The next most common approach is to seal a wood, stone or synthetic sill to the window frame with a high-quality sealant. Something will eventually fail and it's good to be able to disassemble things without destroying everything.
Many site built windows have a similar joist on the bottom sill. Without fail, they are rotten after a decade or so. There is just no guaranteed way of keeping water out of that joint. If you do go with your design, make sure there are a couple of weep holes in the rabbeted joint so any water that makes it through won't just sit there. It should drain into your sill flashing bellow. Make sure those holes won't get blocked by caulk/epoxy.
AG,
Try and design your solution with it's eventual replacement in mind. Setting the window on the exterior trim means what could be a routine switch becomes very involved. I'd do as Michael suggested and eliminate the tongue. I'd do the other stuff Micheal suggested too.