Image Credit: Alan Abrams
Image Credit: Alan Abrams To insulate under the slab foundation, we installed a 9-inch-thick horizontal layer of expanded polystyrene (EPS) foam. The insulation is rated at R-4.2 per inch, so the total R-value of the foam is about R-38,
Image Credit: Alan Abrams The west elevation on October 19, 2013. The yellow membrane — which extends under the slab — will be lapped over the green Zip sheathing, and taped together with an aggressive, waterproof tape. Similarly, the reddish-brown Zip sheathing on the roof will be sealed to the walls with additional membrane and tape.
Image Credit: Alan Abrams This is a view from the southwest on October 19, 2013. When complete, the low-sloped roof on the left will continue across the porch (defined by the block piers) and wrap around to the right and join the roof where the carpenters are working.
Image Credit: Alan Abrams The southeast corner (October 19, 2013).
Image Credit: Alan Abrams The northeast on October 19, 2013. A small screened porch will fill in the recess on the right.
Image Credit: Alan Abrams This photo shows the double stud wall. The 10-inch-deep wall cavity will later be insulated with cellulose. This photo was taken on December 12, 2013, after the housewrap was installed.
Image Credit: Alan Abrams There are two duct systems: one for tempered air, and one for fresh air supply and exhaust.
Image Credit: Alan Abrams Andy Corral of Elysian Energy arrived on December 20, 2013, to get acquainted with the project. Andy will be certifying that the work complies with Passivhaus standard.
Image Credit: Alan Abrams In this December 20 photo, the massing of the Grant residence is apparent.
Image Credit: Alan Abrams Three inches of polyiso were installed on the exterior side of the Zip sheathing, followed by a layer of plywood, housewrap, asphalt felt, and cedar shingle siding. In this photo, the window rough openings are temporarily covered with sheets of OSB.
Image Credit: Alan Abrams DJ Soriano of Elysian Energy records blower door readings. We came in at about .75 ACH @ 50 pascals — four times better than the IRC maximum, but still slightly higher than required by the Passivhaus standard.
Image Credit: Alan Abrams Using a smoke pencil, DJ searches for visible air leaks. Unfortunately, he found very few — which will make additional tightening up very difficult.
Image Credit: Alan Abrams
More Guest Blogs


Does a Passivhaus have to look weird? The short answer is, no.
The “tyranny” of Passivhaus
In his Discourses, Plato has Hippias the Sage assert that “…law is the tyrant of mankind, and often compels us to do many things which are against nature.”
The Passivhaus system is truly rigorous. Often it requires modifying a decision or restraining an impulse that would be natural in another context. Specifying an open masonry fireplace in your design program would be a triple nightmare for the Passive House Consultant to deal with:
- The flue damper. The darn thing would leak so much it would be nearly impossible to reach the airtightness level required to satisfy the energy models.
- The mass of the chimney would constitute a significant thermal bridge.
- Stoking up a blazing fire would probably very quickly overheat the super insulated space, forcing the occupants to open doors and windows.
Never fear. The Passivhaus occupant need not forfeit the vision of a cozy winter’s evening by the fire. There are a few wood stoves and prefabricated fireplaces on the market that are virtually airtight. They can maintain a fire at a low enough output to provide the cozy atmosphere that we naturally seek, without the disadvantages noted above.
The point is, that Passive House limits some decisions, but it does not dictate them.
Passivhaus is compatible with traditional home styles
There are a number of architectural characteristics of a Passivhaus that facilitate performance. To keep warm here in our mid-Atlantic winters, a Passivhaus likes to spread out in the sun, and look to the south. At the same time, a Passivhaus likes generous overhangs and shutters to avoid overheating in summer.
Provision for cross flow ventilation, such as windows on two exposures in each important room, and operable skylights, can reduce the need for mechanical air conditioning during the shoulder seasons. In other words, the house could easily look like a traditional bungalow or cottage.
A Passivhaus also likes simple massing — corners, offsets, and projections present challenges to achieving airtightness, and inevitably introduce thermal bridges. In this sense, it could also be a Cape Cod or Colonial style house.
Some features fight against the grain. Our clients, the Grants of Derwood, Maryland, wanted mulled windows — but the muntin bars reduce the amount of light passing through by as much as 5%. Passivhaus cares deeply about this — when this amenity was factored into the Passive House Performance Package (PHPP), the performance fell off perceptibly.
But there was always a solution somewhere: for example, by enlarging south-facing windows or adding additional insulation to compensate for the loss of solar gain.
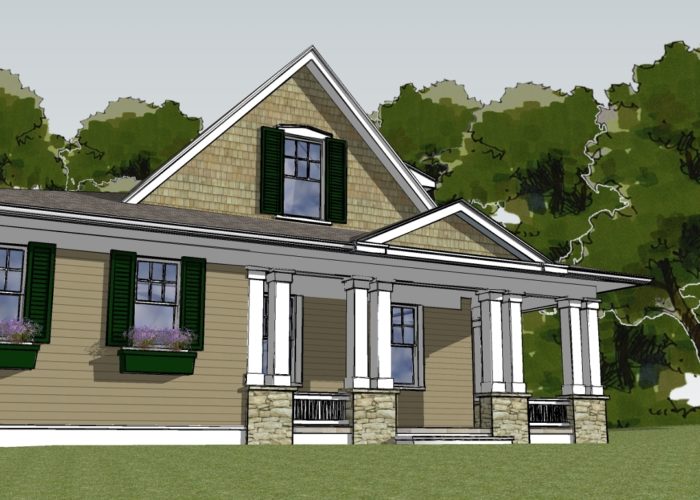
Are you wondering what this house is going to look like when it’s done? The rendering at the top of the page shows the Grant House. Not too weird looking, is it?
October 19, 2013: Under construction
October 19 was a gorgeous day to bike out and visit this Passivhaus project located in Derwood, Maryland. The site is surrounded by forest and abuts Lake Bernard Frank. The bike trail passes over the earthen dam, where I saw great blue herons sunning on the berm, and a banded kingfisher perched in a branch near the water. When I arrived at the site, a red-tailed hawk was wheeling right above the house.
Image #2 (below) shows the west elevation. What has been erected so far is the first layer of the wall and roof assemblies, which will function as the structural shell of this Passivhaus
The specifications call for several inches polyisocyanurate insulation to be installed all of the Zip sheathing shown in the photo. The walls will get 3 inches of polyiso, and the roof will get 6 inches. The roof layer will extend about 30 inches beyond the outside walls to form the eaves. This projection will not only protect the walls from the weather, but will also shade the windows from the summer sun while admitting the winter sun.
A second set of framed walls will be built inside the walls shown in the photo. They will form a 10-inch-deep cavity that will be filled with cellulose insulation. According to PHPP, the walls will achieve R-52.1 and the roof will achieve R-66.1.
December 12, 2013: More progress
As winter closes in, work continues on this Passivhaus project (see Image #6, below). The Intus triple-glazed doors and tilt-turn windows are due to be delivered next week. When they are installed, we can perform a preliminary blower-door test, to see how close we are to the mythic air tightness requirement of 0.6 ach50.
In the meantime, the duct systems have already been installed. There are two duct systems: one for tempered air, and one for fresh air supply and exhaust. As soon as the building is closed in, other rough-in work will continue.
December 20, 2013: Passivhaus certification
Now that the rough carpentry is nearing completion, it was a perfect moment to bring out our Passivhaus rater, Andy Corral of Elysian Energy, to see things in the flesh. I spent a good part of yesterday morning compiling a set of plans and documents for Andy to review, including a revised Passive House Planning Package (PHPP) spreadsheet that reflects the field changes and revisions that have taken place.
Some of the changes are minor tweaks — for example, substituting 4 inches of polyisocyanurate insulation for 6 inches of expanded polystyrene over the primary roof structure. The former has more than a 50% higher R-value than the latter; even as the total thickness is reduced, the net insulation value of the roof is increased by R-2.
This gain is offset by the substitution of a custom wood front door for the Intus E-Forte UPVC door. Although the wood door has a smaller window, it has a lower net R-value, because — counterintuitively — the three layers of glass are more efficient than 2 inches of wood. It was almost jaw-dropping, how much this one change added to the Specific Space Heat Demand.
Another major change is to enclose what had originally been designed as a screened porch. This space is intended for three-season use, and will not have a heat source, but it will still reduce heat loss through the adjacent spaces. I’ve asked Elysian to help quantify the energy savings.
An area of some controversy remains. During the Passivhaus pre-certification process, I initially modified some of the PHPP defaults for ground conditions. These were rejected by PHIUS, and I had to beef up other areas of the building envelope to compensate.
But during construction, we actually improved conditions beyond the initial input. The entire building subgrade was backfilled with an average of 3 feet of crushed stone, and then topped with 4 inches of sand to support the subslab insulation. This is a very effective thermal break with the underlying soil. Including these values in PHPP makes a significant positive impact.
On the other hand, the local climate seems to be slightly cooler than the PHPP default climate for Washington, D.C. Passing by on my bike this morning, Lake Frank — a few hundred yards southeast of the Grant house — was completely frozen over.
March 6, 2014: Airtightness testing
With most of the rough mechanical, electrical, and plumbing work complete, it was time to test the Grant residence Passivhaus for airtightness.
We scored approximately 0.75 air changes per hour (ACH) at 50 pascals (Pa) of pressure. Although this is four times tighter than the current energy code requires, it’s not good enough to meet the Passivhaus standard, which requires a reading no greater than 0.60 ach50. So we still have some tightening up to do.
The bad news is that the testing did not reveal any major leaks. That means mitigating that last little bit will be extremely difficult.
On top of that challenge, the items yet to be installed — the dryer vent and the fireplace flue — are inherently leaky. Wish us luck!
Alan Abrams is a Certified Passive House Consultant, a Certified Passive House Builder, a
Certified Green Professional (NAHB), and a Certified Professional Building Designer (American Institute of Building Designers). He is also the owner of Abrams Design Build in Takoma Park, Maryland.
Weekly Newsletter
Get building science and energy efficiency advice, plus special offers, in your inbox.


5 Comments
The gable over the entrance
The gable over the entrance is a nice touch, as are the columns. Frank Lloyd Wright meets Frank Gehry meets Frankenstein.
Lot of money to spend on a project only suitable on April 1.
Beautiful project, nice
Beautiful project, nice blog
aj
Prefab wood burning fireplace
What efficient prefab wood burning fireplace did you end up with that has a low enough btu output that won't cook the house?
Wall contruct details?
Alan, nice looking project....I hope you will keep us posted on your progress.
I am wondering about your choice of wall sheathing and house wrap....why did you put plywood on top of your rigid foam followed by house wrap and then tar paper? Seems like you are way overkilling your details and they may get you in trouble. By that I mean, you started with ZIP sheathing, assuming all of that got taped, which I am sure it did....this gives you your air and vapor barrier. Then you added your polyiso, if it is foil faced and taped, this is another air and vapor barrier.....at this point I would have expected horizontal lathe strip screwed back to your framing to create an air gap and nailing surface for your cedar shakes. Instead you added a whole nother layer of plywood plus house wrap plus tar paper. Isn't there a concern of trapping moisture in the plywood? And also not really having an air gap behind the shingles for them to dry consistently? Plus the cost of these (3) layers verses the lathe strips?
Vernacular Wisdom
Alan,
Thanks for the interesting article. As I'm sure you're well aware, many of the "passive" aspects of design date to the time before "active" was even an option. i.e., if the building was poorly designed or oriented, it was uncomfortable. There have certainly been innovations and discoveries since, but much of the wisdom of climate-specific vernacular design is as applicable today as it was originally, and Passive House buildings do well to be so informed.
Log in or create an account to post a comment.
Sign up Log in