
More Best Practices
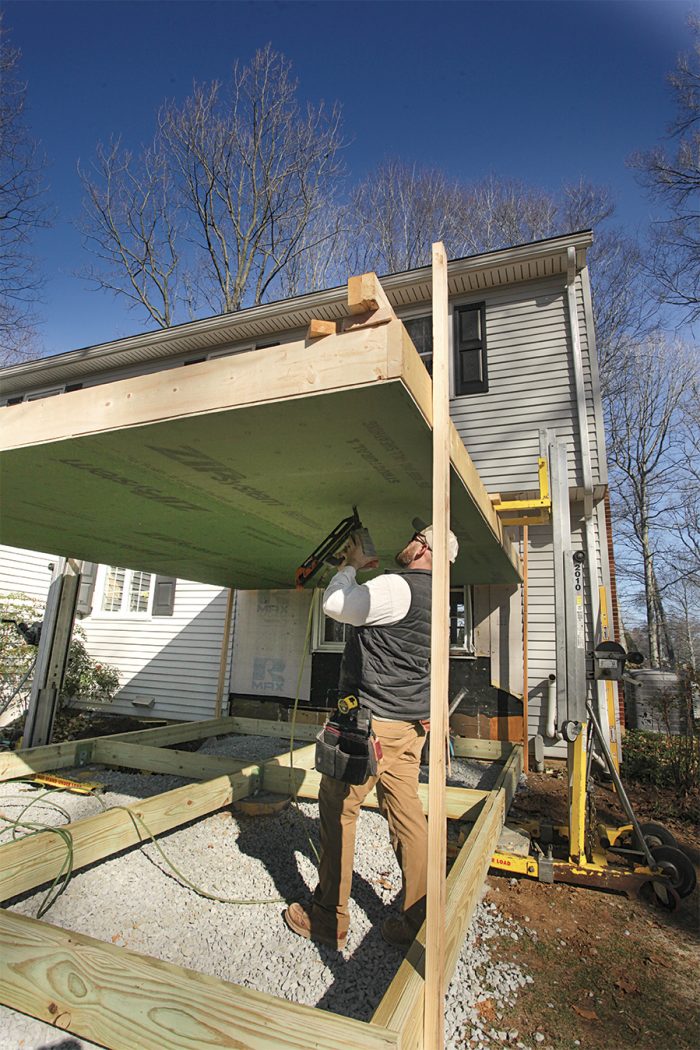
As a remodeling contractor, I often find myself with unique projects that take some outside-the-box thinking, and this job was no different. My customers wanted to add a 12-ft. by 16-ft. sunroom to the back of their home, and property lines, patios, gardens, and a septic system made it near impossible to get excavation equipment and concrete trucks to the location.
After some research and talking with inspectors and other respected contractors, I decided to build the addition on deck-style footings and a sub-frame of built-up pressure treated beams. This is not the standard foundation for sunrooms in our area, but the pros greatly outweighed the cons in this situation. We were able to hand-dig each footing 42 in. deep and place 18-in. concrete forms in the holes, then wheel the concrete around from the driveway to fill the forms. By forgoing excavating machines and distributing the soil from the footing holes to the gardens, we minimized damage to the yard and surrounding areas.
Since the addition is a conditioned space without a crawlspace or basement, we had to come up with a way to seal the floor from air and moisture. We placed a 6-mil polyethylene vapor barrier and stone on the ground under the floor system to help prevent ground moisture from wicking and diffusing up through the floor. We kept the floor approximately 6 in. above our stone and vapor barrier to allow some airflow under the space.
That just left air-sealing. After many hours of figuring, we devised a way to build a standard floor, raise it up, sheathe and tape it, and lower it back down. We rented two manually operated material lifts, each with a 1000-lb. load capacity, from our local supplier and used them to raise up the floor frame. Once it was up at…
Weekly Newsletter
Get building science and energy efficiency advice, plus special offers, in your inbox.

This article is only available to GBA Prime Members
Sign up for a free trial and get instant access to this article as well as GBA’s complete library of premium articles and construction details.
Start Free TrialAlready a member? Log in


11 Comments
Quite a bit of repeated content from Finehomebuilding lately.
Hi Russell.
It has always been our intention to share GBA content with FHB, and visa versa, when appropriate, and to let the two be unique as well. For example, you won't see a FHB trim carpentry article on GBA; you won't see a GBA article on electric vehicle charging in FHB. When it comes to articles like this, about a topic often discussed here, I hope that the content is a service to those GBA members who are not FHB subscribers.
Though we have really good analytics to show us what people come to GBA for, I'm always interested to hear what our more regular users (those who comment and actively participate on the site) would like to see us do more of, less of, the same amount of. So, please feel free to email your feedback to [email protected] any time.
Hi Brian,
I'm not an FHB subscriber and very much appreciate this content. Thanks.
When I've worked on small additions like this, I've found it easier to frame the floor next to the piers, apply the foam continuously (with blocking at bearing points), and protective sheathing, then flip the floor into place. The advantages are never having to work over your head, and reduced thermal bridging.
I also wonder whether on a floor built on piers, with continuous insulation in each bay, is there any point in adding foam board at the rim joist?
Malcolm,
Will you share a bit more detail about your method. Particularly, how are the floor sections connected to each other? Is there a continuous rim added once the floor sections are flipped? And how do you handle air sealing the joints between floor sections once they are flipped and connected?
Or would you attempt to build/flip the entire floor assembly? In the article the addition was 12' by 16'.
Thanks,
Aaron
Aaron,
The two times I have done this were for an addition of (I think) 12' x 14', and more recently a stand alone building of 10' x 12'. In both cases I found it easy to flip and position with a crew of three. For much larger projects that would necessitate being built in sections, probably doubling up the joists at each end would be the easiest. The air sealing would be handled by the subfloor the way it is on most floors over piers and cantilevers - remembering the air would have no way of moving through the joist bays, just in-between the doubled joists. I suppose you could also apply a gasket to one side of each section.
Another benefit of continuous foam under the assembly is that you can make the beams flush without as much thermal bridging, meaning you only need blocking at piers, and the floor can be closer to grade.
I also wonder how best to tape the sheathing below the floor to the wall sheathing for a continuous air barrier. Maybe use a tape with a backer left on half the width of the tape until the floor is either lowered or flipped and then adhered after the walls are up? What readily available tape would be best for this?
I'm not sure it's that important to seal the sheathing under the floor system at the perimeter if the subfloor is the main air-barrier. Then all you need to worry about is the bott0m of the wall sheathing at the rim-joists, which can be either caulking or tape. Any of the tapes used on sheathing should work. Zip or 3M flashing tape would be safe choices.
Were there any concerns about critters that may decide to nest under the structure? It appears that between the joists on the deck portion, it would be quite a bit taller than 6" and a nice location for something small enough to get below the 6" gap at the edges.
Long-time GBA stalker, first-time poster here!
I'm about to undertake a similar project, though slightly more raised off the ground (about 1' air space). I wasn't planning on doing a full gravel bed or vapor barrier, but now wondering if I should. Thoughts?
Another longtime GBA stalker. Thinking this will be a conditioned space and part of the home, I would have liked to have seen some of the sealing, moisture mitigation where the floor assembly meets the house/ledger. I have seen both direct contact and purposeful space left.
Log in or become a member to post a comment.
Sign up Log in