

More Building Science


An energy audit is an inspection and analysis of how a building uses energy. Getting accurate data requires specific tools to perform the right tests. You might think a blower door and a thermal imaging camera would be the most commonly used tools during an audit—and I do use them often—but there are a couple I use more. The following is a look into an energy auditor’s toolbox.
Priority testing
Health and safety will always trump energy conservation, and the presence of carbon monoxide is something I can easily measure. This odorless and colorless gas can be harmful and even deadly in high concentrations. I own a portable, wearable CO monitor that alerts me if CO is at a dangerous level; it also indicates the concentration. Another health and safety−related tool I own is a gas detector. This portable device “sniffs” for gas leaks. I rarely need it but it is useful in pinpointing the source of a gas leak, if I suspect one.
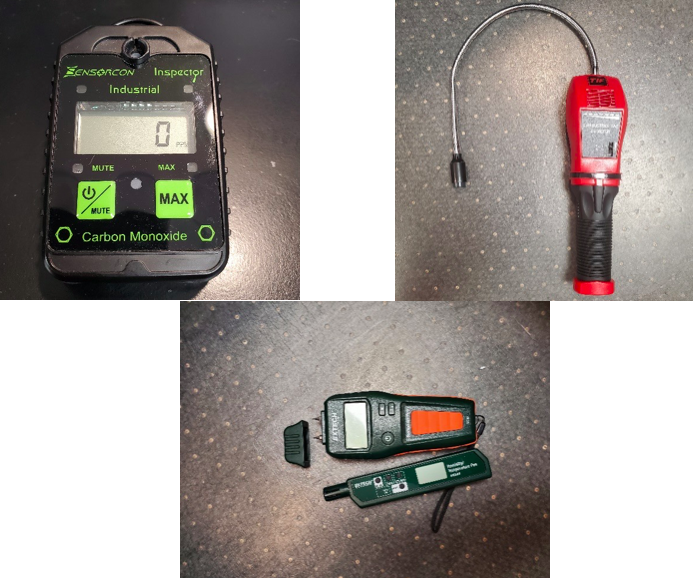
Sometimes my senses are the main tool. Sight, hearing, touch, and smell are all important and often help to determine which other tools to use. For example, a musty odor indicates dampness, which requires some investigation. In this case, I will use a humidity/temperature pen to check the humidity level around the location of the odor. I may also need to check moisture levels of building components. I have two moisture meters—one is a no-contact instrument, the other is pinned. I often start with the no-contact option to avoid damaging finished surfaces, and will use the pin meter if I find an area of concern. Both are made by Extech Instruments; neither is a high-end model, but they both give me valuable ballpark information.
Biggest issue, most-used tools
The majority of energy audits I perform are the result of big electricity bills. The clients want to know why their energy consumption is so high. In such cases, I’m testing a home’s electrical service panel and plug-in appliances. For this, I use a clamp-on ammeter to test amperage being drawn by either an individual circuit or by the entire panel.
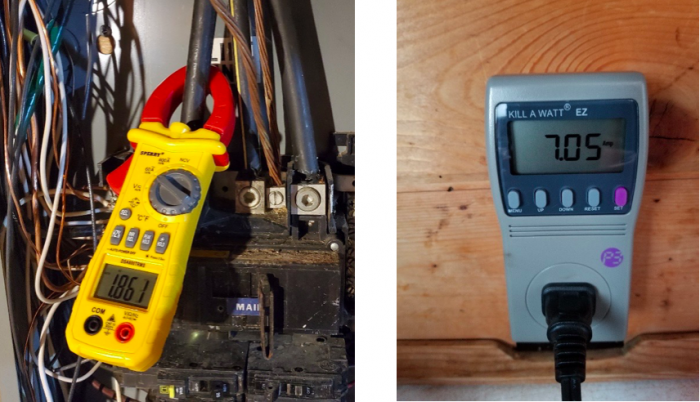
I also have leads to check the voltage coming into a house; voltage can be another contributor to a high bill. For checking usage of individual plug-in appliances, I have a Kill-A-Watt meter. The information from these two devices gives me a snapshot of usage at the time of testing. If I need more detailed information, I request hourly meter readings from the electricity provider, who can provide usage for any period of time, which is helpful if the usage testing isn’t conclusive during the audit.
The one absolute must-have
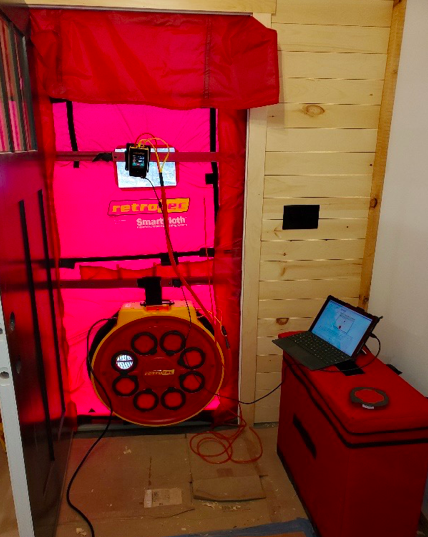
Having a blower door is a must for an energy auditor. Air leakage has many effects on a home. Cost of heating and cooling, comfort, durability, humidity levels, sound transmission, odors, and indoor air quality can all be affected by how tight a structure is, and the only way to know is to test. I own two blower-door kits, a Minneapolis Blower Door and one made by Retrotec. I often control the blower door with either a tablet or laptop computer—my Microsoft Surface comes along on every audit. I can also control the blower door with my cell phone.
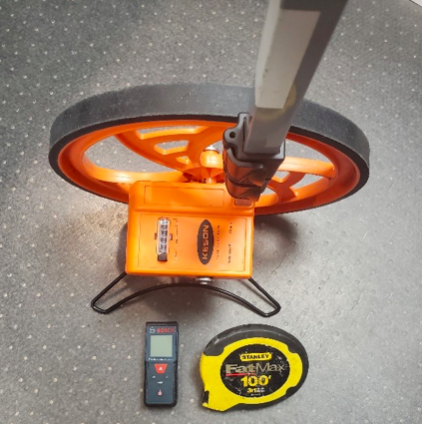
In order to perform a blower-door test, it’s necessary to calculate the house’s square footage, volume, and surface area. The easiest way to determine those things is by using a laser measuring device. It’s a matter of pointing the laser at a surface and reading the measurement from the laser to that surface. It’s fast and easy but it doesn’t always work, especially outdoors in bright sunlight where you can’t see the laser. In such cases, I use a measuring wheel or an old-school tape measure.
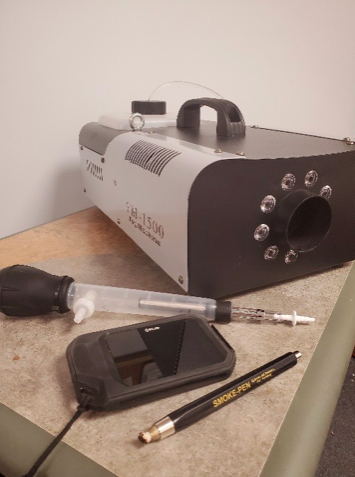
The blower door will indicate a home’s airtightness, but other tools are needed to find the air leaks. The most common tool used for this purpose is a thermal imaging camera. This type of camera indicates temperature differences in its field of view. When used during a blower-door test, the temperature differences displayed on the camera often indicate air leaks, although they can also be indication of thermal bridging or an area of higher moisture content, such as a water leak. The drawback with a thermal imaging camera is that there needs to be a temperature difference between inside and outside the home in order to see anything. Another way to check for air leakage is with smoke. I own a smoke pencil, a smoke puffer, and a theatrical smoke generator—all are tools to help make air movement visible.
Occasionally, I need to test small area of a wall or ceiling that contains a penetration such as an outlet, switch box, or heating/cooling system grill. If improperly sealed, these “holes” in the air control layer can be sources of air leaks. A pressure pan used in conjunction with a blower-door test will indicate if the penetration is leaking air.
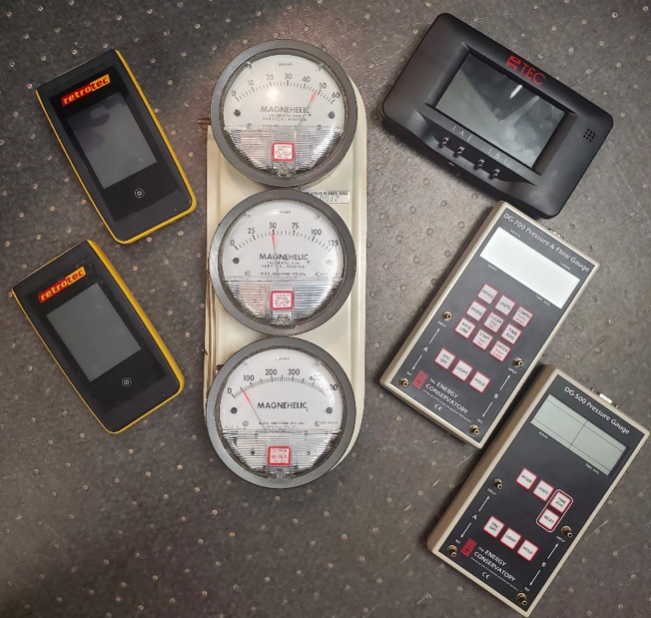
The “brain” behind a blower-door kit is the manometer or digital pressure gauge. This tool has many functions, including testing pressures in forced-air heating and cooling systems and checking natural pressures inside a home in relation to outside or in relation to adjacent rooms. The manometer can even be used to check balance in mechanical ventilation systems like energy recovery ventilators (ERVs) or heat recovery ventilators (HRVs). The center gauge pictured below is an early analog blower-door manometer from around 1990.
Less common but helpful
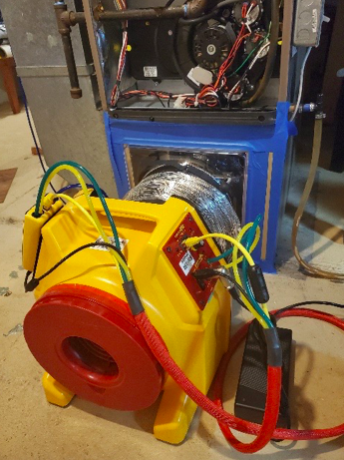
Another tool that is starting to be used more widely is one that tests the tightness of ducts. It is designed to either pressurize or depressurize a duct system in order to determine air leakage. Current building codes require duct tightness testing any time a duct leaves the conditioned space. Also, I have heard of some home-certification programs that require all ducts be tested whether or not they leave the conditioned space. This type of testing is best done before the ducts are concealed by wall and ceiling finishes, but the test can be completed any time.
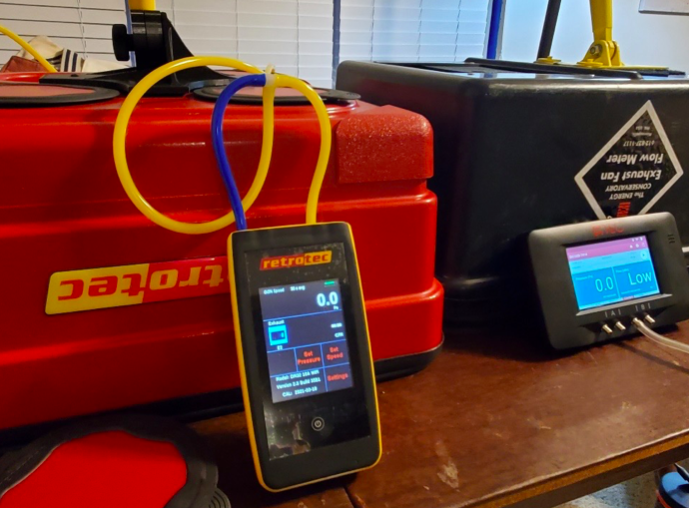
Testing exhaust equipment such as bathroom and kitchen fans is often overlooked when commissioning a house. I use a few different flow hoods that allow me to verify the cubic feet per minute (CFM) rate of an exhaust fan. You can read more about exhaust fan testing here.
A tool I own but have not used in several years is a stack gas analyzer. This device measures flue gases to determine if the combustion appliance is operating efficiently and at the proper fuel-to-air ratio. I tend not to use it because it is not me who will be making adjustments to appliances. I recommend clients have annual maintenance done by someone trained to tune, adjust, and repair combustion appliances.
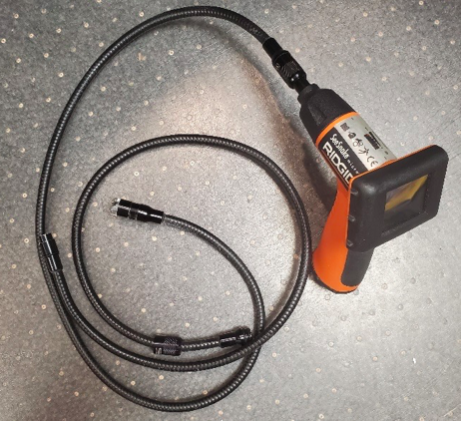 Sometimes I need to look into tight places like walls or inaccessible attics, unfilled concrete blocks, or through pipes. I own a small, older borescope camera called a SeeSnake. It is attached to a flexible rod and works well in hard-to-reach places. The model I have doesn’t take photos, but it does provide a live view, which is often enough to find a problem.
My cell phone is another tool I use during energy auditing. I have an app that calculates dew point temperatures, others that allow me to control my blower doors remotely, and of course a weather app. I also use the calculator and camera—photos are especially helpful when it comes to homeowner education.
These are the energy auditing tools I have accumulated over the past dozen or so years, many of which can be used across trades.
_________________________________________________________________________
Randy Williams is a residential energy auditor and builder in Grand Rapids, Minnesota. Photos courtesy of the author.
Weekly Newsletter
Get building science and energy efficiency advice, plus special offers, in your inbox.


6 Comments
My next door neighbor had chronic ice dams since the house was built in 1977. They wanted to improve the ceiling air tightness and R-value so they could live more carefree. I contacted a friend and very experienced energy auditor here in the Twin Cites to do a complete evaluation of the home in it's original configuration. The ACH50 was right around 6 and thermal imaging showed a lot of heat loss in the vaulted areas. The 4 season room has a T & G cedar ceiling and with the blower door running the air leakage through it was stunning. 60% of the ceilings in the house are vaulted and the original insulation was R-22 fiberglass with no defined air space.
The vaults were opened up and a dedicated airspace was created under the roof sheathing and the R-value was raised by reusing the fiberglass batts and adding polyiso sheathing for a total of R-50. The flat portion of the ceiling was air sealed, air chutes extended and cellulose added to R-50. The recessed lights in this area were updated with sealed LED units and the attic hatch was made airtight. I was amazed at how much the existing recessed lights showed up on the IR camera with the blower door going. My energy auditor really stressed the need to upgrade those recessed lights.
With the help of professional energy auditor and a very dedicated insulation company to upgrade the conventional (flat) ceiling area we were able to end the ice dams. ACH50 was improved to about 4 and energy consumption was reduced 20 t0 25%.
I would not consider a project like this without the oversight of an energy auditor. Those with experience have seen a lot of problem areas and ways to make them right.
Great story Doug! Thanks for the comment.
Article said "In order to perform a blower-door test, it’s necessary to calculate the house’s square footage, volume, and surface area."
If the blower door test is measuring ACH then don't you only need to know volume? Of course square footage is part of a volume calculation. Not sure where surface area is needed.
Hi Dennis,
The surface area is an alternate and more accurate way to quantify a building's air leakage. Because air leaks occur in a building's shell, it makes a lot of sense to show that leakage by CFM per square foot of a building's surface area. The current codes requiring the air changes per hour at 50 Pascals calculation (ACH50) makes it easier to pass a code required blower door test if the home is large. Something we may see change with the codes in the future. Software from both Retrotec and Minneapolis Blower Door allow the input of the surface area and will calculate the CFM/Sq Ft of surface area leakage rate, along with the ACH50 calculation. There is a good article in Green Building Advisor that discusses this topic, "Is it time to move away from ACH @50 Pascals".
Excellent points -- that air leakage is more related to surface area than to structural volume.
Do you recommend the TEC or Retrotec blower door? What are the pros and cons for each? Are they similar enough that it's just a matter of preference?
Log in or create an account to post a comment.
Sign up Log in