
More Energy-Smart Details


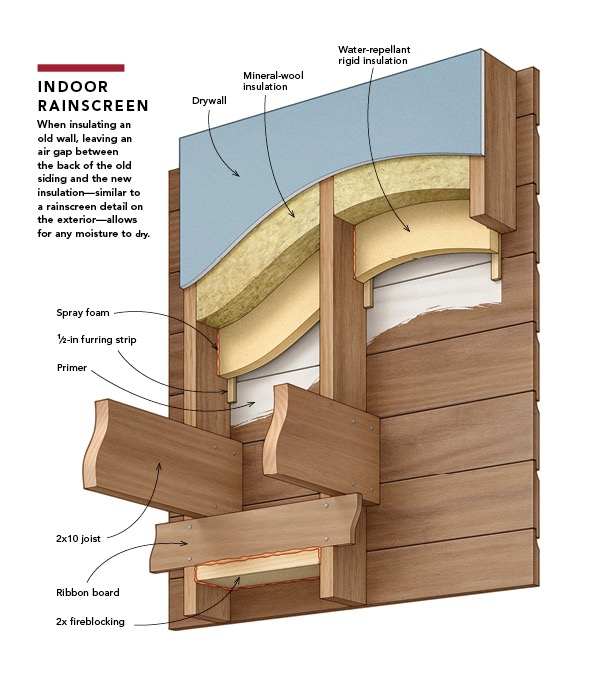
If you read Andy Engel’s post “Key Considerations When Insulating Old Walls” and Martin Holladay’s “Insulating Walls Without Sheathing,” you will find some overlap that makes this detail a good one to know. It addresses both water management and insulation in old walls without sheathing. The assembly’s success is owed to an air gap between the back of the old siding and the new insulation that allows the wall to dry. It functions much like a rainscreen.
Old houses, special considerations
Often, when people are looking to upgrade their home’s energy performance, the first thing they want to do is add insulation to the walls. For those living in older homes, that can come with unique challenges—including the absence of sheathing, which they usually discover after ripping out the lath and plaster. If removing the siding to retrofit the walls from the outside in is not in the budget, the situation needs to be addressed from the interior. So, how do you add insulation to stud bays that abut the backside of siding? Which materials make the most sense? How will moisture be prevented from accumulating?
All siding leaks, so plan for it
The key here is to always assume that water will make its way into the wall. Whatever the means by which it is enters—whether it’s migrating from wet basement walls and condensing on the backside of cold siding or it’s bulk water pouring off the roof during a weather event—this detail allows it to drain down and out while providing drying potential.
This is where the rainscreen analogy comes in.
For bulk water management and drying potential, it’s critical to leave an air space between the back of the siding and the insulation. In this detail, that gap…
Weekly Newsletter
Get building science and energy efficiency advice, plus special offers, in your inbox.

This article is only available to GBA Prime Members
Sign up for a free trial and get instant access to this article as well as GBA’s complete library of premium articles and construction details.
Start Free TrialAlready a member? Log in


17 Comments
My house is similarly constructed with siding directly on the studs—no tar paper even—but platform-framed with tongue-and-groove solid wood boards laid perpendicularly to the joists as the subfloor. How do you recommend detailing where the floor and joist butts are directly contacting the siding? I live in zone 3 where the weather isn’t challenging but when it rains it pours.
Mateo,
Not having a continuous rain-screen gap with a path to drain at the bottom makes any bulk-water intrusion more of a problem. In your situation I would do as Carl Seville suggested and line the backside of the siding with either building paper or house-wrap to limit water entry into the cavity.
When renovating a house with no sheathing I installed felt paper in the stud bays, stapled to the sides of the studs and top and bottom plate, then had spray foam installed. The felt kept the insulation away from the siding and the foam provided a good air seal at the studs and plates. You can't really properly flash existing windows with this technique but it is about the best you can do.
Do you have any suggested details for a wall assembly where the lower half of the wall has 1x board sheathing, maybe some tar paper, and sandstone masonry on the exterior? Seems like a potential issue with the stone being a reservoir cladding and without a good ventilated gap / water control layer -- especially when I want to add continuous exterior insulation to the upper half of the wall, behind siding.
Does the fireblocking work against drying objective in this detail? Exterior rain screens are typically continuous from the top to the bottom of the wall assembly.
Timothy,
The discontinuity removes two of a rain-screen's attributes: the ventilated cavity and the drainage path. However it provides the most important one which is the capillary break, and allows the redistribution of moisture in the wall's materials. So while not ideal, it's a lot better than no rain-screen at all.
It's worth checking whether (as ours does) your code allows exterior walls filled with insulation to forgo fire-blocking at the floors.
Risinger's take on the subject ... https://www.youtube.com/watch?v=jhoQ_f9ZnzQ
Risinger seems like a good guy, and he talks as though what he is doing is logical, but a lot of it makes no sense.
- Those air "snorkels" do nothing and are a waste of time. He doesn't end up with any useful continuous air path between the rain-screen gap and the adjacent spaces, nor is that connection necessarily desirable.
I also don't see why he stresses that it's important that the Delta Vent is vapour-open but air-closed, when he is locating it behind the vapour and air closed Delta Dry, then covering it with closed cell foam. Why is it there at all?
>" I also don't see why he stresses that it's important that the Delta Vent is vapour-open but air-closed, when he is locating it behind the vapour and air closed Delta Dry, then covering it with closed cell foam. Why is it there at all?"
Why? Sponsorship? (Just guessin'....)
Applying the closed cell foam (always a waste when used between framing) directly to the Delta Dry polyethylene dimple mat would have saved time, money and delivered marginally higher thermal performance due to the slightly thicker insulating foam.
Risinger seems to be a fan of closed cell foam, but for many of the applications I see him using it there are usually cheaper & better alternatives. In this instance it's buying at best low single-digits percentage boost in thermal performance of the wall assembly over what a cellulose or open cell foam solution would have delivered, whereas little 1/4" of continuous fan-fold EPS or XPS behind the drywall would with open cell or cellulose would have gained slightly more than 10% over open cell foam or cellulose solutions at a fraction of the cost of the closed cell foam. The only advantage closed cell foam buys them here other than a 1/4" strip of additional floor area is higher structural rigidity, or the ability to tell the inspector that it's R18- R20 (if that was the local code requirement, but I don't think it is) rather than calculating the comparative U-factors.
I'm not following you Malcolm. The snorkels are providing a crawl space to attic air path (with the dimple mat) for drying, not unlike what CoreVent would do for exterior air gap, no?
I'd say he is more biased towards Rockwool (often a sponsor). He's using Rockwool on his own house. Take it for what it is worth ... he is a pitch man.
Wood Goobaa,
If the snorkels do move air, which I'm a bit dubious about as the holes in the bottom plate look to be in the centre of the cavity and nowhere near the 1/2" dimple board, the next question is what mechanism is moving the air? Unlike a ventilated exterior rain-screen which is all outside the conditioned house, the air movement is presumably from the conditioned crawlspace to the unconditioned attic through the stack effect. That's not something you want to encourage.
The problem with those kinds of Heath-Robinson ideas is you have no way of knowing how effective they are. Does the air actually move? Would we consider an exterior rain-screen (or roof cavity) effectively vented with a 3/4" hole at each end? Is there any more drying than there would have been just relying on diffusion or existing air leaks through the cladding, and avoiding all the holes and pex tubes?
Hello,
I am planning on taking my kitchen down to the studs in my 1900 balloon framed home . The kitchen is a single story with 3 exterior walls under an unvented, unconditioned attic. I have original siding over plank sheathing. I am planning on insulating the walls per this article, and furring out the studs using the Bonfiglioli method of EPS foam and 1x3" strapping.
I am wondering how I should best approach the ceiling assembly? It will be taken down to the rafters. Should I screw XPS foam to the rafters and then attach 1x3" strapping to the studs through the foam? Or just make it simple and fasten the drywall to the strapping w/out a thermal break and then fill with blown cellulose above? How about continuing the air barrier that I have put into the walls? Is is not relevant in the ceiling? I am not looking to turn the attic into a conditioned space with spray foam or other method at this time.
Thanks!
David
Could someone explain why the primer helps? Thx
So is this a safer strategy to go with if I'm unsure of any weatherproofing behind my siding and want to take the safer route of allowing my sheathing to dry more readily? I know I have sheathing because I looked from the inside, but am unsure what weatherproofing I have from the outside under my ~13 year old vinyl siding and am getting ready to retrofit two exterior walls. Obviously would rather sacrifice some r-value than end up with a ton of sheathing rot.
baxt1412,
If you don't have a WRB it's a good way to go. If it turns out later you do, apart from it having been a bit more work, you have still ended up with a good wall assembly.
That was basically my guess. And if I did 0.5” gap I mean realistically I’m losing r3 at best. In a 100 year old house where the exterior walls have 0.5” what looks to be horse hair or similar insulation, losing a couple points of r value on just two of the total exterior walls on the first floor alone is minimal and not noticeable on my energy usage I’m sure. So I think I will plan on doing furring strips and rigid Graphite EPS to further encourage drying since it can facilitate that a bit.
I am getting to employ this approach on a gut remodel. Based on this JLC post, could the primer step actually cause problems that a water repellent preservative could avoid? https://www.jlconline.com/how-to/exteriors/q-a-backpriming-siding_o
Log in or become a member to post a comment.
Sign up Log in