

More Building Science


One summer about 40 years ago, at a time when I was deciding between going to college and working while doing neither, my father hooked me up with a gig insulating the walls of a shoddy summer home being lived in year-round. My dad was a well-liked barfly, who knew everyone in the lakeside community where he lived. One of his drinking buddies, whose business name ended with the word “Enterprises,” sold cellulose insulation and owned a blower. Another of his buddies owned the aforementioned summerhouse. And I wanted work. Kismet.
So, on a hot and humid New Jersey−summer day, I found myself drilling 3-in. holes in the siding of that rattletrap house, stuffing in a hose, and blowing cellulose while one of my similarly underemployed friends fed shredded newspaper into the hopper.
As my sweat mixed with cellulose dust, encasing me in a paper-mache carapace, I had little understanding of what I was doing. I had no idea, for instance, if there was blocking that would keep the cellulose from fully insulating the bays, or how important it was that the insulation be blown densely enough to avoid settling, which would render it less effective.
But that was the least of it. I never thought about water. Not once did it cross my mind that the siding on almost every house leaks, never mind the siding on a post-WW2 vacation house in a community my hopper-feeding friend’s father referred to as “the poor man’s Lake Tahoe.”
And what happens to newspaper when it gets wet? It stays wet. While cellulose itself is usually treated with borates that retard fire, mold, and decay, the siding and framing of that house certainly didn’t have that protection. I’m sure I created a hell of a mess for someone down the…
Weekly Newsletter
Get building science and energy efficiency advice, plus special offers, in your inbox.

This article is only available to GBA Prime Members
Sign up for a free trial and get instant access to this article as well as GBA’s complete library of premium articles and construction details.
Start Free TrialAlready a member? Log in


10 Comments
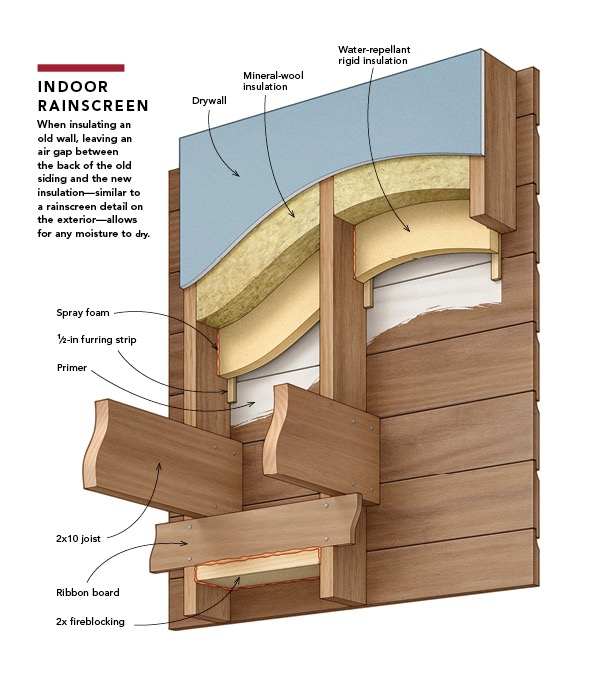
Are you suggesting the air gap only for walls with no sheathing where insulation would be directly against the siding or do you think it's also a good idea behind sheathing. I have an old real 2x4 balloon frame house with board sheathing covered by a layer of wood shingles covered by another layer of cement shingles. Someone suggested that leaving an air gap between rigid insulation and board sheathing might actually create a space that invites moisture in so I should pack bays completely with rigid insulation.
Stolzberg, If you are working from the interior only and leaving the exterior "as is" then exterior sheathing has plenty of drying potential so pack those bays to the fullest and air seal from the interior. An air gap on the inside will only hurt the Rvalue and increase the chance of moisture building up on the inside of the sheathing.
PK
I believe there have been issues with premature paint failures, or having to paint more often when the insulation is packed up against the sheathing/siding in these old homes. Homeowners with old Victorian's in my area can spend $15-50,000 to have their homes repainted so limiting paint life has a real economic impact. I think this is why the author is recommending the air gap.
I really prefer some housewrap stapled to the back of the siding to minimize wind washing of the insulation. That still leaves a small air gap due to the clap laps.
REGARDING SEQUESTRATION OF CARBON BY CELLULOSE
You stated "cellulose has advantages over most other insulations, not the least of which is that it sequesters carbon." This is somewhat of an overstatement. We're really talking about the lifetime of a tree -- say 100 years. Carbon dioxide cycles through plantlife as cellulose continually, for this discussion, 100 years. In the big picture, burning or otherwise degrading cellulose to carbon dioxide, then synthesizing new cellulose through photosynthesis, is happening continually and has been for thousands of years (as we know it today.) The real problem is the release of carbon from fossil fuels that has been sequestered for millions of years. That is what's upsetting our environment. I would argue (some more knowledgeable might disagree) that if we could switch from entirely from fossil fuels to currently produced cellulose (a 100 year timeframe) we could stabilize the carbon dioxide in our atmosphere indefinitely. So fire up your modern woodstove and burn with impunity! :-)
Mark, if we had 100 years to re-sequester the carbon released when burning wood, I'd fully agree with you. But with the climate crisis already here and the next decade as a critically important period, releasing the carbon stored over a few decades all at once is worse than leaving it to decay slowly in the forest. Plus most wood stoves are not very efficient, so their emissions are significantly higher than those of efficient gas-burning appliances. Then again, where I am, wood is plentiful and petroleum is not locally produced. It's a nuanced subject.
>". I would argue (some more knowledgeable might disagree) that if we could switch from entirely from fossil fuels to currently produced cellulose (a 100 year timeframe) we could stabilize the carbon dioxide in our atmosphere indefinitely. So fire up your modern woodstove and burn with impunity! :-)"
----------
>"Plus most wood stoves are not very efficient, so their emissions are significantly higher than those of efficient gas-burning appliances."
The efficiency required for wood-burners to be lower net carbon (or carbon equivalent)-emissions than natural gas depends a LOT on the forestry practices of the wood source, and the fugitive methane emissions of the natural gas sources, and is not merely a function of combustion efficiency.
A decade or so ago in Massachusetts the state commissioned a fairly extensive analysis on this subject in order to correctly adjust renewables subsidies for wood burning power generators. In order for a wood fired generator to break even against a combined cycle gas generator (typically ~50% thermally efficient) was still less than 30%. (More details here: https://www.mass.gov/doc/manometbiomassreportchapter1pdf/download and here: http://gfmc.online/vfe/Manomet-Biomass-Report-June-2010.pdf ). IIRC, initially to get full credit the biomass generators needed to meet or exceed 60% efficiency (basically not achievable), while half-credit was allowed at 25% (difficult, but at least theoretically possible to achieve as generator-only), though heat & power cogeneration was allowed to count toward the net thermal efficiency.
The rules for biomass burners in MA are currently in a state of flux, even as CC gas generators are now pushing 60% thermal efficiency, the analysis shows that even at 25% it's still net-positive from a carbon emissions point of view if non-forest residues are used as feedstock. (more: https://www.wbur.org/earthwhile/2020/12/22/biomass-palmer-springfield-asthma-rps-change ) It's not exactly equivalent, but an EPA rated wood stove has a thermal efficiency of 67%, so it's highly likely that if you're burning storm-damaged wood residue from city trees or urban yards it's going to be lower net carbon than burning natural gas in a condensing gas furnace, but still way more carbon emissions than getting the same amount of heat from an air source heat pump powered by a predominantly CC-gas driven local grid. And where grids are even lower carb than that (such as the ISO-New England grid average), the carbon emissions per MMBTU of a wood stove are many times higher than the heat pump paradigm.
I've been reading all the articles about insulating old houses and I think I'm starting to figure it out but I just want to check. I still need to verify wall construction, but I believe I have, from the outside in, metal siding, wood tongue and groove siding, wood plank sheathing, 2x4 wall construction, with plank sheathing inside. Based on what I've been reading, if I didn't want to pull the metal siding off, I could work from the inside by removing the interior plank sheathing, air sealing all around the edges of the bay next to the exterior plank sheathing, fill the space with batt insulation, put the plank sheathing back up (since it might help with the structure, plus I like a stronger interior wall than just drywall), and then finish with drywall, and I can do this because there is space between the metal siding, siding, and exterior plank sheathing to allow for moisture to dry to the exterior. There will still be thermal bridging from the wood but at least I will have sealed the inside from the outside and insulated. Does anyone see any issues with this plan?
Just a lot of work!
Happy soon-to-be Fourth everyone!
I hope you don't mind if I run an idea across y'all? I'm in climate 3, mixed temps, humid air.
So I'm redoing a room in my pre-1940s house. It's balloon framing, no insulation in the walls, stud bay goes from crawlspace to attic, tongue & groove boards as sheathing. However, the t&g is only on the interior. So my wall from out to in goes: wood clapboard siding - open stud bay (full 4" dimensional studs) - t&g 1" - old nailed wall paper with cloth backing - thin wood paneling.
The plan is to drywall the room and insulate; however, I do not wish to completely remove one side of the wall for budget and time restrictions. I work 7 days a week 8a-5p so most of this will be done myself in the evenings as time sees fit with a buddy here or there. My idea (a combination of an article here by Martin Holladay and a video by Matt Risinger) is to remove the top 3 or 4 t&g boards from the wall, slide down a cut to fit piece of 1/4" dimple matting, add a bug screen to the stud bay openings in the crawlspace, then fill between the dimple and the t&g with blown-in cellulose or fiberglass. Then when finishing drywall, seal it to the framing.
So if I'm not mistaken, that should provide me an air barrier (sealed drywall and rechecking window flashing) and water barrier (dimple mat keeps insulation dry). Then moisture can dry outside
So my questions:
1. Does that actually sound reasonable?! I know it's a convoluted work around but that's what I'm working with here. I know there will bridging from the studs but insulation and an air barrier will help greatly - this will be the master bedroom and I like to sleep cold lol!
2. Do I actually need the stud bay to remain open to the crawlspace? I imagine the stack effect pulls moisture up the walls from the crawlspace to the attic. The crawlspace is actually more of a walk space (you have to hunch over for half of it) and has small vents along the cinder wall. I figure if I close it off with expanding foam then the stack effect will pull air from the conditioned interior. Even if humid air is pulled from the crawlspace, the air gap created above will allow drying, correct?
Thanks for reading and for any tips you may have!!
Connor
Log in or become a member to post a comment.
Sign up Log in