
More Product Guide


ThermalBuck inventor John Brooks is a very clever, passionate building professional who is job-site savvy. He saw a weak component of high-performance walls: wood window bucks in exterior walls with exterior rigid insulation. His ThermalBuck system virtually eliminates that thermal bridge and is very airtight to boot.
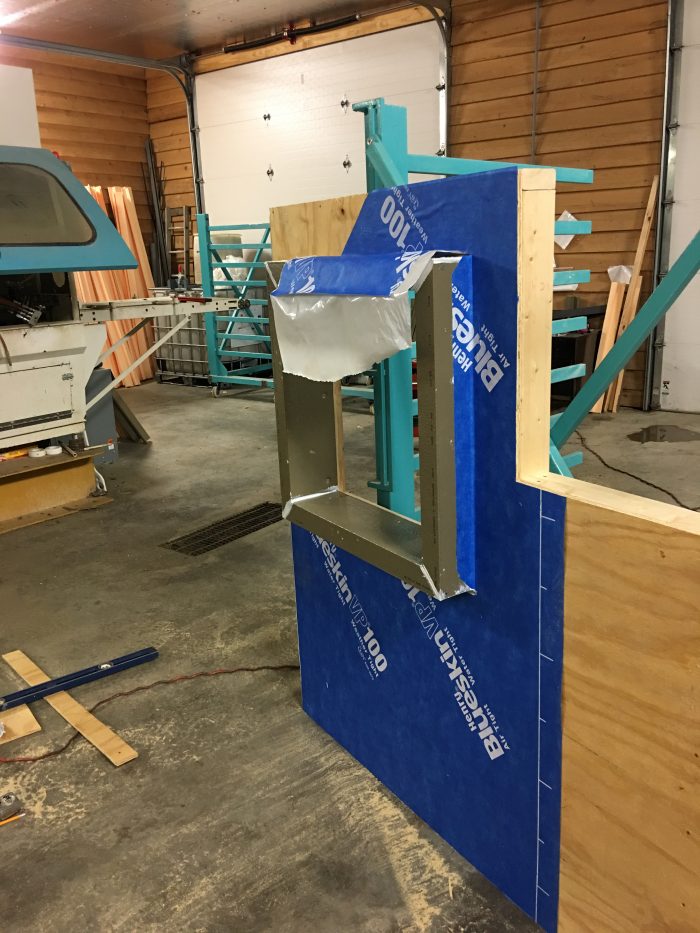
ThermalBuck is a “Rough Opening Extension Support Element” with a high-density EPS core and a high-density plastic casing (a lot like a truck bed liner). It is structurally fastened to the wall framing using nails and adhesive, and then the window is structurally fastened through ThermalBuck to the framing, using long #10 screws. GBA news editor Scott Gibson reported on ThermalBuck in an April 2016 article called “An Alternative to Wood Window Bucks.”
ThermalBuck is quite newsworthy
The novelty of ThermalBuck and the tirelessness of John Brooks have led to ThermalBuck getting quite a bit of attention as a high-performance “outie” flanged window installation system.
- At Greenbuild 2015, my former company, BuildingGreen, called out ThermalBuck in an article, “Greenest of the Green Energy-Saving Products from Greenbuild.”
- The ever-popular Matt Risinger did a “Risinger Goes Rogue” video on the ThermalBuck in November 2016.
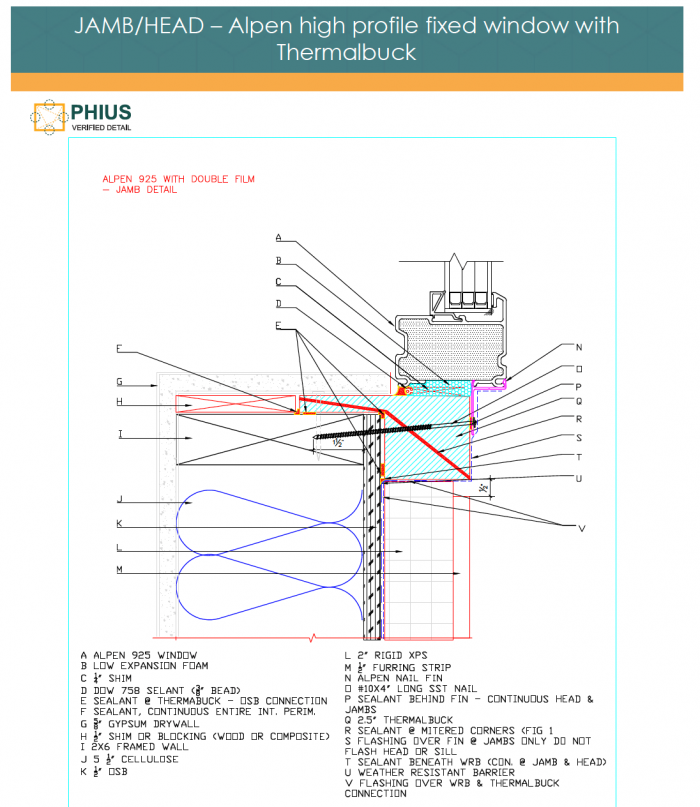
- Passive House Institute U.S. (PHIUS) identified ThermalBuck as a “verified” window installation detail (with Alpen Window).
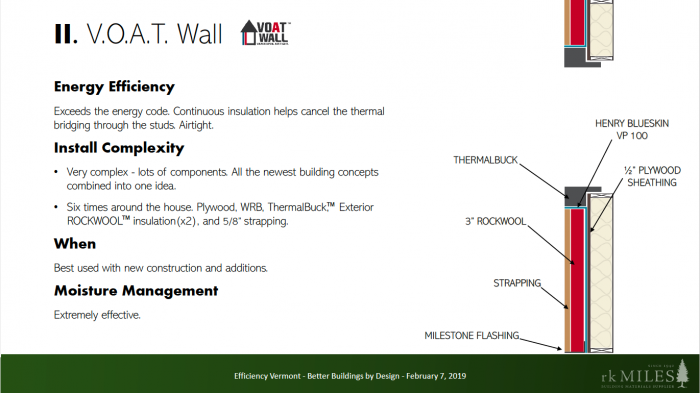
- R.K. Miles, a building materials supplier in Vermont and Massachusetts, identifies ThermalBuck as a “featured product” and a key component of a wall system that it calls the vapor-open air-tight (VOAT) wall.
- An R.K. Miles employee named Nick Stone gave a presentation on vapor-open wall systems, mentioning ThermalBuck in the presentation.
Nick Stone’s presentation was at the Better Buildings By Design conference in Burlington, Vermont. At that conference, I saw Stone compare five wall assemblies. The comparison was based on 4 key elements, including moisture management. Nick’s presentation identified the VOAT wall as having “extremely effective moisture management.”
But when I looked at the five wall mock-ups in the front of the conference room, I saw just one — the ThermalBuck VOAT wall — that did not accommodate a sloped sill or a back-dammed sill pan.
It sure looked like the ThermalBuck system resulted in a face-sealed rather than a water-managed window installation. But ThermalBuck claims to have an “integrated sloped sill.” So which is it?
Face-sealed vs. water-managed window installations
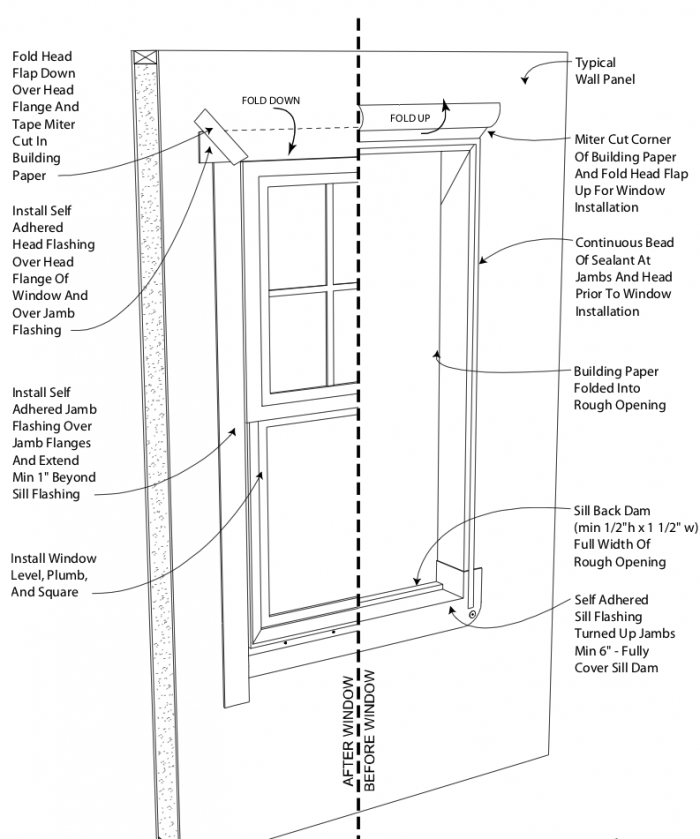
GBA’s Detail Library has a series of details for “face-sealed” and “water-managed” window installations. The key difference between the two is that the former relies on keeping water out with sealant at the face of the water-resistive barrier (WRB) while the latter adds a weather-lapped rough opening system leading to a sill pan that drains to the exterior.
The Building Science Corporation climate-based Guides and their Water Management Guide state that while water-managed window installations are recommended for all levels of bulk water exposure, situations exist that will tolerate a face-sealed approach: regions with less than 20 inches of precipitation, sheltered designs, storage/reservoir claddings, and high drying potential wall assemblies. While not explicitly stated that all of these conditions are required for a face-sealed window installation, I believe that the full monty is implied.
Details of the ThermalBuck window installation system
ThermalBuck has several step-by-step installation guides available on their website as well as several installation videos.
I believe that all of ThermalBuck’s installation methods have the following characteristics in common:
- Reliance on sealant as an adhesive: Continuous beads of sealant are used as an adhesive on the interior of horizontal and vertical legs. This includes the horizontal and vertical legs of the sill component. The mitered cut joints of all four of the “picture-framed” pieces of ThemalBuck are beaded with sealant just prior to installation.
- Reliance on sealant as a face-seal: Continuous beads of sealant as fillet joints are run on both the interior and the exterior of all ThermalBuck components.
- High-performance silicone sealants (DAP Dynoflex 800 or Dow Corning 758) are recommended throughout the sealant system, but ThermalBuck does not require their use.
- The 1/16-inch cant built into every length of ThermalBuck results in a slight down-and-out slope to the sill or horizontal leg. John Brooks refers to this slope as an “integrated sill pan for drainage.”Authors’ Note, 4-30-19: From the ThermalBuck manufacturer – The very first TB version had a sill slope of 1/32-inch but 2 – 3 years back, TB re-configured the slope to 1/16-inch.
- Windows installed with the ThermalBuck system must be flanged. (While this is not stated by ThermalBuck, I could not find any examples showing unflanged windows, nor do I think the system is designed for unflanged windows).
- ThermalBuck window installations are all outie installations; any sheltering to reduce the window’s exposure to bulk water would need to come from design elements (eave overhangs, window roofs or window overhangs, etc.).
- Weather-lapped tape flashings are installed to cover the face of the vertical legs of the ThermalBuck components after the flanged window is installed.
So what is the problem?
Everything is weatherlapped and there are two systems keeping water out: the face sealant of the ThermalBuck installation and the tapes that are used when the window is installed. The problem is, as John Brooks states in one of his installation videos (“How to Install ThermalBuck – Exterior Insulation as the WRB” ), “All windows are eventually going to leak; it’s just a fact of life.”
If the window unit leaks to the interior of the window unit (and interior to the interior fillet joint of sealant), that water has no place to go but in. And if any part of the WRB/window flashing system fails and water makes its way in rather than out at the rough opening, that water has no place to go but in.
High performance exterior wall assemblies all have these four control layers in order of priority:
- Bulk water
- Air
- Vapor
- Thermal
ThermalBuck rocks 2 and 4, and in the VOAT wall does the same for 3. But the most important first one — bulk water — the control layer is not up to the same level of defense as the other three control layuers, in my opinion.
Can ThermalBuck rock number 1?
What if:
- Before the ThermalBuck system is installed, the rough opening is flashed and a sill pan with a backdam or sloped sill (or both) is installed, and
- When the ThermalBuck sill leg is installed, it is not sealed with adhesive on its horizontal and vertical leg (so that any leaked water directed by the sill pan could weep out of the ThermalBuck sill leg)?
Would that do it? Make ThermalBuck high-performance all the way around? I am sure there are additional details to consider and issues that these changes will raise, but as we strive to improve the performance of buildings, we need to honor, by priority, those pesky control layers.
Author’s note: I want to thank John Brooks of ThermalBuck, Nick Stone of R.K. Miles, and Alan Benoit of Sustainable Design for their continued work on high performance buildings, including our constructive email exchanges on bulk water management, the ThermalBuck system, and the VOAT wall.
Peter Yost is GBA’s technical director. He is also the founder of a consulting company in Brattleboro, Vermont, called Building-Wright. He routinely consults on the design and construction of both new homes and retrofit projects. He has been building, researching, teaching, writing, and consulting on high-performance homes for more than twenty years, and he’s been recognized as NAHB Educator of the Year. Do you have a building science puzzle? Contact Pete here.
Weekly Newsletter
Get building science and energy efficiency advice, plus special offers, in your inbox.


12 Comments
In my conversations with the Thermalbuck representative regarding the process of using a Thermalbuck in conjunction with a liquid applied WRB such as Tremco (that would be applied around and into the rough opening before applying the Thermalbuck) it was suggested that a proper seal between the Thermalbuck and the liquid WRB might not be possible. It seems that the Thermalbuck must be directly sealed to the OSB or plywood sheathing in order to be effective and watertight.
If you pan and flash the sill before the Thermalbuck sill piece is attached (and then you also don't seal the sill piece in order to allow water to weep out) then the Thermalbuck sill is not attached to the wall as it is designed to be. It kind of defeats the purpose of having a one piece integrated system surrounding the rough opening.
Why not just install the Thermalbuck as suggested by the manufacturer and then add a sloped sill pan on top off it? Then you can wrap the WRB up into the opening at the sill so it is all covered and protected? Then any bulk water that may get in can't seep into the interior.
Hi Scott -
Indeed the question is how to convert the ThermalBuck system to a water-managed one, still integrated with the WRB, still giving proper structural support to the window unit, and providing a drained-to-the-exterior sill pan.
I think either approach--drained sill pan BEFORE the ThermalBuck goes in (and under the TB sill leg) or AFTER (and over the ThermalBuck sill leg)--presents challenges and will need to be worked out by the manufacturer.
Peter
Peter, since the Thermalbuck has a 5 degree slope on its surface edge isn't that a "drained to the exterior" sill pan?
The problem you have with the design (as I see it) is that water could get behind the window casing/flashing/caulking etc, run down the frame of the window and sit on top of the Thermalbuck sill (and then possibly run in towards the interior of the room). Is that correct?
If so, then sealing the Thermalbuck to the exterior sheathing, caulking the joint between the Thermalbuck and the sheathing and then lapping the WRB up the sides of the Thermalbuck should create an integrated water managed system. The question then becomes, should you add a site built sill pan on top of the Thermalbuck sill pan for extra insurance?
As to putting a drained sill pan into the rough opening BEFORE the Thermalbuck sill pan, I think that would compromise the design of the Thermalbuck system. The product needs to be sealed to the sheathing. I think separating the sill from the rest of the pieces by creating a drainage space around or under the sill would just create a whole new set of problems.
I have not studied the various flashing methods extensively, but this one got me interested in the problem and I have some thoughts about it.
In John Brooks’ video, he says the sill pan is integral with the Thermalbuck, and that the pan slopes at the rate of 1/32” vertical per 1-3/4” horizontal, so that is sloping downward in the exterior direction at an angle of 1.01 degrees. I think I can see that small slope in the drawing detail of the Thermalbuck installation, but it is nearly lost in the pixilation. Also, there is a space between the top of the pan and the bottom of the window frame that is filled with spray foam.
With that very slight downslope of the drain pan, and with the foam fill, I can’t imagine water freely draining off of the pan. It seems like there would be so much capillary action in the foam that the water would just soak the foam and slowly exit by evaporation to the outside.
But if the water had entered because it was raining, it would soak the foam, but not tend to evaporate back to the outside because the air would be moist with the rainfall. Therefore the rain would continue to leak in and back up inward from the sill pan. It is not clear where it would go, but it seems that the exit over the sill pan would be blocked by the foam fill being saturated with water that is not moving down to drain off the sill pan, due to being held back by capillary action.
But in the larger perspective, I am considering this premise: “All windows are eventually going to leak; it’s just a fact of life.” Why is it a fact of life? I can understand there being a potential advantage of a drain pan as leakage backup remedy, but it seems like a rather fussy detail, possibly having its own problems. Why can’t the window simply be installed with enough care and quality to prevent it from leaking during the life of the building?
Ron,
I don't think it's unrealistic at all to think we should be able to install a window so that the parts under our control - that is the intersection between the window and the surrounding wall - should be expected not to leak for a vey long time. The wild-card is the window itself, which might have weaknesses manufactured in.
Somehow the discussion around proper window installation here seems to have painted it as a very complicated process, whereas the steps are really quite simple and quick. I've never removed a window and found rot without there being an obvious error, or neglect over time, that couldn't have been easily remedied.
Malcom Taylor - the twist I will add is that typically with a "Thermal Buck" install the suggestion is that the wall has an elevated level of thermal performance and airtightness. This then suggests that the exterior part of the wall / window install will have alot less energy to solve any minor problems that old walls would easily take care of due to their inefficiency. I also have seen many actually poor window installs that were successful because the wall was so in efficient the problems were baked dry. The problem I have is that a barrier system has to be virtually perfect, and even if so, you have to rely on it for 50 years+
Steve,
That's a very good point. The older buildings around me here in the PNW are often very poorly detailed and suffered leaks at all the exterior penetrations, but damage was limited by the vast amount of heat that flows through their walls.
Ron Keagle - I think there are a number of variables to a success window install over the longevity of its operation. The window itself, the flashing and tape being used as the barrier, the physical location of the window relative to overhangs etc, the amount of rain the area sees annually, etc. To place the window in the best possible position for success would be to address the chance that water may make it in. I personally have designed some barrier type installs, but they have 28" overhangs 11" above the head of the window. It's not unlikely the service life of a window will exceed 50 years, that's a sizable challenge to defend successfully.
It would seem to me any component that becomes part of a building assembly has to get scrutinized like I would the assembly it is part of. When I design my building assemblies I scrutinize for the 4 control layers - 1. Water . 2. Air. 3. Vapor 4. Thermal (In that specific order). Inherent to it's name "Thermalbuck" the component solves for the least risky of the four control layers - the Thermal control layer. In reality this is just energy $$. Now I realize we don't want to waste money, so don't go slamming me just yet. I am often heard saying " If it don't last, it don't matter", and I firmly believe that. That is why "WATER" is my number one concern to solve for. Failure to solve for water places the assembly in jeopardy and challenges the durability of the assembly. Energy efficiency needs to born from an assembly that solves for durability first, energy $$ fourth..... Here's the kicker, if I solve for #1 and #2 very successfully, then #3 and #4 usually can come along for the ride on the success train. I love the idea or concept in elevating details to perform better, I just think we need to scrutinize our decisions to solve for he higher risks first....... just sharing some of my personal thoughts
"When I design my building assemblies I scrutinize for the 4 control layers - 1. Water . 2. Air. 3. Vapor 4. Thermal (In that specific order)."
An extremely simple but clear and practical way to assess assemblies and materials. Good stuff!
Malcolm - only 2 ways to do things, the right way, and again
To solve the issue couldn't you just bend some flashing at the top? Or the manufacture a separate piece with built in flashing for the top of the window. The assembly could also be adapted for recessed installation. It's not rocket science it's bent metal with insulation.
Log in or create an account to post a comment.
Sign up Log in