
Image Credit: All photos: Stephen Sheehy
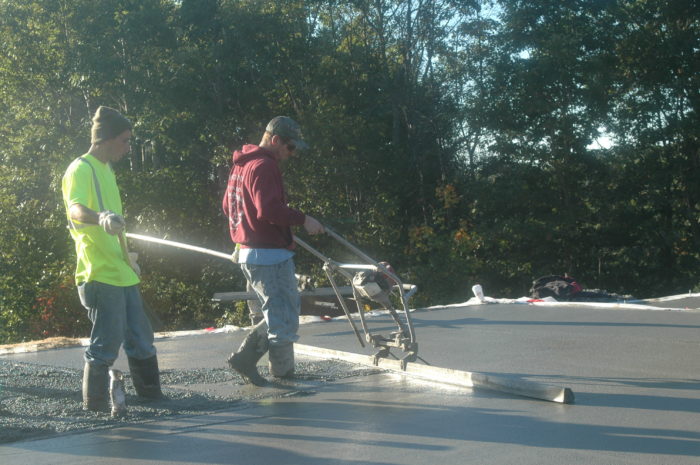
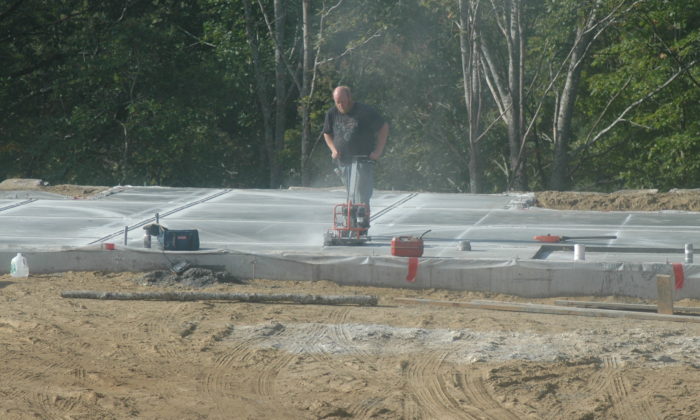
Image Credit: All photos: Stephen Sheehy Four ready-mix trucks and a dozen workers were needed to place the 40 cubic yards of concrete for the slab. The 4,000-psi mix used pea stone for the aggregate. Control joints cut in the surface prevent random cracks in the slab as it cures. Because the slab will be the finished floor, extra care was taken to choose the right concrete mix. With the slab poured, construction can start.
More Guest Blogs


This is Part 3 of a blog series describing the construction of Stephen Sheehy’s house in Maine. The first installment was titled Pretty Good, Not So Big Maine House.
We made a major decision this week. We’ll be using white cedar shingles on the exterior.
Lots of factors went into the selection. We like the nice gray color they eventually turn. There will be no finish, so no regular maintenance is needed. We’ve selected a window detail that works nicely with shingles. Instead of casing, the shingles will be woven around the edge of the window opening and go into the recessed opening for a simple and, we hope, attractive look. The outside corners of the house will be woven as well, with no corner boards.
Another plus is that the shingles are made in Windsor, Maine, about 15 miles from us by a company called Longfellow’s Cedar Shingles & Shakes.
The Longfellow family operates the shingle mill, using logs from Maine. One of the things that makes a “Pretty Good House” is the use of locally sourced materials. Cedar shingles are also a renewable resource.
Getting ready for the slab
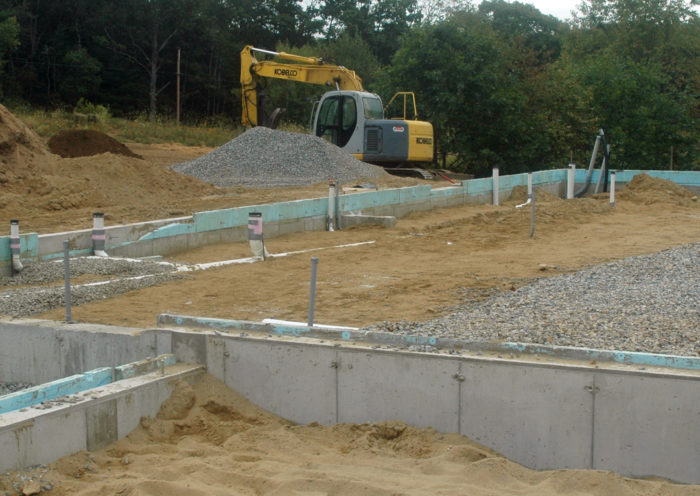
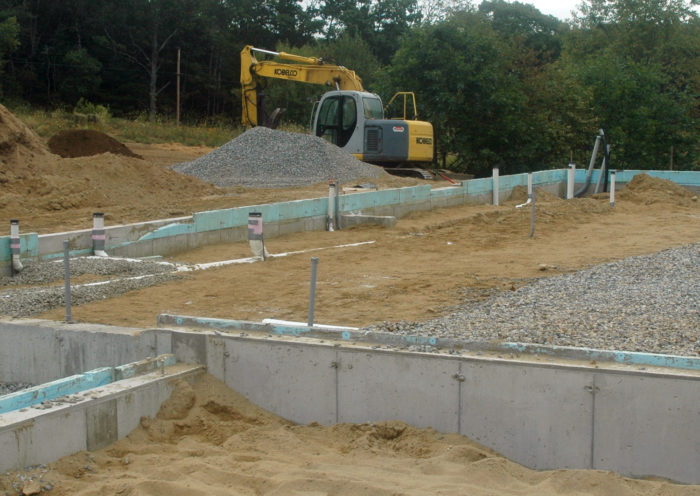
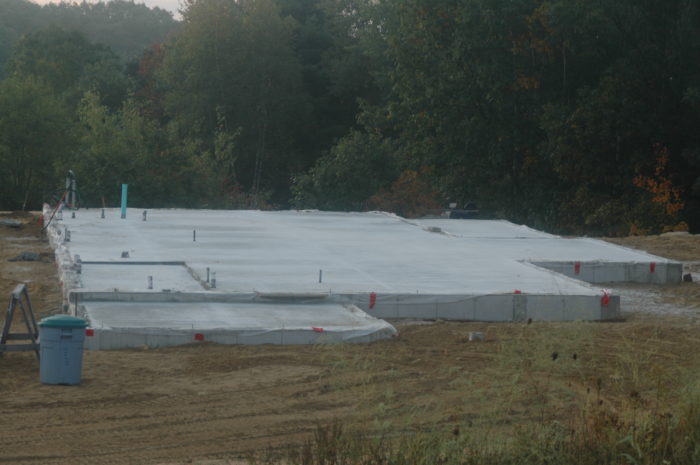
This week, Daryl and his crew have been hard at work backfilling the outside of the foundation and filling and compacting the inside. Once the soil is compacted, 6 inches of stone is placed on top and compacted. On top of that, we’ll place the 4-inch thick recycled insulation, then a polyethylene vapor barrier and finally the 4-inch thick concrete slab that will be our finished floor.
We’ve been obsessing about the polished concrete floor. Concrete cracks. The usual solution is to cut control joints in the slab. The idea is that when (not if) the slab cracks, it will crack along the cut joint and not be visible.
In a garage or basement where appearance isn’t crucial, the typical joint is cut with a saw when the concrete is new, often the day after the slab is placed. But using a saw sometimes creates breaks and chips along the cut and we’re trying to avoid that for our floor, since appearance is important. Tom, our contractor, has been exploring various methods of cutting the control joints that will keep the clean lines we’re looking for. Stay tuned.
Building a septic system
As we’ve noted previously, here in rural Maine, we don’t have municipal sewers or municipal water service. This week, a 1,000-gallon concrete septic tank was installed next to the foundation. Bacteria in the tank break down the effluent and what is left is a watery liquid. From the tank, the liquid effluent runs into a leaching or distribution field that dissipates the liquid into the ground.
We also will have a radon remediation system. Radon is a potential health hazard. It is much easier and cheaper to install radon remediation during construction that it would be later. The system is simple. A perforated pipe runs under the slab and around the inside of the foundation. The pipes are connected to a non-perforated pipe that will run inside a wall and into the space under the roof. A fan is wired into the pipe.
After the house is up, we’ll have a radon test. We expect that radon will not be present in any quantity worthy of concern, given the low level in our existing house just a few hundred yards away. If that is the case, we don’t connect the fan. If radon proves to be at a level that requires action, we’ll run the pipe through the roof and run the fan.
Since the drain lines are under the slab, it is crucial that they be accurately located, so that the vertical pipes will end up being hidden in the walls.
A well draws lots of water
Drilling a well is a pretty simple process. A big drill goes into the earth until it hits bedrock. A steel pipe casing is inserted into the hole to keep the soil from collapsing into the shaft. Once the drill gets to bedrock, the casing isn’t needed, as the rock forms a stable shaft. At our site, the rig hit rock after about 30 feet, so we didn’t need much casing, saving us a bit of expense.
After 360 feet, they hit sufficient water, about a gallon per minute. That may not sound like much water, but the shaft is mostly filled with water, about 500 gallons, so we would have plenty. Still, the driller decided to go a bit deeper and hit lots more water at 380 feet, about 4 gallons per minute. Here in Maine, we’re fortunate that we have abundant water. Close to 400 feet is pretty typical well depth around here.
The well is located near the road, close to where the power comes from the pole. Daryl came back and dug a trench from the well to the house and for the underground power supply to the house. The water pipe needs to be deeper, since frost is a concern. The two trenches merged, with the water pipe at about 5 feet deep and the power line, in plastic conduit, at about 2 feet deep. On top of the wire, our electrician, Jeremy, placed a red plastic tape that will serve to warn anyone digging in the future that they should watch for the conduit.
Getting ready for the slab
Meanwhile, Brian and Ryan from Tom’s crew installed the reclaimed insulation inside the foundation. They needed to cut holes for the various pipes and conduits poking up through the ground. Spray foam was used to seal around the pipes. Then a heavy polyethylene vapor barrier was placed on top by the foundation crew. On top of that, they placed wire mesh to reinforce the concrete.
Last week, the concrete was placed for the slab. Concrete consists of cement, sand, aggregate, and water. The cement for the mix comes from the Dragon plant in Thomaston, Maine, about 30 miles from here and the only cement-making plant in New England. At the suggestion of Jon Meade, who will be polishing the floor later, we specified a stronger-than-usual mix, 4,000 pounds per square inch, using pea stone as the aggregate instead of the usual larger stone. The mix makes for a hard, dense floor, which should result in a better finish.
We had four transit-mix trucks and about a dozen people placing about 40 cubic yards of concrete. It was an impressive ballet. Everyone had a role to play as they worked around big trucks, heavy concrete, and lots of tools. It only took about an hour to place all that concrete.
Since our slab will be the finish floor, appearance is critical. We need control joints cut into the floor to avoid having cracks in the wrong place. We decided on a layout for the joints and Jamie put them onto a foundation drawing that we gave to Tom, who passed it on to Randy McClintick, our concrete sub. Randy’s crew did the footings and foundation. He subbed out the slab to Pride Concrete. Both companies did a great job. We were especially pleased with how the control joints turned out. We had worried that the joints might chip or break at the edges.
Now we need to wait for the roof trusses to be manufactured. Once they are on the way, Tom will frame the walls.
Here is a link to Part 4 of this blog series: Framed Walls and Air Barrier Membranes for a Pretty Good House.
Stephen Sheehy is the author of a construction blog documenting the process of building a Pretty Good House in rural Maine. Over the next several weeks, GBA will publish a serialized and slightly condensed version of Sheehy’s reports. The first installment was published June 15, and the second on June 23.
Weekly Newsletter
Get building science and energy efficiency advice, plus special offers, in your inbox.


10 Comments
well pump
I recommend a grunfos well pump. A standard AC well pump is cheaper but about 4 times as inefficient. At 400 ft a grundfos Hq flex will "soft start" without a surge and bring up 2.5 GPM at about 300 watts. A conventional pump will require closer to 1300 watts and have a 2kw surge. Grundfos are both AC and DC and require no inverter! You can also run it straight off solar panels without inverting or needing batteries. Even at a trickle charge the pump will just bring up a corresponding amount of water. Grundfos also has house pressure pumps with the same specs. They are more expensive but real quality and the payback is worth it at your electric rates.
By the way, if your slab does develop cracks it is unlikely to be a structural issue. Cracks actually look "ancient" like old marble floors. If the cracks appear, celebrate them.
Effective R value for walls
Does your jurisdiction call for a minimum effective R value for your wall assemblies?
Thank you
Radon
We have plenty of radon here in northern Indiana and southern Michigan where I build. If your building code allows it, I would urge you to take the vent pipe all the way through the roof and forego the fan. This sort of passive system often is enough to alleviate any radon issues. Just provide an electrical outlet for future installation of the fan if needed.
replies to Ven, Jesse and Terry
Ven- well pump is already in. For what it's worth, our existing house well has had the same pump for 22 years. Our electricity is cheap. We make it on the roof.
Jesse-Maine has no state mandated building code for communities withy fewer than 2000 people. Our town doesn't even require a building permit and there are no inspections except for plumbing. The walls ended up around R-42 or so. The roof about R-70.
Terry-we'll punch the radon pipe through the roof if necessary. It extends into the utility chase.
Wow no inspections - if we could only be so lucky here..
Thanks Stephen - What does your wall assembly consist of? Thickness, type of insulation, are you addressing thermal bridging?
Response to Jesse Ewing
Jesse,
This construction blog is being published in installments.
Even though you are really eager for the next episode in the series, I urge you to be patient. Everything will be revealed in due time...
Well pump efficiency
At normal residential usage levels, the efficiency of a well pump doesn't really matter.
My well is a fair bit more shallow (only about 100ft to the top of the water), though still enough that it would take at least half the pumping power needed for the deeper well here. Over the past month, my generic 20 year old well pump has only used 7.1kWh total. I estimate that it takes about 2.3 watt hours per gallon pumped. Just not a lot of room to save energy there.
Response to Martin
Sounds good. Thanks for for informing me :)
Agree w/ Terry
Stephen - I also am in Maine (and have built several houses with Phil & Co!). We always put the radon pipe thru the roof, especially if you're using metal roofing. There are several reasons for this:
-It's a lot easier to flash the pipe while you're roofing than retro-fitting it later, and essentially cost-free
-The pipe will be collecting moist air from the sub-slab - where will it vent to if you're not running it to exterior?
-The stack effect may be enough to vent any radon that does exist, without needing to install a fan. This obviously won't happen if the pipe vents to the interior of the shell or if it's capped.
We typically make sure there's a pipe section available to cut a fan in to later if needed, with either an outlet or capped electrical box close enough to plug in to or wire to.
Jesse
Most (if not all) codes in Canada cover every building in the province they are enacted in. There are all sorts of remote areas with no inspections or permits, but legally you are required to follow it anyway. They have us, even if they can't see us!
Log in or create an account to post a comment.
Sign up Log in