Compressing Mineral/Rock Wool insulation under furring strips
rkymtnoffgrd
| Posted in General Questions on
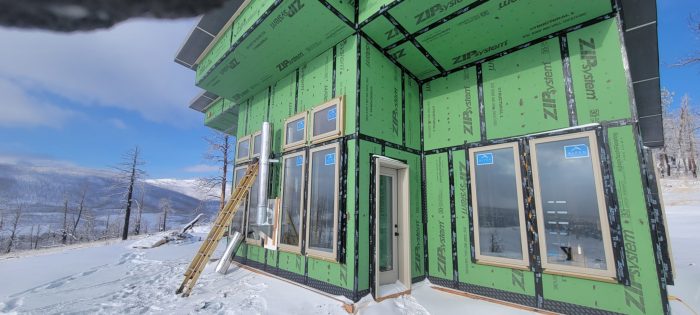
Southern Colorado. Im planning 2″ Mineral/Rock Wool exterior insulation with 1×4 furring strips on 24″OC. Concerned about the “compressibility” of mineral wool under furring and a Wavy wall with lap fiber cement. Also concerned about the 3/4″ wide rainscreen vent and the chimney effect in my high fire zone. 3/4″ seems excessive with the breathability of Wool. Wondering if I could eliminate both concerns and add a little more insulation by buying 2.5″ mineral wool and plan on compressing down .5″ to the exact plane of the exterior wall. How compressible is Mineral Wool?
GBA Detail Library
A collection of one thousand construction details organized by climate and house part
Search and download construction details


Replies
I wrote this comment on a post a while back, it may be helpful.
https://www.greenbuildingadvisor.com/question/how-to-find-studs-through-exterior-insulation
In regard to the resistance to compression, the comfortboard is locally very soft, and regionally stiff. The nearest thing I can think of that will give a familiar experience is a very stiff outdoor foam cushion. You can lay a sack of concrete on it and it will appear not to give. If you push on it hard with your finger it will compress in that region.
Its soft enough that you can suck in a 1x4 with a big screw in that region, and cause the wavy wall you're concerned about. However, if you're semi-aware it can be avoided. See the post above.
The 3/4" cavity is not excessive, it's essentially the minimum that will work, since fastening through to the studs is nearly impossible. This cavity is also what does the heavy lifting in terms of drying potential.
rkymtnoffgrd,
In terms of the fire risk, you may find this useful: https://buildingscience.com/documents/building-science-insights/bsi-129-wildfire
Malcolm, Thanks for the link. I just read the article. Very helpful. I have a question.
Lstiburek mentions that we should provide "screens that resist airborne ember/cinder entry".
Back when vented cladding first started it was common to use various forms of wire mesh, which had their pros and cons. Now the Cor-a-Vent products are much more popular. But they're made of PPE plastic. I'm wondering if being plastic they are susceptible to melting and losing their ability to block embers.
Any thoughts on that? I suppose an option in high fire zones would be perforated metal of some kind.
Yes Malcom, that was a good read... and I am also curious about screens for ember protection, this is was brought up in the article... so what type of mesh/screen is appropriate?
" it is not uncommon in wildfire events that homes catch fire via the entry of airborne embers/cinders behind vented cladding assemblies. If you are going to vent your cladding make sure you have screens that prevent the entry of airborne embers/cinders."
"Here is a big thought, have your vent space as small as possible…keep the vent space ¾ inch or less to limit fire propagation. Bigger is not better."
jgsg and ryymtnoffgrd,
California's wildfire regulations say:
"According to Chapter 7A, screen mesh for roof vents should be made with corrosion-resistant and non-combustible materials, with openings between 1/16 and 1/8" (1.6 and 3.2 mm)."
We are lucky here in coastal BC in that because of our wall rain-screen requirements, lumberyards carry perforated flashing much like this: https://www.menzies-metal.com/metal-flashings/perforated-j-channel-rain-screen-low-back/
which would seem to cover the bases.
I'd also assume the risk of embers entering the cavity would be much less if the top was not vented, so there was no mechanism to drive air movement into the wall.
Mike Guertin wrote about his experience installing 2" Rockwool on the exterior of the 2016 Fine Homebuilding house: https://www.finehomebuilding.com/2016/08/29/exterior-insulation.
Thanks Michael, didn't seem to be too much of an issue in that article... Very helpful
You could put blocking at the fastening points for the furring strips. This would only minimally increase thermal bridging, but it would prevent overtightening the fasteners and overly compressing the mineral wool as a result. I would probably just used cut sections of a 2x4 ripped to the depth you want (maybe a 2x3 would already be a good fit, to save the step of ripping a 2x4 down). You don't need anything fancy, although this would mean quite a bit more cutting of the mineral wool.
A trick I have used in the past to make "blocking" is to cut sections of steel pipe or conduit to sleeve over fasteners. You could probably push this through the mineral wool, or at least through a simple slit cut into the mineral wool, to avoid having to cut clean holes. The sleeve just acts as a sort of depth stop in this case. This would be worse thermally though.
I wouldn't worry too much about compressing the mineral wool between the fastening points for the furring. The issue you could have if you don't use some kind of blocking would be compressing the mineral wool at the fasteners and ending up with a wavy furring strip "bulging out" between fastening points. Careful installation of the fasteners would prevent this, but my project engineer side likes to put in something to prevent a human nature from taking hold (a nice way to say "idiot proofing" :-). If you're doing the work yourself, care can work. If you have a framer that wants to get to the next job doing the work, then, well....
Bill
Bill
Interesting points Bill, the first (blocking) is considerable additional work, the second (stops) seems more doable but still more than I bargained for. I will be doing it myself, and your comment about idiot-proofing for contractors I certainly agree with. In the end, I would think it would be easier and a similar result to set a line and drive the strips into wool to a depth vs to mount and screw based on feel or visual. Perhaps Im overthinking it, Im envisioning a string line spaced 1" off the wall, done every 2', a straight edge, and a plan to compress the wool as the strips are screwed to the proper depth. If I get 2.5" wool, and compress .5", I can reduce the rainscreen gap to 1/4". Which I would feel better about. But is that too much compression? Don't want to bows the strips requiring timberlocks every 6" instead of 12".
Matt Risinger has covered issues of working with mineral wool exterior insulation on several videos. I encourage you to search his channel. Here's one to get you started. He's showing how to handle it with stucco, a very challenging combination.
https://youtu.be/heOLRxxpPxg
Nice Alpen Windows!
Yes, Rockwool can be compressed by over tightening the headlock screws, but honestly, I wouldn't worry about it in terms of performance. Run a string line to keep the walls straight with prevent that wavy look. It CAN happen, but you have to look at the siding at the right angle to be honest. What did exactly what you're doing: https://honeybramble.com/home-interior-design/building-your-own-house-from-the-ground-up/
Same wildfire zones in Colorado. For the rain screen, it's no problem with rock wool since it will refuse to burn, but I would NOT do this detail without a DOUBLE steel mesh or alum at the top and bottom. Instead of one screen, we went with 2 just to make sure any embers/strong blowing winds would not cause problems.
You are more than welcome to email me about my experience with the rain screen in CO anytime for our own personal build. [email protected] Happy to respond.
bcornwellco, I've come to your post last as I've been responding to the others, you have answered some of my previous questions in this one post. I do plan to install with care and string line. I will look at your site. Is there a specific brand of steel mesh recommend for embers? What did you use? Thanks for your email, I have many questions, your proximity and build similarity lead me to believe Ill be reaching out.
You don't have to use the semi rigid, you can use regular batts. MW for metal studs (ie rockwool AFB) is available in 1.5" and 2.5" thickness and it is WAY cheaper than semi rigid.
You can strap out your wall with horizontal 2x3s on edge or 2x2s, either 17.5" OC or 25.5" OC, install the batts between the furring. You'll need a couple of cap nails to hold the batts in place. The vertical 1x4 can now be nailed to the furring. With the 2x2 furring, you can skip any screws as the whole thing can be nailed up with a framing nailer.
A bit more labor and wood but you don't have to deal with squishy batts. I've done this for an over-roof and it was pretty quick and simple.
P.S. In terms of thermal bridging this is almost as effective as continuous insulation. The only thermal bridge is where the exterior strapping and studs cross, this 1.5"x1.5" area is a very small fraction of the overall surface area.