How to insulate floor truss design on rim ends and field
Please see attached pictures and yes I have analysis paralysis…
I have floor trusses and they are 1.5″ wide by 20″ tall along with 2×6 wall framing upstairs and downstairs with osb sheeting on outside with wrap. I am doing batts everywhere else.
New plan is use 4″ felt cardboard/fiberglass backed “roof” polyiso pushed tight to blocking or end truss joist framing (please see pics). Would you A. fill the void in the framing with foam, behind where polyiso block will be, and then put in polyiso block or B. Ignore the void behind where the new polyiso blocking is and just cut polyiso blocking short all 4 sides and gap fill accordingly with spray foam?
Open to any other options. I was going to do batts but I only have 4″ on end of wall so that would mean R13 batts and difficult vapor barrier attachment vs using this 4″ polyiso I just stumbled on.
Thanks and again great site! 100%
Zone 5
GBA Detail Library
A collection of one thousand construction details organized by climate and house part


Replies
Why would you only have 4" on the end of the wall? This is a floor cavity, right? You could put any thickness you like there as it doesn't need to be in plane with the walls below or above. ...Or am I missing something obvious?
Andy,
It is confusing and I am probably not the best to articulate this but thanks for chiming in.
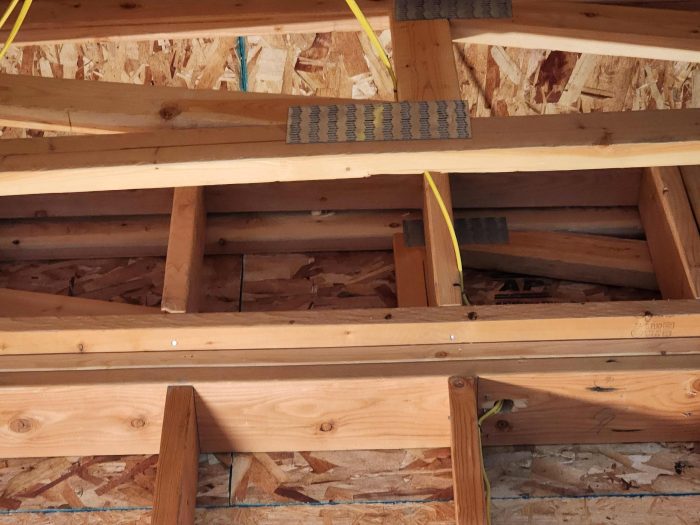
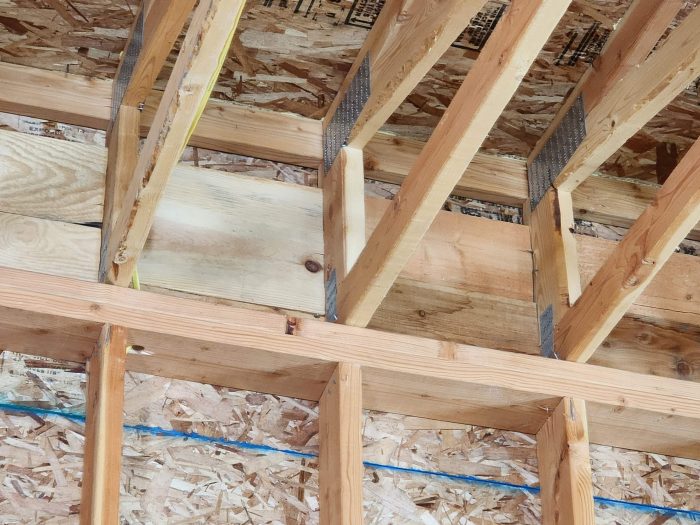
There are two different areas. 1. The perpendicular areas where ends of joists sit on wall ends and 2. The side ends where the joist sits on wall all the way across lengthways.
30' floor trusses going across the shop. They are framed sideways (not the norm) and only 1.5" wide as you can see in the lighter colored pic. They sit on 2x6 (5.5") side walls and I used some milled material laying around to get some blocking in the ends b/t joists then osb on outside. You can see the 2x4 fitted in knotched part on top of truss sideways. So that sideways 2X blocking eats up 1.5" of the top plate real estate on outside of the 2x6 wall leaving 4" to fill in on plate then open air inside truss . That is one reason I am thinking the 4" polyiso blocking for the void would be and quick and easy especially at 12' up off ground as well as cheaper than spray foam.
Yes the insulation can hang past the inside of the below wall and 2x6 truss end but if there is a vapor barrier need that might be difficult to apply. So my thought is nice tight fit with 4" polyiso and hopefully I can avoid a moisture barrier. Currently not planning on drywalling lid and thinking metal but that could change.
The side wall with above floor truss (darker picture) above has more open area in between the truss framing inside of the osb. I am wondering if I can leave that little 1.5" area in the field of the osb open or if I should foam 1.5" and then insulate that with batts or just foam it all? I had to make a little cripple wall on that wall as the floor truss is so thin...
I really hope this makes sense and have a good nite...
*Adding the rest of the floor truss cavity will not be insulated only the ends. This is to allow more heat to pass through.
You are on the right track with the rigid insulation. With that much rigid, you can also add some extra fluffy on the inside to bump up the R value there a bit more if needed, 4" is a fair bit already though.
One thing to watch is gaps between the rigid and the sheathing. I would fill those in with some smaller pieces of 1.5" rigid before the 4" goes in.
Akos,
Thanks for chiming in and yeah 4" polyiso @R26 I am good with that even if I lose a few digits in Winter. Plus it will be equivalent to the walls which is fine imo...
On those gaps between the rigid and the sheathing:
What if I just spray a little "gaps & cracks" for filler in that area? It would also serve as glue on back of rigid and I will further seal all four edge sides. However I am not sure the spray foam would dry (dry to outside?) as I set the rigid piece in place and over the fresh foam on backside.
Also I am thinking I will do foam only for the 2 sides as it is just too difficult to piece it out with rigid between cripple walls and rim truss. So a froth pack for that. I will also heat shop first before any spray foam.
Last thing as it is difficult to find polyiso info other than it is the cat's meow and primarily used on outside of walls. Do you think it is thick enough or "ok" to forgo a vapor barrier on the 4" fiberglass felt backed polyiso? I get mixed info on this.
*Another option on the main walls is use 3" polyiso with 1" XPS on interior side of the polyiiso.
Really appreciate your help!
Roofing polyiso is typically 2 per/inch, the fiber facing doesn't change it all that much. So your 4" iso is around 0.5perm so a vapor barrier by most code definitions, y0u won't need anything else.
I've done the PB&J rigid install, the foam when it expands it can generate a fair bit of force so be careful how much canned foam you put behind the rigid.
The small froth packs are great for these jobs. Make sure you have a helper along as it is near impossible to notice when one of the cans runs out while spraying, you need an extra set of eyes for that plus to move the cans along as you work. Beside heating the place, also heat the cans. I find filling the tub with hot water and putting the cans in there for about an hour does the trick. Make sure you have everything set up so once you start spraying, you don't have to stop until the area is completely done. Have acetone in a cup ready to clean the tips and gun when you need to stop between locations. These spray foam kits need to be used up in about a week once started as the polyol will harden in the pipes and clog the spray nozzle..
"I've done the PB&J rigid install" That was so funny and concise! Thanks for doing that 0.5 perm math as well. I struggle with some of this stuff...
Great info keeping the foam product at temp as well the rest.
Thank You