Hybrid cut-and-cobble foam board with batts in upstairs bathroom exterior walls?
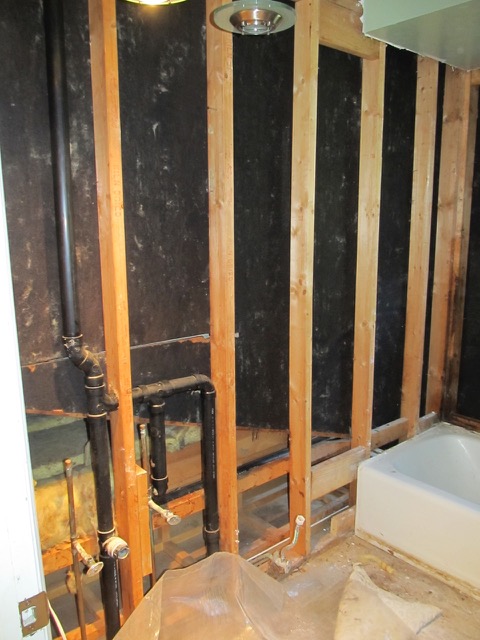
I have a house in Columbus, Ohio (Zone 5) that was built in the early 70s, and I’m in the throes of a complete upstairs bathroom remodel. I’ve gutted the space down to studs (even replaced the subfloor), but I’ve opted to keep the cast iron tub. Well, I’m ready to insulate, but as I read the Q&A exchanges on this site (and several others), I realize that my options are limited. The original insulation schematic included black fiber board sheathing on exterior, unfaced fiberglass batts between 2×4 studs, and a 4mm layer of plastic as a vapor barrier over the whole thing. I tore it all out because much of the once yellow fiberglass under the plastic was now black (be it from mold, air passage, water damage, who knows). The problems I face in replacing the old insulation are
1) The lip on the cast iron tub is really only wide enough to accommodate a layer of Durock cement board and tile, so interior XPS sheathing is out.
2) My original black fiber board exterior sheathing is damaged in places and pulled away from studs in others.
3) I live in Ohio, which has three hot months a year and three very cold ones.
4) Blow-in foam is too expensive for my DIY limited budget.
5) I have one sloped “combo” wall in the space (exterior above the slope line, interior with plumbing and vent pipes below the slope line).
and 6) My stud cavities are only 2×4
So, all this said, it looks like the best I can do is a hybrid application consisting of cut and cobbled 1″ XPS foam board attached to back side of old black fiberboard sheathing (BETWEEN studs) and caulked, unfaced R-8 or R-11 on top of the foam board, and finally, cement board surrounding the tub (and mold-resistant drywall everywhere else). No plastic vapor barrier inside.
So, my question: Is this do-able? Now, I realize that because of the cut-n-cobble, I’ll have thermal bridging through the 2×4 studs, but I had this anyway with the old insulation, and just replacing the old batts and plastic poly with new won’t change that. Right?
I also realize, as Martin Holloday has said in previous posts, that installing XPS between studs is probably a waste of good foam board. But I really don’t know of any other way to work around my existing limitations just short of breaking up and removing the cast iron tub (so that I can interior sheath over the stud walls).
Oh, and BTW: I addressed all of the potential air leak problems when I gutted the room, so I’m hoping that if the black on my old insulation was because of decades of air seeping, this shouldn’t be an issue any more.
My concern is mainly that by installing the XPS between the studs to the back of the exterior sheathing, I’ll be hampering the room’s ability to dry to the outside. Guess the room would now dry to the inside, which I could aid by installing a stronger fan.
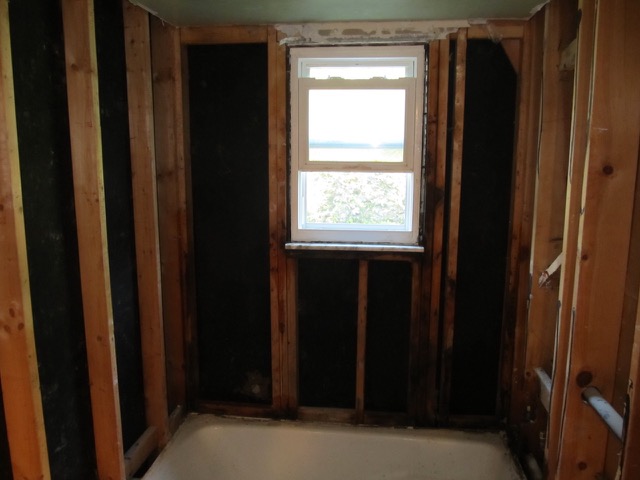
Oh, one last variable: The space DOES have a window over the tub.
I’d appreciate any help that the good folk on this forum might give me. I’m a total newb to the insulation game, but I want to get this install right before I seal the walls and turn the project over to the plumbers and tilers for Phase 2.
GBA Detail Library
A collection of one thousand construction details organized by climate and house part


Replies
Doug,
In cases like yours, do-it-yourselfers have been known to cut and cobble.
All kinds of advice can be found in my article on the topic, Cut-and-Cobble Insulation.
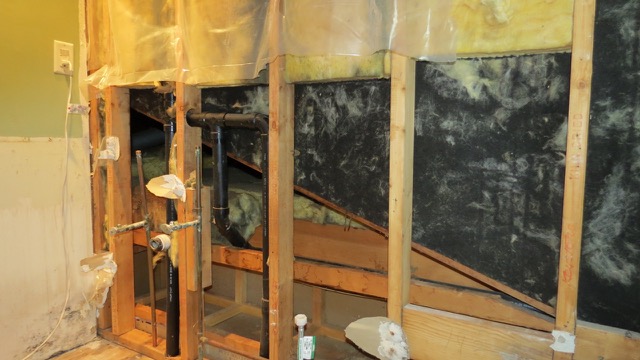
BTW: Here are a few pics of what I had in mind with the XPS. Forgot to include them in the previous post.
The main idea behind my wanting to use the XPS is to reinforce the black fiber board sheathing on the house's exterior, which, as I said, has seen better days. I mean it's pretty solid considering its age, but I had to foam a few holes and caulk the seams (see pics).
Using 1.5" EPS (faced or unfaced) costs about as much as 1" XPS, and will give you quite a bit more dew point margin, which you need for a tub-surround that has no interior side vapor retarder. The R5 XPS will eventually degrade to ~R4.2, whereas R5.8-R6.3 (depending on density) EPS would retain that performance pretty much forever.
With 2" of space for batts a compressed R11 would give you about R7.5, a compressed R13 would deliver about R8. Kraft facers would be fine, but not foil.
The asphalted fiberboard itself is moisture tolerant- if some air leaks and there's a bit of adsorption/condensation on the fiberboard it's no big deal. If you're going to cut'n'cobble it's much safer to do when the sheathing is fiberboard rather than plank, OSB, or plywood. And the fiberboard is also more insulative than plywood or OSB, adding about R1 to the total stackup, which improves the dew point margins. So with 1.5" EPS you'd have ~R7 total on the outside of the first condensing surface, and no more than R8 on the interior. At center-cavity R of R15 and R7 on the exterior you would have about 45% of the total (R15) is outside the condensing surface, very good for a wall in a zone 5 location.
If you went with 1" XPS, that leaves 2.5" for the fiber. A compressed R11 at 2.5" runs about R9, an R13 would be ~R10. Even at the labeled R5, allowing R1 for the fiberboard youd be at R6 outside, R9 (best case from a dew point control perspective), or about 40% of the R15 total. In 25 years the XPS could already be in the R4.5 range for R5.5 out of R14.5, and only 38% of the total R outside the first condensing surface.
And, EPS doesn't have the high global warming factor blowing agent problem. Using cheap Type-I EPS (about R3.9 per inch) it would have no more polymer than 1" of XPS too.
Your situation is similar enough to the situation discussed in this article: https://www.greenbuildingadvisor.com/articles/dept/building-science/how-i-fixed-my-leaky-underinsulated-exterior-wall that you should read it.
You might want to talk to your tile setter before using Durock. Seems like most people are using Ditra system from Schluter.
All: Thanks much for the feedback.
Martin: Your Cut-n-Cobble article was just what I needed. Thanks.
Dana: I meant EPS, not XPS. Am I allowed to mention the product on this forum? It's Foamular 150.
Stephen: I just threw Durock out there as a generic. Was going to just let the tile guy do his thing, but now that you mention it, I've seen enough posts about the Ditra System that I think I'll ask him about it next time I see him. Thanks for the info.
Doug,
Foamular is a brand of XPS (extruded polystyrene).
EPS (expanded polystyrene) is usually white.
Thanks for the correction, Martin. Seems I needed a quick primer on XPS vs EPS. Have since researched the differences.
Dana: When you mentioned 1 1/2" EPS, were you thinking of Insulfoam's R-Tech? Am familiar with this board, as I used the 3/4" version between furring strips on one small concrete wall application in my basement (because I couldn't frame that particular wall out with 2x4s...the awkward exterior wall right at the bottom of the stairs before one turns right into the room). Q: If this product has a higher dew point margin and retains its R-Value over time, might it be something that I could "pancake-stack" (as Martin put it) in a cut-n-cobble install between the 2x4 studs and be done with it? Would I even need the fiberglass batts?
You've got me thinking about 2" unfaced against the fiber board, followed by 1 1/2" faced (retardant side facing into room) on top of that. Would this work? Or is hybrid the way to go? I already have a few bags of R-15 out in the garage to do a hybrid install, but I've priced the 1 1/2" R-Tech you mentioned, and it's reasonable.
One last Q: Best way to seal EPS in the wall cavity? Tape, foam, caulk, or a combo of the three. Am proficient with a utility knife, so I'm confident I can get precise cuts and fit the foam board snugly into place. And do you have any specific recommends of preferred adhesives to use between two layers of EPS if I were to go Martin's pancaking route?
BTW: Thanks so much for your very specific and thoughtful reply to my original post. VERY helpful. This forum is awesome.
What he said. XPS come in pink, blue, green and sometimes gray colors in the US, whereas EPS is almost unversally white, unless covered by facers (often clear plastic, or shiny foil.)
Doug,
Q. "Seems I needed a quick primer on XPS vs EPS."
A. Here is a link to a relevant article: Choosing Rigid Foam.
Q. "If this product [EPS] has a higher dew point margin and retains its R-value over time, might it be something that I could 'pancake-stack' (as Martin put it) in a cut-n-cobble install between the 2x4 studs and be done with it?"
A. Yes, as long as you understand the pluses and minuses of the cut-and-cobble approach.
Q. "Would I even need the fiberglass batts?"
A. No.
Q. "You've got me thinking about 2-in. unfaced against the fiber board, followed by 1 1/2-in. faced (retardant side facing into room) on top of that. Would this work?"
A. What are you talking about? Fiberglass batts or rigid foam? If you are talking about fiberglass batts, it would work -- although fiberglass batts are the worst-performing insulation sold, so there are better options.
Q: "Best way to seal EPS in the wall cavity? Tape, foam, caulk, or a combo of the three?"
A. Wide gaps are best sealed with canned spray foam. Narrow gaps are best sealed with a high quality caulk like a polyurethane caulk or a silicone caulk.
Q. "I am proficient with a utility knife, so I'm confident I can get precise cuts and fit the foam board snugly into place."
A. Actually, if you are sealing the edges with canned spray foam, as most people do, sloppy cuts are better than precise cuts -- because you want to leave a little room for the spray foam.
Q. "Do you have any specific recommends of preferred adhesives to use between two layers of EPS if I were to go Martin's pancaking route?"
A. There is no need to use adhesive between the layers of rigid foam. Just make sure that you seal the perimeter of each layer.
Cutting foam thicker than 1/2" with a utility knife isn't nearly as slick as sharpening the side edge of a 4" putty knife. For polystyrene (XPS or EPS) it can be even a bit easier if you heat up the blade, which also limits the amount of EPS beads you'd need to sweep up later (though I rarely bother with that.) A quick video explanation of how to make your cutting tool, see:
http://www.finehomebuilding.com/2009/01/29/theres-a-better-way-cutting-rigid-insulation taping knife as the foam cutting tool.
Wow. A wealth of great info. Thanks much for the detailed responses, Martin and Dana. You've both helped me a great deal. Haven't responded to your generous posts until now because I've been going round the clock prepping the bathroom for the plumber/tiler, who comes Monday. Have had to spend WAY more time than I envisioned sealing off the entire interior space under the subfloor (to stop air movement), as well as replacing the subfloor itself, which was water-damaged.
So, cut-n-cobbling with EPS it shall be. Will look for plain old white unfaced foam board at Menard's on Sat, as I think that R-Tech's foam board has a blue vapor barrier coating on one side, which might work fine as a built-in vapor barrier on the inside of the wall, but I'm guessing not so much BETWEEN two pancaked boards (the 2" and the 1 1/2"). Also, picked up a professional applicator and a few tubes of Sudafoam (fireblock version). Hope this foam plays nice with the EPS...that it doesn't eat it. : )
Okay, so one final question and I'm good to go. To get to the stud cavities behind the tub near the floor, I had to tear out a mess of 2x6 water-damaged scraps that the builders had installed horizontally between the studs at tub-level (am guessing to provide a nailing surface for the tile board). Just wondering if I should forego replacing these pieces and just install continuous pieces of EPS from floor to ceiling in each stud cavity. Am essentially wondering if I even need horizontal nailing surfaces at all between the studs at tub-level, as installing these boards would complicate my installation, forcing me have to install separate smaller pieces of EPS behind and below the wood blocking at tub-level, rather than simply use the aforementioned continuous runs of 16" x 96" foam board from top to bottom in each cavity. Thoughts?
Thanks again for your help. What a great resource this site is.
"Q. You've got me thinking about 2-in. unfaced against the fiber board, followed by 1 1/2-in. faced (retardant side facing into room) on top of that. Would this work?"
"A. What are you talking about? Fiberglass batts or rigid foam? If you are talking about fiberglass batts, it would work -- although fiberglass batts are the worst-performing insulation sold, so there are better options."
BTW: I was talking about two layers of foam board, a 2" layer closest to the outside of the wall, and a 1 1/2" faced piece on the inside. Upon further reflection, am guessing I wouldn't need any vapor or moisture barrier on the inside of the wall if I'm using 3 1/2" of foam board, right? Only thought it might be necessary because of the exposed studs, which would theoretically absorb moisture.
Have decided that I'm going all-foam board after all. No batts for me. Will insulate my bath like the inside of a styrofoam cooler. : )
Doug,
The horizontal 2x6 pieces between the studs are called "blocking" or "nailers."
They are useful for fastening drywall or tile underlayment.
They are also useful for fastening grab bars.
Think about these issues when you decide how much blocking you need to install.
So, I guess if I install 3 1/2" of EPS in the cavities behind the tub, stop at the height of the tub, re-install the nailers (fully blocking each cavity), and then continue the EPS above the nailers all the way to the ceiling, I should be good to go?