Installation and trimming of finless replacement windows into RO
Hello everyone,
I’m doing a gut renovate on a 100-year-old house in Zone 4.
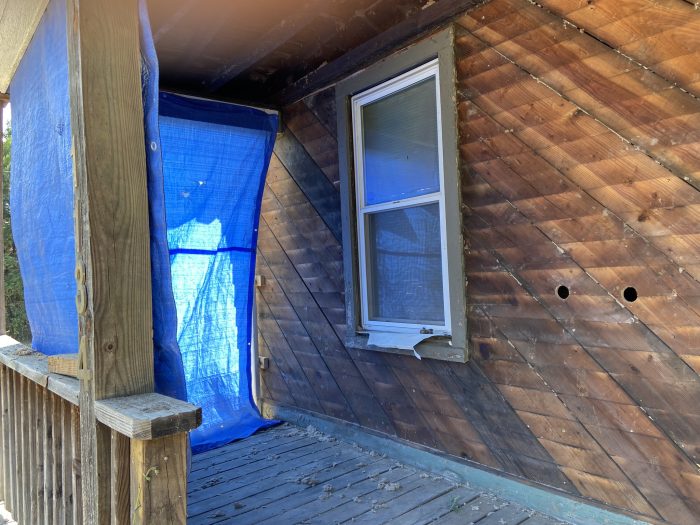
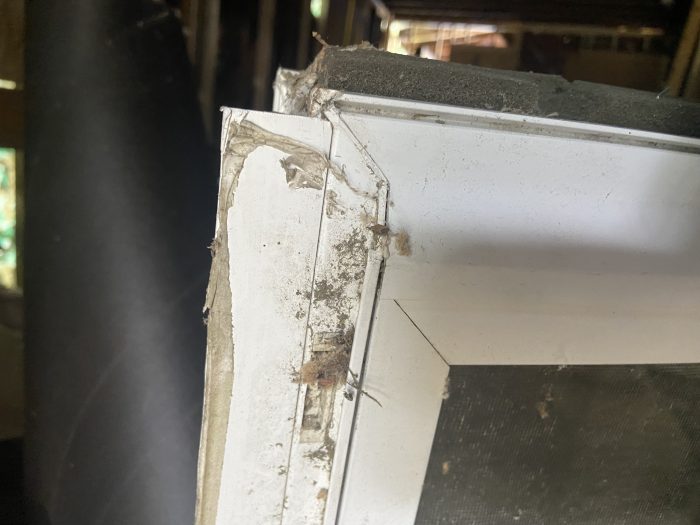
I have pulled out all the windows, in most cases to completely re-do rotted-out framing. The windows, of which there are eleven, are about ten years old and are of a pretty decent quality. I plan to re-use them. They are double pane, double hung, finless vinyl replacement windows. I’ve attached a picture showing one of the windows still in its originally installed form. Flashing was not used at all. They just stuck it in the R.O. and then massively caulked aluminum coil stock all around. The windows have a little groove built into the front surface which I believe the manufacturer (who is also the installer) intended to serve as a receptacle for the aluminum coil stock. It is very likely that this installation approach was responsible for the widespread water damage, but I can’t say for sure given the age of the house.
I have spent a large amount of time reviewing all the information that has appeared in this forum (especially) as well as elsewhere as regards installing finless windows. Nevertheless, coming up with a specific approach to installing these windows and defining my wall stack, given my particular set of conditions/constraints, has been quite a challenge for me.
As it stands now, the house has been reduced to bare studs (dimensional 2x4s) and 1” diagonal board sheathing. A fair amount, perhaps 20%, of the sheathing had to be removed due to being rotted itself or in the way of rotted out framing I needed to replace. The existing sheathing has gaps as large as 1”. I am not planning on trying to seal these gaps.
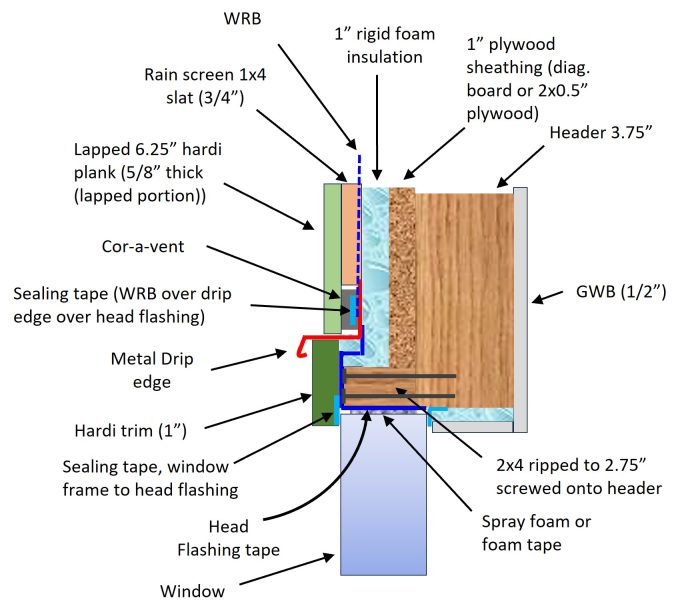
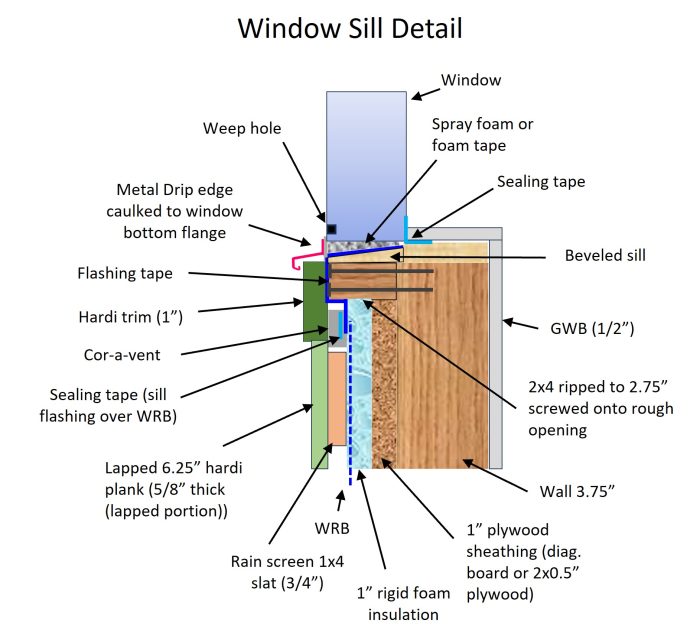
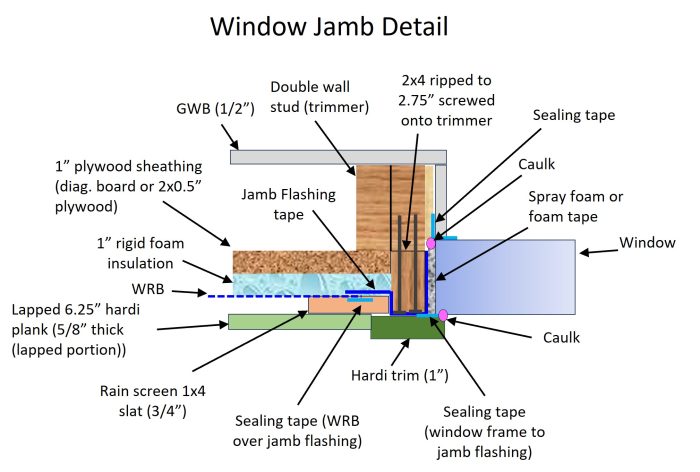
My plan for the wall stack, inside to outside, is the following:
– ½” GWB
– Dimensional 2×4 (3.75” thick) stud wall, 16” o.c., filled with rockwool batts
– 1” sheathing consisting of either the original 1” diagonal board or, where missing, 2 layers of ½” plywood
– 1” of EPS rigid board foam insulation. I’m taping this to serve as my primary air- and WRB
– WRB (Tyvek or similar) extending 24” both sides of doors and windows for additional protection
– 1×4 slats 16” o.c. for rain screen with cor-a-vent at top and bottom, and above and below windows
– Hardi plank siding and trim
I am planning on installing the windows as outies according to the attached pictures. As shown, my plan is to screw on a 2×4 picture frame to the outside of the rough opening, with the picture frame ripped to 2.75” to be flush with the stack of sheathing (1”), foam (1”), and rain screen slats (3/4”). The windows will be installed with the outer face flush with the face of the box.
Unlike the suggestion that Martin made for the picture frame box, my plan is to attach the window directly to the picture frame rather than using masonry clips. As can be seen in the attached photos, the windows are not designed to accept masonry clips, though I suppose I could still ad hoc it by screwing some generic metal plates into the outer side of the window frame. It just seems to me that the 2×4 box ought to be sufficiently strong to allow for direct window attachment. As can be seen in the pictures, the windows also come with some sort of foam on the outside frame. My plan is to remove this and substitute either an expanding foam (e.g. Great Stuff for windows) or else expanding foam tape.
Based on my reading of this forum, I do understand that this design is imperfect in terms of the air barrier and the use of the taped EPS foam board as the primary WRB. Still, I think the plan I’ve described represents a huge improvement over its former state and ought to work “pretty well”. The approach of house wrap as WRB insurance around the doors and windows, which has been mentioned in this forum, strikes me as a sensible effort-saving compromise. Also, I can see that there is significant thermal bridging in my design. I considered ThermalBuck but was deterred by the expense. I would especially appreciate any comments and/or suggestions regarding my approach, shown in the pictures, of flashing and trimming the windows.
Thanks
GBA Detail Library
A collection of one thousand construction details organized by climate and house part


Replies
Looks good to me. I don't see any issues anchoring the windows with screws into the bucks and using foam to air seal. The metal sill flashing on the bottom should go into the groove on the window. The weep holes should be above the groove.
I would treat the taped foam as your main air barrier and the house wrap as the WRB. This will simplify your details a bit. Make sure to figure out how to seal the ceiling air barrier to this and air barrier continuity at the foundation.
Thank you Akos.
Godspeed.
All I can see is about 1,000 layers of things to go wrong coupled with recycled windows, etc. etc.
I cannot imagine putting in all this labor for such a complicated detail over an existing envelope that is not sealed well.
I recommend what I did in my own home: Zip R6 over old sheathing. Reduces multiple steps and makes it a lot easier to reason about what the air and water barrier is.
Patrick,
Thanks for the feedback. I agree the Zip R6 would be a better, in fact excellent solution. It is however about 4x the material cost of the EPS plus partial house wrap approach I’m planning. (R6 is about $55/sheet and 1” EPS ~$16.) I don’t think I see though where very many labor steps are saved. Most of the flashing, install, and trim steps would be very similar.
Definitely food for thought though. Thank you.