Insulate basement wall with half wall, brick exterior, and dimple mat
First of all, this site is incredible! I’ve spent countless hours reading through threads related to my current project and many others. Thank you all for providing this amazing resource.
I live in Seattle, WA, climate zone 4 (marine, I think). My house has a brick exterior walls, and my basement has concrete pony walls with exterior framing on top. I had water in my basement last winter, so I ran the gutters/downspouts through 20′ extension drains that empty into drywells far away from the house. So far, this single step has completely eliminated the water coming in (we had record rainfall last month, and no water got inside). I will also grade the exterior ground to slope away from the house, and I am planning on installing an interior perimeter drain to runs to a sump pump. As a part of the interior drain system, I will be adding dimple mat (aka drain board, JDrain 200, ~1/2″ thick, comes in 6.5′ rolls) from the inside of the gravel trench all the way up to the top of the concrete. This system should catch any water coming through the floor or concrete walls. I’m also sealing every tiny potential crack in the concrete wall to help prevent further water infiltration.
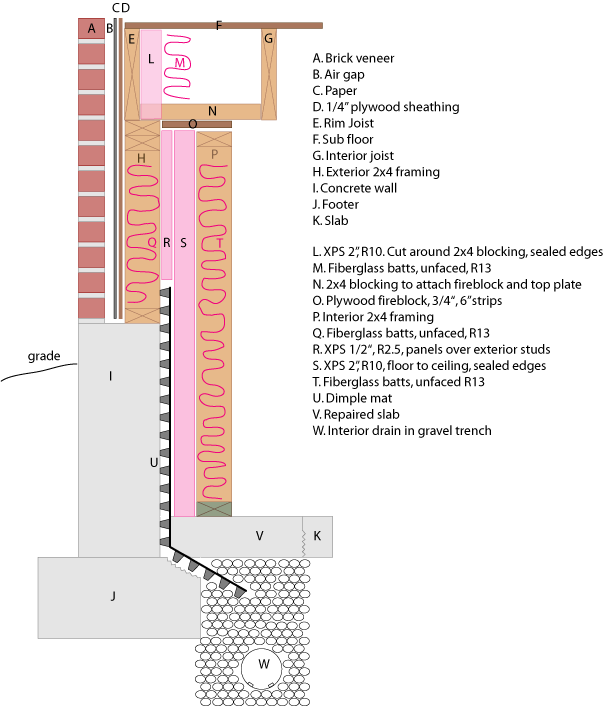
Attached is an illustration of the existing wall structures (not exactly to scale), as well as my most recent plan for insulating the walls. The upper wall is brick veneer | air gap | paper | plywood sheathing | 2×4 framing. The concrete foundation is 58″ high (on two walls, 47″ high on the third), and the exterior framing extends the rest of the way to the ceiling, with the inside of the exterior framing plumb to the concrete foundation. Basically, I’m going to nail the top edge of the dimple mat to the bottom of the exterior studs (using capped nails), then attach 1/2″ XPS panels to bring the exterior studs plumb to the inside face of the dimple mat, then attach 2″ XPS from floor to ceiling. Then I’ll build my stud wall on the interior of the 2″ XPS. Here are my questions.
1. What do you think of my idea of using 1/2″ XPS to bring exterior studs plumb to level of dimple mat? Is 2.5″ XPS an issue in terms of vapor permeance? Should I just use some 1/2″ plywood fur strips instead? Should I make 1.5″ ‘fur strips’ out of the 1/2″ XPS!? Then I could fill the exterior cavity with unfaced R19 fiberglass compressed down to 4″.
2. I have old R13 kraft faced batts laying around from the previous (poorly installed) walls. Can I reuse these somehow, like on the interior stud wall cavities? Based on other threads, I think I *don’t* want the facing…can I just carefully pull it off and use the batts as unfaced R13? Or leave the facing on because it’s no big deal? Or junk these old batts and buy new unfaced batts?
3. Do I need a sill gasket between bottom plate of the interior stud wall and repaired concrete slab? Or just a bead of caulk or sealant (what kind)? Or is a capillary break there not needed because the dimple mat acts as a capillary break against the concrete and the interior perimeter drain should prevent ground water infiltration?
4. Do you see any other issues with my setup? Any advice or suggestions regarding R values, vapor permeance, cost-saving potential?
GBA Detail Library
A collection of one thousand construction details organized by climate and house part


Replies
Carlos,
Q. "What do you think of my idea of using 1/2-inch XPS to bring exterior studs plumb to level of dimple mat?"
A. Looks OK to me.
Q. "Is 2.5 inches of XPS an issue in terms of vapor permeance?"
A. No. for more information on this issue, see Walls With Interior Rigid Foam.
Q. "Should I just use some 1/2 inch plywood fur strips instead? Should I make 1.5 inch 'fur strips' out of the 1/2-inch XPS?"
A. No and no.
Q. "I have old R-13 kraft faced batts laying around from the previous (poorly installed) walls. Can I reuse these somehow, like on the interior stud wall cavities?"
A. Yes.
Q. "Based on other threads, I think I don't want the facing...can I just carefully pull it off and use the batts as unfaced R-13?"
A. Yes.
Q. "Or leave the facing on because it's no big deal?"
A. Yes, that's also possible. I would pull off the kraft facing, though.
Q. "Or junk these old batts and buy new unfaced batts?"
A. The answer to this question depends on the condition of the batts. There is another possible approach: Using 100% rigid foam instead of fiberglass to insulate the interior side of the concrete wall. For more information on this idea, see How to Insulate a Basement Wall.
Q. "Do I need a sill gasket between bottom plate of the interior stud wall and repaired concrete slab? Or just a bead of caulk or sealant (what kind)?"
A. First of all, the bottom plate should be pressure-treated. Either a sill gasket or caulk is a good idea (and the sill gasket is absolutely required if the bottom plate isn't pressure-treated). Any high-quality caulk will work.
Q. "Do you see any other issues with my setup? Any advice or suggestions regarding R values, vapor permeance, cost-saving potential?"
A. Your sketch doesn't show weep holes or through-wall flashing at the base of your brick veneer wall. I hope you have those details.
If the basement literally never floods it's fine to leave the kraft facers on but it's also fine to strip them, as long as you don't lose so much fiberglass in the process than there is insufficient loft for a compression fit.
Put a half-inch to an inch of EPS or XPS under the bottom plate of the interior studwall as a thermal & capillary break, extending all the way to the dimple-mat.
Rather than a thermally bridging fireblock, why not extend the rigid foam R & S layers to the subfloor between the joists, skip the M?
The R5/inch performance of XPS will fall to that of R4.2/inch EPS within the lifecycle of a house as it loses it's climate damaging HFC blowing agents. Using polyiso (foil or fiber faced) or EPS (faced or unfaced) as the wall foam would be much greener. They are both blown with pentane, which has about 1/200th the environmental impact of HFC134a (the primary component in the blowing agents for XPS). EPS will not lose performance over time, polyiso will eventually end up at about R5/inch. Polyiso is somewhat hygroscopic unlike EPS or XPS, which is why the studwall bottom plate & wall foam should rest on either EPS or XPS, but not polyiso.
Reclaimed, factory seconds or surplus foam is by far the greenest foam insulation, since it's extending the benefit period in the cost/benefit ratio. Used fiber faced roofing polyiso and unfaced roofing EPS are commonly reclaimed and near-perfect sheets are often sold for less than 1/3 the cost of virgin stock goods. eg:
https://seattle.craigslist.org/see/mad/5860611670.html
https://seattle.craigslist.org/tac/hsh/5891775447.html
If you do the math, reclaimed roofing foam is often cheaper per R per square foot than even contractor-roll batts at box-store pricing, even using a fully-derated (for age & temperature) R-value.
Martin,
Thank you so much for your responses.
Re: re-using faced R13 batts:
Most are in good condition - pink, fluffy, dry. There's water discoloration on a few batts, and others are a bit mangled, so I will toss just those ones and reuse the good ones. Both you and Dana suggested removing the facing, so I will do that (trying to damage the fiberglass as little as possible). I could indeed achieve the additional R using another layer of rigid foam and then have the interior stud cavities be empty, but, I already have the batts, so I hoped to reuse them rather than buy/find more rigid foam, and it saves a couple of inches of finished depth on each wall.
Re: bottom-plate of interior stud wall:
Yes, I planned on using pressure-treated lumber (it's green in my illustration for that reason...but I didn't label it as PT). I think high-quality caulk will be easier than a sill gasket. Mostly I wondered if the dimple mat obviated the need to worry about this joint...and it sounds like nope, I better still worry about it.
Re: sketch doesn't show weep holes or through-wall flashing at the base of your brick veneer wall:
What weep holes? I've heard of that on the interior of CMU walls...but I think you mean on the bricks...quick Google search...grab a flashlight to check out the outside walls...ah ha. Yep, there are a few weep holes in the bottom-most mortar on the exterior brick wall, about every 5-6 feet (I never noticed those before!). There is black paper in there, and it appears to run along the bottom edge of the bottom mortar, so it looks like the paper might extend down the sheathing and then out to the exterior edge of the concrete, and the first layer of mortar was put down on top of that. Doesn't look like there is metal through-wall flashing. But there's no way for me to confirm that from the inside because the plywood sheathing is in the way (I only know about the air gap because there was a 3" circular hole in the sheathing...which I am planning on sealing). House was built in 1949...maybe the paper was all they did back then. I will hope for the best.
Dana,
Thank you for your response, as well.
I will put 1/2" rigid foam under the bottom plate and wall foam, all the way to the dimple mat. New illustration is attached that shows that (X), along with the caulk seal that Martin suggested.
Re: thermally bridging fireblock:
New illustration shows your suggestion (extend the rigid foam R & S layers to the subfloor between the joists, and skip the M batts). But wouldn't that leave only rigid foam between the stud cavity and the joist space? I thought fireblock material had to be 3/4" plywood, 1/2" drywall, or 2x lumber. From what you are saying, the top plate butted up against rigid foam and sealed is sufficient as a vertical fire block. I suppose the issue is not so much the material but having a good air seal to prevent air from rushing in to feed a potential fire. So, I would seal the top edge of the foam (R and S) to the subfloor (and around the floor joists on the perpendicular wall). I would then butt the interior top plate up against the rigid foam, and seal the top inside edge of that top plate. That means I could completely omit the plywood/drywall fireblock (O) entirely (as well as the M batts). Woot.
Re: XPS or not
I was considering XPS for the wall foam at first due to the lower vapor permeance and the higher R/inch, but greener is certainly better. I did look through some Craigslist ads...and I found a good deal on 4'x4'x2" polyiso panels...hope that guy calls me back soon. And anyway EPS is less expensive than XPS at the store if I can't find any used panels. So, you said I should put EPS or XPS under the bottom plate (because moisture), and either EPS or polyiso would work for the R and S wall panels. Sounds like you are not too concerned about the lower R value of EPS, right? What material would you recommend for L against the rim joist?
With the foam under the bottom plate it no longer needs to be pressure treated.
I'm not AT ALL concerned about the lower R/inch of EPS vs. XPS. With an R13 insulated batt wall 2" of any type of foam brings the wall performance to well above the code-max U-factor.
The thermal performance of the XPS will eventually equal that of the EPS- sooner than the warranty might indicate, doing some additional environmental damage in the process. (Who actually pulls and tests the R-value of the foam after 10 -20 years, and who would be making that warranty claim?) In Europe XPS is blown with (low enviro impact) CO2, and is similar in nearly all respects to HFC blown XPS, except that it tests at R4.2/inch rather than R5/inch. The higher performance of HFC blown XPS is temporary- it's primarily about marketing. There will HFO blown R5/inch XPS available (with much lower impact than HFC blown stuff) 20 minutes after HFCs are banned for that use, but I'm skeptical that the higher performance of HFO blown foam is any less temporary than the HFC blown goods. The thermal performance of EPS is stable over time, and is not dependent in any way upon blowing agents.
You can use any foam you like for component L on the band joist. It will dry through the sheathing into the masonry cavity.
Even comparatively vapor open unfaced Type-II EPS is sufficiently vapor tight (<1.5 perms @ 2") to protect the susceptible studs & wallboard from ground moisture drives. But your dimple mat is already a Class-I vapor retarder, a true vapor barrier, which renders the vapor retardency of the foam somewhat moot.
Thanks again, Dana. I'm going to avoid the XPS if possible. Heck, brand new foil-faced polyiso is the same price ($32 per 4'x8' panel), so I could just use that.
But saving money and using surplus material is good. The Craigslist guy got back to me, and he is out of 2" polyiso, but he has a bunch of unused surplus 2.5" polyiso that he is selling for what I think is a very reasonable price ($7.50 for 4'x4' sheets). I reworked my illustration (version 3 is attached) to use this dimension, and in fact 2.5" is perfect for the first layer of rim joist insulation on my wall with perpendicular joist.
But I am not sure if I should use this material on the stud wall portion because I can't confirm the facing (you mentioned in a different thread that vapor retardency of polyiso is all about the type of facing). You said above that "foil or fiber-faced" polyiso would be fine for the wall foam. I asked him what the facing was and he said his stuff has "thin brown paper facing (and it gets wet when it gets rained on)". I called a roofing supply company to ask about the polyiso products they offer, and they said they have polyiso with "fiber-reinforced organic felt facer" and I looked up that product (ACFoam-II from Atlas Roofing) and it doesn't look like "thin brown paper". So it sounds like his stuff is not really "fiber-faced". Looks like there are many kinds of facing available (here's a technical bulletin PDF). For my purposes:
1. foil facing, 'FF', 'Foil Facer'. This stuff is very low perm.
2. fiber-facing, 'AGF', 'All Glass Facer'. This is low enough perm for my needs.
3. plain old paper facing, I'm guessing this is 'Cellulosic Fiber Board' and not 'GRF' ('Glass Reinforced Facer'). Any idea about the perm on this? I'm guessing pretty high.
You said that my dimple mat makes the vapor retardency of the foam somewhat moot, and I get that, so I think this guy's paper-faced polyiso will work just fine for me on the concrete foundation portion of the wall (which is about 5' high). But on the stud portion of the wall (~2.5' to the ceiling), wouldn't there be too much vapor permeance? Not sure what the 1/2" EPS would provide for vapor retardence, but I'm guessing not enough. If the paper-faced 2.5" polyiso plus 1/2" EPS won't cut it, then I can go buy new foil-faced polyiso for just the stud wall portion.
On another note: I read about rock/mineral wool, and it sounds way better than fiberglass batts. It's a little more expensive, but the flame retardency alone seems worth it to me. Any issue using R15 mineral wool in the interior stud wall cavities?
Carlos,
Don't worry about the vapor permeance of the polyiso facing. In this application, the vapor permeance of the facing is irrelevant.
What he said!
Seriously, fiber faced polyiso works just fine on basement walls & band joists. You even have dimple-mat as a capillary break & vapor barrier between the foam & ground moisture, which renders the vapor retardency of the foam moot- it really doesn't matter AT ALL in your stackup, and hardly at all even without the dimple mat.
FWIW: I've had 3" of reclaimed fiber faced polyiso on the interior side my poured concrete foundation for getting onto a decade now, in a house where during the spring thaw the natural water table is at or slightly above the slab level. There have been a few instances where I've had to cut sections of the foam when making modifications to the house, and there has never been even a hint of moisture issues on the facer, concrete, or foam, or the wallboard that's covering it.