Insulating roof framing in overhangs
Hello All,
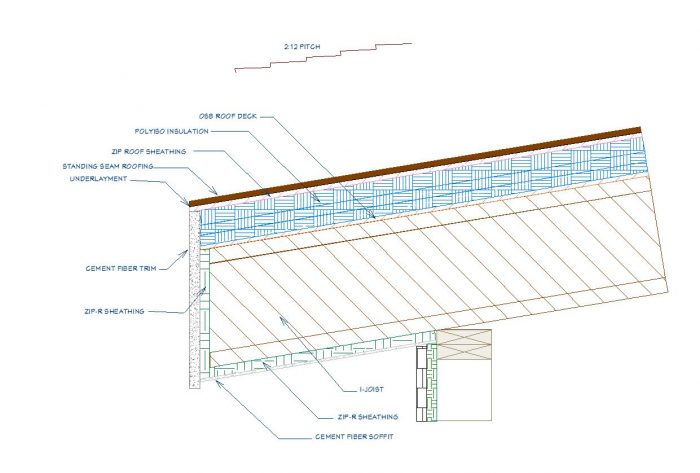
With help from members here, I have built up my roof system as detailed in the attached (which doesn’t necessarily show everything in the proposed assembly). This includes 3 layers of external polyiso along with 7 1/4″ of rockwool batts between the i-joists (not shown). The roof is a shed 2:12 with 24″ overhangs.
My question is in insulating the “exposed” i-joist ends and bottom flange. There’s lots of talk and ideas on stopping the thermal break on the roof deck – i.e. the top flange of the i-joists in my assembly, but I haven’t found information on insulating the ends or the exposed bottom flange of the i-joist. My idea is to use the same Zip-R 3.6 (1″) that I’m using for my wall sheathing to wrap the exposed ends and bottom flange of the i-joists. I am wondering if I could even use this Zip-R as my sub-fascia board (which is what I am showing) or would I need an additional (and more normal) 1x dimensional material for this.
Does this seem like a good approach? Am I missing something or going overboard?
Thanks!
Carl
GBA Detail Library
A collection of one thousand construction details organized by climate and house part


Replies
Hi Carl.
I don't know too much about the structural requirements of using I-joists as rafters. That withstanding, I think what you are proposing is an interesting idea. And the ZIP sheathing will give you a flat, straight substrate for your soffit and facia material.
This is an interesting idea, but it maybe a net negative. By insulating the way you describe, you are essentially making the overhang part of the inside of the building envelope. In a way, you’ve added additional exterior surface area to the structure so more overall area for energy to “leak” through — even if it’s insulated. This extra area’s overall thermal losses may more than offset the energy that would have otherwise been lost through thermal bridging of the I joists if you had insulated in the more usual way of extending something up from the top plate to the roof sheathing.
You may find that better overall performance can be achieved by fitting 3.5” pieces of polyiso in the rafter cavities between I joists directly above the top plate. This keeps the overhang on the outside of the thermal envelope so the extra surface area of the soffit doesn’t work against you.
If you were to stuff some unfaced batts or some kind of blown insulation into the eaves between the I joists, then the additional surface area shouldn’t do anything in terms of additional energy loss. Which way is better (your idea + fluffy stuff in the cavities, or the conventional “above the top plate” method) probably also depends on the labor and material cost differences too.
Bill
Thanks guys for the feedback. Bill - originally I had planned to do as you mention - build an interior "wall" of ridgid insulation between the i-joists in line with the top plate (there will probably be some blocking there anyway). As I was doing this I thought of the fact that every 2 feet there will be basically a strait run of solid uninsulated wood (the bottom flange of the i-joists) bypassing all the insulation in the unvented roof assembly and running directly into my ceiling space. I hear what you're saying - filling these exterior cavities with loose fill insulation (in addition to the additional use of Zip-R) is going to increase costs (possibly even significantly). However it seems to me that this is a very apparent break in building a warm unvented roof structure. I'm also wondering if just adding the Zip-R as I show + adding the ridgid insulation wall at the top plate would be enough. The eave space wouldn't be completely insulated, but at least there would be a thermal break to the ends bottom flange of the joists.
Carl
It would help to redraw it with the bat insulation and your continuous air barrier(s).
Note that sometimes it is better to live with some thermal bridging - because you can get a higher complete assembly R value for less cost.
Carl,
I was faced with a similar detail on my outsulation home. I have 8 1/2" nail base on the roof decks and a final total of 6+" of insulation outside the sheathing plane of the walls. I would strongly recommend against attempting to enclose the entire eave for a couple of reasons. The main one being the great difficulty in air sealing the eaves well enough to not be an active drain on the rest of the envelope.
It is true that two feet of the roof insulation is effectively doing nothing once past the wall line, but that is just necessary to keep the shingles or whatever continuous. The idea of putting an insulation wrap around the eave might seem tempting, but it may help to think of the final volume being a very tiny room with a closed door. The surface area to volume ratio will work to drain any heat out of that volume very quickly without making sure additional heat is put in. This sort of feature would likely become a moisture trap no matter how well sealed due to the inherently limited air exchange with the main house volume.
The losses to the outside temperatures via the edge caps of the I-joists will be pretty small in the overall picture. I framed with dimensional lumber (2x12) for the extended roof overhangs I needed to shed snow away from my walls. We blocked between rafters at the outboard side of the top plate and then spray foamed all the pockets to the depth of my outboard insulation. Eco arguments aside, it was much faster than cut and cobble with vastly superior air sealing attained.
The underside of the eaves received plywood paneling. One advantage of not needing to air seal the eave was the ability to install not easily sealed LED down lights where needed above doorways. That alleviated the need to poke holes into my wall foam for two of the three entry points. The front door did get lights either side.
There have been no discernible effects of having the rafter tails leaking heat, which doesn't mean they are not doing so. Just that I am not seeing thermal printing effects on the walls or roof. As I have noted in other posts, the most discernible heat loss through my envelope comes from the long steel screws used to attach the roof nail base.
Lastly, I would suggest that if you do go ahead with a complete insulation wrap, that you either do it your self or be prepared to nag the crews into an annoyed state. It is a very detailed thing you are considering doing. Best of luck either way you go.
Roger - thanks much for your explanation of what/why you did and your recommendations. I agree with the problems that I may run into with (semi) insulating the eave space. My biggest question/concern is that the exposed bottom flange of the i-joist - without any real insulation it would seem to be a direct channel bypassing all the roof structure insulation right to the interior drywall.
But I do agree that what I'm thinking is complicated, expensive and may bring up issues of its own...
Ideally, I'd like to run up the exterior insulation all the way to the roof outsulation and have the overhang framing separated from the roof framing. (See the below 2nd pic) I might also not have to run the outsulation all the way to the roof edge - although I wonder if this would cause some other unforseen issue.
However I've read that overhangs greater than 8" need to be tied back into the roof framing - so I'd have to cut through this thermal break, defeating my intent.
I'm not settled on a specific path/technique yet - I next plan to look at if there's a way/fastener type that I could use to support these 24" overhangs without having to link it directly to the roof framing (at least with framing material).
I've also added more detail to my initial detail (The first below pic.)
My plan is to do all the sheathing flashing, siding and cornice work myself, so yes, I can be sure to have it done to the level of detail needed.
thanks
Carl
Carl,
When I first read your post, I assumed you were insulating the entire overhang (infilling) with mineral wool or what-have-you in addition to the wrap, and in that case, I don't see how 'more insulation' could ever create thermal losses if the interior surface area of the insulated structure is the same. In that case, no external surface area has been added for losses. Only more insulation. Perhaps I'm misunderstanding. Moisture concerns seem possible.
More broadly, I'm not sure the thermal bridging there is worth fussing too heavily over.
If you did want a thermal break and didn't want to deal with potential pitfalls of insulating the entire shebang, there are probably ways to engineer the overhang in such a way to provide somewhat of a thermal break nearer the top plate, i.e. applied overhangs. If you like the aesthetics, braces can do wonders.
Another thought in that vein would be to maintain the integrity of the tension portion of the I-joist (and the roof sheathing) but cut away the compression connection, replacing it with high compression foam and a load distributor (2x, see attached). There are likely pitfall with this (foam creep and 2x shrinkage), but perhaps the idea could be worked on.
If you had additional roof structure above the foam, extending that would provide a more superb tension connection. Beyond that, if you used all foam, you could likely create a sort of SIP by adhering top and bottom ply layers to the foam in the overhang, creating a fairly solid extending structure. Sort of as seen here: https://www.buildingscience.com/documents/insights/bsi-046-dam-ice-dam
(edit: woops, its not there. Never-mind that. Maybe here: https://www.buildingscience.com/documents/insights/bsi-031-building-in-extreme-cold
note that these roof designs are quite different- namely over structure- but some ideas...)
I'm not an engineer, these are just general ideas.
It's taken me awhile to digest this and do some additional research. I do agree that I may be inviting a moisture issue in going down this route. I am however still trying to add some type of thermal blocking to the bottom flange of these exposed i-joists. My current thought is to just tack strips of either EPS or the Zip-R to these bottom flanges (maybe even "wrap" them) to just provide blocking to this particular element without trying to thermally block the entire space - thoughts?
I've attached a new detail as well as a render of the house for reference
Carl
Carl, Based on the rendering you posted, I have had several thoughts about the roof planes. I am wondering where you are building and what the winter weather is like. I am at 8500 feet in SW Colorado where the snow drove some of my decisions. Before I comment too much more, it would help to know at least your climate zone. The mismatch between wall and roof insulation levels is curious to me. I will assume that commentary is what you are looking for, so please take the comments as intending to help.
Hi Roger - I am in climate zone 4a - central kentucky. There's a little snow once or twice a winter and there are a few times of sub freezing weather to be sure, but nothing like you have. It's more the wind and rain that we have to consider (IMHO). Here's the breakdown on the roof and wall insulation:
Walls
Total R: 26.6 (FYI, Code is 13)
Exterior Sheathing:
ZIP R3.6
Thickness: 1"
R-Value: 3.6
% Total R Value: 14%
Cavity
Rockwool R23 Batts
Thickness: 5 1/2"
R-Value: 23
% Total R Value: 86%
Roof
Total R: 52.75 (Code is 38)
Exterior:
Polyiso Rigid Foam
Thickness: 3.5" (1 x 1.5" + 2 x 1")
R-Value: 22.75
% Total R Value: 43%
Cavity
Rockwool R30 Batts
Thickness: 7 1/4"
R-Value: 30
% Total R Value: 57%
There's also EPS under the slab (R- 15.4)
Carl
>"I am in climate zone 4a - central kentucky.
------
>"Total R: 26.6 (FYI, Code is 13)"
------
>"Total R: 52.75 (Code is 38)"
Local code my be R13 walls, R38 roof, but the IRC/IECC calls out R20 minimum, or R13 + R5 continuous insulation for walls, R49 for roofs. See Table N1102.1.2 :
https://codes.iccsafe.org/content/IRC2018/chapter-11-re-energy-efficiency
Seems Kentucky (like several states) is stuck at IECC 2009 levels:
https://www.energycodes.gov/adoption/states/kentucky (click on the "Residential" tab.)
So while this house beats IRC 2009 code minimums by quite a bit, it's margin on IRC 2018 isn't as spectacular, but still decent.
>"There's also EPS under the slab (R- 15.4)
The R15+ under the slab is a bit overkill if it's not radiant floor heating. Table 2 (p.10) of BA-1005 indicates about half that would be financially rational in zone 4:
https://www.buildingscience.com/sites/default/files/migrate/pdf/BA-1005_High%20R-Value_Walls_Case_Study.pdf
Your thermally broken insulated roof will hit pretty close to (slightly ahead of) the recommended R45-ish whole-assembly performance for compact roofs in that table, but your walls come up shy of the recommended R25. Going with only half the slab insulation and spending the savings on upgrading to the R9.6 ZIP-R would bring your whole-assembly Rs more in line with that table, though cost-wise it might only be rational to upgrade to the R6.6, given the higher than average expense per R for ZIP-R.
Hey Dana,
Thanks for the references and the notes. 2 things:
My planned wall will be R 26.6 so I'm unclear as to your comment "but your walls come up shy of the recommended R25". Am I missing something?
I will have radiant heat in the slab - hence the increased R under it...
c.
Hi Carl, Glad to see you are in Kentucky where the much milder winter weather won't present some of the problems we have here in high country. When I first saw your rendering I wanted to advise against having the front porch roof so flat as well as set so close to the bottoms of the upper windows. Even with good insulation, snow that lays up against the walls under my windows will tend to melt when the sun is out. The house is stucco and medium color which warms more than might be expected even when pretty cold. If the temperatures are near 30F it is even more pronounced.
I realize the rendering most likely is not showing the flashing details for your siding choices, but given the very low pitch and the choice of standing seam roofing, you will need to be very careful of the details. A 2:12 is about as minimal as many metal roofing people will consider. Snow that might accumulate near the upper living room (?) windows could make a mini-dam that would force water pooling between the fins to overflow the back edge of the panel. It may be that the roofer is planning making pan ends on each panel to prevent this, but be very diligent about the details. Caulking is not a substitute for good details.
For my local conditions I went with 4:12 with extended flashing caps. The wall to roof flashing extends a foot from the wall and has a folded down lip that is notched to fit between panel seams for fire ember protection. The extended flashing also ensures that if water is trapped between the ribs, it would need to rise almost as high as the rib before reaching the panel edge next to the wall. I also chose the tallest seam height I could get (easily) in case I got ice damming at the overhangs. So far, no ice dams even though the sun heats the metal up very quickly.
The gutters would also be a big risk here, as the snow tends to slide down slowly and make big waves the roll over the eave edge. Some people use snow brakes with higher pitched roofs to keep the crashing avalanches to a minimum. You won't be experiencing these problems.
It is also a good idea to confirm that the panel length you need for your roof sections can be made or rolled on site. Also check that the roof underlayment can take the heat of a metal roof. Shingles get hot, but metal gets hotter. There are many rated for it, you can decide if the sealing feature of a gummy version is important to your design. We have to use it by code here.
The detail of the eaves posted next to the render could use a tweak in my opinion. I would move the foam between joists out flush with the ZipR at minimum. The top plate will be a bigger thermal leak than the I-joists simply because it runs the length of the wall. As I noted before I have 6 1/2 inches of foam from sheathing to exterior finish, so foaming between the rafters was much more efficient for me and provided superior air sealing. This area is one detail that you will want to do on your own if going cut and cobble.
I would skip the foam under the eaves completely. It won't do a thing of thermal value. Think of the eaves past the main wall as a box. If you set a box outside, even one stuffed with insulation, it won't be warmer than the outside temperature. (disallowing solar gains) During the winter the "boxes" between each I-joist will be very close to the outside temperature if your wall insulation is doing its job. The humidity in Kentucky is probably higher than I experienced even in the Midwest, so I am hesitant to advise on whether providing ventilation for the pockets would be good or bad. Bet invasion at any seam gaps will most certainly be a problem. The little buggers drive me nuts. They are very, very insistent and if they get a nest going, very defensive about my trying to seal them off. Swatting bees on top a tall ladder may be how I die.
Last note, the R15 under your floor is well chosen, but be advised that your overall insulation will lower your demand for heat so much that regulating it down enough may be tricky. Be sure to run your load calcs and look at the shoulder seasons. Don't expect the toasty toes everyone wants. The actual floor temperatures will work out to be more like 72-75 if you don't want to be sweating all the time. I am guessing a slab with pex is your choice not electric wire. The lag in response time will be the biggest issue I suspect.
The house looks very nice, just watch the flashing at the walls and enjoy.
Roger - thanks for the lengthy and detailed reply. You offer a number of good points and suggestions and I appreciate it.
I know the slope on the front porch roof is less than ideal, but I'm thinking it will be ok (I've also discussed/confirmed with my designer/consultant as well) due partially to the fact that this roof is overhung quite a bit by the roof plane above. Your point about blowing snow building up against the upper windows is valid - I will be doing the flashing and siding myself, so will make sure this is done properly, and this is a south-east exposure... I have already got the material picked for the seamless steel roof from a company that offers a type good down to 1:12 and the length that I need (https://www.bestbuymetals.com/standing-seam-panels/vertical-seam/). As far as underlayment, I will tape/liquid flash the Zip Roof and plan to add an additional layer of Carlisle WIP 250HT OR ALCO Shield™ HT Ice and Water Protector OR similar.
I totally hear what you mean about the bee/wasp invasions - Kentucky's bugs and humidity are somewhat new (and annoying) to me (I've lived mostly in the PNW), but this is the compromise with my wife for my building the house :-) . Your point is well taken (with laughter) about sealing this space and reinforces my plans to do so. I think your explanation is valid on not needing to insulate this space at all (other than at the wall plane.)
I will totally admit that in reality, radiant heat is probably not necessary / completely appropriate to my area. But, it's something I've experienced as awesome and always wanted to have in my own place. Since it's relatively inexpensive if done yourself, I'm going to go with it. It will be pex in slab and I am working with Radiantec to get the system designed appropriately.
thanks again!
Carl