Repairing and Waterproofing Brick Foundation Walls
My questions are in regards to repair and waterproofing the basement of my home built in 1929 with a brick foundation in Connecticut. The basement is damp and musty and there are two areas (corners of the basement) where water enters during rainstorms. I am not interested in a finished room for the basement, but I want to remove the damp odor and be able to store items in the basement (e.g. tools that won’t rust due to the moisture, clothes that won’t smell).
Comments as to the foundation characteristics:
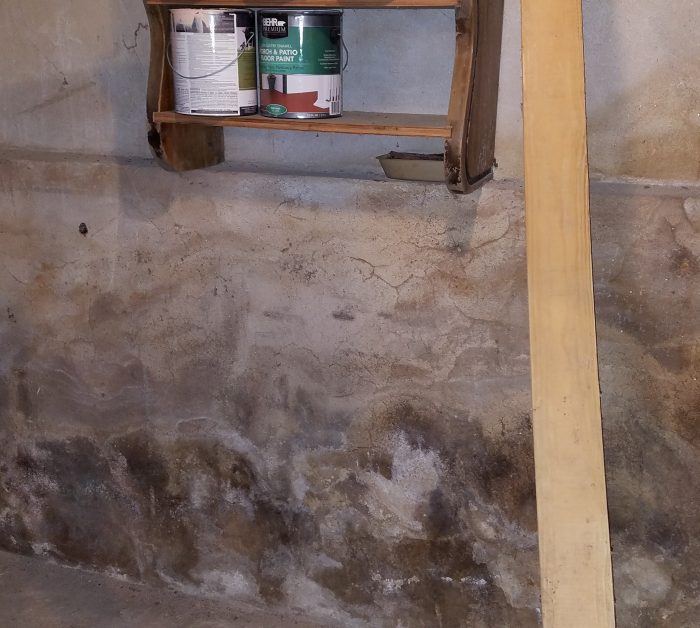
Three of the four basement walls have had a parge coat applied. Some of it is loose and some of it is still bonded well. My parents purchased this house in 1959 and to the best of my knowledge, they did NOT apply this parge coating. So, the parge coating has been part of the foundation for years.
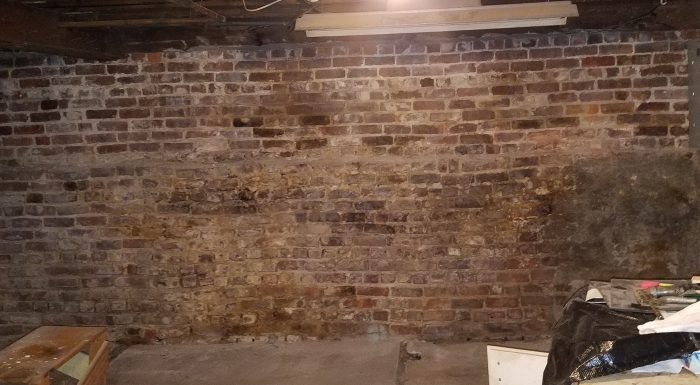
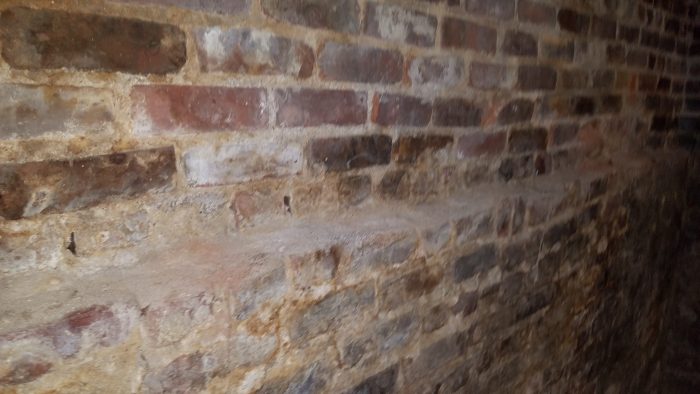
There is one full wall (and parts of two adjacent walls) that has no parge coating and this reveals that the brick needs repointing. I see one or two bricks that have obvious spalling but not sure if there is more damage coming. I do not know if there were repointing attempts since it was built in 1929.
I’ve had a few waterproofing and masonry contractors in for job estimates, but the reality is that I do not know the appropriate fix for this type of issue and I am not sure that some of the contractors do either. Some want to install a French drain, some do not. I think that this is not a high-water table issue.
From researching repointing I have read that the mortar for repointing should be “softer” than the brick. Given that this brick is from 1929 and below grade, can someone recommend the correct mortar for this? When I ask the contractors about the mortar type, they seem to have a one-size fits all approach. I am concerned that if the wrong mortar is used, it will cause bigger problems with the foundation later. What I mean by this is that a harder mortar will force the moisture/water to the brick which will, over time, damage the brick.
My next question is in regards to waterproofing/moisture management. A few contractors have recommended a parge coat to the brick wall and for the walls that are already parge coated they recommend removing the loose coating and patching with the product. One contractor has recommended thoro coat and another has only specified a cement product. Here’s my confusion – if the brick wall needs to breathe, then is a parge coat an appropriate approach? If it is, then what products should be used (there are epoxy’s, paints, hydraulic and mortar products)?
And finally, the basic gap in my understanding is — if there is moisture passing through the brick from the ground moisture, wouldn’t the bricks (that I can’t see) also be in need of some sort of repair? If we “waterproof” from the inside, doesn’t that simply stop the water at the last possible place – meaning water/moisture is still working its way through the bricks and if it is stopped at the last place, doesn’t that hold the water back in the bricks and create the moisture issue and compromise the bricks and mortar yet again?
Any recommendations are greatly appreciated!
(Edited to add house pic)
GBA Detail Library
A collection of one thousand construction details organized by climate and house part


Replies
Perhaps there are some things you can do to reduce the amount of water reaching the foundation. Do you have gutters? Do the downspouts channel the water away from the foundation? Is the soil around the foundation graded properly? Do you have foundation plants? Some photos might help here.
Thanks Steve for your reply, there are gutters and the downspouts are at opposite corners where the water is coming in. the downspouts have a 2 ft. extension to channel the water away but maybe it isn't enough? as to the grading, I think there could definitely be some improvements / fixes made. One contractor did recommend addressing the grading. I don't have pics at this time of the grading but will get some in the next few days. Again, thanks for your thoughts and taking the time to respond.
As an update, i added extensions to the downspouts and so far i don't see puddles in the corners after rain. I need a few downpours before i declare success! Thanks again for your help!
Steve is on the right track. If you have water entering the basement, you need to stop it at its source, not once it gets in the walls. Corner leaks are almost always caused by downspouts depositing water at the foundation corners. Run extensions to get the water as far from the house as possible and regrade the soil surface to slope gently away from the house. You would be surprised how these easy interventions can eliminate leakage during all but the very worst storms. Brick foundations are naturally porous and you can't stop leaks inside. If you really wanted a 100% waterproof system, you would have to excavate and apply waterproofing to the exterior of the walls.
Inside, you could certainly clean up the stained walls and plaster ("parge") the sections of wall without it. Note that traditionally, cement parging was done as a sacrificial layer. Moisture coming through the wall slowly destroys this layer, rather than attacking the mortar and/or the surface of the brick. When the parging falls off of a section of wall, you clean it up and re-parge that section. Yes, you should match the mechanical properties of the original mortar for this parging layer and for repointing. The good news is that, by 1929, most masons were using cement-rich mortar blends. If you can't get a formal test done, I would recommend using type "N" or "O" for your job. These are somewhat softer than "M" and "S", but might still be available in a bag mix. If not, mixing on-site is not that tough for a decent mason. If you can easily scratch the mortar in a place where it is generally in good condition, then use "O". If it barely scratches, the "N" is probably better.
Once the walls are cleaned, repaired and/or parged, You can consider application of an interior moisture barrier coating. These are not necessary, but can significantly reduce the amount of moisture coming through the wall. They are not likely to cause any additional damage to the bricks, but in some cases they allow more moisture to accumulate near your sills and that can be a problem. If you have a couple of feet of foundation showing above grade, then the brick can dry to the exterior, and that helps. Like you have found, there are many products for interior application. All of them work to some degree, but all will eventually blister and peel and then you scrape, clean and reapply. This is again related to how much moisture sits against the foundations. The dryer you keep the soils, the less pressure on the interior coatings.
Finally, you will need a dehumidifier for the basement. All basements need dehumidifiers sometimes, and in most northeast locations, that means from May-October. I find that running it at 60% is low enough to limit mustiness and rusting without using too much energy. Make sure it is set up to automatically pump the water to a proper disposal point. You don't want to have to empty the buckets.
Thanks Peter for your quick and detailed reply. You've addressed a lot of my questions and have helped confirm my understanding of what I've been reading and learning about. I'm still digesting all of this but you have (and others) are definitely helping me to sort this out. thanks!
I have one wall that sounds exactly what you describe Peter- corner leak with the large layer peeling off original 1940s foundation wall. Downspouts have been adjusted but I still get occasional drips down the wall in heavy or multiday storms...maybe a small 1'x1' area of dampness on the floor. If I wanted to finish off this basement space, what would you recommend? How long should a fresh parge and interior waterproof application last? An interior side sump pump seems overkill for how minor the amount of water intrusion-it's probably dry in a day or so, but nonetheless not something you want behind a finished wall.
>" If we “waterproof” from the inside, doesn’t that simply stop the water at the last possible place – meaning water/moisture is still working its way through the bricks and if it is stopped at the last place, doesn’t that hold the water back in the bricks and create the moisture issue and compromise the bricks and mortar yet again? "
It's the MOVING moisture that creates a problem. When moisture is blocked from moving through the mortar, it can't take minerals out. The moisture in the wet mortar & brick only dissolves the minerals in the moisture until it reaches a saturated state, which it tolerates well. It doesn't break down unless the moisture is flowing through the material and being replenished by un-saturated water.
A French drain on the exterior and good surface grading/drainage is a good first step to controlling bulk water incursions, but even when effective it only fixes part of the problem. A parge coat doesn't make the brick water tight- there is still a lot of capillary draw bringing in ground moisture.
But bulk water & ground water is only part of the "musty basement" problem. Brick foundations aren't very air tight, even when parged. In CT the summertime outdoor air dew points are WELL above the low to mid 50s F subsoil temperatures, and summertime air leakage becomes a major source of high basement humidity, even when it hasn't been raining. If the walls are pretty flat it's pretty safe & easy to use an inch or two of EPS or polyiso (but not XPS) board foam against the walls using tapes & foam/caulk sealants to make it air tight. The rim joist and foundation sill seams are usually a bigger air leak than all window & door crackage in the house combined- those too need to be air sealed & insulated.
With an air-sealed insulated basement the summertime basement temperature is a few degrees higher (and wintertime basement temp quite a bit higher), which results in a lower relative humidity and somewhat lower mold-risk even at the same absolute moisture levels. The air-tightness to the outdoors reduces or eliminates the moisture load of the damp outdoor air, reducing the amount of mechanical dehumidification needed to keep the stink at bay.
In most basements keeping it under 65% RH (at whatever the basement temperature happens to be), is enough to keep the smell under control, but with the cool slab it means any cardboard boxes need to be a few inches off the floor to avoid mold on the bottom of stored goods. Shelves for the storage are great, but even shipping pallets are fine.
The current code min in CT is R15 continuous insulation, or a U-factor of the same performance. In CT as little as R5 of foam on the exterior side is sufficient for wintertime dew point control on an R13 interior side studwall, provided there is a painted wallboard on the interior as a vapor retarder. Sometimes an all-foam solution is easier though. It takes 2.75" of roofing polyiso or 4" of EPS to get there. Fortunately there are several vendors of USED roofing foam in CT which can take the wallet-sting out of an all-foam solution, selling fiber faced roofing polyiso or Type VIII roofing EPS at less than 1/3 the cost of virgin stock foam. Searching your local CT craigslist for the terms "rigid + insulation" will rarely come up empty, eg:
https://newlondon.craigslist.org/search/sss?query=rigid+insulation
XPS is the least-green insulation material out there due to the extreme greenhouse potential of the blowing agents used to manufacture it. Virgin stock XPS has nearly 10x the CO2e footprint of EPS of similar density R for R, all due to the HFC blowing agents. (Polyiso and EPS are blown with low-impact hydrocarbon blowing agents.) But USED XPS is fine for this application, since no new blowing agent or polymer is needed for reclaimed foam. For design purposes, derate reclaimed XPS to R4.2/inch (the same as EPS of equal density) which is the fully depleted performance of XPS after the HFCs have left the foam. (This is reason XPS is only warranteed to R4.5/inch @ 20 years- the performance boost of the blowing agents is temporary.)
Thank you for your reply! Thanks for helping me to understand the moisture issue with respect to the water movement through the bricks! As to the drain system, I don't think I will be able to accomplish an exterior drain system due mostly to the presence of front and back porches. Believe me, I would love to fix this "right" and be able to stop worrying about this.
I did read with interest the idea of sealing up the basement to deal with the humidity. Thanks very much for taking the time to respond!
For repointing a few of the interior bricks, can I use Great Stuff? It would easily fill in the spaces. Would it be too porous?