Exterior Insulation and Vented Rainscreen
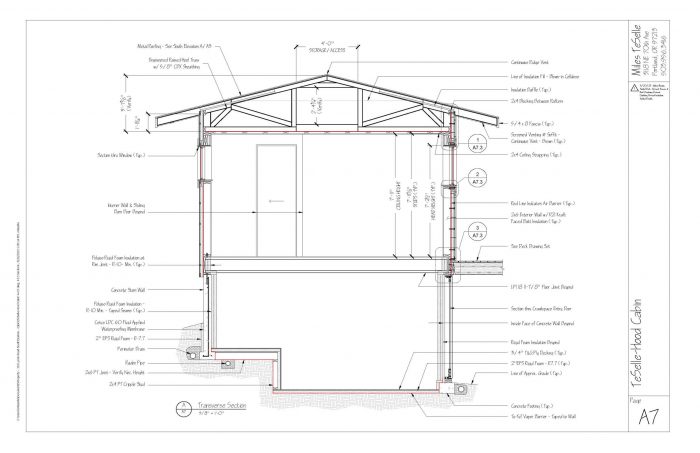
We will start framing our cabin soon. It is in the Columbia Gorge, in Skamania County, WA. Zone 5B. Please see drawings (attached, and additional posts). My section drawings show insulation, air barrier, layers, etc. Rigid foam outsulation and rain screen. I have read the Pretty Good House book, by Michael Maines, and others, and several articles at GBA, and in Fine Homebuilding, including this one by Justin Fink:
My cladding/siding will be rough-sawn plywood, with battens. Breckenridge, or similar.
https://www.lakesidelumber.com/products/wood-siding/plywood/
Question 1: If I run the plywood siding vertically, do I need to run the strapping horizontally?
Comment 1: Notching the horizontal wood strapping seems time-consuming, and having water drain through untreated wood doesn’t sound that great either. So, my drawings show Cor-A-Vent Sturdi-Batten and SV-3.
Question 2: In this article, https://www.greenbuildingadvisor.com/article/how-to-combine-board-and-batten-siding-with-exterior-rigid-foam, Peter Yost is talking about connecting the furring(strapping) to the studs and the cladding to the furring(strapping). But with the Cor-A-Vent, there is no wood strapping to fasten the cladding to. So my drawings show 4 1/2″ nails going though all the layers, all the way to the framing. Are there guns and gun nails for fasteners that big? Fastening all of the cladding through all the layers with screws sounds slow. Are there other solutions I should consider?
Questions 3: I’ve read this article:
For my climate zone, I should go beyond the drainable housewrap, and create a ventilated rain screen, correct?
Some comments on my drawings:
Question 4: Basement: I know that the vapor barrier should be on top of the rigid foam that’s on the floor. But the vapor barrier is already installed, and the rigid foam is not. Is it OK as shown?
Comment 2: Air Barrier on the walls: It should have gone underneath the mudsill on the concrete, but the mudsill and floor joists are already installed.
Question 5: Air Barrier on the walls: Should I interrupt the wall sheathing, in order to connect the wall air barrier to the ceiling air barrier?
Comment 3: I should be using advanced framing, with studs at 24″ on center. But I am already getting my framer/carpenter up to speed on two new techniques (outsulation and rain screen), and paying him by the hour as he learns these new techniques, so I’m not ready to embrace a new framing technique on this project. Plus, I don’t know enough about it myself.
Question 6: Do I have all the control layers shown correctly?
Question 7: Are there any changes to my details that you would recommend?
Thanks,
Miles

GBA Detail Library
A collection of one thousand construction details organized by climate and house part


Replies
1. Typically running the strapping horizontally is fine. Just leave a 2" gap at each end. There really isn't a lot of bulk water that needs to be drained. It's more about ventilation and evaporation. That said, you can also run the strapping on a 45 degree angle. It requires a bit of forethought but it works.
2. When you talk about more than about 1" of exterior rigid foam, you run into these issues. The connectors for your siding materials really should go about 1.25" into your studs, but you can get away with 3/4". You could go with REALLY long screws to get through the insulation and hope you actually hit the studs. More reliable and simpler is to use 3/4" thick furring, typically 1x3 lumber or strips of 3/4" plywood. These would get screwed all the way through the insulation and 1.25" into your studs. Then your siding has 3/4" furring to attach to and doesn't need to go through the insulation. When applied over thick insulation the Cor-a-vent products are really only there to block insects.
Your challenge is to combine the 3/4" furring with the vertical siding. That means running your furring either horizontally or at an angle, as described in 1. But it also means that each furring strip only gets secured to studs at your stud spacing, 16" or 24" depending on how your wall is framed. That's a fair bit of load at each connection point and your building department may require an engineer to check it. It's certainly a feasible solution though.
3. Yes, give yourself a good rain screen. In the PNW you really want that.
Re. 4 & 5 I hope others will respond. I'm not confident to answer those questions. Best of luck with your project.
Hi, thanks very much for the info!
Miles
Here are the exterior elevations.
Here are some photos of the job site.
Question 4.
The reason for the VB above the rigid is that it can float away during the pour. Once the rigid floats up, there is no way to get it back down. Simplest is to keep as is put a 2nd layer of 6mil poly over the rigid.
You need to protect the bottom of the foam. One way is perforated flashing that you install before the foam goes on. Can also be a piece of PT lumber ripped to the thickness of the foam. The corovent strips now get nailed to this to protect the rain screen cavity.
Comment 2:
You can seal the sheathing to the concrete with fancy tape (Fentrim) or liquid flash.
Question 5:
Yes. The simplest way is either a wide piece of flashing tape or strip of house wrap over the top of the wall before the trusses are set. You can than connect the ceiling air barrier to this tape/strip on the inside for air barrier continuity. You can do the same thing at interior partition walls.
Comment 3
Most advanced framing details are not really worth it. 24" OC is simple enough because all you do change the spacing, also saves a bit of lumber cost. I would build the rest using standard details.
The images are not very clear, but make sure there is flashing above your deck ledger and this flashing has a small gap above it so it can drain. Simple way is to raise the joists up 1/2" so the floor boards are not sitting directly on the flashing.
Thanks, Akos.
Question 4 - vapor barier: Good advice. In this case, we'll be putting plywood over the foam, so there won't be a slab.
Foam on Walls: Good advice. I have read about taping the bottom of the foam, but the PT lumber might be better.
Comment 2 - Air Barrier to foundation: I'm not sure where you are talking about applying the tape. I just added a detail, and attached it. Could you sketch where the tape goes on the attached sketch?
Thanks for the other info.
Images not clear: That's strange. Those jpegs are high res, so I don't know why they're so small when they pop up. But I have also attached a pdf version, which is clearer. And you can download either the jpeg or pdf versions.
Thanks,
Miles
See attached sketch.
Perfect - thanks!
Hi Akos. Thanks again for that sketch. And in my attached pdf, you can see how I added it to my drawings. Question: How is the 2x PT Nailer/Foam Protector attached? Concrete nails into the concrete stem wall?
Thanks,
Miles
Miles007,
That's the complication - and why most details show that bottom piece of PT as being attached to the sill-plate - which does two things:
- It allows for the reality that your framed walls will not be perfectly coplanar with the stem-walls below.
- It keeps your wall sheathing off the concrete.
Miles,
Questions:
1. No, with panel goods (Hardi-board or plywood) you can run your strapping vertically at 16"oc. Use the same detailing as you would with horizontal cladding.
2. Now you are back to being able to use plywood strips or 1"x material for the strapping. If your sheathing is 1/2" or thicker you don't need to hit studs. The plywood fasteners will now have plenty to bite into.
At the base of the rain-screen protect the cavity with perforated flashing or Cor-a-Vent.
Comments:
3. As Akos said: just change the stud spacing to 24"oc and leave out the other advanced framing detailing.
Thoughts on your sections:
- You will need something more than just a footing (a stem-wall is the typical solution) at the lower end to keep the framing up at least 8" above grade.
- There is no point in adding exterior rigid insulation unless it extends above grade.
- Concrete-less slabs need particular attention to keeping them dry. They need at minimum to be above the level of the top of the footing, and have a layer of free draining material underneath.
- This is the important one. The foundation details need engineering and modifying. You can not retain grade, or resist horizontal forces on your upper foundation wall with wood joists the way you have shown.
Hi Malcolm Taylor,
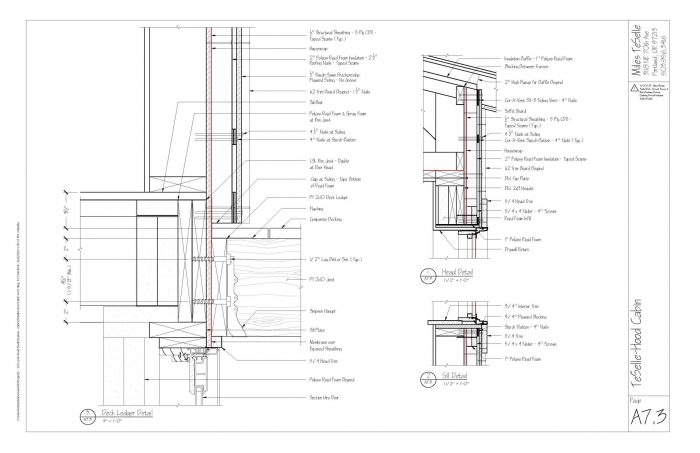
Another question for you. This is regarding your answer to question 2 above. At the top and bottom of the rain screen, I decided to go with the Cor-A-Vent instead of the perforated flashing. But if the 1x strapping is 3/4" and the Cor-A-Vent SV-3 is only 7/16" thick, how does that work? Do you mill some lumber to furr out behind the Cor-A-Vent? A pdf of the current section drawing is attached.
Thanks,
Miles
Miles,
Isn't the SV-5 made for a 3/4" gap? If you use the sv-3 I'd pack it out from behind with sill-seal.
I realize I had missed that you are using exterior insulation when I replied in post #8. That means my advice to not bother hitting studs with the fasteners on your rain-screen furring was wrong.
I wouldn't bother venting the top of your cavity. You get almost all the benefits of the rain-screen without the added complication.
Hi Malcolm Taylor,
It won't let me reply to your reply, so hopefully you will see this. Thanks for all the info, and for the heads up on the SV-5.
Exterior Insulation and Studs: I think what you're saying is:
Fasten the rain screen strapping with long screws; through all the layers, and into the studs. And then when I attach my 5/8" rough-sawn plywood siding and battens, those nails only need to go into the 1x rain screen straps.
Is that correct?
Miles,
Yes that's right.
Sounds good. Thanks again, Malcolm.
Miles
Hi Malcolm. Thanks for post #29, above. We have built it as shown in my section detail, with the wall sheathing coming down just to the bottom of the sill plate.
The good thing is that we wrapped flashing tape around the bottom of the plywood, and down onto the stem wall in Z shape, as shown in my detail. So the PT won't be touching the concrete.
For attaching the 2x PT Nailer/Foam Protector, I guess we will use concrete nails, or concrete screws.
And we will probably attach that bottom trim to the PT first, and then attach them to the stem wall as a unit.
Thanks,
Miles
Miles,
I have found that the most reliable and easy to use concrete screws are:
https://www.grkfasteners.com/specialty-accessories/caliburn-concrete-screw/
Hi Malcolm,
Thanks for post #31, below. OK, great. Thanks for the recommendation,
Miles
Hi Malcolm,
Thanks very much for your replies. Here are a few follow-up questions:
Perforated Flashing: I think I see; the perforations allow air to flow thru the rain screen. Do you have a link or a brand that you've used?
Sections - Footing: Sorry for the confusion. There is a concrete stem wall all the way around. Please see attached sections, and photo above. Maybe the confusion is from Section A/A7, which shows a section thru the crawlspace entry door.
Exterior Rigid Foam: We installed it before backfilling; at the time, we hadn't finalized all of the details. Right now, it comes up to grade level. Would you recommend adding pieces between the existing top, and the future rigid foam on the wall, with taped seams? If so, those pieces should be EPS, in case we change the grading.
Concrete-free slab: For free-draining material underneath, is there a sketch or an article that you would recommend?
Foundation Details: As above, please see attached sections, and photo above.
Thanks again,
Miles
Miles,
We are lucky in that lumberyards here stock perforated trim for rain-screens. You can also get it from:
https://www.menzies-metal.com/metal-flashings/perforated-j-channel-rain-screen-low-back/
I should have said "to the keep the door 8" above grade". Attaching the door sill directly to the footing is a problematic detail.
Is there any reason the stem-walls extend so far above grade, rather than stepping down and have framed walls above?
Because concrete has such a low R-value, the cold can just bypass the exterior foam where it ends at grade. Unless it is made continuous with the foam above it isn't doing much. Given that you will be insulating the interior, and the complications involved in covering it above grade, I'd probably just leave it as is.
All slabs, with or without concrete, should be located on top of the footing, preferably with several inches of fill between the underside and the top of the concrete. The typical detail has 6" to 8" of clear-crushed gravel as a capillary break, and a top dressing of sand for leveling. This layer is critical for floors made of foam and wood.
Back to the important part: The step you show in the grade under the crawlspace, which is made up of unrestrained soil, with the footing exposed on one side, is problematic from a water management point of view, but more importantly is structurally unsound - especially in a seismically active region.
Great, thanks for that link to the perf. trim.
Stem walls above grade: Yes. Please see attached site plan. We also had our excavator shoot the elevations, to establish heights. If we build the future addition, we want to make sure the front door is far enough above grade.
Rigid Foam on Concrete, above grade: Thanks for answering that. For the foundation of the future addition, we will look into ICFs.
Basement Floor: I'm sure you're right about those details. We are tempted to build the floor as drawn, in order to have some usable storage space down there. But as you are indicating, that could lead to moisture problems.
Step in Grade: Good point. See attached photos. We should probably build a retaining wall to restrain the soil at that step.
Here is another photo of the crawlspace.
Miles,
Stepping back bit. It looks like it's going to be a nice cabin, and it's great you have already thought through how it can expand. That's very rare, and will save you all sorts of grief down the road.
Good luck with your build!
Hey, thanks so much, Malcolm! Have a great day,
Miles
Have you reviewed the info at http://cchrc.org/remote-walls/? I followed that closely when doing my house.
Interesting. Thanks, I'll check it out.
HOPING FOR A QUICK REPLY, IF POSSIBLE. Malcolm Taylor, Akos, jollygreenshortguy, and others:
Please see attached Sections.
1) The 2" Polyiso they sent is foil faced on both sides. Is that OK? There is also some 1" Polyiso, for around the doors and windows, as shown on details. Same question for that.
2) I have read about making sure you have the right thickness of rigid foam, dew point, etc. But I'm not sure I understand it. Climate zone listed above. Wall cavities will be either R21 (faced) fiberglass batts, or dense pack cellulose. I'm hoping you can reassure me that I have got the correct rigid foam exterior insulation. Do I?
Thanks,
Miles
Miles,
You are fine. You have a sufficient R-value for the exterior foam in your climate zone, and it being impermeable doesn't matter.
https://www.greenbuildingadvisor.com/article/calculating-the-minimum-thickness-of-rigid-foam-sheathing
Hey, great. Thanks very much. That's a big relief. :--)
Here are the Sections as jpegs, although the PDFs attached above are probably easier to read.
Here's a current photo. The build is coming along nicely.
Hi,
Another question for you. Please see attached detail. PDF and JPG are the same. I have read this article, by Martin Holladay, and other articles: https://www.finehomebuilding.com/2010/05/20/flashing-windows-in-rain-screen-walls
In the article, you can see the Jamb detail, which I have included below. This is very similar to how our cabin is detailed. But in the example, the nailing flange of the window is attached further inboard.
Question: If I were to do that, it would expose the edge of the plywood siding/cladding. So it seems like we need to attach the nailing flanges of the windows and doors OVER the 1x4 nailer. And then run the flashing tape over the 1x4 nailer. Is this correct?
Thanks,
Miles
Hi, hoping that someone can answer my question in post #33, above. Malcolm Taylor? Akos? Or others?
Hello again. My contractor is working on this today, so I'm hoping someone can answer the question in post #33 above. Malcolm Taylor? Akos? Martin Holladay? Others?
Thanks,
Miles
Miles,
You can do as you suggest, or If the window frame outside the nailing flange is too shallow to cover your rain-screen furring and siding, you can hold the furring and siding back from the window and add a window buck, or window trim, deep enough to cover the materials, The buck or trim will be mounted directly to the flange.
Hi Malcolm,
Thanks very much. That makes sense, what you're saying. The attached detail shows what you're talking about, if I drew it correctly. It sounds like either method will work, so we will just need to decide which way to go.
Thanks,
Miles