Image Credit: David Glasser
Image Credit: David Glasser Lightweight forms. Insulated concrete forms are easy to pick up with one hand.
Image Credit: David Glasser A shallow foundation. Only two courses of ICF blocks were needed to complete the short stemwalls of the frost-protected shallow foundation.
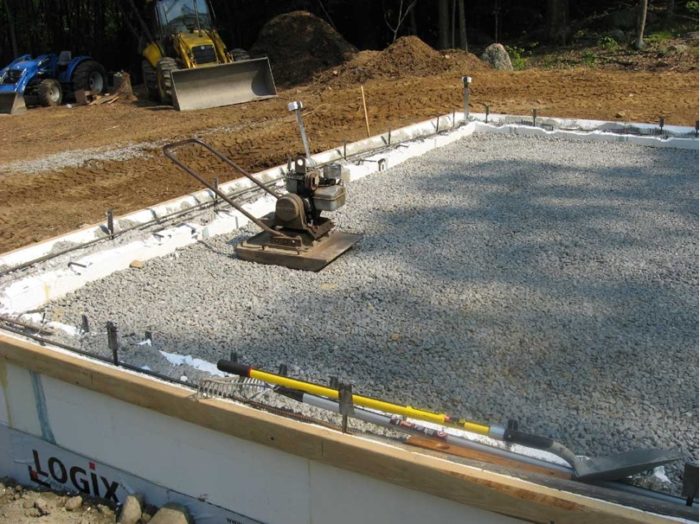
Image Credit: David Glasser Compacted stone. The foundation was filled with crushed stone to support the slab.
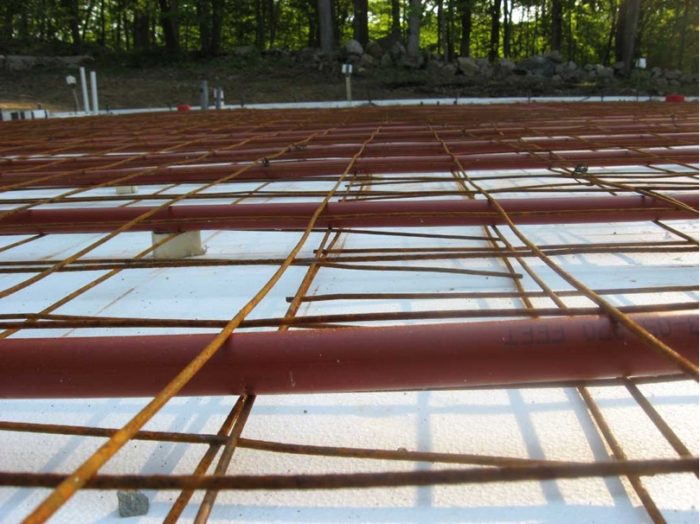
Image Credit: David Glasser A PEX sandwich. The hydronic heating tubes loop back and forth between two layers of reinforcing mesh.
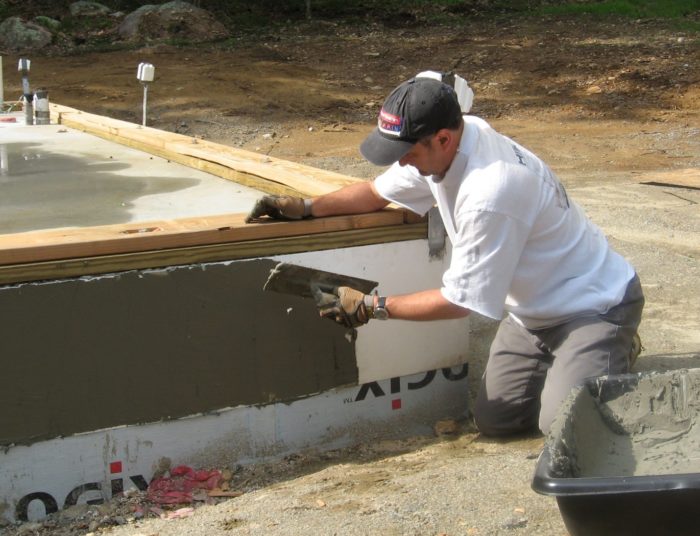
Image Credit: David Glasser Parge coat. The above-grade portion of the ICFs was protected with stucco.
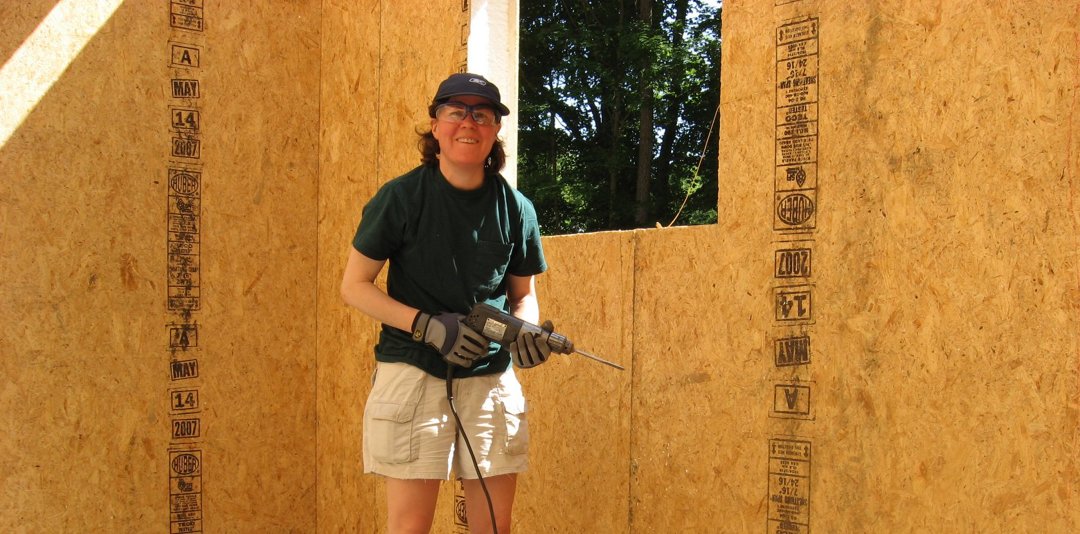
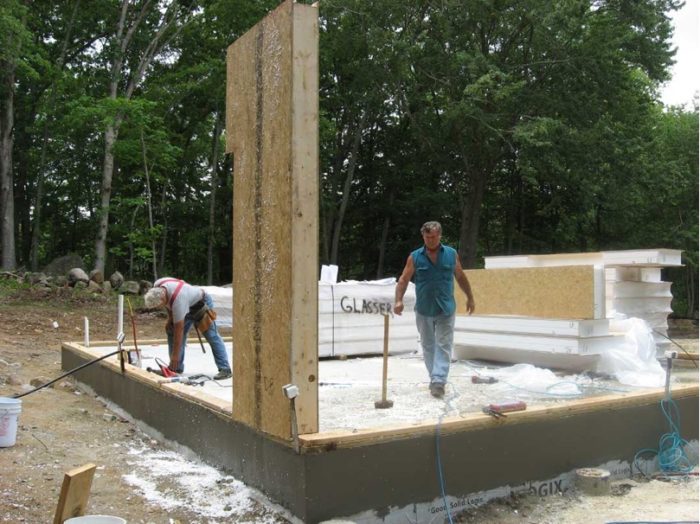
Image Credit: David Glasser The first structural insulated panel (SIP) is up.
Image Credit: David Glasser Foam holes. Holes are drilled near the edges of a SIP panel; the holes will later be filled with spray foam to seal the seam.
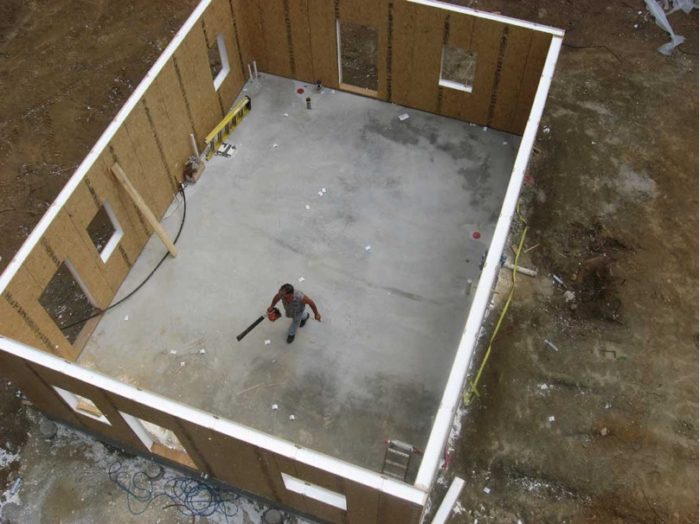
Image Credit: David Glasser Bird's eye view. All of the wall panels for the first floor have been erected.
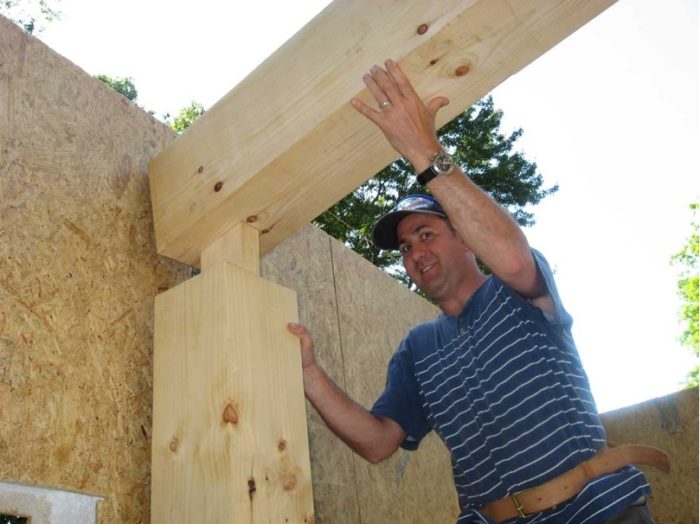
Image Credit: David Glasser Mortise and tenon. The second floor is supported by timber-framed beams.
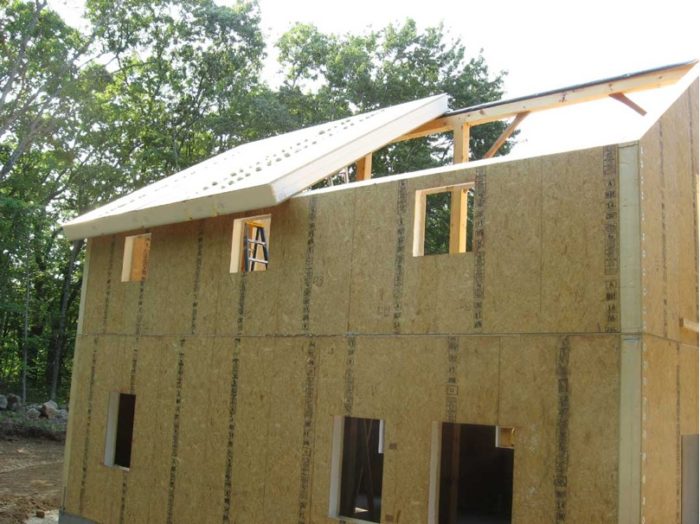
Image Credit: David Glasser A SIP roof. The roof panels are supported by an exposed timber-framed ridge beam.
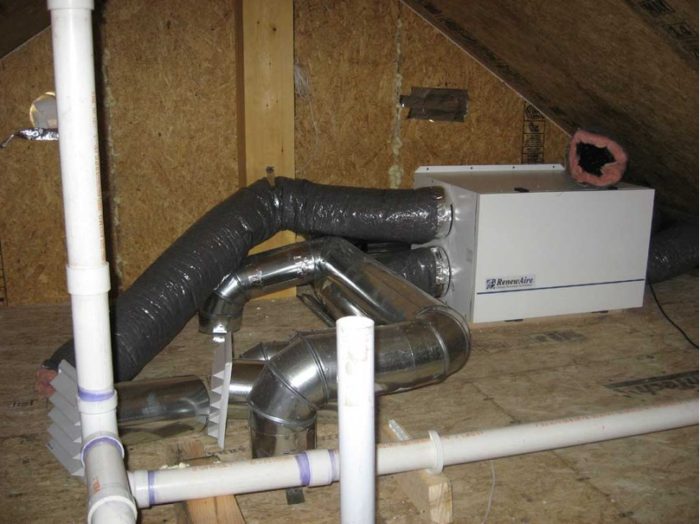
Image Credit: David Glasser The heat-recovery ventilator (HRV) is located in the attic.
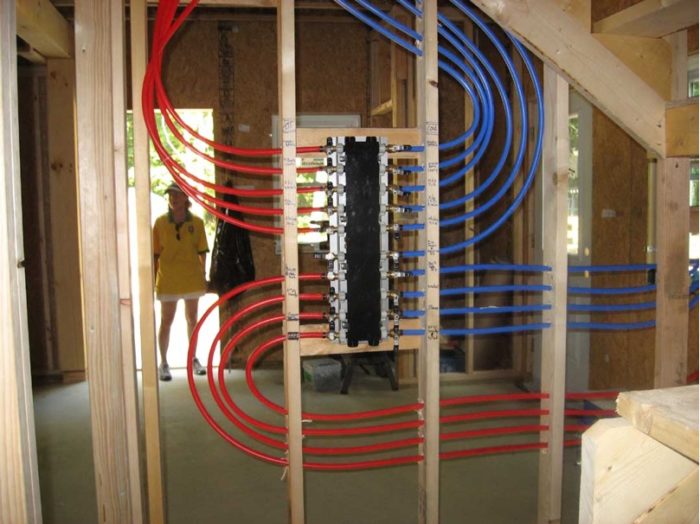
Image Credit: David Glasser The red and blue PEX tubing connected to the plumbing manifold creates an artistic tableau.
Image Credit: David Glasser
A musician and a nurse take on the GC role
By David and Cathy Glasser
To see a video tour of this home, click here.
Acting as general contractors, my wife Cathy (a nurse practitioner) and I (a jazz musician) succeeded in building a Five-Star+ Energy Star home for less than $125 a square foot. If we could do it, so can you.
We built our house on a piece of family property that included an old cottage where I had spent summers as a youth. Several contractors advised us that the old cottage wasn’t worth renovating, so we decided to raze the cottage and build a new house. Because we were building a weekend home, it needed to be energy-efficient.
Trolling for ideas on the Web
Since we had no building or homeownership experience, we began investigating our options over the Internet. We looked at yurts, modular homes, structural insulated panels (SIPs), and plans for stick-built homes.
SIPs appealed to us because they seemed to be a very cost-effective way of building an energy-efficient home. SIP homes go up quickly, reducing labor costs. But, since I had no building experience, I needed help.
I sent an e-mail to a SIP manufacturer, Northeast Precision Panels, and Ralph Lord called me back. Lord listened to our needs and wants — a modest, simple, energy-efficient home — and suggested we get in touch with Alan Rossetto. In 2003, Rossetto had built the most energy-efficient home in Vermont. Lord sent us a copy of Rossetto’s Fine Homebuilding article.
We loved the look, feel, and concept of the house shown in Rossetto’s article, so we contacted Rosetto. That was the start of our wonderful, fulfilling, and thoroughly educational experience as owner/builders.
You don’t need an architect
After speaking with Rossetto, we decided to go ahead and build a SIP house. Rossetto explained the order of events to us. He strongly suggested to us that we could act as the GC for the project. I estimate that acting as GC probably saved us between $40,000 and $60,000. Although I was very apprehensive about taking on such a responsibility, Rossetto assured me that SIPs were a simple building system, and he’d be there to advise us.
To keep costs as low as possible, we decided to build a simple rectangle. We calculated that a basic, story-and-a-half home measuring 24 ft. x 28 ft. would fit our budget. Rossetto asked us to draw a preliminary floor plan. That sent us back to the Internet for ideas; looking at other floor plans helped us out.
Because we knew the house would be very simple, we decided against hiring an architect. An architect would have been one more person to pay. Architects approach things with a creative and inventive mindset, a mindset that we felt could conflict with the simplicity of our concept. Of course we complied with all local building codes and had the building plans stamped by a qualified engineer.
We came up with an open floor plan on the ground floor, with three small but functional bedrooms upstairs. We sent our basic (perhaps even crude) drawing to a designer, Paul Patterson, whom Rossetto had worked with before. We consulted with Patterson and Rossetto by e-mail until we had ironed out all the details and were satisfied that the plan was consistent with our design and our budget.
Preventing change orders
We’ve read that the single most common reason for construction cost overruns is a decision to change details midstream. That’s why we tried very hard to include everything we wanted in the original design; we made a commitment to stick to this design, if at all possible — no matter what we might realize later. This commitment helped us stay within our limited budget.
To secure a construction loan, an owner/builder/GC must present a loan officer with a thorough spreadsheet showing anticipated costs. The bank required us to submit documents from our subcontractors indicating anticipated completion dates for different phases of work. The bank provided a series of partial payments; that’s why it is advisable to have some money up front to cover early expenses. In some cases, a bank can provide an advance, but it is always best to plan a cushion.
In spite of our “no-changes” vow, we ended up making some changes to our plans along the way, including adding 4 ft. to the length of the house. In January 2007 I submitted the plans to the town and applied for a building permit. Although my application was met with some skeptical looks, I had no major difficulties getting a permit.
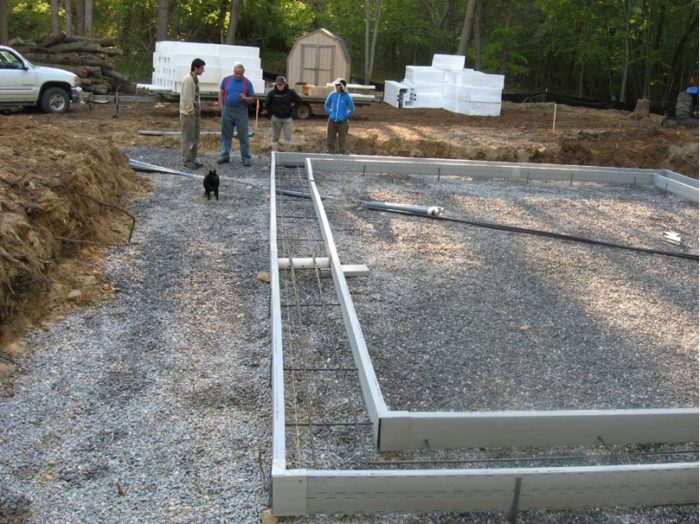
With construction set to start on May 21, we began to put all our ducks in a row. Rossetto ordered the SIPs and the materials for the ICF foundation. In spite of some minor glitches, we started on schedule by digging a 3-ft.-deep hole and installing a layer of crushed stone in the bottom.
A shallow frost-protected foundation
We used CertainTeed Form-a-Drains as footing forms. These hollow plastic forms have slits in the sides to channel away any water that accumulates around the footings. Attached to one end of the footing form is a drainpipe that carries away any water that might accumulate.
We assembled and set the Form-a-Drain pieces and placed rebar between the forms. We measured carefully and checked that everything was level and square; this is crucial, as the entire building sits on the footing. Our plumber and electrician came by to install the plumbing waste lines and the conduit for the underground electric service. We also installed radon vent pipe; although we didn’t know whether radon would ever be an issue, the piping is much easier to install before rather than after the slab is poured.
The next step was to pour the footings. Our excavation contractor, Mike Malcarne, ordered the concrete. It’s important to be ready when the concrete truck arrives — if you’re not ready for the pour, the concrete goes to waste (at your expense). We filled the footing forms with concrete and vibrated out all of the air bubbles.
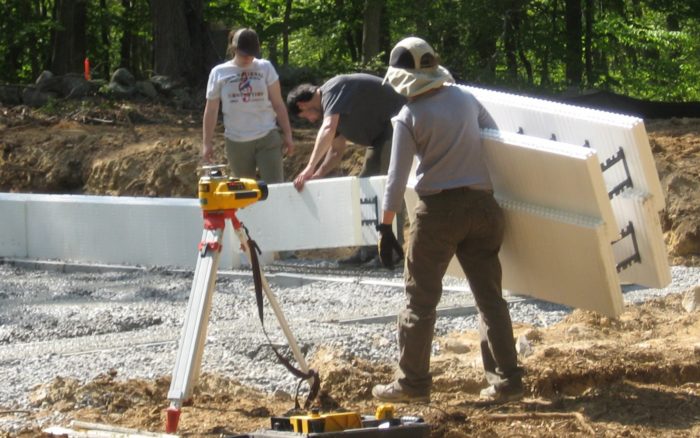
Stacking the insulated concrete forms
Next we stacked the ICF blocks for the foundation walls. These blocks are very light and easy to maneuver. When stacked, they interlock like big Legos. The first course of blocks were slightly submerged into the damp concrete in the footing forms. We made sure the ICFs were level and square, and we placed rebar in the forms.
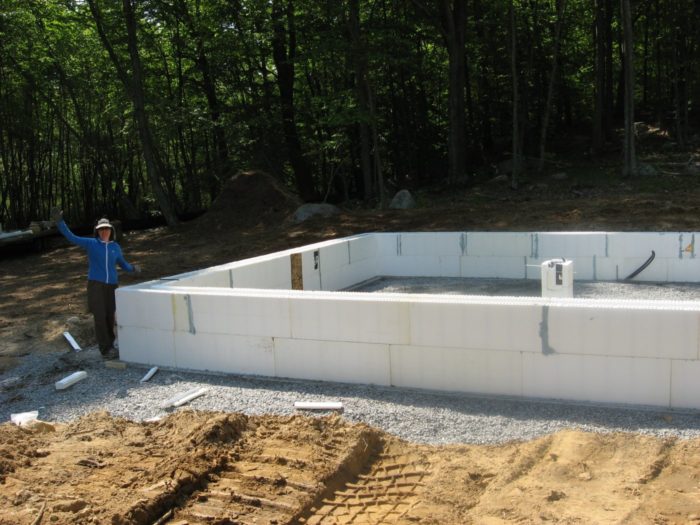
The next day we poured the foundation walls as well as two interior footings for timber-frame posts. Again we worked the air bubbles out of the fresh concrete, and checked, double checked, and checked again to make sure everything was level and square. The weight of the concrete can move the ICFs around, so it’s important to brace the forms to hold everything level and square.
As the concrete was curing, we set anchor bolts into place so that we could bolt down the mudsills after the slab was poured. Six of us completed all of this work in two days.
Tubing for radiant heat
The electrician and plumber returned to rough-in the pipes and conduit that would penetrate the slab. We also installed the manifold for the slab’s radiant heat tubing.
Next we installed a “skirt” of 2-in.-thick rigid foam, installed horizontally around the exterior of the foundation. This insulation prevents frost from penetrating under the shallow footings. Then we installed a continuous horizontal layer of 2-in.-thick rigid foam inside the foundation. This insulation slows the flow of heat from the warm slab to the cooler ground below.
We installed a layer of horizontal wire reinforcing mesh over the crushed stone inside the foundation. We laid out the radiant tubing on top the wire mesh; we used two independent loops for the slab. On top of the tubing we placed another level of wire mesh, forming a sandwich. We tied the two layers of mesh together so that the tubing wouldn’t move when the concrete was poured. Then we lifted the entire sandwich up and supported the sandwich on small blocks of 1-in. foam insulation. By raising the mesh and tubing, a gap was created to allow the concrete to flow underneath the radiant tubing and to get the tubing a little closer to the top of the slab. Alan and I did this in one day’s work.
Pouring the concrete slab
We accomplished all of this work, beginning with a hole in the ground, in three days.
We were ready to pour the slab, so we ordered some more concrete. Once the slab was poured, my carpenter attached 2x8s on top of 2x9s around the perimeter of the slab to create the mudsills. (This created a sill with a ½-in. lip on each side; the SIP panels have a recessed bottom plate and protruding OSB faces that matched the profile of the mudsill.) He attached the mudsills to the J-bolts we had placed into the foundation walls.
The wall panels arrive
Now it was time to erect the wall panels — a process like putting together a puzzle. It’s a relatively simple process. The panels are numbered, and the door and window openings are cut out at the factory, so all you do is place the first panel on the mudsill (using P400 construction adhesive to seal any possible air leaks), check to make sure it’s square and level, and nail it to the sill. Then you move to the next one — just like painting by numbers.
The panels are joined together with a 1×4 vertical spline on the inside of each side of the joint where the two panels meet. The panels are nailed together; then holes are drilled through the spline every 8 in. These holes are later filled with spray foam insulation, creating a very tight envelope. Sealing potential air leaks is a key to obtaining the Energy Star rating.
Since we designed an open-plan first floor, the supports for the second-floor beam would be exposed, so we specified timber framing. The exposed timber framing adds a warm look to the house. We hired timber-frame contractors (Garland Mills); they came down and together we placed the posts and beam across the center of the building.
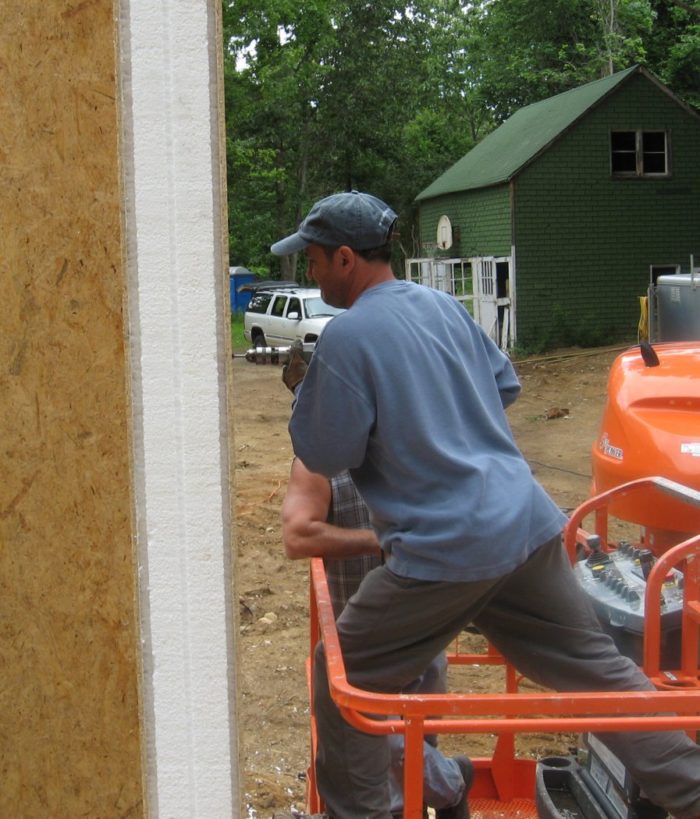
The entire shell, including the roof, was completed in eight 12-hour days by four of us, with help from the man-lift I rented. The timber framers were on site for about a day.
Mechanical ventilation
Alan and I installed the energy-recovery ventilator (ERV) and the associated ductwork. The ventilation system introduces fresh air through grilles in the bedroom closets and exhausts stale, humid air from the three bathrooms. The ERV can be programmed to run on a 24-hour timer (with a variety of timing options), or it can respond to changes in indoor or outdoor humidity. There is a manual override switch in each bathroom which operates the exhaust fan at high speed for 20 minutes, so there is no need for separate bathroom exhaust fans.
We hired subcontractors to perform most of the rest of the work, including partition framing, window and door installation, rough plumbing, rough electric, drywall, siding, roofing, flooring,and painting. These jobs took about nine months to complete.
During this time Cathy and I made many decisions, selecting the siding, paint colors, light fixtures, plumbing fixtures, and flooring. Of course, I had to keep tabs on the subcontractors’ progress, pay the subs as required, schedule inspections, and arrange for draws of money from the bank.
Budgeting
Any construction budget must include a contingency fund for cost overruns and unexpected costs; no estimate can account for all variables.
Our original budget was $200,000; we hoped to build the house for less. I took out a loan for $225,000. We had access to funds from several sources to go as high as $325,000, but we definitely didn’t want that to happen. We tried diligently to keep costs under $225,000.
We knew that construction costs are hard to predict, so we were prepared for worst-case scenarios. But diligence, determination, and hard work helped keep things under control. If you do your research, are realistic, and don’t modify your original plan, you should be able to stay within your budget.
If a jazz musician and nurse practitioner from New York City — a couple with no building experience whatsoever — can do it, you can too. The house (1,800 sq. ft., including the porch) cost us $222,000, including the appliances but not the lot, site preparation, or landscaping.
Including the survey work, land clearing, old house demolition, barn rehab, permits, landscaping, and lawyers, we ended up spending just under $300,000. If I had done the floors, bathroom tile work, and painting, we could have saved some money.
The original plans called for a simple screened-in porch. We ended up building a three-season enclosed porch; that change cost us another $10,000 or so. But all of these changes were well worth it. We saved some money by choosing a simple off-white Corian countertop. We also made reasonable choices for tile and flooring. We bought our appliances at Home Depot and our furniture at thrift shops.
Building our house has been a very rewarding and wonderful experience. Yes, it was hard work, and it was stressful at times. But it was exciting. The construction brought us closer together; it’s a memory we’ll always have. I think the hard work and the accomplishment has had a profound affect on our two boys (3 and 5 years old during the construction). I hope that the experience helped teach them the value of hard work, education, and perseverance.
Reasons for our success
There are several reasons why the construction of our home was a positive experience:
- Cathy and I agreed on the basic concept: a simple but elegant and comfortable energy-efficient home.
- We had a clear understanding of our budget. We stuck to our budget and didn’t design more than we could afford.
- We participated in the work: mentally, physically, emotionally, and financially. Because of our multifaceted investment, we were responsible for the results. Our mindset would have been different if we had hired people to do things that had little understanding of, or felt no connection to.
- We had an experienced person (Alan) to advise us about the order of events and to help us purchase materials. Cathy and I made all the decisions, but it was very helpful to have an experienced consultant to bounce ideas off of.
These things were crucial I think to our success. Although things didn’t turn out perfect — they never do — they’re pretty close. We love and enjoy the house every time we’re there and will always have very fond memories of the construction.
Weekly Newsletter
Get building science and energy efficiency advice, plus special offers, in your inbox.
Lessons Learned
We both really have few regrets. We would have put a slightly smaller bathtub in our master bath — the tub we chose takes too long to fill up.
If we had to do it again, we’d hire a different plumber and drywall contractor; we had to have some of the drywall redone.
We probably have one more door than we need on the porch. But those are all little things.
One thing about building a new house yourself: there is less potential for unpredictable surprises. If you do your research and preparation well, you should be in the ballpark.
Building our home was a great experience and we love the house. It doesn’t have everything that everyone might want, but it has everything we want — so for us, it’s perfect.
General Specs and Team
| Location: | Old Lyme, CT |
|---|---|
| Bedrooms: | 3 |
| Bathrooms: | 3 |
| Living Space: | 1800 |
| Cost: | 122 |
| Additional Notes: | Completed: 2008 |
Designers: David and Cathy Glasser, Paul Patterson, and Alan Rossetto General contractor: David and Cathy Glasser Construction consultant: Alan Rossetto Engineer: JK Structural Designs
Construction
Foundation: frost-protected shallow foundation with ICF stemwalls
Under-slab insulation: Continuous layer of 2" XPS (R-10)
Foundation wall insulation: R-25 ICFs
Walls: R-30 SIPs (8" of EPS)
Roof: R-45 SIPs (12" of EPS)
Windows: Triple-glazed low-e (U-0.20)
Energy Specs
Space heating: Buderus propane-fired modulating boiler; distribution by in-floor radiant tubing
Domestic hot water: indirect Superstor tank
Air conditioning: None
Energy Star appliances and CFL lighting.
HERS Index: 49
Energy Star Score: 5 stars plus
Indoor Air Quality
Mechanical ventilation: Renewaire ERV
Green Materials and Resource Efficiency
Bamboo flooring upstairs


4 Comments
Owner-Builder
Congragulations! I am a general contractor of over 30 years and though I think most owner/builder projects are a mess at best, I could tell as I began to read why yours went so well. You took the time to learn about what you were doing. Many people who hire GC's end up with a mess and often spend more money. I could go on and on with different scanarios I have seen over the years but I am a proponent of tenacious owners overseeing their own project. In my opinion it is far more important that what your past experience or knowledge is.
Congratulations are in order
Hats and hard hats are off to Cathy and David!! When's the book come out? :O)
How is it working?
After over 5 years, how is this house working for the owners? Any major things they would have done differently? Would they use SIPs again?
How is it working?
It's fine. No problems. It's been 8 years.
Log in or create an account to post a comment.
Sign up Log in