
Image Credit: Greg Labbé
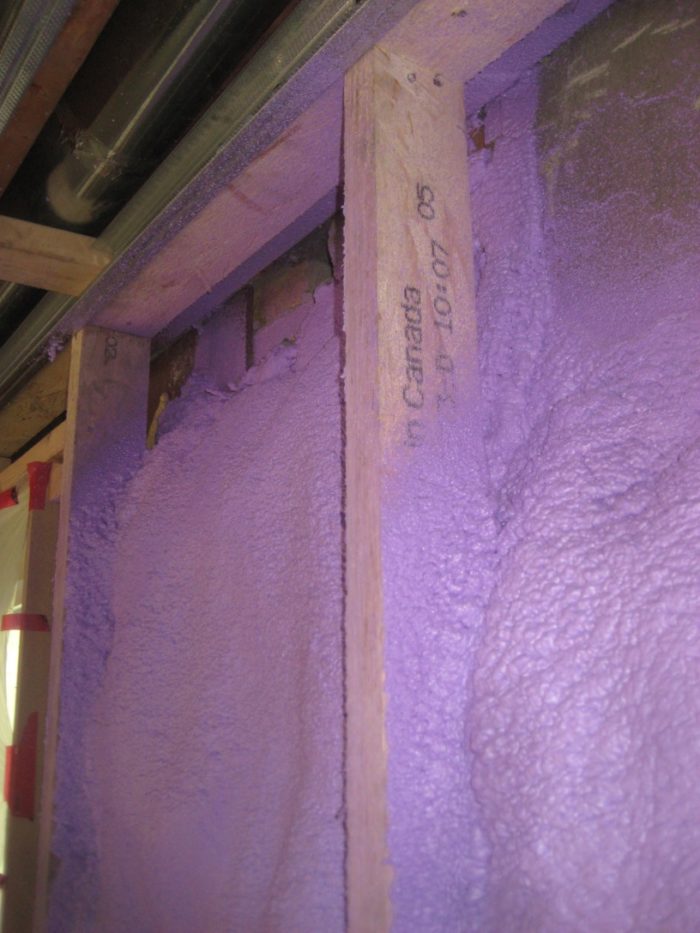
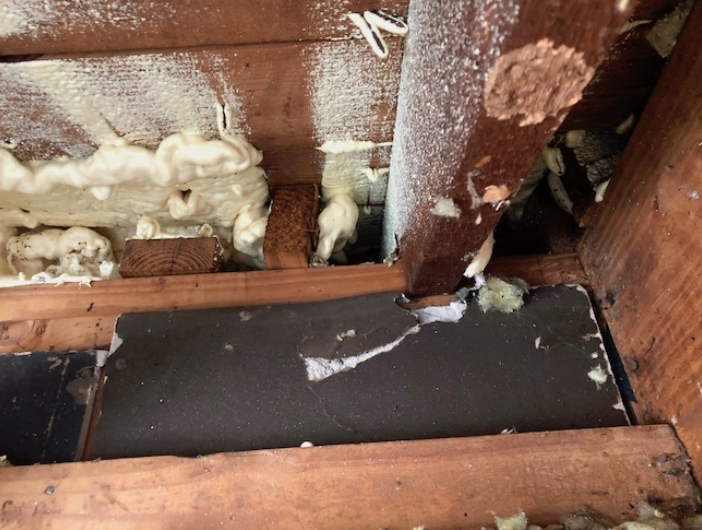
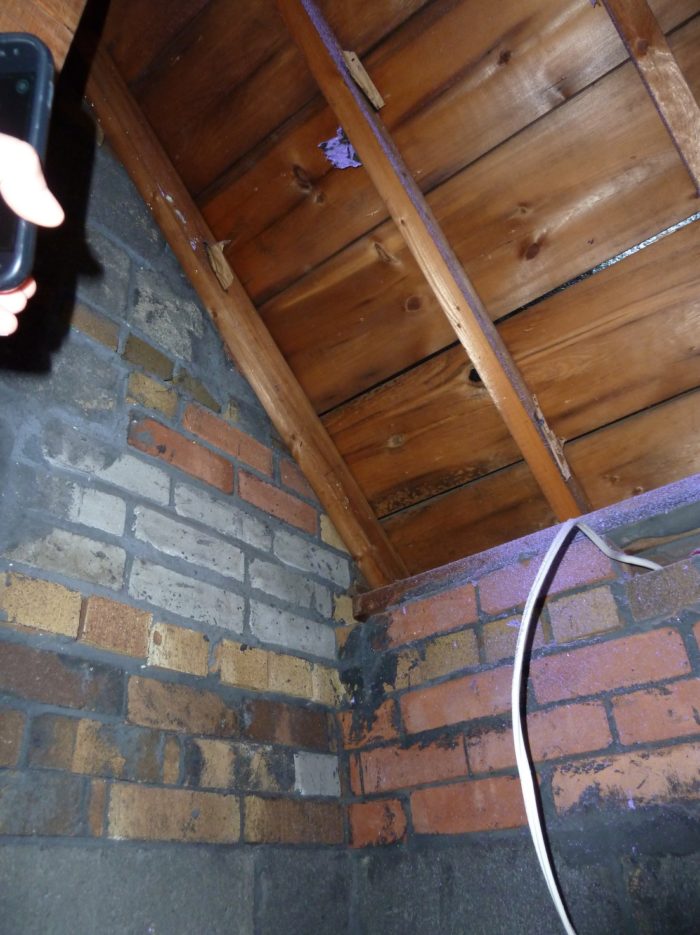
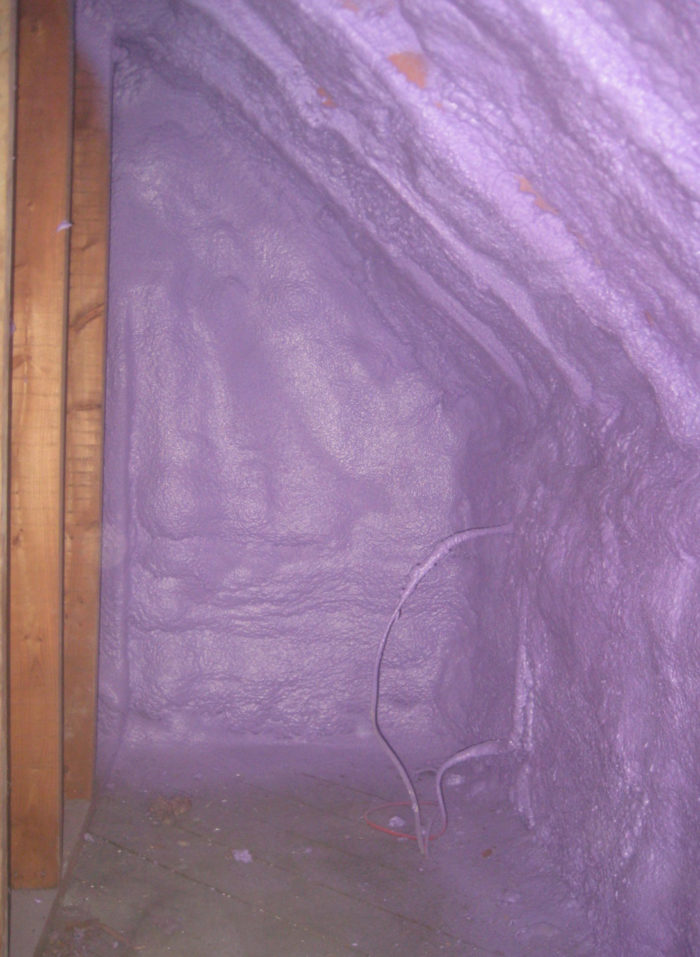
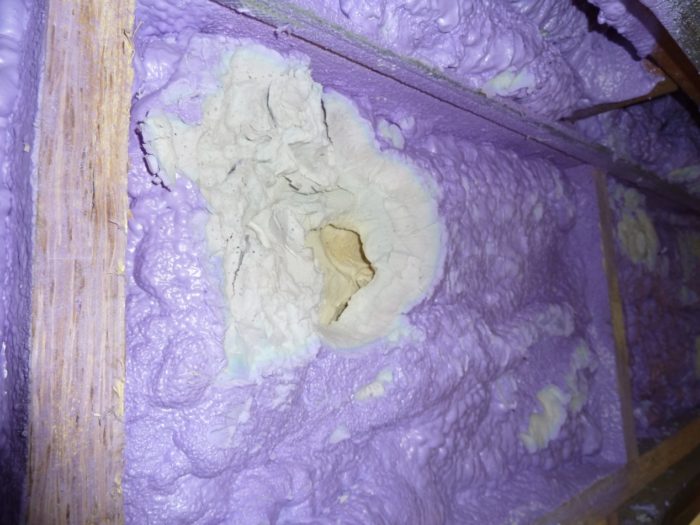
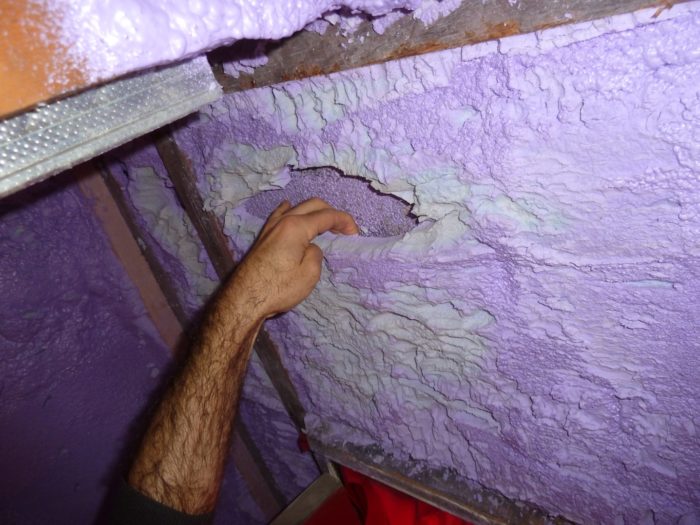
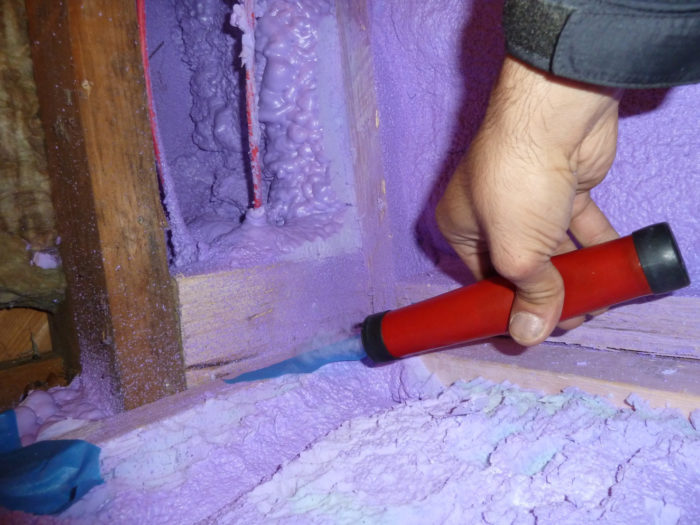
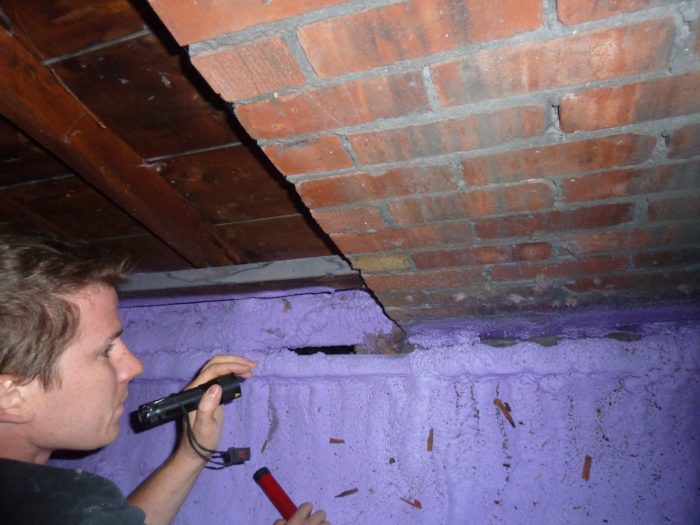
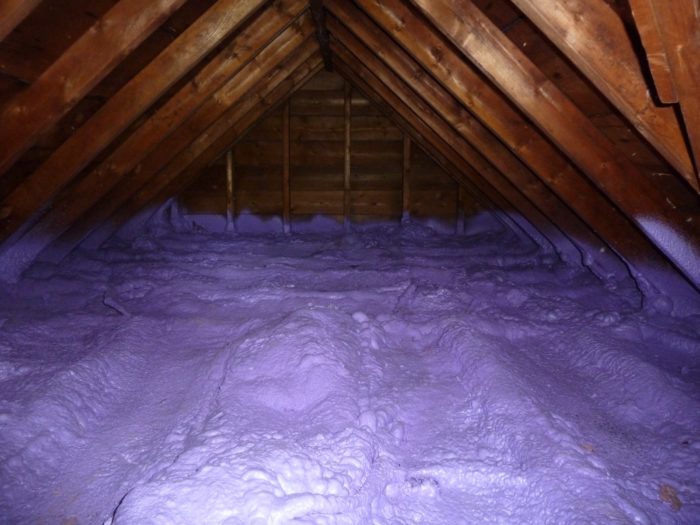
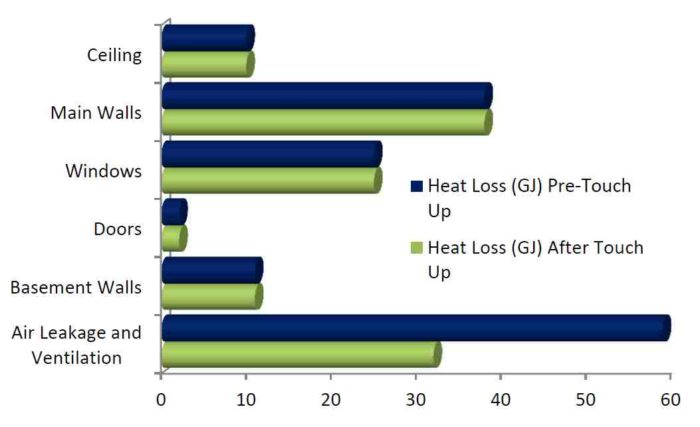
Image Credit: Greg Labbé At the start of the job, the rundown 1940s home in Toronto had uninsulated block and brick masonry walls. The eave walls on the second floor were about 4 feet high, just as on a typical Cape Cod home. The interior of the 2-wythe walls are mostly made of concrete blocks, with occasional bricks. At the left, you can see the studs of the wood-framed kneewall on the second floor. The masonry exterior walls and the underside of the roof sheathing were insulated with 2-pound spray foam. Before the insulation crew arrived, the subfloor was cut back 3 inches at the perimeter of the building, so that the foam insulated wasn't interrupted by the subfloor. Blower-door testing revealed air leaks that were traced to blisters in the cured foam. The pockets were full of air, and it wasn't always obvious what caused the blister to form. In this location, a flash coat of foam adhered well the wall, but the second coat didn't stick to the flash coat and was coming off in large flakes. A smoke pencil revealed that the wood floor joists penetrating the new spray foam were still leaky at the newly furred out (non-structural) basement top plate. Builder Paul Clinkard checks out the foam job in the attic, at the junction between the gable end top plate and the masonry chimney. The gaps in the foam were touched up with more foam around the mothballed chimney. The attic floor was vacuumed clean and spray foamed. The blower-door test revealed the adverse effects of electrical wires and pipes on the airtightness of the attic floor. As a consequence, significantly more foam had to be used. The leakiest areas were at the perimeter of the attic near the eaves. This attic floor will eventually be filled with R-60 cellulose. This bar graph shows estimated annual heat loss in gigajoules.
More Guest Blogs


If you’re retrofitting a vintage brick building without an air barrier, don’t count on the spray foam to create a perfect air seal. If you plan to use the spray foam as your air barrier, it’s important to test your work before you cover it with drywall so you can seal any air leaks.
I recently had the pleasure of working with a forward-thinking design/build firm in Toronto, Argyris & Clinkard Fine Homes. The company’s objective was to complete a deep-energy retrofit of a 50-year-old solid masonry home in Toronto. As with all high-performance homes, a fully ducted HRV was installed.
The goal was to make the house as airtight as possible. Medium-density (2 pounds per cubic foot) closed-cell spray foam was sprayed on the interior of of the concrete block walls. Studs were spaced off the wall to reduce thermal bridging and to ensure that there was a monolithic uninterrupted coat of foam against the concrete blocks.
Builders Paul Clinkard and Liam Argyris called us in to perform a blower-door test before the drywall went up. The results were an eye-opener, showing why we can’t rely on foam alone for a good air seal in solid masonry home retrofits, unless we include blower-door-directed air sealing after the foam is installed.
Using spray foam for a deep-energy retrofit
This story-and-a-half house had uninsulated solid masonry walls (3-inch concrete block on the inside and 3-inch decorative brick on the exterior). On the second floor, the masonry walls extended up about 4 feet from the subfloor, as in a typical Cape. The home had wood-framed kneewall partitions that created a narrow 2-foot-wide space between the kneewalls and the exterior masonry walls. The gable walls on the second floor had the same masonry construction as the first-floor walls.
This construction is typical for homes of its age in Toronto. The homeowner wanted to upgrade the house for a new century from the inside, so a computer energy simulation was performed to guide the decision-making process, based on the potential energy savings from a variety of possible upgrades.
Unfortunately, as in almost all renovations, the orientation of the home conspired against any improvements in solar heat gain. Obstacles to producing a continuous air barrier included structural penetrations through the planned spray foam.
The scope of work included the following measures:
- The attic floor was vacuumed clean and spray foam was applied to the back of the plasterboard ceiling.
- The sloped roof assemblies between the tops of the second-floor kneewalls and the attic above the second floor were unchanged, as they were already insulated with dense-packed with cellulose.
- The space behind the wood-framed second-floor kneewalls (formerly outside the conditioned envelope of the house) was brought within the conditioned envelope by spraying the underside of the roof sheathing and the interior of the exterior walls with spray foam.
- On both the main floor and the second floor, the ¾-inch diagonal tongue-and-groove pine subfloor (which originally extended to the exterior concrete block wall) was cut back 3 inches at the perimeter of the building to create a gap for the spray foam.
- New studs were installed on the main floor and in the basement; these were made of engineered lumber and were spaced about 2 inches off the concrete-block wall to provide room for a continuous monolithic layer of spray foam, reducing air leakage and thermal bridging at the studs. The engineered studs required less bracing to combat the tendency of expanding spray foam to cause studs to bow inward or to bow into themselves at inside corners.
- The gravel on the basement floor was covered with spray foam, and a new concrete slab was poured on top of the cured foam. The foam was brought up the wall to break the slab from the wall.
- The foundation walls were insulated on the exterior with 2 inches of XPS (R-10), from the footing to the mudsill. (Exterior foundation insulation was preferable to interior insulation because masonry partitions in the basement created hard-to-detail T junctions.)
What is the ideal substrate?
Spray foam sticks really well to clean wood or masonry, as long as it’s dry and not frozen. It doesn’t stick well to dirt, oil, or water. The person spraying foam needs to understand these facts, and also needs to know where to apply the spray foam, and how the best location to apply the foam continuously changes as a spray-foam installer moves from the basement to the rim joist to the roof.
The ideal substrate for spray foam is scrupulously clean, openly accessible, and free of wires, cross bracing, 6-mil poly, plumbing, cables, or ducts — you get the picture. Ideally, there would be nothing in the stud cavities and the foam could be uniformly applied, producing a good air seal. Unfortunately, the reality is that stud cavities are busy places and spraying in them for a perfect air seal is really hard to do.
Spray foam is shot from a distance of 3 feet, and all the stuff in the stud cavity can create unfoamed “shadows” on the back substrate (just like the shadows created by a flashlight beam). Those shadows create voids or open blisters that can leak air. With each pass of foam, the substrate’s surface transfers its increasingly distorted shape to the next layer of foam.
The situation can be improved by training electricians to run wires on the back of the wall. Don’t move the plumbing pipes to the back of the wall, though, even if it would make things easier for the foam installers. Plumbing pipes need to be on the warm side of the insulation to keep them from freezing.
The trouble with spray foam
The trouble with spray foam is that it has to be sprayed onto a surface, and often we can’t choose the surface, as the situation forces our hand.
For the sake of discussion, let’s imagine that on this retrofit project, we wanted to use drywall as our air barrier, following the Airtight Drywall Approach. To apply spray foam to the air barrier, we’d have to spray the drywall from the back side — an approach that would be ideal but impossible. So we apply spray foam from inside the house, adhering the foam to the concrete block and hoping for an airtight result.
Avoiding voids in our building assemblies
The advantage of bonding foam to the air barrier is that it eliminates air movement between the two. If there is a gap between the back of the drywall and the interior face of the spray foam, the gap becomes a highway that connects all the small leaks from the foam’s imperfections and unfoamed penetrations. When a difference in pressure exists, voilà ! For leakage to happen, you need only a difference in pressure and a hole. We can’t stop physics from producing pressure differences, but we can seal holes.
To be effective, spray foam should be sprayed onto an exterior air barrier like wood sheathing. If you are renovating an old house, the usual method is to coat the inside surfaces of the exterior walls with spray foam insulation or a liquid-applied membrane like StoGuard Gold Coat. (The latter approach was described in a recent Fine Homebuilding article).
By the way, if a liquid-applied membrane is used as an air barrier, it still needs to be tested for airtightness before spray foam is applied. The purported advantages of liquid-applied membranes lie in their flexibility and strong adhesion which provide long-term performance.
For any deep-energy retrofit, the air barrier needs to be tested, whether the air barrier includes spray foam, polyethylene, a liquid-applied membrane, plywood, foam sheathing, Tyvek, Typar, or drywall.
It’s common on other job sites to see drywall hung as soon as the spray foam is installed. However, we suspect that for retrofits where foam is applied directly onto solid masonry, finding and sealing leaks with the help of a blower door will ensure significantly better performance.
On this project, the homeowner understood the value of performing a blower-door test to check the spray foam for leaks before the drywall went up. The spray foam was intended as an all-in-one solution that provided high R-value insulation and an air barrier. Had the drywall been installed over the air leaks, the gap between the cured skin and the back of the drywall would have short-circuited the insulation.
So what happened at the house?
After the spray foam was installed, we performed a pre-drywall blower-door test. The test showed an air leakage rate of 10.8 air changes per hour at 50 Pascals (10.8 ach50), with an equivalent leakage area (ELA) of 340 square inches.
This massive rate of air leakage would make the house uncomfortable and more expensive to condition; it could also lead to condensation problems. For purposes of reference, an Energy Star home should test at or below 2 ach50. At the Toronto house, the heat loss attributable to air leakage would have exceeded the conductive heat loss through the entire ceiling and above-grade wall area.
With the blower door running we were able to locate the air leaks in the foam, and the spray foam contractor came back to touch up the leaks. The smaller leak locations were caulked or touched up with canned foam.
After this work was performed, a second test showed that the air leakage rate had been cut in half to 5.4 ach50 with an ELA of 177 square inches (see Image #10, below). This was a significant drop in heat loss and condensation liabilities, and should result in improved occupant comfort.
As the project moves forward and the final two windows and doors are installed, we expect the air leakage rate to be halved again.
Greg Labbé is co-owner of BlueGreen Consulting Group, a high-performance home consulting firm that works with architects, builders, and homeowners to optimize the energy performance of new and existing homes through detailed energy modeling and site testing.
Weekly Newsletter
Get building science and energy efficiency advice, plus special offers, in your inbox.


32 Comments
How to find the blisters in the foam?
After the blower door test, how did the builder find the blisters behind the foam?
Did they use an infrared camera?
Off-Ratio SPF
Correct me if I'm wrong. Those pictures clearly show off-ratio spray foam. How did this builder correct the situation other than covering up the mess with more spray foam and cellulose? This article clearly demonstrates the spray foam industry is not as perfect in Canada as we have been led to believe here in the states.
So what about this????????????
https://www.greenbuildingadvisor.com/blogs/dept/musings/insulating-old-brick-buildings
Which clearly recommends against insulating brick homes from the inside due to spalling caused by water which used to be kept liquid by escaping heat now freezing.
Response to B.W.
B.W.,
Your summary does a disservice to the complexity of this issue. To contradict your misleading summary, let me quote from the article:
“Most experts agree that the best insulation for the interior of an old brick building is closed-cell spray foam. In most cases, the foam is sprayed directly against the interior side of the brick. To determine how thick you can go, you’ll need to talk to your consultant. ‘We take samples of brick and send them to John Straube for the hot and cold soak test,’ says Brennan. ‘Then he does WUFI modeling. We generally end up installing about 3 inches of closed-cell foam.’ ”
If anyone is interested in knowing what I wrote about the issue, just click the link and read the article.
More about bad installation rather than the product
This article should be more about bad installation training than about spray foam as a product. If our installers produced a job looking like this, they would immediately be pulled out of production for intensive training before they could touch another project (attached photo of typical properly done project). The blower door numbers should never have been a surprise. No blower door tests would have been done until the obvious visual installation errors and defects were addressed. We get great air seal numbers with spray foam but it’s never an “all-in-one” solution. SPF has to be part of an integrated approach like ALL air sealing projects. SPF frequently brings projects closer to their goals faster and for less than other methods. And no, you don't get “shadows” because you have to spray from 3 feet away! The installer should have been able to solve this issue easily. We never tell our clients they have to move wires to the back of walls to get an air seal or prevent “shadows”. Blisters, discolored & bad looking foam, missed areas….my goodness, it sounds like the installer on this project needs some helpful training before articles about spray foam are written around their work. Oh, and it looks like some areas could be used for storage so where is the code required Thermal Barrier coating?
Spalling risk is climate dependent (answer to But Why)
Spalling requires both a high moisture content and repeated deep-freezing with intermittent thawing. While it's possible to screw it up as far south as US climate zone 4 (I've personally seen it happen in southern Westchester County NY, the cool edge of zone 4, where the wetting mechanism was splash-back from dripping roof gutters on 3 story, no high-R interior required) it seems fairly rare south of US climate zone 6.
Deeper roof overhangs to limit rain-wetting of the masonry, and air-tight interiors to limit high rates of wintertime moisture transport from the interior are usually enough to keep the brick dry enough to avoid spalling almost everywhere in the US & Canada. The weak points are sometimes where old and splitting/checking joist timber penetrate the insulation layer and the cold edge of the joist takes on enough moisture to be a rot hazard in the long term, but even there that's generally only a cold/very-cold climate issue.
The climate in Toronto (where the subject of this blog is located) is akin to US climate zone 5- there's some risk of spalling by running the brick cold if you're not careful, but not a huge risk. The rake & eaves of the house look deep enough to limit rain-wetting- there may be some eave splash-back or wind-drift/snowpack issues on the bottom part of the brick to manage, but there's plenty of exposed concrete foundation that would be taking the brunt of it. If the concrete begins to show spalling, a thin sacrificial parge of lime mortar every 25-50 years would likely keep it all happy. I'm not worried.
CMU vs bricks
I have very little experience with masonry buildings, but I'm curious if a solid concrete wall with brick exterior, such as described in the article should be treated the same as the solid brick buildings described in Martin's article? What it if were a hollow block building with a brick exterior? Same concerns?
This is a poorly done foam job
I must echo James on this topic- plain and simple, this looks like a very novice foam job and looks to be done by someone not trained.
The discoloration on the blister pic shows a darker color foam behind the finished lift. This indicates poor mixture and/or too much foam was sprayed too fast on the first coat and can make it harder for subsequent lifts to adhere.
Poor workmanship = poor results, no matter what you use.
Please explain photo 1
Photo 1 appears to show a major gap in the foam application at the top of the wall. Does it represent something else? I have trouble understanding how anyone could apply foam this way, but maybe I am missing something.
Detecting blisters in spray foam
I would still like to know how they detected the blisters/voids in the spray foam.
Spray foam on the inside
It is unfortunate that this job didn't go well. It hurts the spray foam and renovations industries. Personally, I have had very good results with interior spray foam as an air barrier. After spraying, we typically see results under 1.0 ACH50. (we do a lot of blower door testing, just to be sure). I am in Italy doing renos on old stone houses and the results are nothing short of amazing. (for anyone with a REALLY good memory, you may remember me - I had a drywall air barrier query some time ago - final ACH was 0.78). In fairness, my renos are more the "gut" type. I gut the entire inside (floors and walls - I'm going to be redoing electrical, plumbing and installing HRV/ERV anyway) and leave only the shell. The coverage of the spray is obviously not an issue at that point.
Response to Bob Irving
Bob,
Q. "I'm curious if a solid concrete wall with brick exterior, such as described in the article should be treated the same as the solid brick buildings described in Martin's article? What it if were a hollow block building with a brick exterior? Same concerns?"
A. First of all, the house in this article has walls that combine concrete blocks (I assume these blocks are hollow blocks like CMUs, although they may be a type of solid block) with one exterior wythe of brick.
The concerns raised in my article on old buildings with multi-wythe brick walls (Insulating Old Brick Buildings) are specific to historic buildings with solid brick walls. Once you introduce a wall of solid concrete or CMUs into the equation, you've got a different wall system. Some, but not all, of the concerns mentioned in the article apply.
It's probable that walls that include CMUs or poured concrete are likely to have fewer rather than more risks when insulated on the interior than multi-wythe brick walls; but all historic brick homes need to be carefully evaluated before they are insulated on the interior.
Reply Aaron Gatzke
Aaron,
The delta T wasn't high enough to use the IR. We used the trusty blower door. Of course, if the blister was sealed under another lift of foam, we didn't find it, but then again it didn't leak!
Brick and Block walls.
I suppose it is a sad measure of our time, that the traditional way to finish a wall has been apparently lost. For hundreds of years brick and block walls were first covered with a parging coat of soft wet plaster, before the harder finishing coat was applied. A brick wall finished with wet plaster is always air tight. By all means then glue sheets of polystyrene to the wall, glue drywall to the polystyrene, then add a finishing wet coat of plaster.
This type of finish means the room surface is completely isolated from the brick wall, there are no heat bridges and one has a warm cheap to heat room. Note: This finish avoids heat loss through the wall and more importantly down and up the wall, avoiding heat loss into the ground and sky.
Response Richard Beyer
Richard,
Next you'll be saying that all Canadian Mayors of big cities are crack-addicts!
In all seriousness, the foam was dimensionally stable and the density seemed good, so I don't think it was off ratio. Off ratio foam problems usually develop obvious signs of trauma withing a day or two:
http://www.bluegreengroup.ca/tag/off-ratio-foam/
When I ran foam crews, we followed CUFCA rules and our sprayers used to test all the foam I sprayed for adhesion and density for each barrel set and site, but this is BASF foam and I don't know what their QA procedures are.
This brings me to a most important issue that may distinguish Canada from the USA but I doubt it: Building Codes are laws ("know your rights" as the Clash would rant!) we should all have access to as citizens, but the codes often refer to standards. These standards are not free, they cost alot of money and no one wants to buy a whack of standards that may be changed next year. As a result very few companies and spray foam applicators have read the CAN/CSA standards to guild the "Manufacture" of foam.
Response James Morshead
Spray foam, like cellulose, EPS, XTPS and Roxul are all great insulators when applied properly. We as an industry have a responsibility to keep ourselves in check and anyone reading from this web site I’d say is light years ahead of the rest. Perhaps my pictures didn’t highlight what went right on this job and my apologies to all for merely pointing out “what could be better”!
Bear in mind this wasn’t new construction the substrate was 50 year old concrete block, so a bit less uniform that your picture with new sheathing. The point of the article was that in masonry DER, if foam is the air barrier, is needs to be tested with a blower door and though I agree obvious fixes should have been repaired before the spray crew went home, many of the leaks we NOT OBVIOUS and only a tool like the blower door could have found them.
Regarding stud bay prep, anything that can push the clutter back help and its not the sprayer’s job to push bundles of wires that are installed like guitar strings!
Regarding storage, the knee walls will be sealed up.
Response Dana Dorsett
Dana,
Well said, thank you. Using Building Science Corp's analogy, the safe storage capacity of brick depends lays in the balance with wetting and drying. The more we can discourage water from getting into the wall be better..
Response to Bob Irving
Bob in my limited understating of concrete, it seems the higher the MPa of concrete the less room for capillary forces. Ie raising damp. If your brick is a modern “Brick veneer” with a good drainage plane behind it, there maybe fewer consequences to insulating on the inside I'd guess.
Response Bo Jespersen
As previously mentioned, I didn’t highlight what went right. I agree the colour variance caught my eye too, but I haven’t worked much with BASF and foam and am not sure what the colour profile of “good foam” is supposed to be.
Perhaps we can have a BASF expert chime in?
Response Derek Roff
Sorry Derek, I should have given a bit more context here, I dropped in mid-spray to highlight the fact that the new "wood" framing was spaced of the wall, which is a good thing!
Response Aaron Gatzke
Using a blower door and detecting leaks by hand. Couldn’t use IR as no temperature difference between inside and out.
Response Alec Shalinsky
Congratulations for being a forward thinking builder! You would be an exception here in Ontario, few builders test their work with a blower door, and I am impressed that you can consistently get DERs under 1ACH, that’s great.
In the end, this was a “good ending story” I just haven’t been back to do the final test!
Response Roger Anthony
In our area,the method you describe only exists on common or party walls of vintage buildings.
But on exterior walls, the plaster is always applied to rough cut wood lathes nailed to vertical wood strapping at~16"oc into the brick. Either way I see your point in just sticking foam sheets on the existing walls. I’ve sen it done but its rare because there isn't enough wire in electrical boxes for outlets and switches to extend by insulation and new drywall depth. The floor joists still need air leakage control at rim joists and the trim is always fun if the wall wanders at all.
Gregg Labbe
Your comment was really uncalled for.
"Next you'll be saying that all Canadian Mayors of big cities are crack-addicts!"
I simply asked a question and you make a statement like that!
Maybe "You" need to read topics posted by Mason Knowles on how to identify off-ratio SPF and how to test before you install the product.
http://sprayfoam.com/newsarchives/archivedetails.cfm?id=123
http://masonknowles.com/docs/troubleshooting_sprayfoam_insulation_jlc2010sept.pdf
Your posted pictures clearly show a job that was not installed by an industry trained expert and most likely was not CUFCA certified. If you did not want constructive criticism by the other readers you may want to select your pictures wisely.
These pictures indicate a novice sprayer was your spray technician. This is not to say this technician is a bad person, it only means he/she needs more training and most probably should not be the lead man behind the spray foam gun. I notice you did not have any remarks for those men who critiqued this poor installation. I will assume it's because they are spray foam installers.
If your trying to educate readers know what your talking about before you critique a readers response. I have 30 years in the building trades so please do not attempt to talk circles around me.
As for men not wanting to pay for curriculum...that's a cop out. True professionals pay, pay and pay more to learn the proper procedures. True professionals are not worried about the customer not wanting to pay their price. True professionals always have work. Once you learn how to ask for the money you to will not worry or feel you have to prove a point.
So for you to make a statement such as; "These standards are not free, they cost alot of money and no one wants to buy a whack of standards that may be changed next year. As a result very few companies and spray foam applicators have read the CAN/CSA standards to guild the "Manufacture" of foam."
You must be speaking for yourself. I know many professionals who swear by education as their number one source to prosperity!
If I was wrong there would be no such thing as Allison Bailes or Joseph Lstiburek of this wonderful Building Science world.
http://www.buildingscienceseminars.com/presenters/lstiburek.aspx
Here's a little FREE education for you... most bad jobs do not show in 2 to 3 days... some can take month's and may never show as these pictures of what went wrong in my home clearly show. This was installed by a "Professional SPF Installer" which employ's 140 men and women!
https://www.facebook.com/media/set/?set=a.494429110577942.105507.198693330151523&type=3
Respond Marcus de la fleur
Marcus,
Your web links are great, thanks for sharing!
Response Richard Beyer
Richard,
I assumed most North Americans had heard about our mayor - Rob Ford - who some allege is a crack addict. Please have a look at the lambasting he's getting from US comedians:
http://globalnews.ca/news/949364/watch-late-night-comedians-poke-fun-at-rob-ford-crack-scandal/
I'm sorry my attempt at repartee failed so miserably. I too agree education is important.
Wait there's more:
https://www.youtube.com/watch?v=RUY6lDja-DE
Termites??
Is there any issue with the spray foam acting as a channel for termites? Sorry, I don't know whether Toronto is far enough north not to have these pesky bugs. It sounds like the foam was applied as a relatively continuous sheet throughout the interior of the thermal envelope, but extended to soil in the basement.
Greg Labbe
Greg you have to excuse me for being so harsh on you. I do not find humor in playing with peoples homes with mediocre workmanship. Knowing first hand what these spray foam chemicals can do to a families health when used improperly by under-trained men, places repartee in another forum. This was not the place for it.
Richard and Miranda Menzies
http://www.cbc.ca/news/canada/toronto/spray-on-insulation-a-highway-for-termites-experts-warn-1.1392079
More on termites and Toronto
http://www.torontonianonline.com/2013/07/23/spray-foam-insulation-a-haven-for-termites-in-toronto
http://inspectapedia.com/interiors/InsulationInsects.htm
Response to Richard & Miranda Menzies and Richard Beyer
When we build or re-build, our aim is to have the our work outlive us by a 100 years.
Frustratingly and ironically it seems the "lowly" insect and even rodents can wreck havoc on our work, even here in Toronto. Likely more-so as our climate changes. It is scary as nothing seems sacred to these restless creatures.
From ants to termites to mice and squirrels, there is a lot to think about when it comes to making homes durable.
Skills and attention to detail
I agree with the comments that point out that spray foam does a good air sealing job if the right skill and attention to detail is at hand. Our recent SPF installation in a deep energy retrofit of a 111 year old masonry building brought the air infiltration down from 13.9 ach50 to 2.1 ach50 (still need to put new windows in...)
The "shadows" are an issue, but should be easily resolved by an experienced spraying crew (see also: http://delafleur.com/blog/?p=3217 and http://delafleur.com/blog/?p=4257).
"The situation can be improved by training electricians to run wires on the back of the wall."
I am not sure if I would like to have anything at the back of the wall. What if I need to get to those wires one day? In my opinion, thermal integrity (i.e. uncluttered SPF) and resilience (i.e. I can fix that wire) is an integral part of sustainable building practice (see also: http://delafleur.com/blog/?p=3379).
Log in or create an account to post a comment.
Sign up Log in