

Image Credit: All photos: Marc Rosenbaum
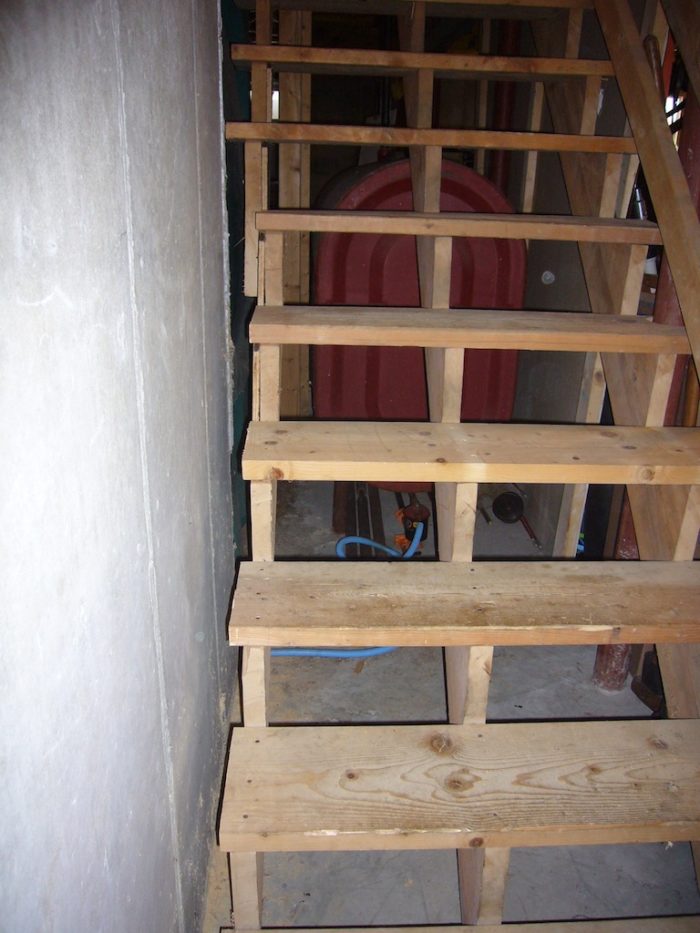
Image Credit: All photos: Marc Rosenbaum The lower end of the stair stringer has been cut and moved away from the wall and scabbed back to the original stringer with a piece of plywood cut to match the stringer profile. All the treads that butted to the wall have been cut back about two-and-a-half inches, then re-nailed to the stringer. The oil tank in the background is history. Once the stair treads were cut back, I had enough room to slide the foam insulation between the stairs and the concrete wall.
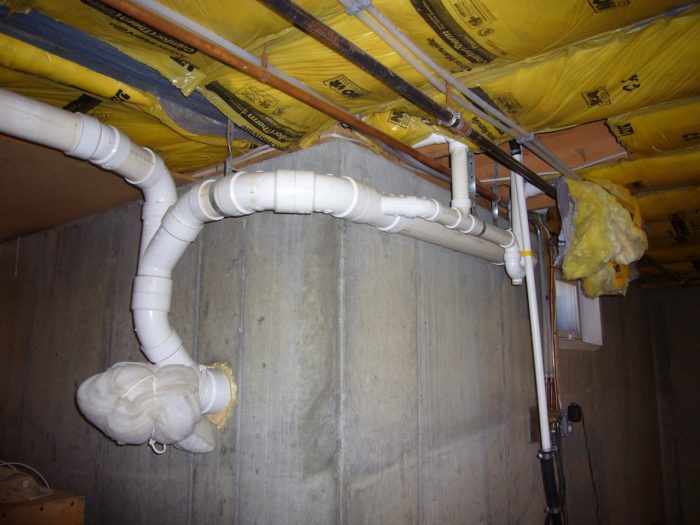
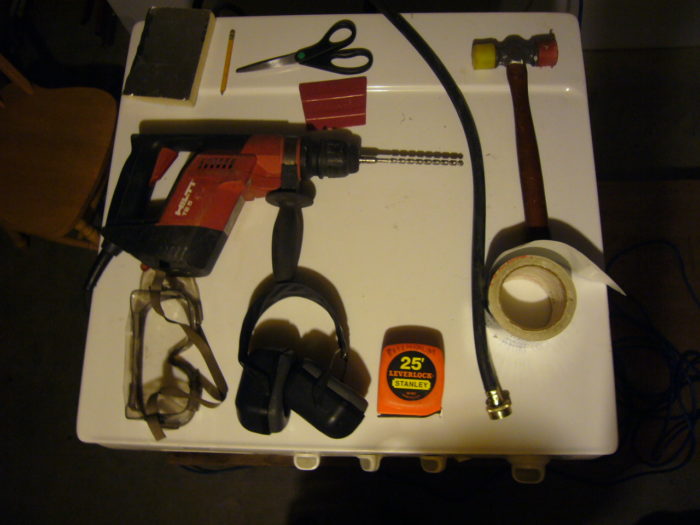
Image Credit: Marc Rosenbaum The PVC waste plumbing from the kitchen sink and washing machine was hard against the concrete. Moving the PVC waste pipe entailed only three cuts, and two extensions with two couplings each, and one shortening with a single new coupling. The pressure tank was moved out with two couplings after draining it — an hour's worth of time. I put the first layer of foam on, then the second, keeping a leading edge of the first layer exposed. In tight quarters sometimes a full 4-foot-wide sheet won't fit, so one trick is to cut it from the rear and snap it carefully so it bends and can be eased around an obstacle like a water heater. Clockwise: a tape measure, ear and eye protection, a hammer drill, pencil, scissors, a hard rubber squeegee to smooth out the tape, a rubber hammer, and aluminum foil duct tape to hold the foam temporarily. I cut the foam with a kitchen knife — no need to use a power saw which will make a mess with foam dust. I used the Hilti IDP polypropylene fastener, and to use this one drills a 5/16 inch pilot hole and then whacks the barbed IDP into the hole through the foam. The IDP is made in various lengths to accommodate different foam thicknesses. Here is the IDP inserted in the hole in the foam layers before I've driven it in with the rubber hammer. A two-component spray foam kit. Before you begin spraying two-component foam, put on a protective Tyvek suit. For an effective air seal, the spray foam should extend from the top of the polyisocyanurate to the subfloor above. It's satisfying to seal air leaks and install insulation with one product.
More Guest Blogs


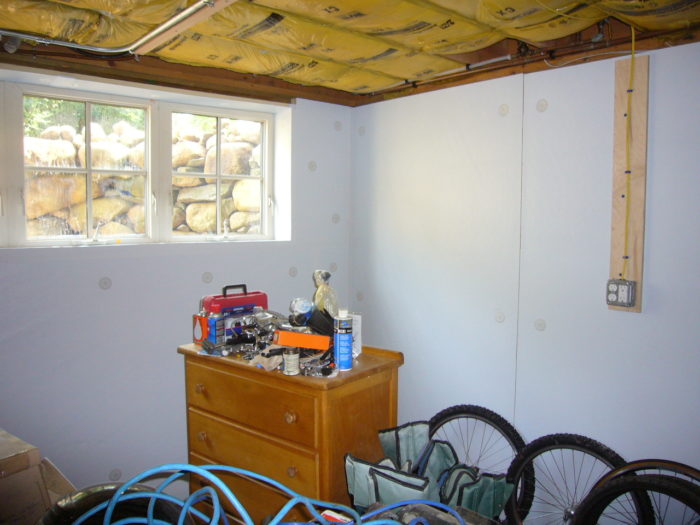
In Part 1 of this blog series, I mentioned that I had to move a number of infrastructure items away from the concrete walls so I could have an unbroken insulation installation. In retrospect, it was a good idea to move them, and the time it took was at least partially compensated for by not needing to take time to fit the foam around the obstacles.
They were:
– The stairs to the basement from the first floor were framed hard against the concrete. I was fortunate in that the stringer against the concrete was not fastened to the concrete, but rather rested on a pressure treated 2×4 plate fastened to the floor. In the photo below (Image #2), the lower end of the stair stringer has been cut, and then moved away from the wall and scabbed back to the original stringer with a piece of plywood cut to match the stringer profile. All the treads that butted to the wall have been cut back about two-and-a-half inches, then re-nailed to the stringer. This was perhaps a two hour task, which would have been faster if I’d known about Japanese-style pull saws. The oil tank in the background is of course history…
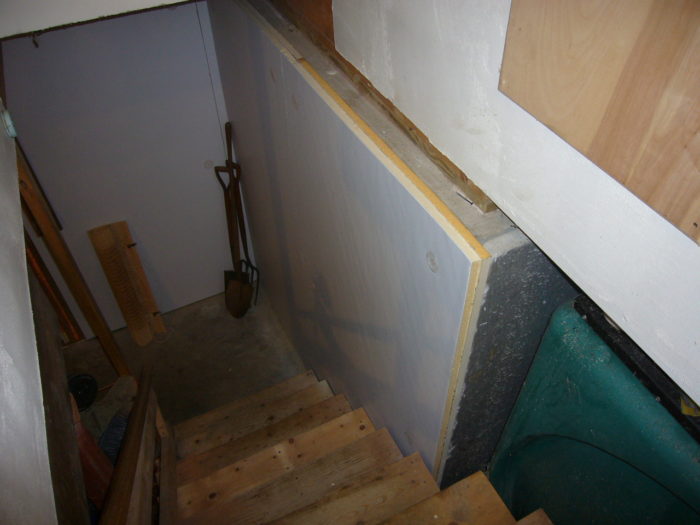
Once I got to the foam installing process, the foam slid right in (see Image #3, below).
– The electric panel I left where it was. I did install a piece of plywood adjacent to the panel over foam for the electrician to mount the PV inverter and various meters.
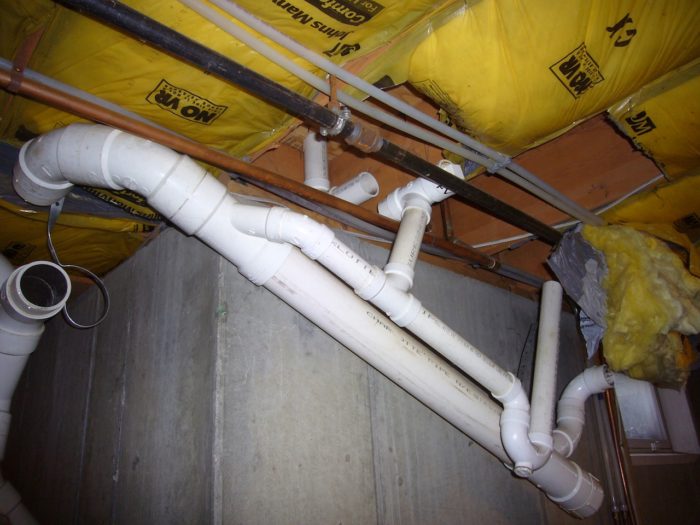
– The PVC waste plumbing from the kitchen sink and washing machine was hard against the concrete, but moving it entailed only three cuts, and two extensions with two couplings each, and one shortening with a single new coupling (see Image #4 and Image #5, below). One advantage of messing with this was that I discovered and repaired the joint that the plumber failed to glue originally 🙂 Maybe another two hours here.
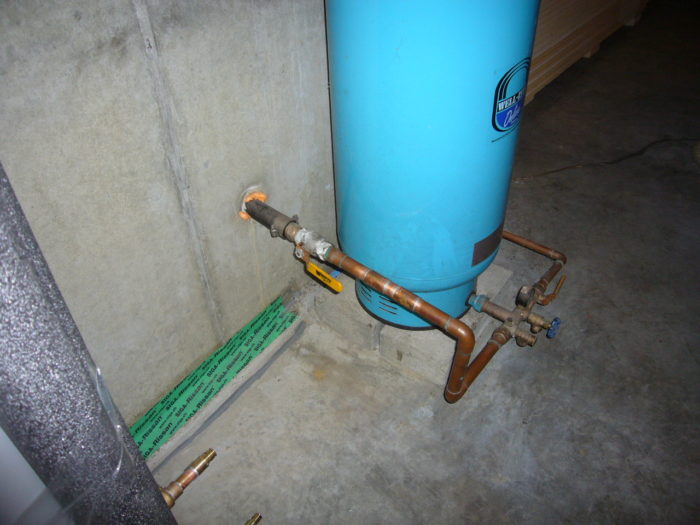
– The potable water pressure tank was moved out with two couplings after draining it — an hour’s worth of time (see Image #6, below).
– The washer hoses and electric receptacle, and other switches, were the hardest to move, because they were fastened to the concrete with powder-actuated fasteners — ones that are literally shot into the concrete. That took a lot of prying and I managed to whack myself in the head with a prybar when one let loose all at once.
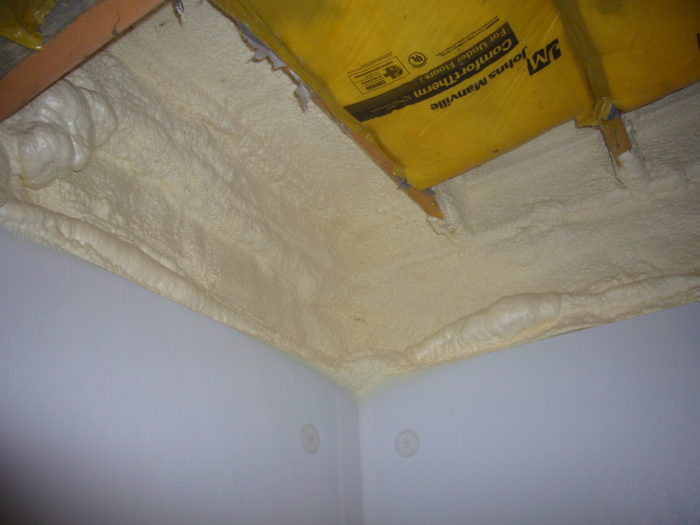
Two layers of polyiso, with staggered joints
Once all the clearances were established, I set to work installing the foam. It went on in two layers, with the joints staggered to help it be airtight (see Image #7, below). In tight quarters sometimes a full 4-foot-wide sheet won’t fit, so one trick is to cut it from the rear and snap it carefully so it bends and can be eased around an obstacle like a water heater (see Image #8, below). When it has space to flatten out the cut won’t be visible.
To see the tools of the rigid foam installer’s trade — at least those used by this DIYer — see Image #9, below.
Allow me to rhapsodize about the Hilti hammer drill. It has two modes, but the cool one is that the chuck oscillates in and out as well as around, which flings the hardened drill bit against a hard, brittle substance like concrete and makes drilling a piece of cake. Awesome tool — I didn’t want to return it to Pete Ives.
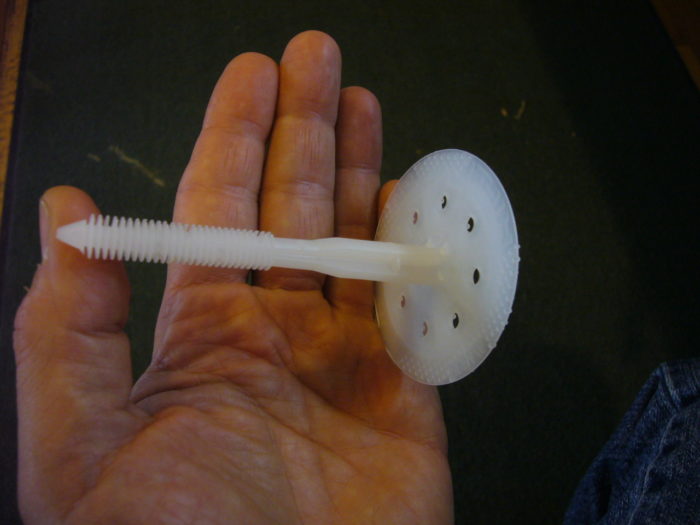
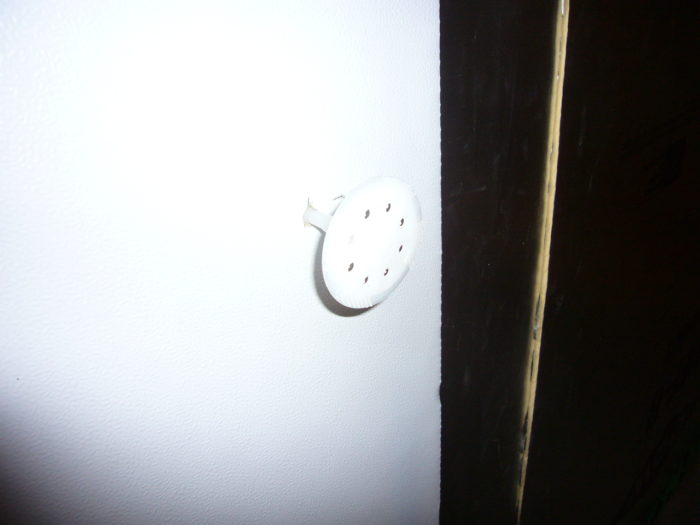
Each of the approximately two hundred fifty holes I drilled took five to ten seconds, and I did it all on one bit (they must be hard!) I used the Hilti IDP polypropylene fasteners (see Image #10, below), and to use this one drills a 5/16 inch pilot hole and then whacks the barbed IDP into the hole through the foam (see Image #11, below). The IDP is made in various lengths to accommodate different foam thicknesses. I like the system because it’s easy, and there is no metal to corrode or act as a thermal bridge. And it has a big head that acts as an integral washer to spread the load out against the foam.
Seal the panel seams with white foil tape
I cut the foam off flush with the top of the concrete so when I sprayed closed-cell foam at the rim joist I would be able to lap the spray foam onto the rigid foam.
Once all the foam was installed, I taped the seams with a white foil tape that Dow supplies. I found it difficult to separate the tape from the release paper, so I’ll look for another white tape.
Once the foam is installed and taped, the white color makes an immense difference in the brightness and sense of cleanliness in the basement. It immediately got warmer and the relative humidity dropped. As of early August, I have seen no condensation moisture on concrete in the basement, a big change from last summer where the slab/wall joint and a foot or so up the wall got damp. The basement doesn’t have that signature Martha’s Vineyard sine qua non, the dehumidifier, and it doesn’t appear to need it.
Tips for using a two-component spray foam kit
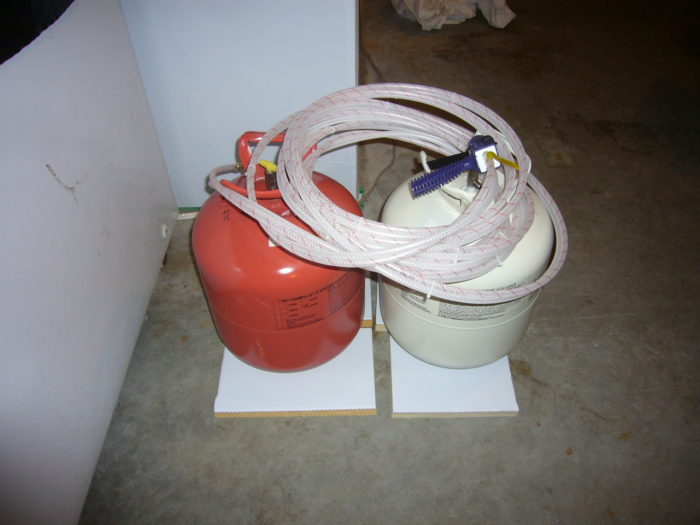
The next step was to insulate and air seal at the rim joist, so that the thermal boundary was continuous to the bottom of the subfloor above. I chose to do this with a two-component spray polyurethane kit that I bought from my friends at the Energy Federation. This kit comes has two steel cylinders, hoses, a spray gun, and a couple of dozen spray nozzles (see Image #12, below).
First I had to pull the fiberglass batt insulation out of the last floor joist bay where the joists were parallel to the foundation wall, and I folded the batts back on themselves where the joists were perpendicular to the wall. This allowed me space to get in and spray foam against the rim joist and down over the sills to the top of the rigid foam.
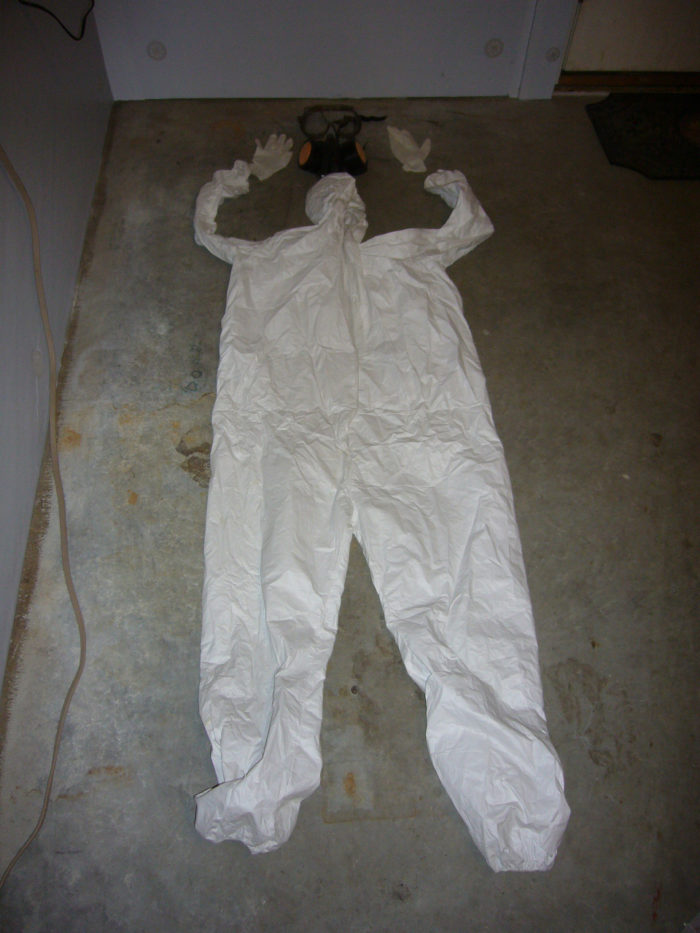
I put some polyethylene over my valued junk and got all the bikes out of the basement so I wouldn’t end up with tiny (or larger) foam blobs on my stuff. I wore a protective mask (regular users of polyurethane spray foams should be using an outdoor air supply, because one of the components can cause asthma-like symptoms in some people with repeated exposures — see the Spray Polyurethane Foam Health and Safety website for good information about hazards and how to deal with them), goggles, and a Tyvek suit and rubber gloves, all to keep the stuff off of me (see Image #13, below).
Once you start the process, you keep going. Whenever you stop spraying for thirty seconds the nozzle clogs and you snap on a new one. I got the whole job done in about two hours (see Image #14 and Image #15, below).
The foam didn’t expand as fast as I thought it would, so I didn’t get a very even job of it — some areas got more than others. I think I got the air leakage spots because I used a fan spray nozzle and sprayed into the cracks first in each area. I was told that 70°F, the temperature of the basement when I was spraying, was at the low end of the range for this foam and that I would have gotten better results had I heated the foam to 80°F or so.
The project cost $4,000
When I was done, I re-installed the fiberglass batts. I had gone back and forth about whether to remove all the batts. What I concluded, rightly or otherwise, is that it wasn’t critical to me that the basement was as warm as possible. If there is no insulation in the frame floor above the basement, there will be more heat flow down to the basement and it will be warmer. By leaving the batts in place, total heat loss to the ground from the occupied portion of the house is reduced, but the basement space is between two layers of insulation, that of the floor above and that of the walls, so it will be cooler.
I reckon I spent close to $4,000 on this project, or about $25 per lineal foot of basement wall. There’s a total of perhaps seven to eight days of my time in the whole shootin’ match. It would be less with a house with fewer than sixteen corners. It’s not primarily for energy savings; rather it is to make the basement a more usable space without needing a dehumidifier running. We see some of our clients’ electrical bill double in the summer due to dehumidification. With the foam in place, vapor transport from the soil through the concrete is significantly reduced, and the warmer temperature of the basement means relative humidity drops. The change feels totally worth it to Jill and me.
Once it was all done, I could begin to put things I want in the basement in place where they belong and cease moving them around to get them out of the way. Right now there are twenty-five chicks less than a week old down there in the OK Chicken Corral, beginning their nine-week journey to our freezer. But that’s another story…
Marc Rosenbaum is director of engineering at South Mountain Company on the island of Martha’s Vineyard in Massachusetts. He writes a blog called Thriving on Low Carbon.
Weekly Newsletter
Get building science and energy efficiency advice, plus special offers, in your inbox.


21 Comments
A grade blog Marc
Is there a
A grade blog Marc
Is there a 2" thickness limit with the foam you used for proper cure?
Great article. Will
Great article. Will definitely save this one.
similar strategy, what about the floor?
Marc,
We did a similar project for my basement. We removed the existing knotty pine paneling (and the moldy 2x4 studding with fiberglass batts!), installed single sheets of 3" styrofoam, added 3/4" strapping with coated steel screws, then reinstalled the paneling. Your use of 2 layers of foam- the outer being a code-approved surface, and the use of plastic fasteners seems better, though with the paneling we needed the nailer strips anyway. For the rim-joist bays I had a foam contractor come and do most of it for $500. I had to leave some bays open for various reasons. For those I cut left-over poly-iso or XPS boards to fit, using 1-part closed cell foam (gun & foam from energyfederation.org) to 'glue' the boards in place by sealing all edges and buttering the backs. I found this approach to work well. The air seall might not be as super tight as continous spray foam, but I think its pretty darn good and avoids the more toxic 2-part system.
That 1st summer the difference was profound- no dehumidifier was required. Subsequently I noticed by the end of the summer a bit of damp air seems to hang around, though no noticable condensation. Using the basement as a workshop with wood and sawdust no doubt adds to the dampness factor. We considered insulating the slab with 1" XPS with plywood and sheet flooring, but that's a costly job and the sump-pump has failed before, so adding layers seems risky should a flood ever happen again.
A few questions for you- How will you cover the exposed foam at the sill? That's a code requirement in our parts. We covered ours with mineral wool (a natural fire-retardant), though some day we'll finish the ceiling. And how/when did you get the floor insulated? For retro-work the slab can be a challenge - I've thought about applying a recycled rubber floor. The R-value is about 2.2/in, and thicknesses vary from 1/8" up to an inch. I'm leaning toward 1/4" (R~0.5) for a cost in the $1-2/sf range. That should reduce the condesation potential from indoor air, but could it trap moisture-vapor coming from below?
Thanks for the detailed description of your project and process.
Response to Christopher Vlcek
Christopher,
If you read Part One of this series, you'll find out that insulation was installed under Marc's slab when the home was built.
Marc wrote, "My house has one inch of extruded foam beneath the slab."
Questions
Mr. Rosenbaum, I would like to do something like this in our basement and have a couple questions.
1. How did you seal the foam board to the slab?
2. How did you fasten the PV plywood and other wood through the foam board?
Thanks very much.
responses
@aj - usually closed cell foam is installed in a max of 2" lifts
@Chris - IRC allows 3-1/4" of foam at the rim without protection
@Windsor - in most places I didn't need to seal the foam to the slab, but where the slab was wavy is laid down a bead of foam sealant first. The plywood is fastened with Tapcons.
Spray Foam kit price
Thanks for this article, you've done a great job explaining what you've done. I'm wondering about the coverage of the spray foam kit you used. I've done nearly the same work in my own basement, but in the rim joist area I used cans of spray foam to seal all the seams and then filled the cavities with fiberglass batts. I'm regretting not spending the money to fill this area entirely with spray foam but I'm considering going back to do this before I finish the room Were you able to get away with one kit or did you use more and how much did this part of the insulation job cost?
Thanks!
Response to Mark Fredericks
Mark,
Here's a 605-board-foot kit for spraying two-component spray foam:
http://www.jrproductsinc.com/shop/pc/viewPrd.asp?idproduct=57
It costs $620. If your rim-joist area is 12 inches high and and 120 feet long (that would be the case for a 25' x 35' basement), then you can install the foam about 5 inches thick on your rim joist. If the manufacturer is exaggerating, or if you spray it unevenly, call it 4 inches. If you get some on the surrounding joists, as you probably will, call it 3 inches.
Hello,
A couple questions:
Hello,
A couple questions: Would there be any drying issues with insulating a greener foundation with foam?
We were planning to heavily insulate our (new house) basement on the exterior only, but may end up with additional foam in some parts of the basement interior as well, depending on how it's to be used / finished.
I know that the moisture in the concrete needs to go somewhere at sometime, and with the potential for such complete sealing around the rim joist area with spray foam, and possibly foam on two sides, can that (or future) moisture still dry, in or out ?
Also, as an aside, can anyone verify if longer lengths in IDP type foam fasteners are available. While we located one listed online (HILTI) http://www.hilti.com/holcom/page/module/product/prca_productdetail.jsf?&nodeId=-11167&selProdOid=10139, they informed us that the product is not available.
We are hoping to locate some IDP's long enough to secure two layers of reclaimed 3'' EPS panels (2'x4' w / shiplap) to the outside of our foundation in one shot. The longest ones we found were just 4 1/2'' overall.
Thanks
Is R13 up to code?
First of all, thanks for a great blog post. I'm looking to do the exact same thing in my basement. I want a bright(er), dry, clean space where I can confidently store gear right against the wall without fear of dirt and mold.
I did have a question about code. It seems that everybody uses up to 2" of foam board and I know the polyiso you used gives you the best R-value possible of about R-13. But is that strictly up to code? I thought that code is R-15 in the Northeast. I'm very confused on code and how strictly it is enforced. I like to play things by the book, but I'd like to avoid using over 2" of foam (for expense and dimensions) and I know that air sealed R-13 is much better than what I have.
I also had a question about the HILTI connectors you used. I can see they work great, but did you consider gluing the panels against the concrete for an even cleaner finish?
Response to Ben Mills
Ben,
The only relevant answer to your question about building codes needs to come from your local building inspector. Codes vary widely from one jurisdiction to the next, and code enforcement varies from strict to nonexistent.
In most jurisdictions, there is no requirement for older homes to meet the current building code.
The 2009 version of the International Residential Code requires a minimum of R-10 (when installing continuous insulation) for basement walls in Climate Zones 4 through 8.
The 2006 version of the IRC was (for political reasons) more stringent than the 2009 version of the code, since it called for a minimum of R-15 for basement walls in Climate Zones 6 through 8.
Response to Martin Holladay
Martin,
That's the impression I get about the codes. It's interesting - I would hope they would enforce a code like not leaving exposed XPS/polyiso (hence the choice of Thermax), but at the same time, I would hope they wouldn't be sticklers about R-13 vs R-15, when I know R-13 would be a lot better than what I have (studded walls with fiberglass right against the concrete).
I will definitely contact my local building inspector before I do anything.
cement smoothness needed?
I'd like to put two 1" layers of Thermax in my New England basement just like Marc Rosenbaum described but I have lots of little cement 'hills' or protrusions from the surface of the wall where the edges of the forms were. They vary in height but I'd say 1/2" is typical, some are nearly 1". I looked at the Thermax documentation but it doesn't indicate how close to flat the walls should be. Any thoughts? Should I try to grind them down, or will the 1" sheets deform around them when I fasten the sheets down with Hilti fasteners?
Likewise, I would like to find out if there is any way of avoiding using closed cell spray foam as the first layer on a fieldstone foundation wall(zone 5) that is quite rough and out of square. Has anyone got a non spray foam solution? 475 has a detail with a lime plaster parge and intello to the interior of the (vapor permeable) insulation.
P.H.R.,
The only way to insulate the interior of a fieldstone foundation wall that is quite rough and out-of-square is with closed-cell spray foam.
Martin, I have since heard about Hempcreete and I am going to look into it further. It is non structural but can be formed/shuttured. A 300mm/12 inch wall is reputed to be R25. More technical information on it here: http://limecrete.co.uk/hempcrete-factsheet/
I just got notification today from Mass Dept of Agricultural Resources that industrial hemp as a building material is now allowed for sale in MA.
https://www.mass.gov/policy-statement/sale-of-hemp-derived-products-in-the-commonwealth
This should lower the entry barrier for experimentation and evaluation of hempcrete.
Travis,
Try to knock off the big protrusions with a hammer or a hammer and cold chisel. The small ones will simple compress the rigid foam.
I am in the process of doing something very similar. My plan is to use faced durospan GPS rigid foam on my walls. I live in Victoria BC (climate zone 4 marine I think). It's not particularly cold here (wintertime temperatures are usually around 4-6 degrees C) and my basement is conditions by our large centrally ducted heat pump. Same zone as Seattle.
Is there any danger in using a faced product like the halo or durospan foam? I'm thinking ill put a 1" layer (R5) + a 2" (R10) layer with staggered seams.
User 7286729,
Q. "Is there any danger in using a faced product like the Halo or Durospan foam?"
A. No.
Given my climate zone, is would a 2" R10 foam layer on my walls be sufficient?
Log in or create an account to post a comment.
Sign up Log in