Image Credit: Eric Whetzel
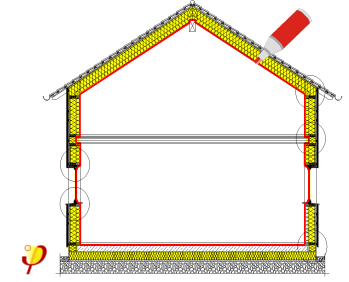
Image Credit: Eric Whetzel This illustration from the Passivhaus Institut shows a continuous air and thermal barrier as an unbroken red line that defines the building envelope. Installing the Stego Wrap vapor barrier was something of a chore, but getting the first course straight, flat and smooth was worth the effort. Plumbing lines were sealed to the vapor barrier with a gasket and Stego tape. Strips of rigid foam insulation will create a thermal break between the foundation wall and the slab. The strips are held in place with a bead of sealant. The welded wire mesh, which reinforces the concrete basement slab, punctured many tiny holes in the vapor barrier — all of which had to be patched. Using a fiber-reinforced concrete would have been much easier, but somehow that detail was missed.
More Guest Blogs


Editor’s note: This post is one of a series by Eric Whetzel about the design and construction of his house in Palatine, Illinois, a suburb of Chicago. The first blog in his series was called An Introduction to a New Passive House Project; a list of Eric’s previous posts appears below. For more details, see Eric’s blog, Kimchi & Kraut.
Following Passive House principles, we knew we were going to insulate and air-seal our basement slab. As explained on the Passipedia website:
“The most important principle for energy efficient construction is a continuous insulating envelope all around the building … which minimizes heat losses like a warm coat. In addition to the insulating envelope, there should also be an airtight layer … as most insulation materials are not airtight. Independently of the construction, materials or building technology, one rule is always applicable: both insulation and airtight layers need to be continuous.”
Passive House builders use the “red pen test,” which is supposed to occur in the design phase of a project when it’s much easier to address weaknesses or errors in the details of a design (see Image #2 below). That applies to air sealing, and it’s also effective when looking for points of potential water intrusion, or even to test the thermal layer for areas of thermal bridging. The basic idea is that if your layers aren’t continuous you’ll find yourself lifting your red pen, meaning it’s an area that needs to be addressed.
An effective way of thinking about a structure, used by high-performance builders, is to think in terms of six sides rather than just four when contemplating the details for air sealing and insulating: four walls, the attic/roof, and the basement (or frost-protected slab).
A similar approach to Passive House for building high-performance structures is adopted by advocates of The Pretty Good House concept, even if it’s less stringent, more open to interpretation, and tends to be more “rule of thumb” rather than energy-model-driven (e.g. PHPP or WUFI).
Based on our climate zone, which is Zone 5, we decided we wanted to shoot for 16/20/40/60 for insulation R-values — the series of numbers represents R-values for under the basement slab/ the exterior foundation walls/ framed exterior walls/ and the attic. (Our attic R-value proved to be significantly higher than 60, but more on that later.) These values are in the ballpark for both Pretty Good House (PGH) and Passive House. (Here’s an excellent overall summary of the Passive House concept I recently came across at EcoCor.)
Arguably, the “sweet spot” for how much insulation makes sense for these areas, even when adjusted for climate region, is still a topic for heated debate. Nevertheless, it’s important to keep in mind that the simpler the form your structure takes — for example, two-story cubes without basements — the easier it is to achieve Passive House or similar building standards. Simple building forms mean simplified framing, air-sealing, and limits on the exterior surface area, features that a single-story ranch that is spread out and has all kinds of nooks and crannies does not. (The difference also has serious ramifications for overall heating and cooling demand.) Likewise, simple forms also make it easier to figure out how much insulation you need to reach a benchmark like Passive House or PGH. A simple form can also have durability implications.
Choosing Roxul to insulate the slab
Our R-values were based on a number of considerations: the construction drawings of our original builder, information made available by Hammer & Hand (in particular their Madrona Passive House), and articles on the Building Science Corporation website (in particular this one and this one), as well as Green Building Advisor. These resources, all of which have proven to be indispensable at every stage of the build, have made our project possible.
In terms of the details around the slab and the foundation walls, this article from the Department of Energy also proved to be especially helpful.
After considering various insulation choices, we decided to go with Roxul for under our slab, the exterior of our foundation, and our wall assembly. (Blown-in cellulose in the attic was the only significant deviation from the use of Roxul.)
To get to an R-value of 16 under the basement slab we used two layers of 2-inch thick Roxul ComfortBoard 80 (R-4 per inch).
We installed each layer with staggered seams, although the Roxul representative I spoke with via email insisted that because the Roxul is so dimensionally stable this isn’t nearly as important as it would be with rigid foam insulation. (The same holds true with a double layer of ComfortBoard 80 on the exterior side of wall sheathing.)
One of the many benefits of using Roxul is that the material wants to stick to itself, whether in batt or rigid board form. This makes for tighter joints between pieces, and even when cuts around obstructions are less than perfect it’s easy to fill in any gaps with torn apart pieces of Roxul (again, this holds true for both ComfortBoard 80 and Roxul’s batt insulation).
Expecting lower R-values
A Roxul rep told me to assume a loss of R-1 due to the compressive pressure of the poured concrete, thus our R-16 for two layers of Roxul is, according to Roxul, really R-15. Having installed the two layers myself, walked on it during and after installing the vapor barrier, my guess is in some areas this loss in R-value is even greater than 1.
Based on the comments quoted in an article by Martin Holladay at GBA (“Sub-Slab Mineral Wool”), I would have to say my experience was exactly the same: in some areas the Roxul seemed to lose most, if not all, of its rigidity. I’ve also noticed while working with both the ComfortBoard 80 and Roxul batts there seems to be a variation in the material from piece to piece and bag to bag. Some pieces are very easy to cut (these pieces are noticeably stiffer), while other pieces seem mushier or lacking in rigidity — either under- or over-cooked, perhaps — making them more difficult to cut and work with.
This seems like less of an issue for vertical applications (i.e. walls), while potentially troublesome for horizontal applications under a slab — especially if you’re depending on that R-4 per inch to meet the demands of energy modeling for a certification program like Passive House.
I’m glad we’ve been able to mostly avoid foam insulation in the build, but seeing the Roxul in a real-world application does make me wonder if some kind of rigid foam might’ve given me a more consistent whole floor R-value.
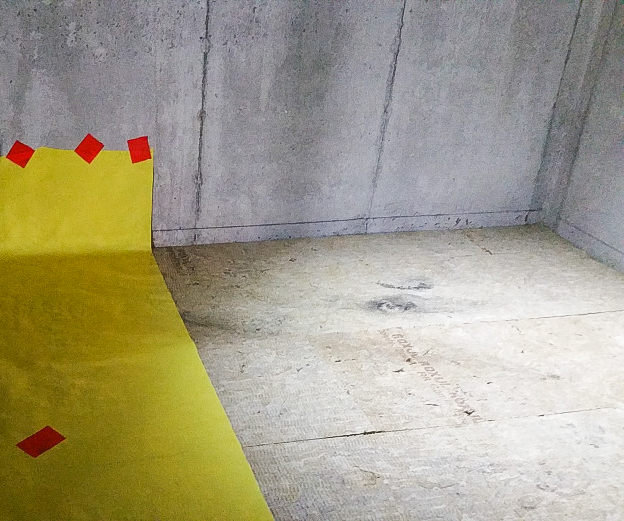
Adding a vapor barrier
Once the two layers of Roxul were down, it was time to install the vapor barrier over the insulation. While the Roxul acts like a blanket, helping to maintain a consistent temperature in the basement, the vapor barrier helps to keep moisture and soil gases (mainly radon, as I understand it) at bay.
The product I’ve seen used in most Passive House, Pretty Good House, or equivalent projects, is Stego Wrap. (For more about the product, including a video covering recommended installation practices, visit the Stego website.)
We used the 10-mil version of Stego Wrap. The material is very durable and fairly hard to damage. Even when tears occurred, it was easy to patch with pieces of the Stego red tape, or a combination of a cut piece of Stego Wrap with pieces of the red tape.
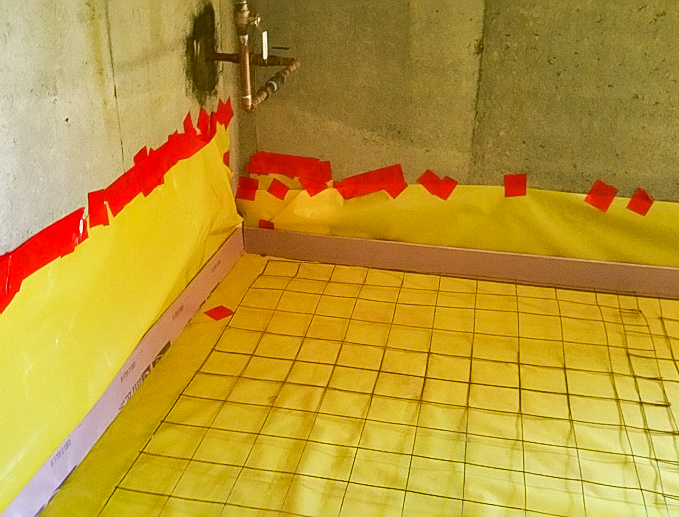
Installing the two layers of Roxul on the basement floor was pretty straightforward. Installing the Stego Wrap was generally a pain in the ass. Maybe I was just tired, but I really didn’t enjoy installing it at all. For example, it was difficult to keep it tight to the walls, although I learned to leave it hanging fairly loose at floor-wall junctions, which definitely helped. Getting the first row straight, flat, and smooth was time-consuming and annoying, but it did make getting successive rows installed straight much easier (see Image #3 below).
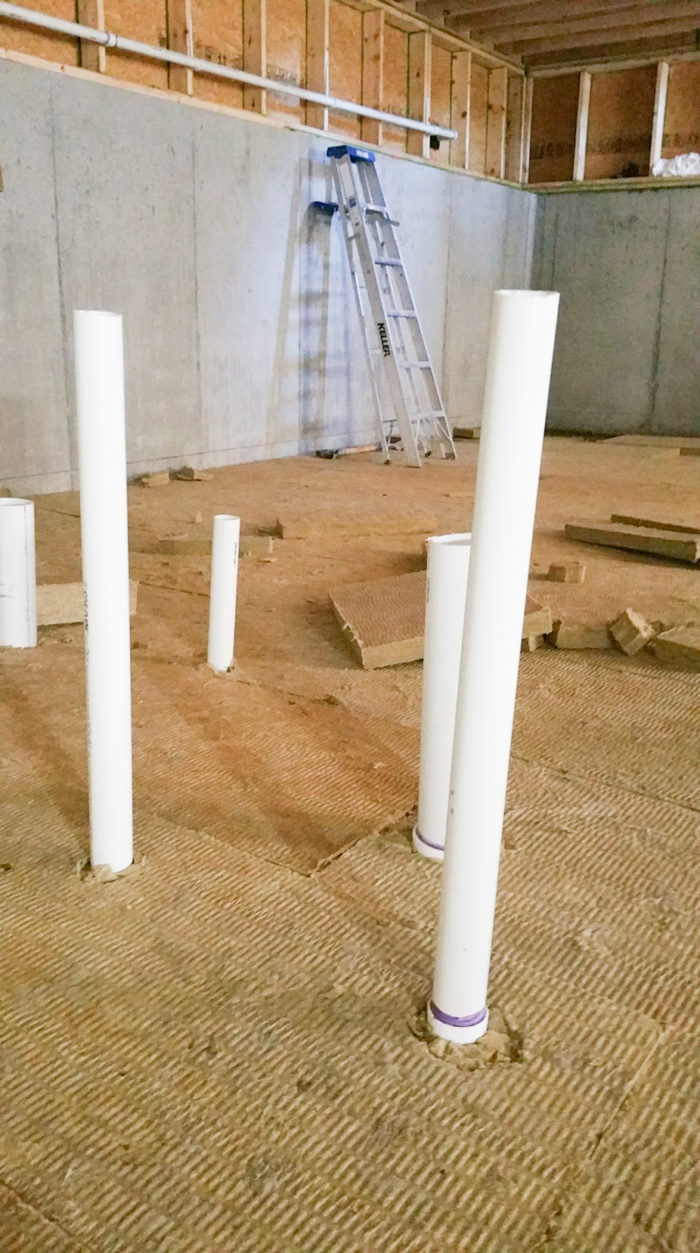
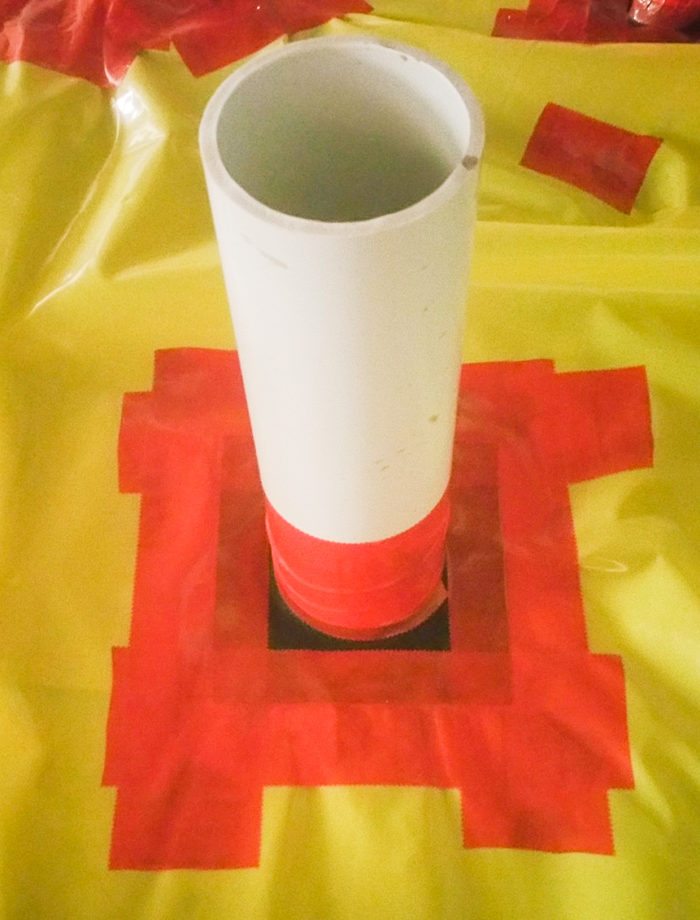
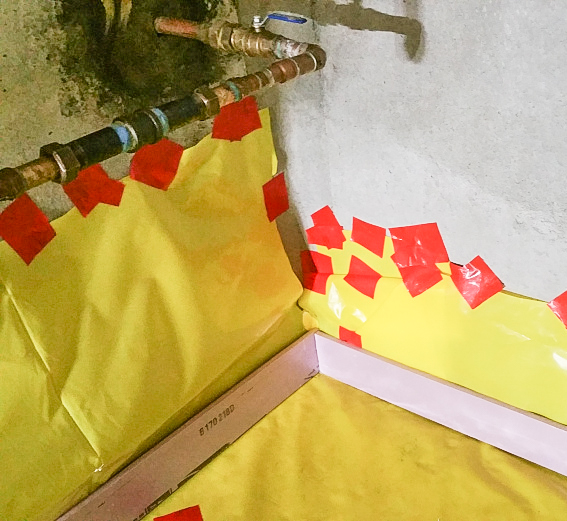
Where drain lines and other plumbing came through the insulation and vapor barrier, I used a Roflex pipe gasket (available from 475 High Performance Building Supply) and red Stego tape to make the seal (see Image #4 below).
Once all the Stego was in place, we added a strip of 1/2-inch rigid foam insulation at the floor-wall junction as a thermal break. I wanted to use Roxul ComfortBoard 80 (the 1 1/4-inch-thick version) even for this, but time and money made the foam an easier choice. (ComfortBoard 80 is still a special order item in my area, meaning it’s always about two weeks away from the time you place your order — hopefully this changes in the near future.)
We kept the foam in place by running a bead of OSI sealant on the back of each section before pushing it up against the Stego Wrap. For the most part this seemed to work well (see Image #5 below).
Next up, the welded wire mesh
One of the real disappointments of installing the basement slab was seeing the concrete guys put down the welded wire mesh (typically noted as W.W.M. on construction drawings) — basically chicken wire with pointy ends. (I exaggerate, but not by much.)
If I could do it over again, I would look into using a concrete mix containing sufficient pieces of fiberglass or some other alternative, so that using the welded wire mesh could be avoided altogether. I was already familiar with the idea of fiberglass used in place of metal in concrete forms, having experimented with decorative concrete last year and having seen videos like this one.
I’m not sure why I didn’t think to ask for fiber-reinforced concrete instead of the normal welded wire mesh — it was one detail that just got missed, unfortunately.
As the wire mesh went down, the guys could see how annoyed and concerned I was by the holes it was making in the Stego Wrap. One of them, Oscar, started helping me bend the pointy ends up. Once they were safely pointed up, I went around with the red tape to patch the many tiny holes in the Stego Wrap. Not a fun way to kill a couple of hours (see Image #6 below).
Why my architect or the concrete guys didn’t suggest a mix with fiberglass instead of the welded wire mesh is unclear. The reality with any green build, especially if you’re acting as GC, is you’re likely to be the only one who really cares about getting the many details right, especially if the architect and subcontractors have never built like this before — they were just doing what they always do.
Weekly Newsletter
Get building science and energy efficiency advice, plus special offers, in your inbox.


12 Comments
WWM is supposed to go mid-depth in the slab
Thank your for sharing your process on GBA. The mineral wool insulation layer and air barrier look good to me. I, too, was sad to see the welded wire mesh sitting directly on the air barrier, not just because it punctured the membrane. Reinforcing is supposed to go approximately mid-depth (or in the lower third) of a concrete slab. I've often seen little plastic "chairs" used to support the mesh. If such spacers had been used on your project, the mesh would have been in the proper position structurally, and the air barrier wouldn't have been punctured (as much). Perhaps your concrete people are planning to "lift" the rebar into the slab after it is poured, but that isn't considered best practice.
Roxul, the Champagne of Ridged Insulation
Indeed the slab vapor barrier has to be sealed at the edges and at penetrations to keep radon from entering, but concrete makes a wonderful air barrier. The purpose of vapor barrier is to prevent moisture from entering the slab through capillary action. Small punctures in the membrane do not inhibit this function. As Joe Listiburek states, "You can walk on it in golf shoes" without affecting it's performance as a vapor barrier.
I think you overestimate the reduction in insulation thermal performance caused by concrete compressing Roxul board, based on the impression you get from walking on it. Lets say you weigh 150 lbs and have huge feet measuring 36 sq. in. each. As you walk the pressure exerted by all your weight on one foot is 4.2 PSI. Since as you step all your weight is is likely on the ball of one foot the actual pressure is larger. One sq. ft. of four inch thick concrete weighs 50 lbs., thus exerting .35 PSI on the insulation.
Today I stopped by the only Roxul dealer in my area. They only had batts, with the 5.5" thick version selling for 2.13 USD/sq. ft. The same as Owens Corning Thermafiber mineral wool batts sold by a local big box. However, 2" thick R8 Roxul Comfortboard 80 has to be special ordered. They can get it 2' x 4' or 3' x 4' in reasonable quantities for 2.08USD/sq. ft. verses .78 USD/sq. ft. for R10 under-slab grade EPS. He didn't even get the price for 4' x 8' Comfortboard because I'd have to buy 13 pallets.
Comfortboard is amazing stuff, but at 3.3 times the price?
Douglas Higden
Roxul density varies
I have used Roxul in walls and it is good to work with, but I did notice a wide range of densities, at times, within a pack and even in a single batt. In places it wasn't much stiffer than fiberglass. The production process needs to be be improved so the quality is more uniform.
Doug, Home Depot carries some of their products, so check on their stock.
Bob Ward
Sealing the slab-wall joint
How do you plan to seal the gap between the slab and the foundation wall?The concrete will shrink as it cures, leaving a space through which soil gases can enter. Judging by the pictures, the tape at the top of the Stego Wrap isn't meant to be a continuous air barrier, as least as shown at that stage of the job. I have a similar arrangement in my basement, and, clearly not thinking straight, I trimmed off the excess Stego Wrap flush with the slab not long after the concrete set-up. I'm unsure about the best method to seal the joint.
Sealing the slab-wall joint
Doug,
If you follow the link to my blog, in the post for the basement slab, towards the end, I talk about how we addressed it. I actually asked a question about it here on GBA, wondering what other people did, and that's where the solution originated.
Air/Moisture Barrier Protection
Not sure if this the "right" way or not, but this has always been my solution to protect the barrier under a slab: break the insulation into 2 layers. You end up with the same amount of insulation, and the top layer protects the barrier.
Roxul, the Wonder Insulation
Eric, I did read your blog awhile back, (quite a story) but I'll check it out again. I apologize for my tone, I wrote it under the influence of sticker shock after my day's shopping. Just curious, why the 9' basement ceiling? I'm going with 7 1/2' that will allow me to just barely see out the non egress windows.
I love the idea of Roxul. If i could afford it I'd use it every where but the ceiling. As batts they install better than fiberglass and are much cheaper than spray foam. On the exterior Comfortboard panels really shine. They naturally shed water, but being vapor transparent allow any water that does get into the wall system to dry easily. They eliminate the need for drainage wrap above grade and dimple wrap below. Add to that mineral wool's sound absorption properties and relatively green manufacturing process. Roxul is indeed wonder insulation.
I checked out the Home Depot site. They only offer batts at 1.17/ sq. ft. USD, slightly more than my dealer quoted.
I don't understand how having two layers of insulation protects the barrier Alan. It has been my understanding that one employs two layers of sub-slab foam insulation with joints staggered because foam shrinks in time and the second layer prevents gaps in the overall installation. Incidentally, Roxul does not shrink making it possible to install it in one layer without fear. Wonder insulation indeed.
I haven't given up on Comfortboard altogether. While I am considering using Kimberly Clark's Block-It above grade. It is a drain wrap that sells for the same price as standard Tyvek. I haven't come up with a satisfactory alternative for sub-grade exterior insulation on basement walls. Owens Corning makes nice draining XPS panels but they are even more expensive than Roxul and, well, XPS. Dimple sheet messes with the thicknesses of my wall assembly and adds labor and material costs, thus cancelling the Roxul price disadvantage. I just wish I could get it in 4' x 8' sheets.
Placing the vapor barrier
Placing the vapor barrier below a layer of foam protects it from likely damage during the concrete pour. The downside to that approach is that the foam could float upward during the pour, and excess water will be stuck around and below the foam and won't be able to dry through the concrete through capillary action. It will eventually dry but it could take a long time.
WWF Mid Depth and Holes
Interesting about the WWF causing holes in the vapor barrier. When they poured the concrete at our basement slab, the contractor had the WWF on the vapor barrier and poured the concrete in small amounts. then a crew member would lift the WWF up so that it was mid-way through the slab. I have seen them use the saddles on commercial jobs, but at least in Colorado, I've never seen it on residential. Of course, our basement slab was only 500 SF. Either way, I watched pretty carefully and I did not see any holes getting punctured. Again, maybe since it was so small, I had fewer edges in the WWF. Or, maybe it was punctured and I won't know until I do a blower door test. But, I'm not going full Passiv either. I'm just trying to do the best I can on my budget.
Still battling abbreviations -- still searching for clarity --
I was lost in the wilderness for several sentences. Finally, I figured it out.
WWF = welded wire fabric
Maybe I'm not wrapping my head around this insulation thing but if you are just insulating the slab wouldn't the cold still transfer inside through the walls as the are coupled with the footers?
Mixed_Beans,
This was Eric's explanation in another one of his blogs:
"With a 9-foot basement, we’re hoping the temperatures at this depth are consistently mild enough to avoid any kind of significant energy penalty. "
https://www.greenbuildingadvisor.com/article/urban-rustic-details-for-an-insulated-foundation
Log in or create an account to post a comment.
Sign up Log in