
Image Credit: Erik North
More Guest Blogs


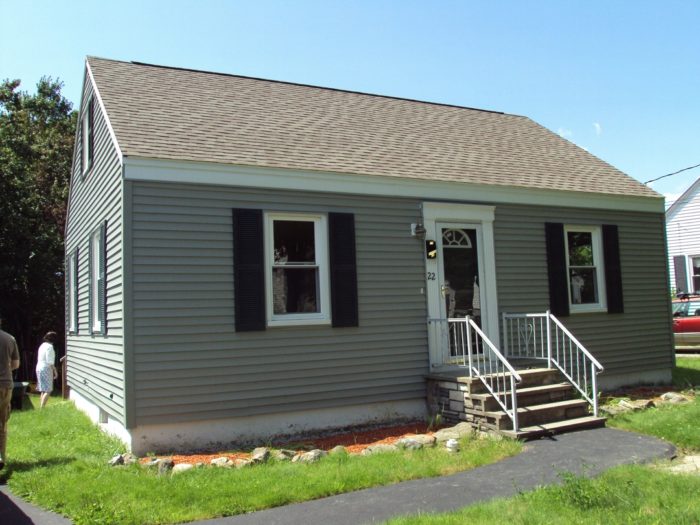
One of the great ironies in construction (I bet you didn’t even know that construction could be ironic) is that Cape Cod style houses perform pretty poorly on Cape Cod. The year-round sea breezes wash right through a Cape building frame, making them chilly and uncomfortable in the winter months.
How did Cape Cod style houses (which perform not-so-great in the winter) become popular in New England? Maybe the name was a marketing scheme? And how can we address the air leakage and heat loss issues to make Capes more comfortable?
Many rooms in a small footprint
The second floor framing in Cape Cod style houses packs a lot of living into a compact space. In as little as a 600-square-foot footprint, one can fit a 4-bedroom, 2-bath, 1100-square-foot home. For the price and availability, Capes can be quite a deal.
However, that same framing, which makes great use of space, also leaks conditioned air like crazy. If some half-assed attempt to ventilate has been made, odds are very good the second floor will be frigid come January.
Getting heat upstairs
Heat distribution is the first area of concern. Most heating system and insulation issues with Capes stem from their having been built in the cheap-oil era. In 1950, insulation was an afterthought and heating was dirt cheap. It’s the rare Cape which has had these shortcomings fully addressed since its construction.
Sometimes the second floor isn’t piped for heat at all. On other occasions, the hot water pipes are run through the walls. When the baseboard units are on the opposite side of the house, hot water pipes are often run through the kneewall space outside the attic insulation. All of these are exciting ways to lose heat (or, in the case of the unheated second floor, not gain enough).
Each problem has its own solution. If the second floor isn’t heated, it might make sense to have heating baseboard or ducting installed. No amount of fans or wishful thinking will move enough heat from the first floor of a Cape to make it comfortable.
If the hot water pipes for the second floor baseboards run through the exterior walls, well, you have a more challenging problem. If the exterior walls are uninsulated, dense-pack them with cellulose; this will also insulate the pipes.
If the walls are insulated, try to determine whether the pipes run inside the insulation. (I know… that’s not easy. I use a fiber-optic boroscope and infrared camera to look inside the wall cavity). If not, you’ll need to reinsulate that cavity and put some thermal resistance between the pipe and outside sheathing.
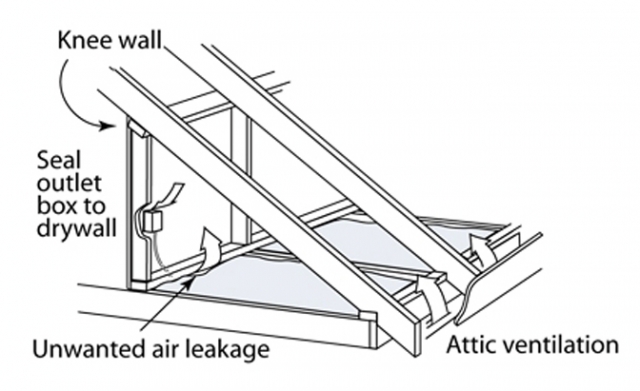
The illustration shows an attic kneewall in a Cape Cod style house. Capes are often insulated at the vertical wall and joist flats in the kneewalls. If the hot water pipes for the second floor heating are run through the kneewalls, they’ll be outside the thermal envelope.
Where will you locate your air barrier?
Insulation and air sealing can be problematic in a Cape. The kneewall framing usually has built-in bookshelves, drawers and closets. The kneewall sits on top of the first floor joists, meaning that interior air is usually flowing under the kneewall. Finally, the tops of the kneewalls usually aren’t sealed. Much more conditioned air than you’d like flows up the wall slopes and out the attic cap.
There are three possible approaches to insulating and air sealing a Cape.
One can adopt an unvented approach and seal the whole thing. (If you choose this approach, you’d better have moisture under control).
You can insulate the roof deck and vent the attic. This vented approach is challenging in a Cape, as the ventilation needs a clear path from soffit to peak. The eaves need to be sealed to prevent unwanted unconditioned air from wind washing the insulation (I’m looking at you, ocean winds), and the tops of the kneewalls need to be sealed around the vents.
Finally, they can be insulated at the horizontal and vertical flats. In this case, the tops and bottoms of the kneewalls need to be air sealed with blocking.
Cape Cod style homes date back a couple of hundred years. They’ve been optimized for space, but were not developed with energy efficiency in mind. But as long as you seal the air leaks and insulate well, a Cape can be warm and efficient.
Erik North, the owner of Free Energy Maine, is an energy auditor and home performance specialist in Westbrook, Maine. He is also the author of the Energy Auditing Blog.
Weekly Newsletter
Get building science and energy efficiency advice, plus special offers, in your inbox.


16 Comments
Its not just Capes
You don't have to live in Cape to experience this exact scenario. Just ask any of us who have a home with a "bonus" room over a garage. Its actually even worse as the Cape at least has conditioned space beneath the upper level. Not so with a bonus room over a garage which creates even greater extremes.
Re: Its not just Capes
Chris,
Great point...bonus rooms over garages are pretty popular in new construction in coastal Maine. Between unconditioned air on five sides, soffits vented into the bonus room floor joists, those same joists open into the house's framing and unsealed tops of the marriage walls, bonus rooms can be an energy disaster.
kneewalls and roof valley's
We have even a tougher problem with our 1930's house. We have sweeping gable roofs that form a valley with a kneewall down to a point at the either side of the front of the house. I can't properly vent the roof of the kneewall because the soffit is only 1' wide at the base (the peak is the full width of the house). The rafters above the closet are only 2x4's, so I can't insulate it properly between the rafters. If I drop the ceiling of the closet more then 2" (to add ridged foam boards) the closet doors won't open.... Needless to say, we get giant ice dams on the front of the house and the closets stay very cold. Not sure what (besides moving) we could do.
Insul-lam (Retro-fit SIPS) panels are your solution
All of the insulation and venting problems described above could be solved using a combination of Retro-fit SIPS panels and converting to an un-vented attic space. Using 8"to 12" of rigid foam insulation (depending on your climate zone) above the 2x4 constructed roof framing with the attached OSB or plywood sheeting on top, then air-sealing the small triangle at the eves with spray-foam insulation will result in a warm, dry upstairs living space, either in the Cape Cod, or the bonus room over the garage.
The same treatment, but with less insulation, can be applied to the walls of the Cape Cod house, to air-seal and insulate those inefficient stud walls. More information on this technique can be found on http://www.sips.org
kneewalls and roof valley's
Thanks Ted,
It's great advice, I don't mean to discount it. It's just that the cost would be prohibitive. Especially when we invested in a new roof just years ago. The reality is that we would move first. It would also deface the best asset of the house, it's looks. We have brick exterior decorative fascia boards, moldings etc.. Also, adding sip panels or foam boards to the top of the low roof would block some of the windows. Attached is a photo with an outline of the rooms inside so you can see some of the issues.
Our house reminds me of why Martin was right when he wrote that simple roofs are better and more energy efficient. But like most people, we were (are) attracted by the multiple roof lines and the character of our house. but we do pay a cost for that character.
Pretty roofs
Francis, I hear you loud and clear. My wife and I moved into a 1911 balloon-framed farmhouse (see attached picture) here in Indiana after falling in love with the original heart pine floors and roof line. Unfortunately, four years later, I'm still trying to figure out how best to handle the remodeled attic (done by the previous owner) and its copious kneewalls (which were built on top of the original attic floor). Air barrier? Right. Venting is handled by three gable vents in the dormers, with no soffits to speak of. Needless to say, the past few winters has created some impressive icicles, and the summers can get a bit hot without a window-mounted A/C unit.
After reading Martin Holliday's recent article on roof design, the thought occurred to me to rip off the old one and put on a simple two-gable design that would max out the floor space upstairs, allow for 8- or 9-foot ceilings, and so forth. But alas, we'll move before we shell out for that expense. Perhaps using SIPS as Ted suggested could make things easier (at least eliminate venting), but the engineering and design expense would still be prohibitive in my estimation, especially considering I've already installed new siding (fiber cement), A/C unit, water heater, gutted and remodeled the kitchen, and replaced most of the original plumbing. Money pit, perhaps, but it's at least pretty.
Cape Cod Updates
Caleb,
You can do some really neat things with a second story addition. I have used several times, vaulted parallel chord trusses to create an open and energy efficient upper level. There is no outward pressure with this truss configuration so any vertical wall height will work. I have also used these trusses in combination with micro-lam beams and I joists to create rather large dormer openings if this is the look you are after. The parallel chord truss allows a header free wall so the placement of large south facing windows is made easy, if the trusses are vaulted you can get the window openings higher in the wall to enhance winter daylighting.
Furthermore
I tested a 1942 1 1/2 story in St. Paul, MN before starting a renovation and the infiltration rate was right at 10 ACH50. Infrared scans showed horrendous air leakage under the kneewalls with the blower door running and this house had been remodeled on the 2nd level some years before. I decided along with the approval of the owner not to try and work within the confines of the existing roof structure. Instead we ended up with R-30 walls, R- 70 ceilings and very airtight new construction. I set it up so the first level walls could be upgraded at a future date with blown wall cavity insulation and rigid foam exterior sheathing.
A SIP over-roof would be overkill for a cape
Any rigid foam over the roof deck and an unvented attic approach would be a good solution, but it doesn't need the strucutral rigidity of a SIP. Even with the typical 2x6 rafters it's plenty rigid enough to support less-structural foam & nailer decks. SIP roofs also have the disadvantage of having an un-vented nailer deck, where moisture cycling inevitably causes the ridge seam to leak air, and degradation of the outer OSB skin at that point. Rigid foam seams sealed) with 2x furring (through-screwed to the structural deck or rafters) supporting a vented nailer-deck can be a cheaper/better solution long term. Breaking up the furring in to 2' sections with 1' gaps can further enhance drying via cross-ventilation.
There are commercial cross vented solutions from several vendors (Atlas, Hunter Panels, etc.). Whether a DIY solution with furring is more cost-effective than those solutions depends on the simplicity of the roof and local labor rates. But on simple 2-plane gable ended cape roofs (like the one depicted above) a DIY version with furring is almost always less expensive. If one has access to reclaimed foam panels from commercial re-roofing (insulationdepot.com in Framingham MA is just one source among many) the material costs of a DIY plummets.
2nd attempt
This is my second attempt to load the picture of our house. Truthfully, it's a lousy picture anyway, but here goes!
2nd attempt - explanation
As you can see from the (lousy) picture, adding foam to the low roof above the front vestibule is not an option due to the windows. We could add foam to the top of the roof, but it would be a waste of the newer roof and it would throw off the proprotions of the house. If we do stay in the house, I think we will spray foam between the rafters to at least R-30 in the crawlspaces, then spray foam above the closets to the full depth that we can. We will still get some iced damming and excess heat loss above the closets, but it will still be an vast improvement.
re: funky roof lines
Francis,
Isn't that front vestibule technically outside of the envelope? Does it have heat?
funky roof lines
Technically, yes. But the inside door is strictly an interior door. Any air sealing or insulating would need to be done at the exterior door. Besides, if we "capped" the upper roof with foam or sips, the upper roof line won't match the lower roof line. The curb appeal of the house is it's best feature. We don't want to ruin it.
Cape Cod House
Our little Cape Cod is indeed a bear to heat properly. Compounding the problem is that our place is brick over block construction - there is no way to get insulation in the outside walls. I would caution against running ductwork to heat the attic level. Previous owners did that and the ducts are so convoluted (and, of course, not taped or insulated) that only tepid air finally makes it up there. At the same time, about a third of the air flow originally designed to heat the main level is drawn off. We normally just keep the overall heat low and resort to using space heaters which, in these small rooms, work very well.
We also took out the drawers built into the knee walls that leaked like a sieve, insulated the dickens out of those spaces, sealed them with drywall, and put cabinet doors over the spaces. Great improvement.
Non expanding injection foam
Dan:
You may be able to insulate (or at least air-seal) the brick veneer/concrete block construction with a non-expanding injection foam such as CoreFill 500 or TriPolymer, etc. but it depends on the climate & other construction details. It's not cheap, and the thermal bridging of the CMU webs are high, but when R values are that low it may still be cost-effective.
Retrofit sealing & insulating those ducts (or even re-designing and replacing them) is probably cost-effective as well. But if you're going that far, cost comparing it to retrofitting an all new hydronic (pumped hot water) heating system might be in order.
Thanks for your ideas. The
Thanks for your ideas. The foam injection is a no go - the block is that half width stuff with very small cavities. . The technician said he'd have to drill hundreds of holes with no guarantee of hitting every pocket. I have insulated all the duct I can access. To do it all would mean ripping out virtually all the drywall in the house. We plan to just bide our time until we are ready to move on. It's one of those cases when we would have been better off if the previous owners hadn't done any work on the house.
Log in or create an account to post a comment.
Sign up Log in