
More Musings of an Energy Nerd


It’s easy to find advice on flashing windows. But what about exterior doors? For some reason, most construction experts haven’t provided builders with much advice about flashing doors.
Don’t be fooled, though: The lack of online advice on door flashing doesn’t mean that door flashing is unimportant. If you screw up these details, you can rot out your subfloor and floor joists.
Flashing an exterior door, step by step
- First, read the installation instructions provided by the door manufacturer. Unless these instructions violate basic flashing principles, you should follow these instructions.
- Next, verify that the rough opening is the right size. In most cases, the rough opening should be 1/2 inch higher than the door frame (after accounting for the height of your installed sill pan), and between 1/2 inch and 3/4 inch wider than the door frame. Of course, the rough opening should be level, plumb, and square.
- Install the sill pan according to the sill pan manufacturer’s instructions. (For more information on sill pans, see “Sill Pans for Exterior Doors.”)
If it’s a PVC sill pan, you need to glue the sections together (after fitting them to the opening). Most sill pan manufacturers recommend the installation of three parallel beads of caulk (usually, elastomeric or polyurethane caulk) at the rough threshold before the sill pan is secured in place.
If you prefer to make a site-built sill pan, you can do that. Remember, though, that a site-built sill pan needs either (a) an interior dam, or (b) a positive slope toward the exterior.
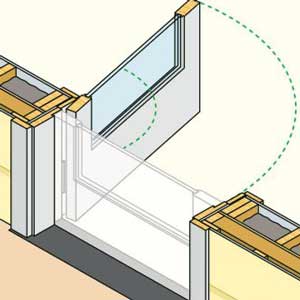
4. In most cases, an exterior door shouldn’t be installed until after the water-resistive barrier (WRB) has been installed on the wall. If your walls have conventional housewrap, you’ll need to create a flap in the WRB at the head of the…
Weekly Newsletter
Get building science and energy efficiency advice, plus special offers, in your inbox.

This article is only available to GBA Prime Members
Sign up for a free trial and get instant access to this article as well as GBA’s complete library of premium articles and construction details.
Start Free TrialAlready a member? Log in


16 Comments
Excellent overview. Unfortunately no matter how diligent the installation, the weak points remain the construction of the pre-hung jambs and brick-molding, which are typically made from untreated finger-joint wood. If these were a composite material or treated-lumber, a lot of the problems wouldn't occur.
Malcolm,
You're right about finger-jointed wood, which in my opinion is unsuited for exterior use.
Since most of us can't afford to buy a custom-made mahogany door -- and it's best if the mahogany stays in the tropical forests where it belongs, rooted in the soil and growing skyward -- North American designers and builders should make sure that every exterior door is protected by a wide roof.
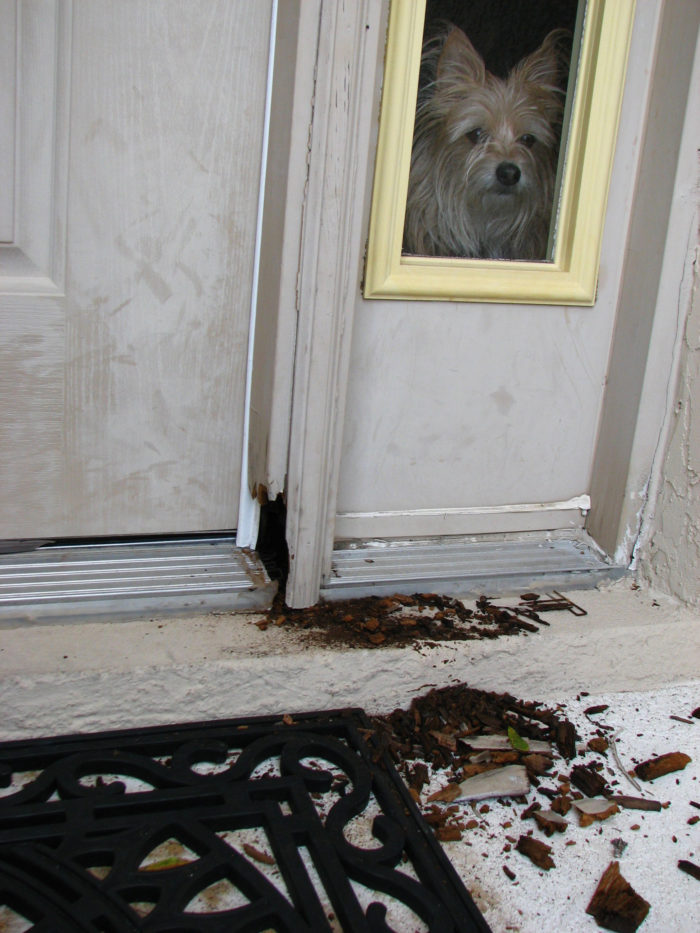
Regular painting of the jambs, casing and door panel helps doors and their frames last longer. Don't forget the end grain on the casing. That door in the photo looks like it has never been painted, which likely contributed to its early demise.
Patrick,
True. Wandering around recently built subdivisions here it's amazing how many exterior door-frames still just have the factory primer on them. Luckily the recent trend of ersatz craftsman-style houses means they often follow Martin's injunction to have deep sheltering front-porches, and are doing alright.
Malcolm,
The favorite color for doors in rural Vermont is "Therma-Tru gray." A timeless choice.
All the major door manufacturers offer composite or PVC jamb and trim options. These options do add quite a bit to the door price. Although very worth while for a long lasting and low maintenance door assembly. Also just to note, never apply sealant under sill if a pan is in place. Only seal back side water damn area.
I'm a bit confused by #6, where you write "you’ll probably need to lay the door down so you can install three parallel beads of caulk on the underside of the door sill."
That would probably clog up the sill pan with caulking and possibly prevent drainage. I had thought that was old advice that was thrown out when we started using sill pans and a drainage approach.
The door does need an air seal below the door, and that may be accomplished by a single bead of caulk at the backside of the sill or pan. If the sill needs more caulking to effectively help glue it in place, I think the caulk lines should be placed perpendicular to the direction of the sill so water has clear channels out.
I do agree there is a lack of discussion about the various door flashing scenarios. The door in the picture at the top of the article is a perfect example where a well intentioned builder may still do some head scratching about how a pan fits in with existing conditions.
Malcolm,
I understand your confusion. The debate about the use of caulk between sill pans and door sills (or between sill pans and window sills) is a long-standing one. Your approach -- using a single bead of caulk (for air sealing) toward the interior -- is entirely defensible.
The recommendation to include 3 parallel beads of caulk comes from the instructions provided by several door manufacturers -- manufacturers who no doubt have concluded that a redundant air seal is more important than drainage of liquid water.
In fact it is rare for enough liquid water to reach a sill pan that drainage becomes important. Most water reaching a sill pan arrives as a few drops at a time -- drops which usually find a way to evaporate before they cause any harm, as long as a sill pan has been installed. This is especially true of an exterior door protected by a roof.
I see. I hadn't considered that the amount of water may be small enough to evaporate before it becomes a problem. However, obviously not all doors are protected by roofs, even if that's a better design.
Protection against water intrusion takes clear priority over protection against air intrusion. Regardless, I think we can have both. I think the recommendation from manufacturers is dated, bad advice. Best practice is to allow for drainage, just like with windows or an assembly, and that's what we should be promoting I think.
Everything that Martin has described here is the bare minimum IRC code requirement and has been for several code cycles. What's amazing is how many installers don't even meet code minimum. Section 703.4 Flashing - has some performance and prescriptive measures. And it boils down to some basics: Exterior windows and doors - Flashed according to manufacturers' instructions. If there are not instructions then pan fllashing that is sloped or sealed to direct water to the exterior must be installed. Flashing or 'protection' at head and sides.
A system I like for sealing the sides of cased windows and doors rather than just relying on sealant is to reverse backflash the jamb and backside of the casing with self-adhering flashing tape and then face apply a second piece to bridge between the backflashed piece and the WRB with a face-applied self-adhering flashing. We used this method for years and then Dupont came out with StraightFlash VF - a flashing tape that has reverse-bonded strips so the tape can be installed in one step instead of the two step taping process we used to use.
Here is a link to a video that shows Mike's method of flashing pre-cased exterior doors:
That's scary. I forgot about that video
"Many builders fold the housewrap into the rough jambs, so that the housewrap is used as the rough jamb flashing. A better approach is to install real jamb flashing."
What's the reasoning for 'real jamb flashing' being superior? Does it boil down to the material itself?
As far as the arrangement of components, WRB turned into the rough jambs seems to make sense to me. If the WRB was a good quality one (such as Solitex or Siga) one would hope to utilize as much of it as possible (and save $ on tape).
edit: In researching, I've seen mention that adhered tape is less likely to allow water to migrate into the jambs behind the WRB... I guess this begs the question of how much we should really manage water behind WRB's. If this is a big concern, one idea is to tape the WRB to the rough jamb at the outside corner on the inside of the WRB using narrower tape (cheaper and on hand). This creates the adhered blockage where water would make its entrance. One would then proceed with folding the WRB to the inside. Too finicky for most maybe?
Tyler,
It does boil down to the material itself. House-wrap is not waterproof. It isn't designed to keep standing water from moving through it over time. Lumberyards here often differentiate between 30 or 60 minute building paper - which is how long it will resist direct wetting before letting moisture through. Both door and window sills need impermeable membranes or flashing.
Thanks Malcolm. That makes sense.
2 questions:
1) I would certainly never use just the WRB for the sill where there could undoubtedly be saturation. Do you feel the material concern is still relevant to the jambs, being vertical surfaces?
2) Would you feel more comfortable with the more expensive Euro WRB's and the like that claim near waterproofness (such as Solitex Mento which claims 33' water column resistance? Not sure of the time factor on that.)
Tyler,
The jambs are much like any other part of a wall. They should shed water, so although some builders like to line the whole rough opening with peel & stick membrane I don't think it's necessary. Whatever WRB you are using on the walls is fine continuing into the RO at the jambs.
More important than the WRB material is that the jambs be protected by flashing-tape on top of the window flange so that water doesn't get into the opening in the first place.
Log in or become a member to post a comment.
Sign up Log in