
In this video, Ben Bogie walks us through a high-performance job site that uses an atypical set of assemblies to achieve Passive House levels of performance with stringent airtightness goals. Many of these details may seem redundant or extreme, but they work together to meet the goals of creating a durable, energy-efficient house using materials that Ben and his team are comfortable working with.
Here we have a stick-frame 2×8 wall with sheathing on the inside, and then 2-3/8 in. of rigid wood-fiber insulation on the outside. Then we have a 16-in. TJI roof frame with sheathing on the inside, 2-3/8 in. wood fiber insulation on the outside, and a vented assembly above that. This set of assemblies should help us get there as well as give a highly insulated, highly efficient, very airtight, high-grade, thermally stellar–performing wall and roof assembly.
The details
What we have here are the first connections for our air barrier and our airtightness (air-control) layers. We have a bulb gasket that goes in between the top of our concrete stem wall and our green plate. This makes a seal between the concrete, which is effectively airtight, and the bottom of our green plate. We will then have a tape connection from our green plate onto our rim, and we’ll tape our corners or any splices in the middle of the run. Then we have a turn, so our tape goes from our rim joist up onto our subfloor, and that effectively turns a 90° angle and sends our air-control layer into the inside of the building. Later, we will sheath the inside of the wall and tape from the subfloor to the sheathing on the inside of the wall, which then makes the turn, directing us from the horizontal plane vertically up the wall with our air barrier.
Now we have a solid 2×8 16-on-center frame structure. This starts off the construction of our thermal control, the superinsulation of this home. This is above code to begin with, but next, we’ll use rigid wood-fiber insulation that goes right down to the bottom to meet the foundation. This completely insulates for no thermal bridging from the foundation all the way up the wall assembly.
Why do we have the sheathing to the inside?
- It puts the air barrier in a warm and protected location.
- CDX plywood on the inside is also functioning as our vapor barrier or vapor modulation for this wall assembly.
In a cold climate, that slows the loading of the vapor into the wall assembly. And as that vapor passes through, that moisture is never going to encounter anything that’s more vapor-closed than the plywood. It allows drying to happen rapidly to the outside here so that we never have any accumulation or buildup of moisture inside of the wall assembly. Also, we are now completely thermally broken, with 2-3/8 in. of insulation. We’re vapor open and all of our control layers are on the warm side and protected inside of the assembly.
Roof-frame construction
We have 16-in. TJIs with an applied 2x4s on top of them to give us a total of 17-1/2 in. of thickness here, which is what we need to hit our performance goals. These will be filled with dense-pack cellulose. Like the wall assembly, we’ll have plywood that travels up the wall, is taped and connected, and travels all the way across the bottom plane of the roof surface, forming our air barrier and our vapor control.
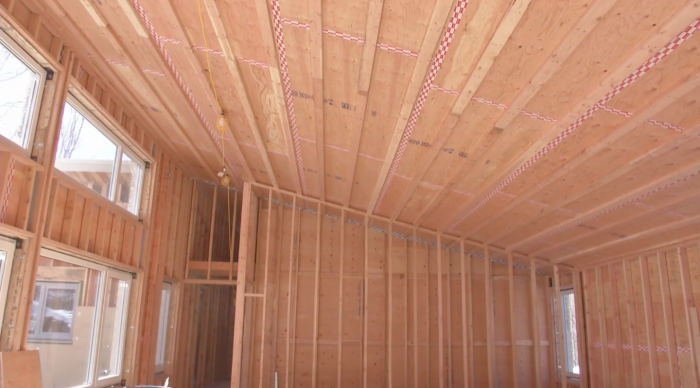
Another detail to note is that because we have a low head height, we need to get our headers into it. So we have flush-framed headers up above our wall opening that allow us to keep that slim sightline above the window. This roof plane will be covered with plywood. In order to maintain that as our air barrier with no penetrations, we add 2x4s on the flat and create an 1-1/2-in. service cavity that travels all the way across the roof. Additionally, on the walls we have a second wall frame to the interior of 2x4s. This will be insulated with mineral wool, which is inside of the air barrier. Any of our service penetrations inside of the house happen inside the air barrier. We’ll only have a limited number that actually penetrate through our air barrier to the outside, which makes it that much easier to control our airtightness.
________________________________________________________________________
Ben Bogie is a second-generation high-performance building obsessive working as a project manager for BPC Green Builders of Ridgefield, Conn.
Weekly Newsletter
Get building science and energy efficiency advice, plus special offers, in your inbox.


8 Comments
Ben - Very interesting video and a great system to build a super tight and efficient house, thanks for sharing. As a Designer of zero energy homes exclusively, I always look at cost as one of the primary reasons to choose a building method, whether be ICF, SIP, Rammed Earth, Adobe or Double-stud walls, and I usually come to the conclusion that costs render those systems as a boutique construction. I always say that if wasn’t for their higher cost it would be more common, if not the norm.
I would be interested to know if there are any comparative cost studies on what you showed us in the video and a “typical” 2x6 wall with the air and moisture barrier and insulation on the outside.
Seems to me that this structure is more expensive than the double stud wall home that we just built here in Lancaster Co, PA. We had two 2x4 walls with a 4.25 inch gap (allowing for the option of a 2x12 top plate). The Bogie wall is probably more expensive than double 2x4 walls as it has a 2x8 wall plus another 2x4 interior wall primarily for a service cavity (and more insulation). We sheathed our walls on the outside whereas I like how the Bogie wall puts the air/vapor barriers to the inside.
Just like Bogie, we also sheathed the interior of our ceiling with 1/2" CDX and taped joints, however we didn't add a service cavity because we had an attic above. We kept penetrations to a minimum, pretty much only light fixtures and the wires connecting them -- we did not use the attic as a free-for-all place to run stuff. For the ceiling electrical boxes I actually built small wooden enclosures which were easily sealed in their own joints and also easily sealed to the attic side of the CDX with only the electrical box sticking through. But if you don't have an attic, then the service cavity makes good sense (seems to me).
So my point is it seems that these walls would be more expensive because of 2x4 + 2x8 wall versus two 2x4 walls. As for the roof section, hard to compare since we had an attic with trusses versus our ceiling and roof attached to rafters.
Overall though this seems like another good wall design for superinsulation.
A rational (relatively easy to construct - put a lot of emphasis on RELATIVELY) wall for cold climate builds - keep up the good work! Would it be OK to call this the "BOGIE wall" in the future?
Does a 2X8 wall need 16" on center spacing? That's a lot of wood.
Thanks Ben for the video - I've got an upcoming passive house project that will be using an exact same wall assembly (using 2x10 studs instead) that'll be prefabricated in a factory here in BC. Good to see similar assemblies being used elsewhere for high performance homes.
So the 2x8 frame is dead air space?
It would be nigh impossible to have a "super-insulated" house unless the 2x8 space is filled with insulation. However the video and article are vague because it never clearly states what happens to this space. The paragraph starting with "Now we have a solid 2×8..." implies that there is insulation in the 2x8 space -- and there would be no point in having 2x8 over 2x4 unless the space was filled with insulation. Yet in the video only about 20 seconds in we see a couple guys applying the exterior insulation on the hollow wall, no insulation. So they must add insulation later, either before the wall is totally covered by the external insulation, or blowing in cellulose after the fact? Very unclear on this detail. At about 02:10 in the video the speaker alludes to the idea of insulation in the 2x8 space but still rather vague. But the only way this wall can reach super-insulation status is to have that 2x8 gap filled. And that was the only question I really had about this wall -- if insulation in the 2x8 gap is outside the sheathing then, unless you are drilling holes and blowing in cellulose, the insulation has to be installed before the wall exterior is enclosed and therefore is exposed to the weather. So indeed this detail is vague. My final guess, cover exterior wall with the rigid insulation and then blow in cellulose?
In the comments here https://www.greenbuildingadvisor.com/article/interior-sheathing-and-exterior-fiber-board-insulation Ben mentions that the cavities are insulated with dense-packed cellulose.
Log in or create an account to post a comment.
Sign up Log in