
Image Credit: Image #1: Walsh Construction Company
Image Credit: Image #1: Walsh Construction Company Architect’s wall section drawing indicating the air barrier system and the thermal barrier.
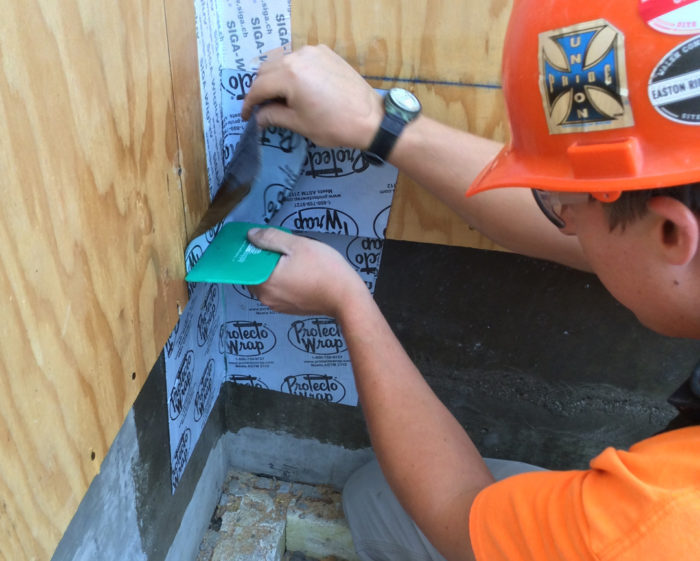
Image Credit: Image #2: Ankrom Moisan Architects We staggered the construction of the stairway/utility sections at each end of the building in a way that allowed us access to the walls so we could air seal the Passive House enclosure with Siga Wigluv tape on the plywood sheathing. We also needed to run the foundation insulation through the interface between the two zones. This atypical sequencing of the work was necessitated by certain aspects of the Passive House design.
Image Credit: Images #3 through #7: Walsh Construction Company An infrared scan of the south façade. We turned up the temporary heat inside the building to create a temperature differential to aid with the scanning process. The walls appear to be burning quite “hot” since no insulation has yet been installed in the framing cavities. The thermal quality of the triple-glazed windows can clearly be seen in the photo. Prior to the preliminary airtightness test, Marty and Dalan inspected the building for any significant air leaks. Here they are scanning the top of the elevator shaft with infrared cameras. One blower door, positioned in the main entry door, was all that Ryan and Sara needed to test our Passive House volume of 380,171 cubic feet. Our skilled crew made all the difference. They were trained for the tasks and diligently executed the design. Their hard work paid off in a highly airtight building. Here Phil applies a peel-and-stick membrane “dart” over the pinhole at an inside corner of the wall-to-roof interface. Attention to detail at this level can make a difference in achieving an airtightness goal.
More Guest Blogs


This is Part 5 of a blog series describing construction of the Orchards at Orenco project in Oregon. The first installment was titled The Largest Passivhaus Building in the U.S.
From a building science perspective, the level of airtightness needed to achieve efficiency and durability is debatable. However, at the Orchards at Orenco project (where we were pursuing Passive House certification through PHIUS) the requirement was clear and simple: less than or equal to 0.6 ach50. That’s a high bar.
Going into the project, we had distinct concerns about our ability to pull it off — concerns founded on blower-door test results from ten or so previous projects where we and the design teams had placed a lot of focus on airtight design and construction. So, while this was not really equal to taking a moon shot, a goal that significantly exceeds what has been accomplished before would be concerning to a rational group of people.
Good detail drawings helped
Needless to say, we placed a great deal of emphasis (as we forged ahead) on achieving the airtightness requirements. We worked closely with the design team to ensure both the continuity of the air barrier system and the constructability of the system and required details.
The architects — Michael Bonn and Amanda Lunger with Ankrom Moisan Architects — did a great job with design documentation, clearly indicating the location of the air barrier through all the section drawings (see Image #2, below). These drawings allowed us to understand the plane of airtightness at a conceptual level and helped us follow through at the detail level to ensure air barrier continuity.
Key details for airtightness included the wall-to-foundation connections, the wall-to-roof interfaces, and the window-to-wall interfaces.
We had several very tricky details where the Passive House enclosure extends through the building interior — at the elevator and fitness/laundry room stacks near the center of the building and at the exit stairways and trash room stacks at each end of the building (see Image #3, below).
Our proactive coordination efforts helped us to identify any conditions that weren’t addressed in the initial design drawings and work through those details with Michael and Amanda during construction.
A preliminary blower-door test
Near the midpoint of our construction schedule we planned a preliminary airtightness test. We were keen to understand where we would be at that point, since we’ve tested many buildings over the past 5 years but had never achieved a Passive House level of airtightness before.
The results from our previous whole-building airtightness tests have ranged from 0.17 cfm75 per square foot of envelope to 0.36 cfm75/sf. The Passive House requirement of 0.6 ach50 is premised on the building’s volume, not the surface area of the enclosure, so we had a difficult time comparing what would be needed for Orchards to what we have achieved on those other buildings. Our best estimate was that something approaching 0.11 cfm75/sf would be needed.
We included several days of downtime in the project schedule to conduct the preliminary test and to allow for any remedial air-sealing work at leaks identified during testing.
As soon as we topped off the building structure and installed the peel-and-stick air barrier/temporary roofing on the roof deck, we were ready for the test. All windows and balcony doors had been installed and sealed at their perimeters, all joints in the plywood wall sheathing had been taped, and the wall sheathing had been sealed to the foundation.
Every significant penetration of the Passive House enclosure was installed and complete at this time with the exception of 5 building entry doors, 13 interior Passive House doors, and one large dampered vent that would be located at the top of the elevator shaft. At these openings, we installed temporary closures with plywood and tape.
Prior to the actual test – conducted by Ryan Shanahan, PHIUS+ Rater with Earth Advantage (EA) – we ran an internal quality control check on the building. It was a nice cold Friday night in November, so were able to fit the building with our blower door and scan the building thoroughly with infrared cameras (see Image #4, below).
We cranked up the temporary heat in the building to create some temperature differential to assist with the scans. Of particular concern for quality control was the top of the elevator shaft where the plane of airtightness was quite convoluted (see Image #5, below). However we did not find any significant leakage paths in this area.
We did identify a few small leakage paths around the bottom of several patio doors at the first floor, but other than that we found the building to be buttoned up pretty nicely. We took a few test runs of the building ourselves and our “pre-prelim” numbers were pretty good, but we didn’t want to jinx the “official” prelim test. When Ryan ran his test the following Monday, the result was 0.075 ach50. The whole team was stoked at the results and we could all rest a little easier, knowing we were solidly where we needed to be to achieve the Passive House airtightness goals.
If the building is this tight, let’s save some money
The quality of tightness achieved at this point allowed the team to consider making several changes to the design. In the initial design, the elevator had been isolated from the Passive House enclosure due to concerns about the amount of air leakage that could occur at the required backdraft damper at the top of the shaft. This design move created considerable complexity and expense since the walls and top of the shaft – and the doors into the elevator lobby – had to be air-sealed and highly insulated.
Given the preliminary airtightness result, the owner’s representative, Craig Kelley with Housing Development Center, questioned whether it would be possible to reconfigure the Passive House to include the elevator shaft. This would allow the team to use standard hollow metal doors at the elevator lobby in lieu of the airtight, highly insulated, custom wood doors that had been specified.
Additionally Craig wondered if more standard storefront doors could be used at the building entries rather than the airtight, highly insulated doors that had been planned (to be sourced from Schuco, a German window and door manufacturer). The Schuco doors, while exhibiting excellent performance data, were a concern to the team since their standard sill/threshold did not appear to meet ADA accessibility requirements.
Using product air leakage data, and with input from Ryan as well as Dylan Lamar (Passive House consultant with Green Hammer), Craig estimated the net loss in airtightness from these changes would be around 0.055 ach50. Dylan then studied the impacts of these proposed changes in the PHPP, and found them both to be allowable within the energy limits of the standard. In the case of the Passive House enclosure reconfiguration at the elevator, we needed to install additional insulation at the foundation and exterior walls and do a bit of revised air barrier detailing; however, these were relatively easy upgrades to accommodate at this point during construction. These two design changes combined saved $26,000 and, by using storefront doors with standard saddle thresholds, we were able to avoid any issues with meeting accessibility requirements.
A tense wait to hear the final results
At the time of preliminary testing no interior drywall and very little water-resistive barrier had been installed. We knew that installation of these materials would increase tightness; however, we also knew that the storefront doors and elevator vent would counteract that increase. In May, as we approached project completion and turnover to REACH, it was time to conduct the final airtightness testing.
This process was relatively straightforward given the building’s design, with very few ventilation penetrations of the enclosure. We cleared out the building so there was no interior trade work on the test day. We filled all plumbing traps with water to ensure they were sealed, checked all windows and exterior doors to verify closure, propped open all the interior doors, and sealed off the ventilation intake and exhaust at each of the mechanical penthouses. We took a close look at the storefront doors and noticed we could see daylight through the butt joints in the door framing. Oh well. That’s storefront!
Ryan set up a single blower door in the main entry and the basic testing was completed in less than an hour (see Image #6, below). Results: 0.12 ach50 negative, 0.15 ach50 positive, 0.13 ach50 average. When figured in terms of the enclosure area, the airtightness is 0.011 cfm50/sf. These results are no doubt a testament to the level of collaboration and teamwork between all the individuals and firms working on the Orchards project.
Major credit also goes to the superb efforts of our field crew, for their nearly flawless execution of a very good air barrier design (see Image #7, below). Our friends at RDH Building Sciences maintain a database of North American building airtightness. They say that Orchards is the tightest multi-unit residential building in their database. We think that’s pretty cool!
In retrospect, we could have used less expensive doors
To add to our understanding of the role that various design measures play in the building’s airtightness, the team commissioned several additional test iterations by Earth Advantage. In one particularly interesting iteration, all 9 interior passive house doors were propped open for the “whole building” test. The trash chute was wide open and the louvers on the trash room doors were left open. The resulting leakage was measured at 2131 cfm at -50 Pascals. Given the additional building volume, this added about 0.3 ach50 to the overall building air leakage number.
The team found this to be informative and very surprising. To quote Dylan Lamar: “It suggests if we’d known how good a job we’d be doing on the enclosure that we could have afforded cheaper, leakier commercial doors and even some limited open louvers. On the other hand it shows that this limited number of components alone amounts to the same leakage as the entire building enclosure and all its high-quality windows and doors. A few bad apples don’t necessarily spoil the bunch, at least when the bunch is a seriously well-executed set of apples.”
A forthcoming blog will discuss the HVAC and other systems at the Orchards at Orenco project.
Mike Steffen is a builder, architect, and educator committed to making better buildings. He is vice president and general manager of Walsh Construction Company in Portland, Oregon.
Weekly Newsletter
Get building science and energy efficiency advice, plus special offers, in your inbox.


One Comment
That stings
2131 cfm50? Almost 60,000 square feet, but it leaks less than my 2,500 sqft house. Ouch. Pretty impressive, though!
Log in or create an account to post a comment.
Sign up Log in