

More Building Science


Back in October 2016, I started my Building Science Puzzles on GBA with this blog: Building Science Puzzles: The Jigsaw Approach. In that post I explained six steps for solving building science problems; steps borrowed from my wife’s approach to solving jigsaw puzzles. Those steps are:
- Assume nothing
- Establish boundaries
- Find patterns
- Zoom out
- Cheat
- Solve and savor
Four years and many investigations later, I now have another half-dozen steps to offer—they are not really sequential so “steps” may not be the best term, but I’m sticking to the original construct. So, starting now with step 7, let’s dive in.
Step 7: Photograph everything
I mostly hate my cell phone, but its camera is so bloody good these days and its right in my pocket all the time. I now photograph everything on every project because after the initial investigation, questions always come up when I’m back at my desk. And many times, either an image I took or one that the client can take and send has been key to working out the issue at hand. Also, in going back and reviewing images, things turn up. Take, for example, this image of a CMU basement corner, up at the sill plate.
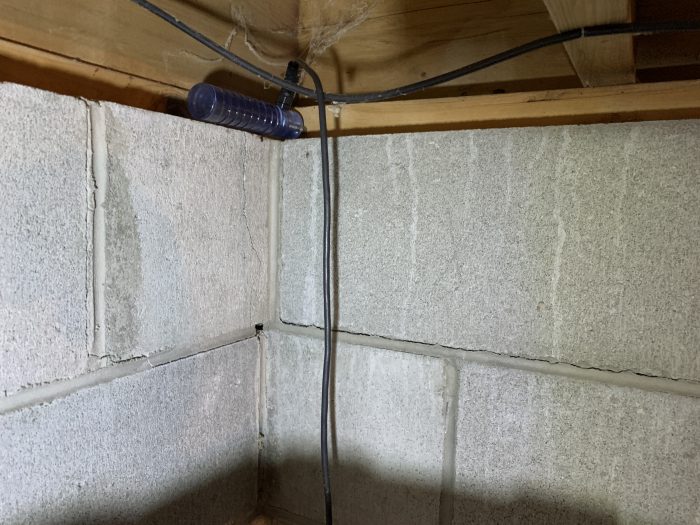
I took the image to show exactly where the framing had elevated moisture content but in reviewing the image, the stepped cracks jumped right out in a way they did not during the investigation. This project is a very recent one, and we are now gathering more information on just why this corner of the basement is the only one with these step cracks.
Step 8: Use FaceTime

Sometimes clients can’t afford to have me travel to their home for a full investigation, but they want my cut on their building science-related concerns anyway. More than once we have worked together to determine the culprit with three now common things: a really good internet connection, two iPhones, and FaceTime. With a little patience, it really can be the next best thing to being there.
On a project in Baltimore, for example, the client walked me around the outside of her home on FaceTime, and then took me thoroughly through the interior until we tracked down a classic thermal bypass: a vented attic space with a common sidewall to a vaulted ceiling interface. (Sorry, I just now learned that you can record FaceTime sessions. If I’d known sooner, I would have shared a video of one of these investigations in this post.)
Step 9: Return and/or monitor the home
In other cases, it’s expecting a lot for just one visit to a problem home to be enough to solve the puzzle. In these cases, the opposite is sometimes true—projects are close enough that a return trip is easy and worthwhile.
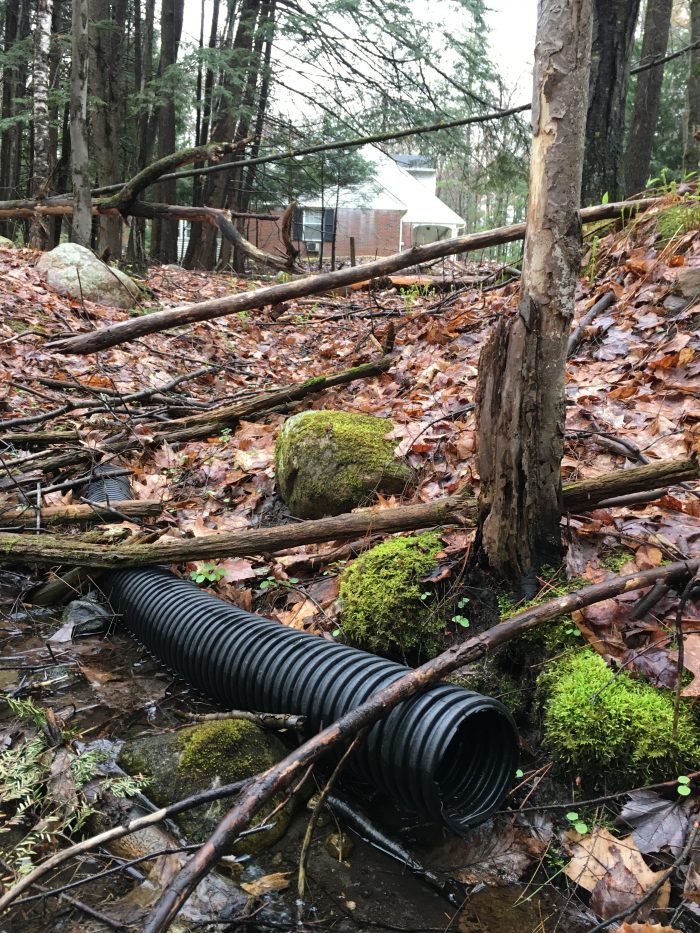
On one recent project, we were pretty sure that the full-basement foundation had a drain-to-daylight perimeter footing drain system. And we really wanted to know just how effective it was, so locating the drain outlet was key. It took me two additional trips, but I finally found it, which allowed us to monitor the outlet after several rain storms to get a sense of how the drainage system was performing.
Step 10: Encourage storytelling
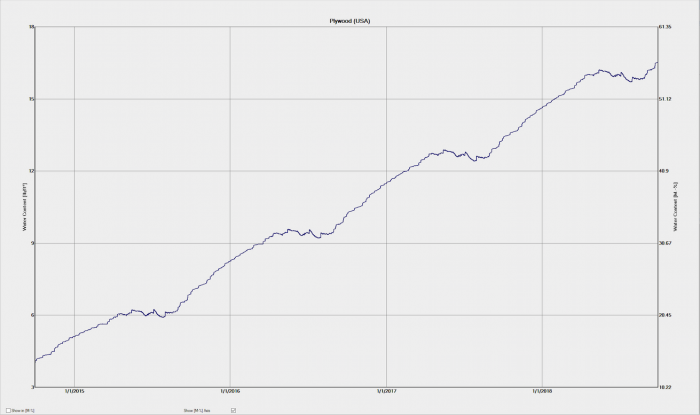
More than once it has been hidden knowledge that the occupants had that explained a building science puzzle. On one project in nearby western Massachusetts, we thought that the basement was a source of moisture and concern in this home, but we were having trouble reconciling the apparent moisture problem in the basement with a lack of moisture issues in the attic. The HOBO temperature/relative humidity data in the graph below was just completely perplexing to me, the remodeler who hired me for a moisture management consult, and the homeowners.
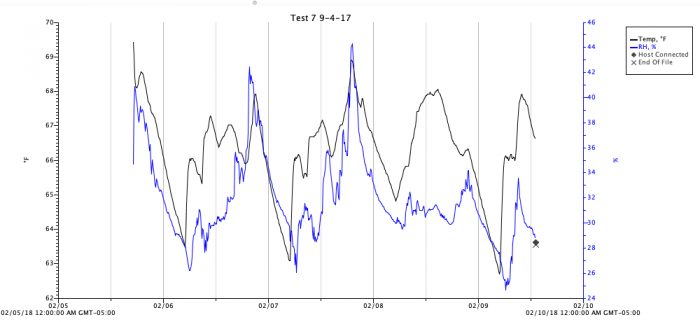
During the night (in early February) on the first floor, the air temperature drops but so does the RH; during the day, both the temperature and the RH go up—this is just the opposite of what we often get—as temperature drops, the RH goes up and when the temperature goes up the RH drops.
The remodeler took the data and explained the graph to the family, including elderly parents living on the first floor (the middle-age couple and owners live on the second floor). The elderly gentleman laughed and said, “would it matter that every winter night we open up our bedroom window ’cause we like that cold fresh air as we sleep?” (The middle-age couple did not find this so amusing, maybe because they pay the heating bill!)
Yep, that would do it and effectively decouple the basement from the rest of the house during the winter at night. Why do both the temperature and the RH go up during the day on the first floor? Because the older couple does a lot of baking and cooking, boiling water for tea and coffee, and with a gas cooktop and oven.
Step 11: Ask WUFI
I don’t often work in WUFI, a hygrothermal modeling program—see WUFI Is Driving Me Crazy—because frankly I don’t get paid very often for doing what is needed in WUFI, which is running at least a dozen simulations of any assembly and conducting sensitivity analysis with all the runs to make sure that the results actually make sense.
But I have been using WUFI to connect what I am seeing in the field during a building investigation with simulation results. It’s sort of field verification in reverse.
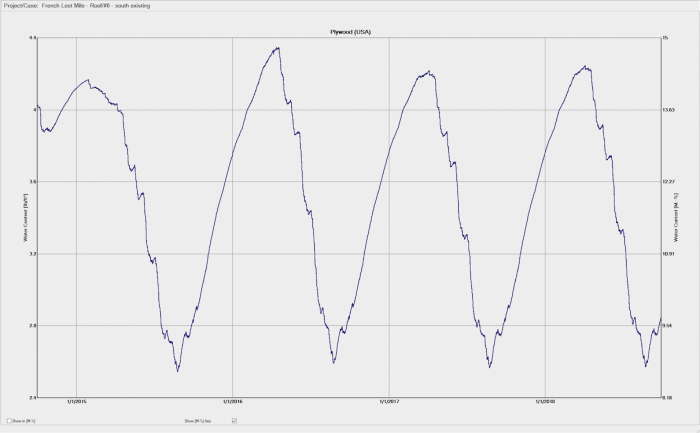
In the example below, I used WUFI to verify how different a moisture problem was being expressed in steep north- and south-facing roof assemblies on the same building.
Step 12: Let fog clear things up
I have only been doing fogging on building assessments and investigations for about two years or so. But I am finding fogging invaluable for three reasons:
- Air leakage is about a hole, another hole, and a driving force. If you can connect the interior hole (as evidenced by IR photo ghosting during blower door depressurization) with the exterior hole or outlet (as evidenced by escaping theatrical fog during a blower door pressurization), then you have confirmed the pathway.
- You can fog even when you don’t have the delta-T for IR camera work.
- I have had clients that just don’t seem to get air leakage and condensation when I show them IR image ghosting with blower door depressurization but when they see the theatrical fog pouring out of their house, there is a eureka moment (see the top photo).
That’s it—how I connect puzzle making with my building investigation work in now a dozen steps. I hope you find them useful and maybe will add some to the list!
-Peter Yost is GBA’s technical director. He is also the founder of a consulting company in Brattleboro, Vermont, called Building-Wright. He routinely consults on the design and construction of both new homes and retrofit projects. He has been building, researching, teaching, writing, and consulting on high-performance homes for more than twenty years, and he’s been recognized as NAHB Educator of the Year. Do you have a building science puzzle? Contact Pete here. Photos and illustration courtesy of the author.
Weekly Newsletter
Get building science and energy efficiency advice, plus special offers, in your inbox.


2 Comments
> when they see the theatrical fog pouring out of their house, there is a eureka moment
"gotta see it to believe it" :)
Thanks for sharing!
https://www.greenbuildingadvisor.com/article/petes-puzzle-the-jigsaw-approach-revisited
Log in or create an account to post a comment.
Sign up Log in