

More Guest Blogs


Editor’s note: This is one in a series of blogs detailing the construction of a net-zero energy house in Point Roberts, Washington, by an owner/builder with relatively little building experience. A list of Matt Bath’s GBA articles can be found at the bottom of this page. You’ll find Matt Bath’s full blog, Saving Sustainably, here. If you want to follow project costs, you can keep an eye on a budget worksheet here.
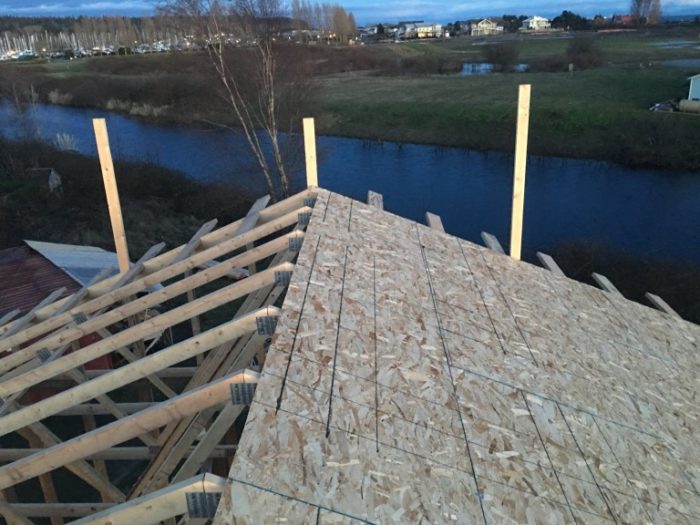
Although some old-fashioned builders prefer to frame their roofs one stick of lumber at a time, it can be dangerous to handle large pieces of dimensional lumber when you are two stories up in the air and working solo. Most modern builders order roof trusses and have them placed on their sides on top of the house with a crane. All you have to do is drag each truss to its proper location and roll it to a vertical position.
Before the trusses were delivered, I made sure to plumb and line the second-story walls. This was relatively easy because with the floor already installed, I knew the first story was locked in very tightly. This meant I could use it to brace the second floor, which I did with the plumb bob and 20-foot-long 2x4s just as I had done on the first floor.
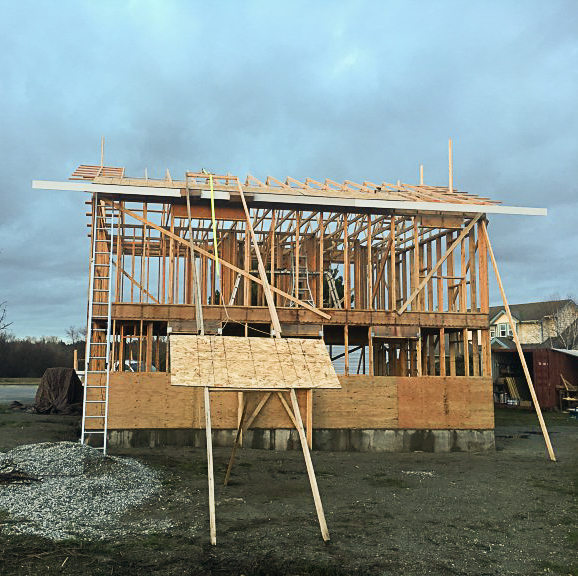
The trusses arrived on a long flatbed, and the driver used a crane to hoist them 20 feet up to the top of the second-story wall. They came in two stacks, so I had him place one in the middle of the house and the other standing up at the other end. I used some long 2x4s to support the vertical set so they wouldn’t fall over the side of the house (see the first photo in the gallery above). I was fortunate to have my friends Michael and PJ helping me, as the 24-foot-long, 5-foot-high trusses are pretty heavy for a one-man operation.
Raising the trusses
We started with the stack that was laying flat. We grabbed the gable end truss and slid it down to the other end of the house where we slowly and carefully stood it up against vertical 2x4s just like the ones at the other end of the house.
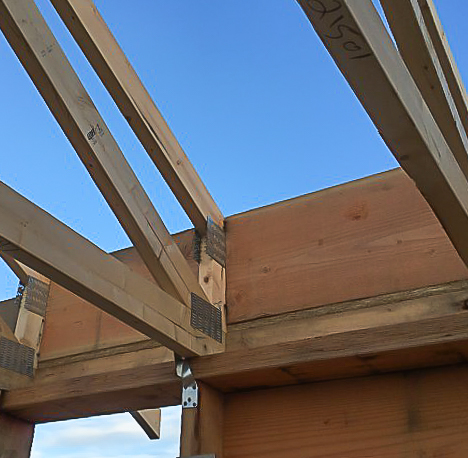
We nailed the truss to the top plate flush with the end, and then nailed in a small 2×4 block to prevent the truss from falling back down (see Photo #2 in the gallery). I had cut these pieces, which are called bird blocks, in advance to 22 7/16 inches so they would fit snugly in the spaces between the trusses.
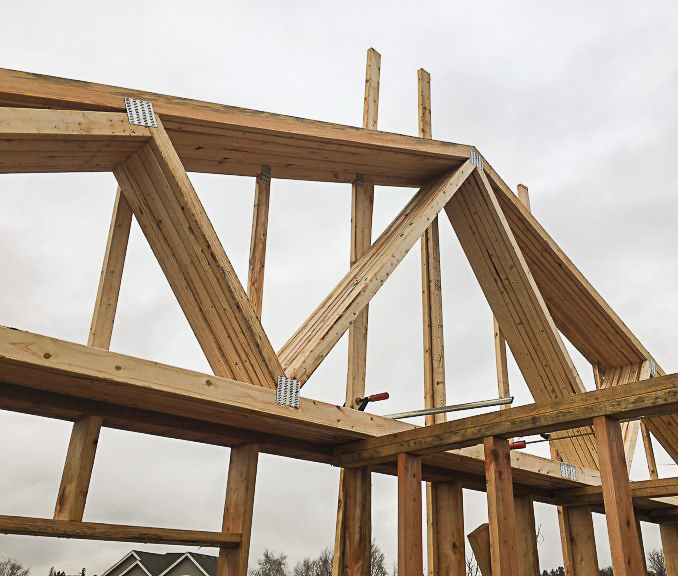
We slid the next truss down and lined it up against the bird blocks, then used a 2×4 as a pole to push the truss up into its vertical position. At that point we would nail the truss into the bird blocks, and toenail it into the top plate.
We repeated this process until we had rolled all the trusses in the first stack (see Photo #3 in the gallery). At that point, we ran a few 1×4 boards along the inside of the top chords to ensure that the trusses were spaced properly. The braces also added lateral strength and prevented the trusses from rolling back on their sides.
Positioning the rest of the trusses
The second stack of trusses was installed in much the same manner, but this was a good deal easier since the crane had already placed them standing up. I installed the 1x4s first, and then used them as rails on which to slide the trusses upright into position.
If I haven’t made it clear before, building a house can be quite a surreal experience. Here I am, standing on top of a second-story wall and marveling at what a phenomenal day it is while most of the rest of the world is hard at work, slaving away at jobs they don’t like to slowly chip away at 30-year mortgages. If they only knew they could build a beautiful net-zero home in such a serene suburb of a major city for less than $200,000. Oh, and not just any city but Vancouver, the only North American city to crack a European-dominated Top Ten quality-of-living ranking of global cities.
Frieze blocks and baffles
When I ordered the roof trusses, I specified a 15-inch energy heel. This feature ensures that the attic insulation will maintain its full depth all the way to the edge of the wall. I will be using blown-in cellulose insulation in the attic. To achieve my desired R-60 I will need about 16 1/2 inches of insulation.
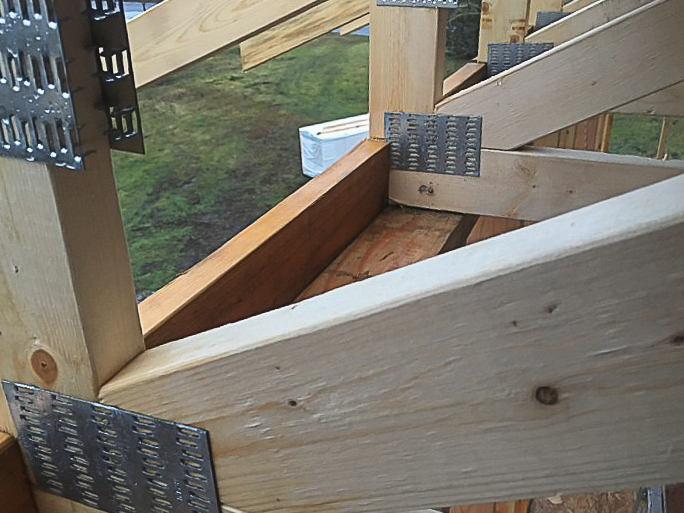
Before I can install the roof sheathing, the sides of the walls need to be built up to the same level as the roof, otherwise the cellulose would just fall out after we blew it in. The pieces used to build up the wall are called frieze blocks (see Photo #4 in gallery). I had to add a layer of plywood to ensure that the blocks were tall enough. I also beveled the top edge of each block so that it would match the slope of the trusses. The beveled edge will make it much easier to air seal the frieze block to the roof sheathing on top.
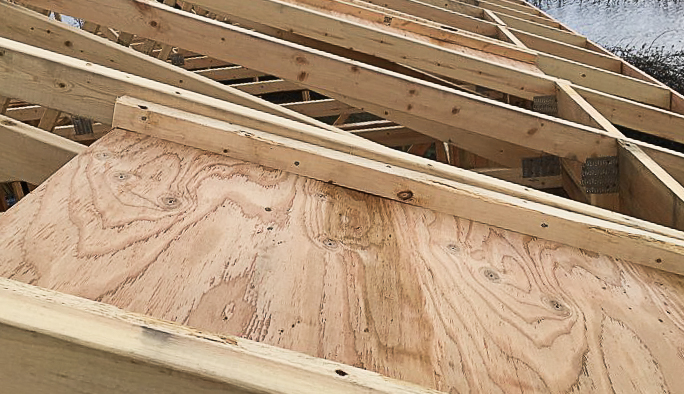
Even with a perfectly installed roof and airtight seals all around the insulation, moisture has a knack of finding its way into pretty much anyplace you don’t want it to be. The most effective way to remove this unwanted moisture that could potentially lead to rot and mold is to use moving air. The air will enter the attic through the baffles where it will warm slightly. That will cause it to rise and eventually exit through the ridge vent at the peak of the roof.
As the air completes this journey, it will pick up any moisture that exists in the attic. As you can see in Photo #5 in the gallery, the baffle is more than just an opening through the wall of frieze blocks. It is actually more like an air tunnel that runs over the top of the insulation. It is extremely important to ensure no moving air comes into contact with the insulation.
If you can imagine the roof sheathing going on over the top of this baffle, it will create a 2-inch-deep air tunnel through the attic between the two layers of wood. I installed baffles on every third truss and plan to install a full-length soffit vent.
Adding the lookouts and fascia
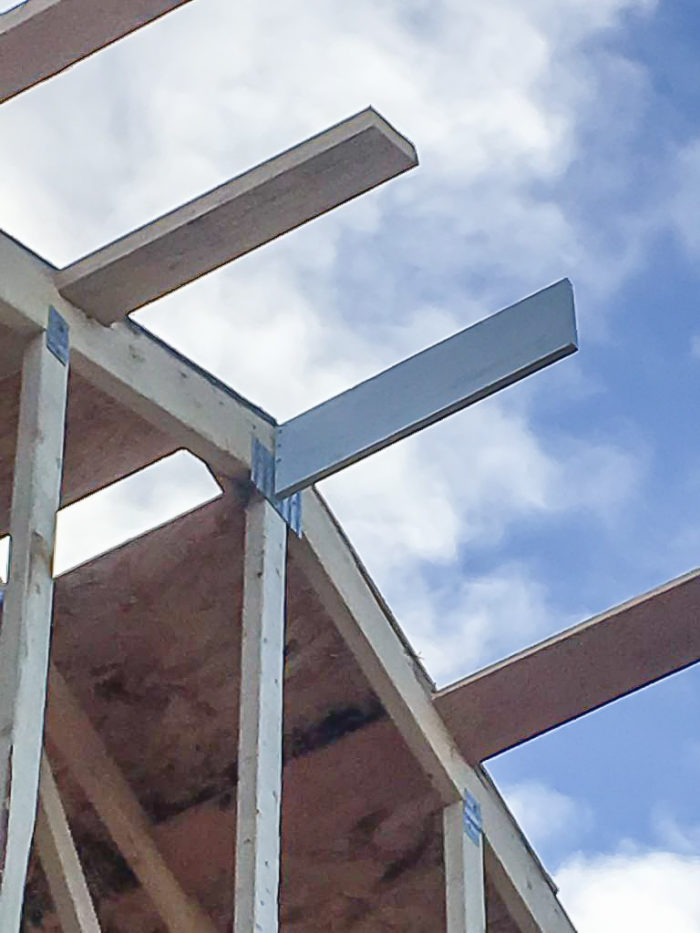
Other components I need to install before adding the sheathing are the lookouts, subfascia, and fascia. Lookouts run along the gable ends, and will not only give a nice look to the trim but also will support the outer edge of the roof. Overhangs help to keep rain away from the walls, and also provide some shade for the windows when the sun is high in the sky.
Lookouts consist of 2×6s cut to just under 4 feet and installed to cantilever beyond the edge of the roof (see Photo #6 in the gallery). The top chords of the these trusses are notched so the 2×6s sit flush with the top of the truss [Note: Always check with the manufacturer before modifying any truss in the field.] I’ll attach the bargeboards to to the ends of the lookouts after the roof sheathing has been installed.
The subfascia is attached to the truss tails. I used the subfascia to line up the ends of the trusses and ensure they are straight. The subfascia also supports the fascia and provides nailing for the soffit, which won’t be added for a few more months. Like the frieze blocks, the top of the subfascia is beveled to match the slope of the roof.
Clamps and brackets can provide a little help
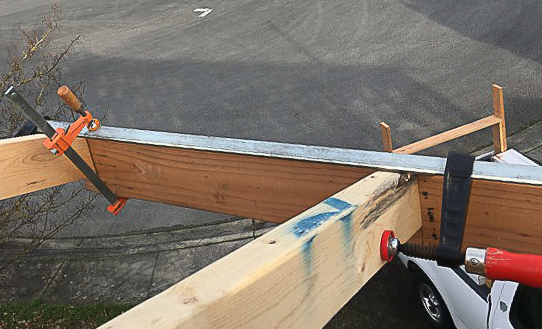
Straightening the trusses sometimes requires a significant amount of force. Imagine yourself 20 feet up in the air, leaning out over the edge of the wall, trying to hold an 8-pound nail gun with one hand and applying a ton of force with the other hand. Not a pretty thought, is it? Clamps give me an extra pair of hands so I don’t need to put myself in those kinds of positions (see Photo #7 in the gallery).
A couple of makeshift brackets supported the subfascia while I got it ready to nail on. The main section was a 20-foot-long 2×6, which weighs close to 50 lb. It isn’t something you really want to carry up a 20-foot ladder! I was able to pull the board up through the trusses and then ease it over the edge of the truss tails until it was lying on the brackets. Then I would climb up the ladder to nail it on.
The final step before attaching the sheathing is the fascia. The fascia is pre-primed and textured, since it is one of the first pieces we are adding to the house that will still be visible when construction is completed
Just like the previous parts I described, the top of the fascia is beveled to match the slope of the roof. The edge of the roof sheathing will sit on top of the fascia. When the gutters are added, they will run around the fascia and partially conceal it.
Sheathing the roof
I had been waiting for today for almost a month! It has been so frustrating to watch the OSB subfloor on the second floor get wet day after day, but today I took a big step towards getting a roof over it as I installed the first row of roof sheathing.
With all the inclement weather, I had spent plenty of time figuring out how to get the roof sheathing installed as safely and efficiently as possible. Carrying a 4×8 sheet of OSB is hard enough on the ground, so the thought of bringing it 20 feet up a ladder didn’t sit very well with me. My solution was to buy a cheap winch online and build some “rails” so I could simply stand on the trusses and crank up the OSB like I was reeling in a fish.
It worked like a charm! The webbing that came with the winch wasn’t long enough but I had some extra rope that worked just fine. Before I started reeling the sheathing up to the roof I used a chalk reel to snap a line 4 feet up from the fascia. The goal is to have the top edge of the OSB sheathing line up directly over the top of the fascia.
With that done I brought up the first panel and matched it up with my chalk line. Just like the subfloor, roof sheathing must be nailed to the trusses every 12 inches on the inside parts of the panel (the field) and every 6 inches on the edges. I made sure that each truss was on layout — 2 feet center to center — before nailing down the OSB. Once the sheathing is nailed down, the trusses aren’t going to go anywhere, so this was my last chance to make sure they were nice and straight.
Before installing the next row of panels, I installed an H-clip on the edge of each sheet of OSB, roughly halfway between each of the trusses. The clips will ensure that there is enough space between the panels to allow them to expand and contract while keeping them aligned.
Once the clips were installed, I repeated the steps on the next layer of sheathing. For the last course of sheathing, I left a 3-inch gap on each side of the ridge for the ridge vent (see Image #8 in gallery). The gap will be covered with a material that will allow air (and moisture), but not water, to go through it.
Installing the bargeboards and gable overhangs
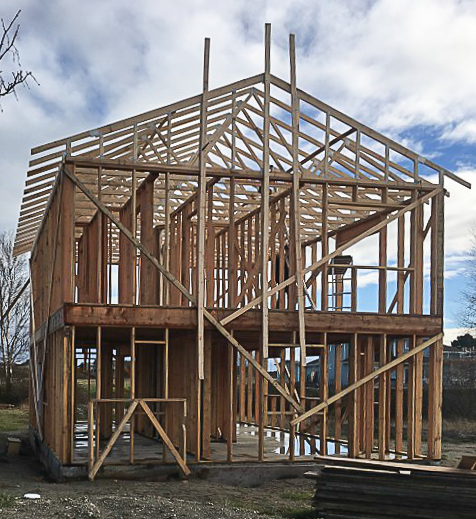
I’m tantalizingly close to reaching that glorious point where rain will no longer be able to fall through the roof, but a few key steps remain. Most important, there is currently no roof sheathing on the gable end overhangs. I installed the OSB sheathing only to the gable end trusses, not to the ends of the lookouts.
The reason is that the bottom face of the overhang will be visible from below, and the OSB sheathing has a very cheap look to it. Plywood looks 10 times better and will hold up much better to the elements, so it’s worth making the transition from the OSB to plywood just for those gable end overhangs.
The other item that needs to be installed before adding the roof underlayment are the bargeboards on the gable ends. They are made of the same primed, textured wood as the fascia.
At the peak, I used what was left of the primed, textured wood to make a vertical support extending from the outside face of the gable-end truss to a point that lined up with the lookouts. The mitered bargeboards will land on the end of this board (see Photo #9 in the gallery). These pieces are toenailed to the trusses at each end of the roof.
After evening up the lookouts with a circular saw, I mitered one end of a bargeboard and brought it up to the roof. I eased it over the edge and lined up the top side with the tops of the lookouts and clamped it in place. The bottom of the bargeboard was aligned with the fascia at the eave. Next, I marked the other end of the bargeboard where it crossed the center of the ridge piece and cut it along this line. Then I nailed it to the ends of the lookouts using galvanized nails (as these nails will be exposed to the elements).
With the bargeboards in place, I ripped a sheet of plywood in half lengthwise and used my winch to reel the two pieces up to the top of the roof. I lined one edge up so it was about 1/4 inch from the edge of the bargeboard and tacked it down to the lookouts. I then ran my circular saw along the opposite edge of the plywood just deep enough so it would cut through the plywood but not the OSB sheathing. This trimmed off about 3/4 inch of the OSB and exposed half the width of the gable end truss so I could nail down the plywood to the truss, the bargeboards and the lookouts.
Next up: Roofing underlayment and shingles.
Other posts by Matt Bath:
Designing and Installing a Septic System
Weekly Newsletter
Get building science and energy efficiency advice, plus special offers, in your inbox.


19 Comments
Matt,
The GBA community appreciates your enthusiasm and enterprise. That said, I think I need to warn GBA readers about two issues.
One issue is your decision to install ventilation baffles in every third rafter bay instead of every rafter bay. This approach doesn't follow conventional advice. Ideally, you want to vent every rafter bay, not every third rafter bay.
The other issue is the way you supported your rake overhangs (the roof overhangs on the gable end of your home). Although your text describes cantilevered 2x6s, the photos contradict your description. (See first attached image below.) Those 2x6s aren't cantilevered; they are short stubs extending from the last truss. [Later edit: I realize now that I was wrong. Those are pencil marks, not saw cuts.]
Ideally, you would have come up with an engineered solution (involving the truss manufacturer) before construction began. When I have installed "lookouts" (as you call them) -- sometimes called outriggers -- I have oriented them at 90 degrees to your approach, so that they provide some structure. (See second attached image below.)
When in doubt, talk to an engineer.
Martin,
Since this isn't a conditioned attic nor a cathedral ceiling (at least as far as I have interpreted so far - his insulation will be on the floor of the attic), does the baffling for every bay still matter?
It seems like Matt is trying to simply encourage a little precisely directed, accelerated airflow to help "vacuum" moist air out of the space. I can understand how it would still be a recommended detail to include in every bay, but it doesn't seem quite as critical as in other cases.
Mike
Image 4 of 9 which notes the frieze blocks also shows a hurricane tie down on the truss. Isn't it installed backward? How would you install drywall (especially air tight drywall) to the bottoms of the trusses with the one side projecting out into the interior of the building?
Yes, Jeremy, I did have to go back and fix those. Good eye!
“[Deleted]”
Well, if you are going to pile lets just go for it. The basis for his argument for using roof trusses was it was dangerous for a lone man to install a stick built roof and then he said he needed to have help to install the trusses........................ummmm HELLO...............
For some reason I don't see any images of the building's details in this article but I note in Jeremy's Sept 20th comment that he asks about the hurricane tie-downs being possibly installed incorrectly facing the inside (?) preventing drywall being installed properly.
I read this interesting article from Fine Homebuilding Magazine about which buildings survive hurricanes and one section mentioned how to install hurricane tie down straps properly.
https://www.finehomebuilding.com/membership/pdf/8612/021237064.pdf
Matt's "Lookouts"
I think the lookouts are continuous. The confusion comes from him having let them in to the gable truss, rather than ordering the gable truss 1 1/2" or 3 1/2" shorter than the rest of the trusses as is commonly done. More worrying for me is that the plywood sheathing at the overhangs doesn't span two truss spaces. That means it doesn't contribute the structural integrity of the roof, and would be a code violation up here.
I know it all turned out fine, but boy I'd be nervous standing and sheathing a roof without the wall sheathing being completed.
Malcolm,
You're right. I realize now that those are pencil marks, not cuts, on the lookouts.
I agree about the sheathing transition on the rake overhangs -- I cringed when I read that, and meant to mention it in my comment, but got distracted by the other issues. Thanks for your comments on these two issues.
Malcolm, I believe you are in the Victoria, BC area, correct? From the article, it seems as though this house is built in the Vancouver, BC area. I may be mistaken on both those counts. However, if I'm not, "up here" is........well, "up here." I'm not sure of the code differences between the island and the lower Delta, but things are usually pretty uniform here (ie. OBC governs pretty much everything).
Jaccen,
I'm about an hour up the west coast of the Island from Victoria, near French Beach. I probably shouldn't be as cavalier when I use "up here" as though everyone knows I means Canada, or more specifically BC.
Matt is building in Point Roberts, presumably under Washington State codes. I'm not clear as to how their framing requirements differ from ours, but from a comm0n-sense perspective, the absence of dedicated shear-walls and hardware forming a continuous connection from foundation to roof, when building in high seismic-zone is something that worries me.
In this blog, he appears to indicate he is building in Vancouver. I know there's a Vancouver in Washington, but I'm pretty sure that's not the one on the list of top ten quality of living cities in the world.
He's close by but:
"A quick half hour drive from downtown Vancouver, BC and just a few hundred feet from its million dollar, overpriced southern suburbs is a small peninsula that crosses south below the 49th parallel that marks the border between Washington state and British Columbia. Home prices below this invisible line are a fraction of the cost of similarly sized homes on the Canadian side"
Notching the top chord of a truss with let-ins for the rake overhangs reduces it's compressive strength while adding even more load. Short of paying an engineer to run the numbers, at the very least sistering-on another board to those top chords seems in order. With rake overhangs the end trusses are carrying more load than any of the trusses in the middle even without the let-ins, and have now been made weaker than the rest.
The rake overhangs all seem to be directly over a 2x4 post in the truss. The compressive strength is likely fine with a continuous path to bearing like that. And since he notes "Always check with the manufacturer before modifying any truss in the field" the truss engineer likely approved the let-ins. I definitely would've put a full sheet of roof sheathing to connect the overhang to the trusses though. And there are better ways to construct an overhang for sure.
That's a good point. The supporting 2x4s are a detail that escaped me in the first quick pass through the gallery pics.
What amuses me is his derision of "most of the rest of the world" who are "hard at work, slaving away at jobs they don’t like to slowly chip away at 30-year mortgages" while those very professionals who apparently don't like their jobs (nobody told me) have provided him with the resources to enable him to complete this project. His other articles have derided contractors in a similar fashion and yet he builds based off many, many years of contractors and other slavers contributing to society. In fact, his "surreal experience" is one that many people call their day job. I applaud his efforts (which are impressive no doubt) but the self importance wears the reader thin quickly.
Yupster,
I guess it's how people interrupt what he wrote but I did NOT get that vibe from him. He is a proud homeowner/builder who is proud of himself and his accomplishments. I don't think he meant to insult people. I don't think he would spend the time to write a blog on a building forum just to disparage contractors and non-home builders.
I built my own home also. It was difficult and hard work. Now looking back, I'm still shocked that I pulled it off. I saved myself about $60,000+ by doing it myself. I might try it one more time before I become worm food and now I am more knowledgeable and things I would do differently.
Just for a factoid. 70-85% of people hate their job per the latest stats. So what he said is a fact. Ease off the guy.
The dilemma I face with these blogs is that while they are usually fascinating chronicles of the construction process, they also effectively become how-to manuals for others contemplating builds of their own. So when they contain reasoning that is flawed, or techniques that are more difficult - or yield poor results - if these things aren't highlighted people may just accept them.
In the Wolfe island Blog the decision to uses CLT and exterior insulation, rather than the double-stud alternative, was made because the owner's neighbour said it was impossible to effectively dense-pack thick walls. This is demonstrably false.
Similarly, on Matt's house: There are a number of ways to finish overhangs. If you don't want to install soffits, the alternative isn't usually to leave the roof sheathing and all the fasteners that hold the roofing exposed, or to use framing lumber for the lookouts.
Pointing out these types of things can make for uncomfortable reading, and might appear as personal criticism of the blog's authors. They have just built something they are justifiably proud of. Unfortunately I don't any alternative if we are going to have an honest discussion around how we should be building.
Log in or create an account to post a comment.
Sign up Log in