

More Guest Blogs


Editor’s note: This is one in a series of blogs detailing the construction of a net-zero energy house in Point Roberts, Washington, by an owner/builder with relatively little building experience. A list of Matt Bath’s GBA articles can be found at the bottom of this page. You’ll find Matt Bath’s full blog, Saving Sustainably, here. If you want to follow project costs, you can keep an eye on a budget worksheet here.
Flooring is pretty basic. If you’ve ever noticed how a deck is built, you have the gist of it. Long planks called joists are laid out so they are parallel with each other, and then capped with 4×8 sheets of plywood or OSB to create a flat, sturdy surface.
In the house I’m building, the second-floor joists are supported by some of the first floor walls. As I mentioned in an earlier post, one of my interior walls is a load-bearing wall, so it will be used to transfer half the weight of the second floor to the ground.
Since the floor joists run from the exterior walls to the interior bearing wall, they will need to handle a significant amount of weight. The joists will then transfer that load to the exterior walls and the interior load-bearing wall.
Proper joist sizes can easily be figured out from the IRC (International Residential Code) using a table. For me, that meant looking at the part of the table that dealt with 24-inch on-center joist spacing, since that is what I’m using. Then, figure out the greatest distance the joists will span, which for me is just slightly over 14 feet. Last, select a lumber option that supports a minimum span greater than this distance. I decided to go with No. 2 2×12 Douglas fir, which supports a span of up to 16 feet 6 inches. I hope that will give me a less bouncy, less squeaky floor.
Framing solo means some heavy lifting
Lifting 2x12s 10 feet up in the air solo is a great workout. After cutting each joist to length, I lifted one end and rested it on the top of an exterior wall. Next, I moved a ladder near the interior bearing wall and lifted the other end of the joist up so I could rest it on the top of the ladder. After climbing up a few rungs on the ladder, I had enough height to lift the joist from the top of the ladder to the interior wall. I made sure the crown of each joist was up.
I installed the rim joists first. These run on the top of the exterior walls perpendicular to the rest of the joists. The rim joists are toe-nailed to the top plate. Once the rim joists are up, the other joists are placed perpendicularly between them and nailed to the rim joists, as well as toe-nailed to the exterior walls.
The opening for the stairway required a little bit of detail. Code requires joists around the opening to be doubled. In addition, when you are unable to rest a joist on a bearing wall, you must use steel joist hangers to carry the weight. The manufacturer of the hangers (in this case Simpson Strong-Tie) tells you what kind of nails you must use and the weight the hanger is capable of carrying.
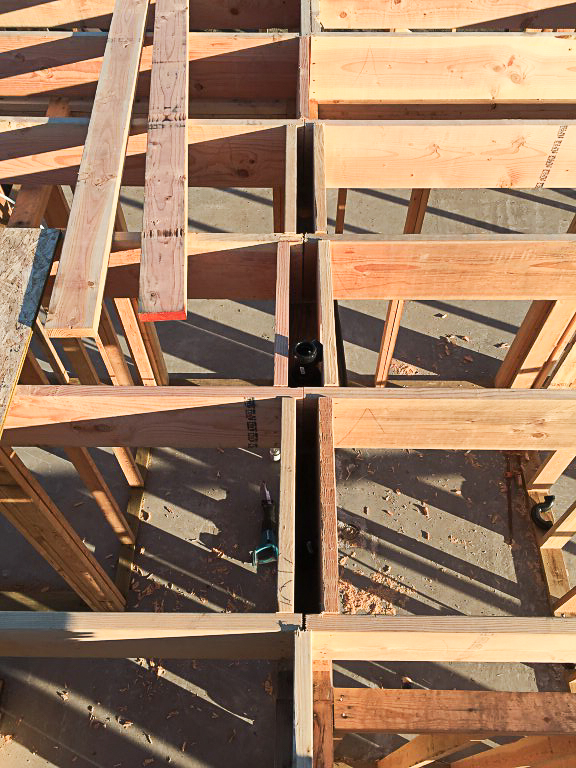
Before the subfloor can be nailed onto the joists, small lengths of 2×12 called “blocking” must be installed. Together with the rim joists they ensure that the floor joists won’t roll onto their flat sides. The blocking is placed along the top of the interior bearing wall at the exact place where the two floor joist spans meet (see the first image in the image gallery).
Plumbing runs in the interior walls
I kept all the plumbing of the house on interior walls so I wouldn’t take any precious space away from insulation in the exterior walls. As a result, the interior bearing wall has a significant amount of plumbing running through it. The plumbing runs through the middle of the wall. All of the DWV pipes must be vented vertically through the roof. These pipes want to go through the middle of the interior bearing wall and exit right into the middle of my blocking. As the photo shows, my solution was to install a double set of blocking with a space for the pipes between them.
In addition, I had planned for some of these pipes to run horizontally in the space between the floor joists. For example, the washing machine will be on the second floor, but the space I want to put it in doesn’t have a wall below it on the first floor. So this horizontal run would need to make a turn through the blocking so it can run between the floor joists.
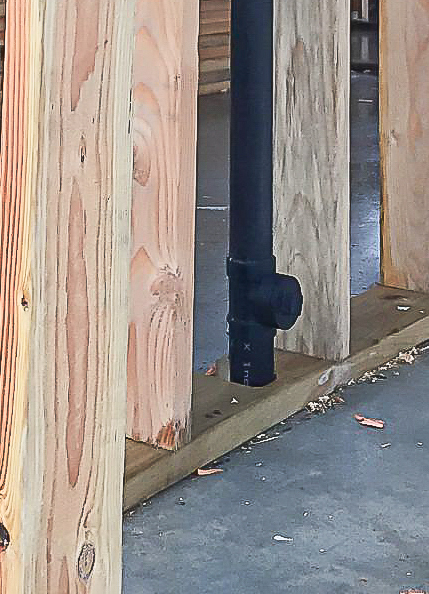
All of my planning really paid off because some of the runs of ABS pipe were required to have cleanouts. If I hadn’t installed the cleanouts before running the vertical pipe up through the blocking it would have been a pain to do later. The cleanout you see in Image #2 in the gallery will be covered with a bench seat at the dining room table. In case of a plumbing emergency, the cushion can be taken off the seat and a hinged panel will provide access to the cleanout.
For a contractor, calling the plumber out before the entire house is framed is unusual. I’m sure they would have been able to come up with a solution without breaking their routine, but I’m also pretty sure it wouldn’t have been as neat and efficient as my solution. For me, it was very easy to stop framing for half the day and work on some plumbing so that I could finish with the blocking. Yet another great example of the flaws in building a house with contractors.
Getting sheet goods to the second floor
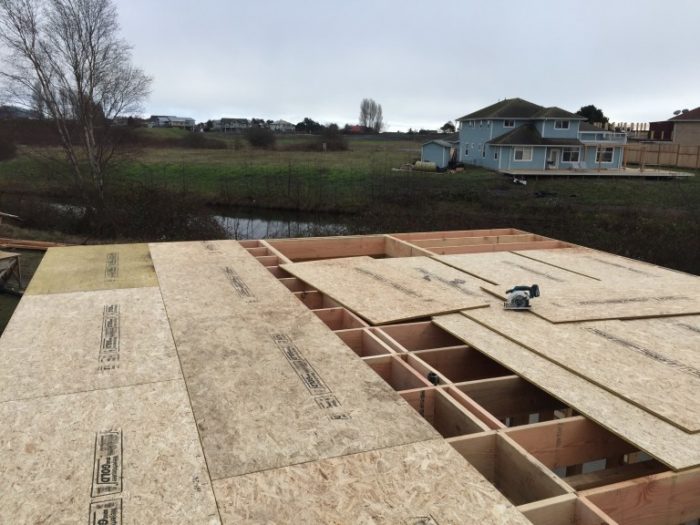
Solving small problems is a huge part of building. I’ve always enjoyed crossword puzzles and the like, so I shouldn’t be at all surprised that I am enjoying building the house so much. Today’s problem was how to get 24 sheets of OSB — each weighing 59 pounds — 11 feet up in the air to the second floor.
My solution was to build a small section of scaffolding about 6 feet long and 5 feet high. I would carry a sheet over, turn it so its short side was down and lift it up on the scaffolding (see Image #3).
Then I would climb up to the top, grab the end of it and pull it the rest of the way up. This was easy once I had a couple of them already up there to stand on, but for the first ones I had to stand on a couple of 2×6s that I had laid out across the joists. Have I mentioned that building a house is a great way to face your fear of heights?
It’s important to get the first row of subflooring on straight because all the other rows will interlock with it. I used my chalk reel to snap a line 4 feet in from the edge to ensure that I got it just right. I applied a liberal bead of PL 400 construction adhesive to the top of the joists.
Code calls for panels to be nailed with 8d common nails every 6 inches on the edges and every 12 inches in the field. The boards are marked out so you can easily find the spots where these nails should go (assuming the joists are lined up correctly).
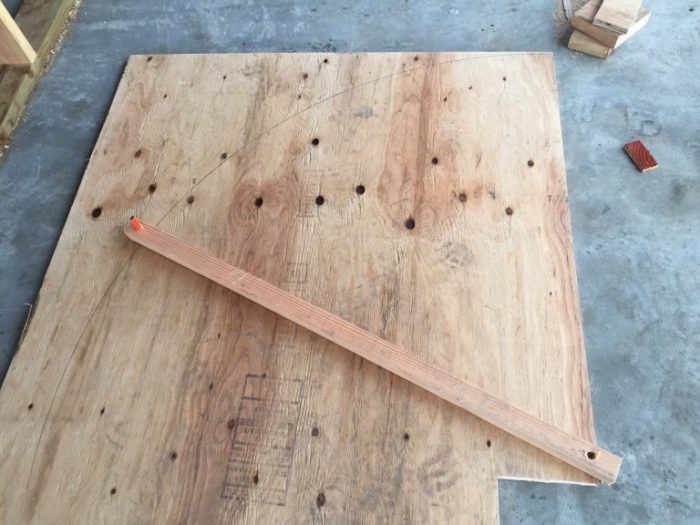
You can also see how I left a small gap in between each board to allow for expansion due moisture (see Image #4).
When I got to the row above the blocking I used a sander to make sure that none of the blocks stuck up above the joists.
Luckily, I thought ahead a little bit, and before I got to the last panel I cut out a hole for the stairway opening. Otherwise I wouldn’t have been able to get back down! The opening will eventually be much larger, but for safety reasons I left it just big enough to allow for comfortable access. I marked a warning on the areas that will eventually be cut out because there aren’t any joists underneath. The OSB subflooring is strong, but without a joist underneath a panel could easily break.
The last step was to run a circular saw all the way around the perimeter to remove any protruding edges of OSB. Because of the small gap between each sheet there was about a 1/4-inch lip around the outside edge of the building.
That, and the offcuts from the stairway opening, was the only waste I had. This is very rare in today’s average construction job as the house plans usually call for a bunch of details and angles in the floor. Contractors cut panels in all sorts of ways as needed and then discard what they don’t use, which can be a substantial amount. This is one of the benefits of designing a house yourself. I specifically designed the house with dimensions divisible by 4 feet for this very reason.
I’ve been trying to keep the OSB flooring dry with a tarp, but with the walls going up it is difficult. I spent some extra money on Weyerhauser EdgeGold OSB subflooring. According to company reps, it’s no problem if the sheets get wet for a few weeks as long as they are given time to dry out.
Framing the second floor
Framing the second floor is not a whole lot different than framing the first. Whereas on the first floor, the sill plate was pressure-treated lumber, this isn’t necessary on the second. Also, the bottom plate was bolted to the concrete foundation on the first floor, but on the second the plate is simply nailed to the rim joists.
Before raising the exterior walls with help from some friends, I toe-nailed the inside edge of the bottom plate to the subfloor. These nails act like a hinge when the wall is raised, ensuring that it stays in position and doesn’t fall off the house before it gets nailed into place.
The first floor walls were pretty simple, but things got slightly more complicated on the second floor with the master bathroom: It has walled-off areas for the shower, toilet, and two walk-in closets. Several of these walls are angled, and one of the master bedroom walls is actually curved!
Creating an angled wall is pretty simple. When two walls meet at a 45- degree angle all you do is miter both top plates and bottom plates at 22.5 degrees so that when they fit together they create a 45-degree angle.
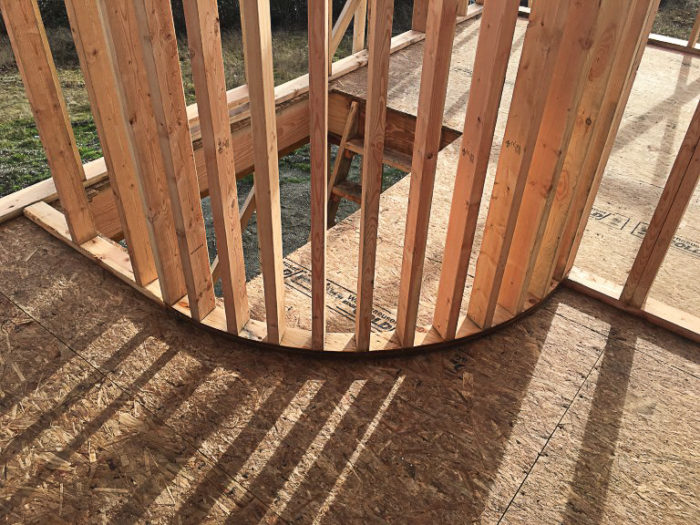
To build the circular wall, I had some 3/4-inch plywood ready. I created a makeshift compass to get the right radius for the wall and transfer it to the plywood. Then I drew out a second radius exactly 3 1/2 inches smaller than the first for the inside of the wall plate (see Image #5). Sandwiching two of these pieces together, I ended up with an equivalent to a curved 2×4.
The one thing about a curved wall is that it uses a lot of studs (see Image #6). The far side of the wall will curve right around the spiral staircase when it is installed.
Next up: The roof.
Other blogs by Matt Bath:
- Saving Sustainably: An Introduction
- Designing and Installing a Septic System
- Foundation Formwork
- Pouring the Slab
- Framing the First Floor
Weekly Newsletter
Get building science and energy efficiency advice, plus special offers, in your inbox.


One Comment
Re: Image 3 - Two other ways to get 4x8 sheathing up the second floor:
1. I nailed two long 2x4's at about a steep 60 degree angle from the ground to the top of a band joist, about 3' apart. Then I leaned a sheet of sheathing on the parallel 2x4's, and shoved it up quickly to fly up past the 2x4's onto the floor joists. Later did the same thing for getting lighter roof sheathing up to the low end of the roof joists (~9' off the ground), although on this windy day, the wind blew the sheathing back off the building about a half dozen times before I could quickly climb up there to get on top of a sheet and nail it off. After the first sheet, other sheets would rest on top of the first one and were protected from the wind. Can work solo but obviously a second person would make this task easier.
2. NOT RECOMMENDED! My girlfriend's brother sat at the edge of the framed floor while his buddy lifted sheathing up to him from the ground. He grabbed the sheathing and rotated his shoulders and back to place the sheathing beside him. He injured his back pretty badly and had back trouble ever since.
Log in or create an account to post a comment.
Sign up Log in