

More Guest Blogs


Editor’s note: This is one in a series of blogs detailing the construction of a net-zero energy house in Point Roberts, Washington, by an owner-builder with relatively little building experience. A list of Matt Bath’s GBA articles can be found at the bottom of this page. You’ll find Matt Bath’s full blog, Saving Sustainably, here. If you want to follow project costs, you can keep an eye on a budget worksheet here.
The plywood sheathing has been doing an adequate job of stopping the rain from getting inside the house, but with enough time, rain and wind will damage the plywood as well. Only the application of a water-resistive barrier (WRB) can truly protect the house from the elements.
I had held off on this step because I needed a solid two or three weeks of good weather. It isn’t as easy as wrapping the WRB around the house, cutting out holes in the plywood sheathing, and sticking in the windows. At the majority of new construction job sites, that is the procedure. But for my net-zero home there were several additional steps that are incredibly important.
I started by cutting out the window openings in the plywood sheathing. From the inside, I used the framing as a guide and drilled a hole in each of the four corners of every window opening. I moved outside, connected the outer edges of the holes with a straightedge and a pencil, and then cut the sheathing along the lines with a saw.
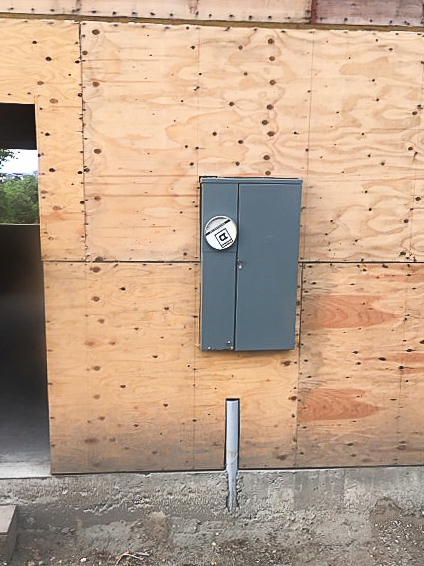
I also cut out an opening for the main electrical panel, which will be partially inside the wall (see the photo below). Just enough of it will be sticking out to ensure that it can be opened from the exterior of the house. I had planned the location of the panel prior to pouring the foundation. The underground service entrance conduit had to be in just the right spot. Some houses have overhead service cables, but in my neighborhood the electricity comes from conduit running underground.
Next, I taped all the seams in the plywood with all-weather flashing tape. This important step will reduce air infiltration.
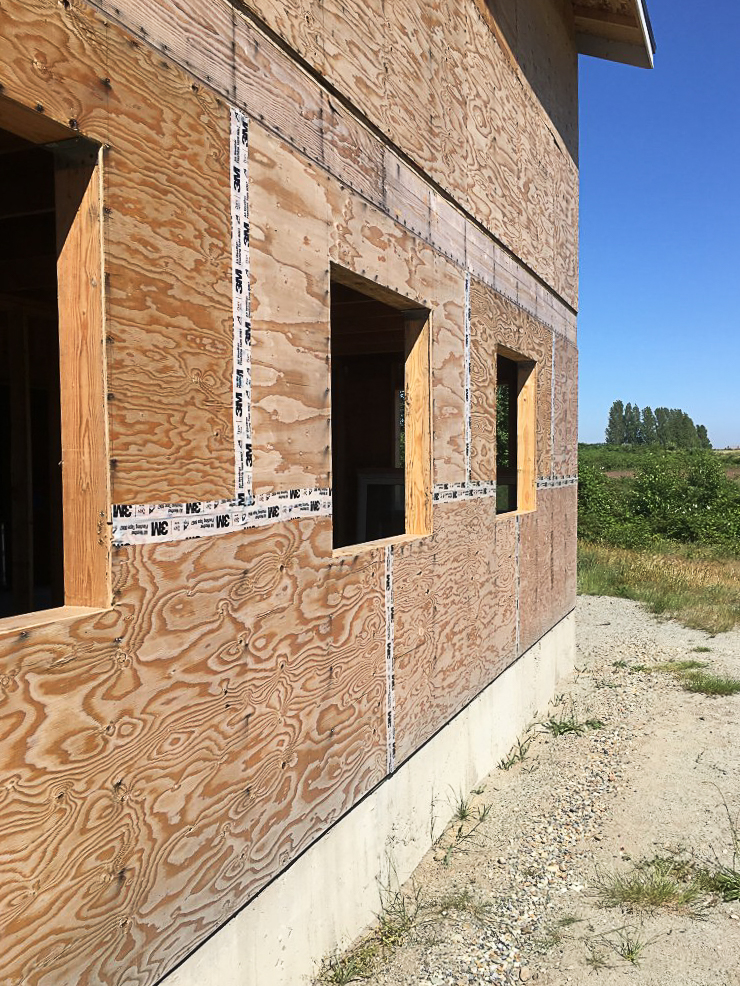
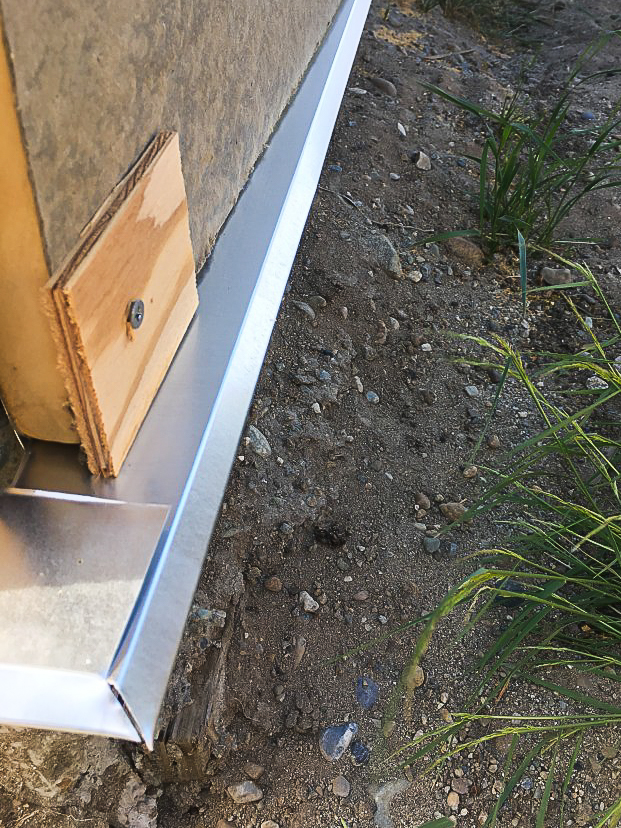
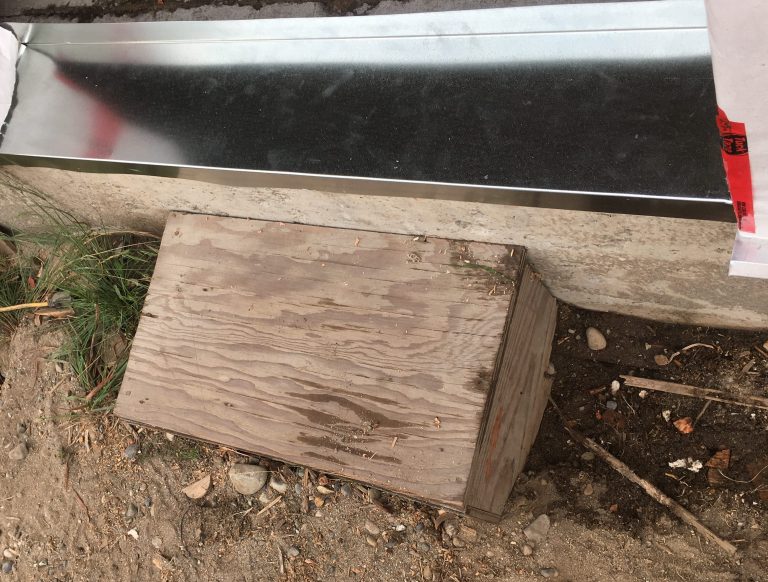
I had sheathed both the second floor and first floor exterior walls with plywood, but there was still a gap in the middle. I used plywood from the window cutouts to fill this void. I also nailed galvanized metal Z-flashing at the very bottom of the plywood sheathing. This will keep water out of the bottom of the assembly.
With the flashing attached, I installed sheets of polyisocyanurate foam insulation on the outside of the sheathing. Polyiso has an R-value of 5.7 per inch. The continuous layer of insulation is a vital step in building a net-zero home. The vast majority of houses only have insulation installed between the studs in exterior walls. This allows up to 30% of the heat in the home to be lost through the studs because wood has an R-value of only 1 per inch. In a wall built with 2×6 studs like mine, that’s an R-value of R-6 for the studs and R-25 for the insulation.
If you look at the framing of an average house, you see that a ton of extra wood is often added for no reason, which increases the ratio of R-6 wall areas to the R-25 wall areas. More R-6 areas compared to R-25 areas mean more heat will be lost through the wall resulting in higher utility bills. This is why I used advanced framing to build my net-zero home, and it is also why I am encasing the exterior walls with a layer of foam, in essence turning it into a giant foam cooler. I planned the locations of the sheets so that there weren’t any seams above or below window openings. This will improve the strength of the foam in these areas.

The foam will eventually be held in place by vertical 1×4 furring strips. I couldn’t attach them yet because the strips also will be holding the WRB in place. This barrier is sometimes called by a trade name, Tyvek, much like people who refer to tissues as Kleenex. Tyvek allows water vapor to pass through, but sheds liquid water. That’s important, because the last thing you want is to trap water vapor inside the wall.
I used pieces of scrap wood to hold the foam in place until I could install the Tyvek. I marked out specific locations to attach these scraps so they would be screwed down in the exact locations where the furring strips will eventually be attached. This reduced the amount of damage to the foam insulation. I used the same all-weather flashing tape to seal the seams between sheets of foam against air infiltration.
Choosing the right windows
Windows allow heat to enter the home via radiation from the sun, and allow heat to both enter and exit the home via conduction (windows are much better conductors of heat than insulated walls). To mitigate this issue, I paid top dollar for triple-pane, highly efficient windows.
The windows have a U-factor of 0.15, which correlates to an R-value of 7. While this is not half as good as the R-value of the insulated wall of the house (R-25), it is much better than the R-value of an average efficiency window (R-3). This means that my windows don’t conduct heat quite as well as the average window, but far better than my wall. I will undoubtedly lose more heat through the windows than any other part of the house.
The solar radiation, on the other hand, is a good thing in my climate. The windows have a Solar Heat Gain Coefficient of 0.39, which is a measure of their ability to block radiation from entering the house. The lower the number, the more solar energy the windows block. While this number isn’t as high as that of less efficient windows, it is higher than average considering the excellent R-value of my windows. That’s a good thing for me, because in my area it is far more likely to be cold than hot, so allowing solar heat into the house is quite often a win when it comes to saving sustainably.
Installing the windows
Proper installation of the windows is one of the most important aspects of ensuring both an airtight, and watertight building envelope. After roof penetrations, window openings are one of the most common areas of water damage in the average home. Adding to the issue, window manufacturers sometimes provide entirely different installation instructions than do manufacturers of the WRBs or flashing membranes.
First I cut an “I” shaped slit in the Tyvek over the window opening then made another cut down the middle. I also made a 4-inch-long diagonal cut at each of the top corners folded up a flap of Tyvek at the top.
I wrapped the Tyvek around the studs to the inside and stapled it in place. Then I cut off the excess, and folded the top flap of Tyvek up and taped it in place temporarily.
It’s also a good idea to check the sheathing at the sill and trim it back if necessary to ensure a smooth transition between the sill, sheathing, and the foam.
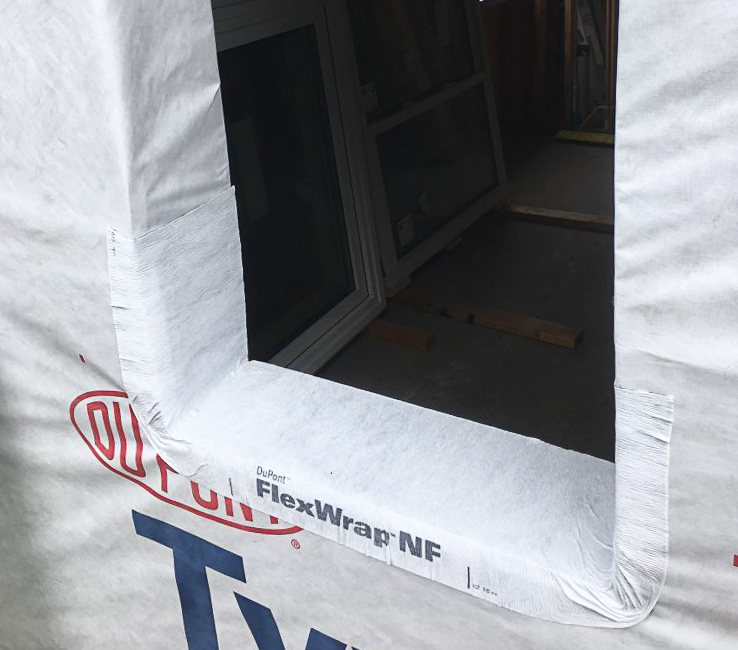
Next, cut a beveled cedar siding board to fit the bottom of the window opening. In my case, this meant ripping the siding down to 7 inches wide (5 1/2 inches for the window sill, 1/2 inch for the sheathing, and 1 inch for the foam). I nailed this to the sill. The beveled sill will help direct any water that finds its way past the window back out to the exterior.
The next step is to attach a flexible peel-and-stick flashing membrane to the cedar. I used Flexwrap NF, which is specially made to wrap around the bottom corners of the window sill and make a nice, watertight seal.
I caulked the nailing fins of the window and set the window in place. I drove two screws into the top to hold it in place, and made sure to press the window into the opening so that the caulk made a tight seal.
Now I could move to the interior and use shims to level, plumb, and square the window. I made sure there was a uniform gap between the framing and the window frame around the entire perimeter.
Now I could move back outside and finish screwing the nailing flange to the sheathing. I used 2 1/2-inch-long screws so they could go through the 1 inch of foam and 1/2 inch of sheathing and still penetrate the stud.
I applied flexible peel-and-stick flashing over the side nailing fins of the window, then over the top of the nailing flange. Then I folded down the top flap over the flashing and used Tuck tape to secure all edges of the fold to the wall, as the photo below shows.
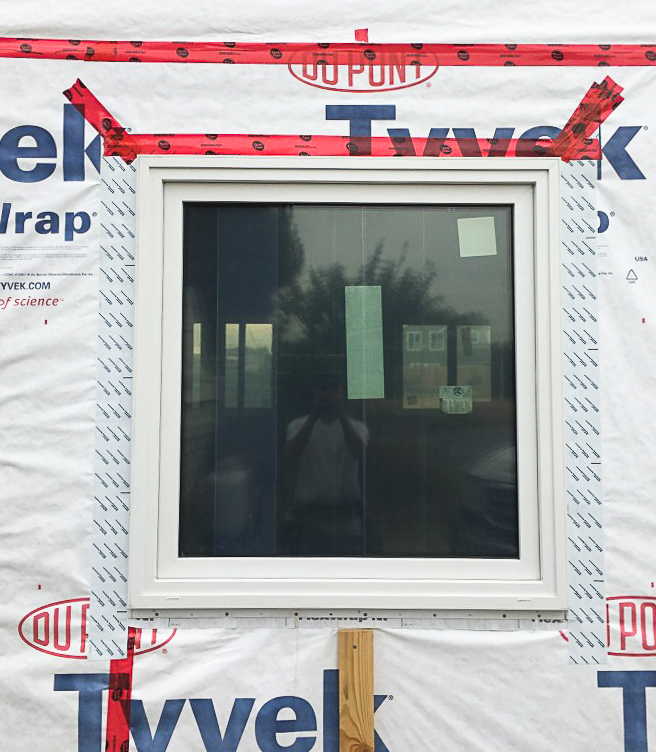
Back on the interior of the window, I used low-expansion foam to seal the perimeter of the window in the opening.
Finishing up the gable ends
The last section of the house to be dried in are the gable ends. The gable-end trusses cover an area of the house that is not heated, so it doesn’t need to be insulated. However, if I simply apply sheathing over the gable end truss, the sheathing will be recessed 1 inch from the rest of the wall due to the lack of foam. To make up for this, I ripped 2×4s down to 1 inch thick and nailed them to the gable-end truss. This moved the sheathing outward so it matched up with the foam below it.
With the sheathing fully supported and attached, all that was left was to attach the WRB. I used staples for the areas that were just under the overhangs since they will be fully protected, then lapped the bottom of the sheet 12 inches over the sheet below it and taped it down with Tuck tape.
I still needed to add more furring strips so that they extend all the way to the roof line. The furring strips will hold the siding away from the WRB, creating a 3/4-inch air gap between the two layers. Any water that gets past the fiber cement siding will be blocked from entering the house by the WRB, and then dried out by air moving in and out of the gap between the two layers. This water protection technique is known as a rainscreen and has been proven to be extremely effective.
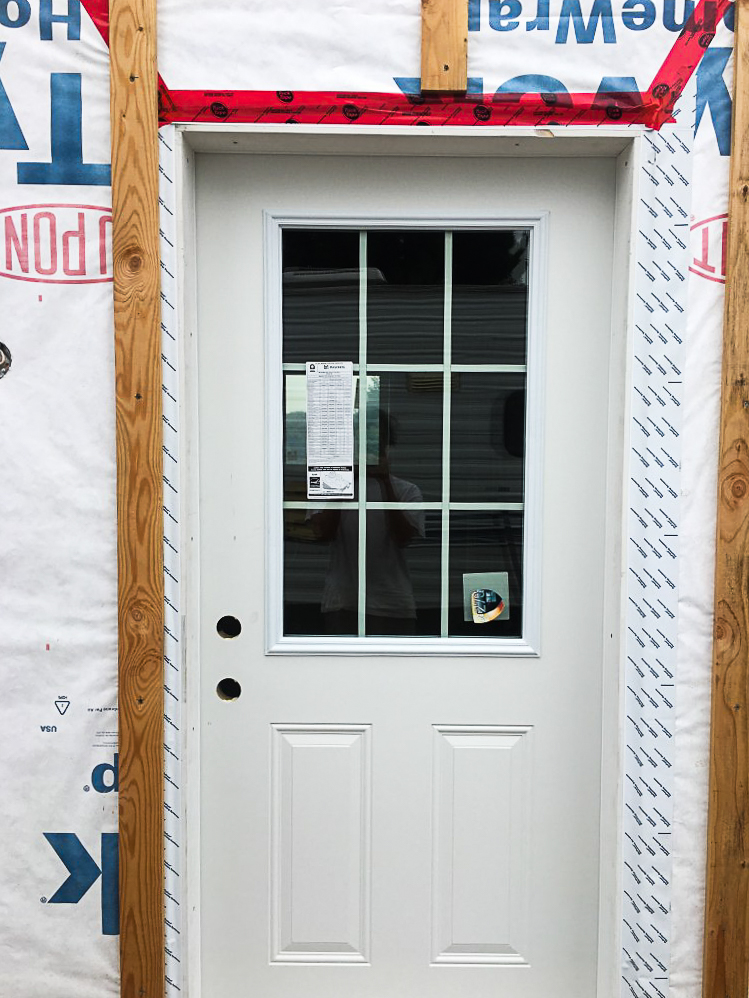
Last step: Install the entry door
Installation of the entry door began by checking that the rough opening was the correct size. It wasn’t. I caught a mistake that I had made: the rough opening was 1 inch too small. I either had to install a smaller door, or make the rough opening larger. Seeing as how this door was the only 36-inch-wide door in the house, I was forced to make it bigger to satisfy the building code for emergency exit. (In addition to this door, there’s a 2′ 8″ patio door and the French doors on the second floor.)
I lost a day’s work as I had to cut out the king and jack studs on one side of the opening, remove the header, trim back the sheathing, foam, and Tyvek 1 inch, build a new header and support that was an inch larger, reattach it to the king stud and jack stud, and then nail it back into place.
The next step was to clean and dry the concrete at the rough opening, apply a very liberal coating of caulk and press the sill pan into place, ensuring it is slightly sloped to the exterior. I had the door pans custom made at a metal fabrication shop so they perfectly fit the rough openings for each door, and they will prevent any water that finds its way around the door will eventually be brought down to the pan by gravity and then out.
Placing the door carefully into place over the sill pan, I used shims to ensure that it was plumb, square, and level. Then I used some long screws to go through the jamb, through the shims, and into the studs on each side of the door. I also used the screws that came with the door to go through the hinges and into the studs.
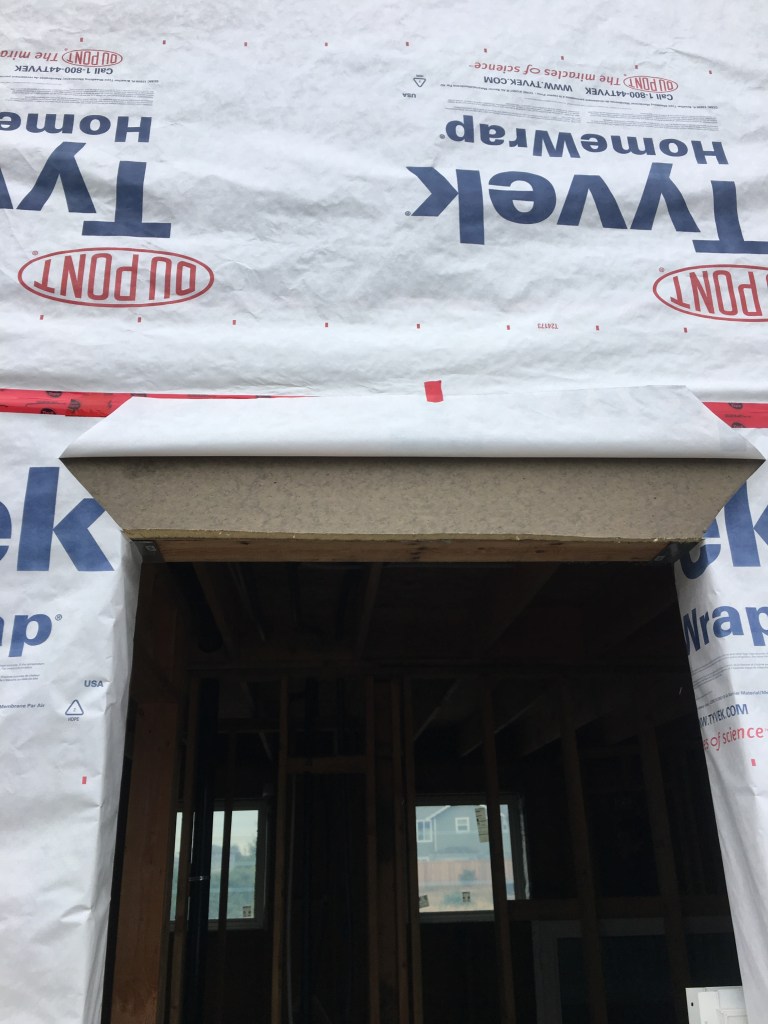
Next, I cut off the ends of the shims, and flashed the door in much the same manner as I had flashed the windows. I used one piece of peel-and-stick flashing on each side, and then folded the Tyvek back at the head (top) of the door, ran one final piece of flashing, and then folded the Tyvek back down over the head and taped it into place.
I decided not to install the French doors on the second story yet. I will wait until I finish building the second floor walkout deck so I don’t have to install them while balancing on a ladder.
With the foam providing support and the Tyvek providing moisture protection, the opening in the sheathing for the French doors is dried in at this point even though the doors aren’t installed. At this point the house is officially dried in and I can really start getting going on the inside.
Weekly Newsletter
Get building science and energy efficiency advice, plus special offers, in your inbox.


20 Comments
The exterior sheathing should have lapped the 1st floor walls, 2nd floor framing, and 2nd floor walls. Leaving the rim board exposed and infilling the sheathing creates a hinge point and decreases the overall strength of the wall system.
Here's what I noticed: The photo at the top of the page shows an exterior door without any roof protection. That always makes me cringe.
Fortunately, it's fairly easy to solve -- a small gable roof over the door can be installed after the house is complete.
Agree. The PE crossed out my small porch roof on my plans. I will be adding it after final.
ThermaTru/REEB offer Jamb upgrades for all their exterior doors in this situation. A roof would be ideal but some designs don't allow for it.
What is the rationale for having the electrical panel outside? I realize it may be code, but why?
Local utilities often require that the main disconnect is within a few feet of the meter. If you have an outside meter and the panel is right on the opposite side of the wall, as in a garage or basement, then the main disconnect and panel are generally together in that location. But, if the main distribution panel is far from the meter, then you generally have a meter and disconnect together. There is also some regional difference here. I've seen that having the entire panel outside is more common in warmer and dryer regions, and inside in colder/wetter ones. This makes sense.
There is no flashing over the windows. I know that's how Tyvek shows their installation, and Matt has diligently followed it, but that's a big problem in the PNW.
https://www.youtube.com/watch?v=JhXx__AMzTo
I am looking at the detailing around the door and window openings. It seems that the exterior foam is placed right up to the edge of the openings and then covered with Tyvek (which wraps around into the opening).
Wouldn't it be better to install pieces of wood (1x2's perhaps?) around the exterior openings and butt the foam against them? It seems to me that installing window and doors over flexible foam wouldn't be the best method of creating a tight seal between the window and door frames and the wall.
If the owner didn't want to use wood around the openings there are those premade foam window bucks.
https://thermalbuck.com/
I wonder how he is going to secure and flash the finish trim and siding?
Could be worse Malcolm, I raced with some window flashing by boat to give to contractors hired by the NPS to work on our Plum Island Life Saving station, only to come back later to find they installed it over the WRB with about 30 nails/holes. Ugh! Came back with Ranger to explain it and they had already covered it in the cedar shakes. Hope those shakes work well...
Shake flashing! I'll have to remember that technique.
I've always wondered about this method of installing windows. What about water that might get behind your tyvek? it could get uunder your caulked flange, under your tape, under your flexwrap, and then under the beveled siding piece as well. I see an unhindered path to trimmer, sill... now, this probably won't happen to you as I can't find one fastener in your tyvek in any of the pictures you provided, except for the fasteners through your furring. Though you did mention stapling the wrb to the trimmer, and if you stapled everywhere else that could be a problem - but perhaps not with the foam being taped and covering the wrb...
I once asked tyvek about this method and voiced my concerns. They said it has been "tested rigorously" and that's all they gave me.
For what it's worth, i think the wrb should be cut and folded back and away from opening on top and sides revealing 6" of sheathing and have wrb flush with sill, then set your caulked flanged window into RO. tape sides/top, then fold wrb OVER flange, then tape wrb to flange. (Tyvek recommends taping head flap over head flange, why not everywhere else?)
perhaps this is different when using foam? As I am unfamiliar with windows in foam i suppose. with this install method however, how could water get inside? The only way for water inside is if it penetrates sheathing somehow.
Kevin,
I you are uncomfortable relying on the Tyvek, you can install the window first. That's how it is more commonly done.
https://www.youtube.com/watch?v=C6sP4kwSa5c
I think both methods work. My own feeling is that if y0u have got water behind your WRB on a rain-screen wall, something has gone terribly wrong.
Three other things I wondered about.
1. Shouldn't the water resistant layer have gone underneath the foam instead of on top of it?
2. What about an air barrier?
3. Is 1"of foam sufficient for the exterior insulation?
Scott, when I designed the house I answered all 3 of your questions using information from this site. The primary air barrier is made at the sheathing level, although I did tape the seams in the foam as well. I am also using continuous drywall as a backup. The minimum foam for my zone 4 2x6 wall is R3.75. My one inch of polyisocyanurate provides R5.7
https://www.greenbuildingadvisor.com/article/calculating-the-minimum-thickness-of-rigid-foam-sheathing
Scott,
Q. "Shouldn't the water resistant layer have gone underneath the foam instead of on top of it?"
A. The answer can be found in this article: "Where Does the Housewrap Go?"
AH! So according to your article "Where Does the Housewrap GO?", Matt is installing "Outie" windows since his housewrap is installed on top of the foam. But in your article, you state: "Outie windows are usually installed with the window flanges in the same plane as the back of the siding. This usually requires the installation of a plywood box in each window rough opening; the box extends x inches beyond the plywood or OSB sheathing, with x = the thickness of the foam + the thickness of rainscreen strapping.."
You further state for an outie window: "After the foam is installed but before the housewrap goes up, you need to install a “picture frame” of strapping lumber (installed flat to the foam) around each rough opening. The outer face of the strapping should be flush with the outer edge of the plywood frame. Then you install your window. The housewrap goes up next, on top of the foam."
It doesn't appear that Matt installed either a plywood box to hold the window in the rough opening or a picture frame of strapping lumber around his openings. Wouldn't it have been easier to just build a picture frame around the openings out of 1x2" lumber, screw the window flanges to that and then run the foam up against the picture frame?
Scott,
This may help answer your questions: https://www.greenbuildingadvisor.com/article/installing-windows-in-a-foam-sheathed-wall
Malcolm, I do have flashing over the windows but it does not extend through the rainscreen. I understand it should ideally connect to the WRB, but I used the outtie window installation from Lstiburek and I am trusting his experience here. Unless there is some mistake I made I am not aware of.
Matt,
The only flashings that get installed on the rain-screen are those protecting horizontal separations in cladding. They are situated there to maintain the continuity of the rain-screen cavity. All others need to extend back to the WRB so they can direct water to the exterior. Any moisture that gets behind your cladding can run down to the window head.
I take it that this is the article that refers to the Lstiburek method of how to install outie windows in a foam sheathed wall?
https://www.nrel.gov/docs/fy05osti/37583.pdf
Log in or create an account to post a comment.
Sign up Log in